AppFog and Django. Where to begin?
Good day, dear habrovchane! Recently, I became interested in Python and, in particular, the Django web framework. After getting acquainted with the main features I wanted to find a free hosting with Django support. I repent, at that moment I completely forgot about GAE, but, after reading about it yesterday, I realized that the choice was just as good. So, welcome, AppFog! (carefully, under the cut pictures!)
Unfortunately, you need to pay for buns like SSH. The price itself . Well, we register a free account and get a message on the soap with a confirmation key (I already have a second day with this stage some crap). After that, we should be transferred to https://console.appfog.com/ , where we will create our application.
Click on the New App button and select the platform we need. In principle, here I experienced a wow effect, because the list is impressive. Choose Django.
Next we need to choose the location of the server. As you can see, not all servers support different platforms. I chose AWS Europe West. Next, enter the domain name for our site.
Click Create App. We get to the page where we will be shown the "log" of creating the application.
After creation, we will automatically be transferred to the application page.
Services - we can manage the services of our application.
Add-ons - you can install additional features. The page is big, so I’ll just give them a list:
Update source code - a little lower.
Domain names - allows you to add your own domains. But ... * drum roll * Not available on a free account.
Env variables - allows you to add environment variables.
SSL - not available on a free account.
Clone - clones the application to another server.
Settings - one single button - Delete App.
')
And now again a fly in the ointment (although, as someone) - to update the application code, we need Ruby and the heme af . Since I have a Windows, we pull the installer. Go to the Ruby Installer page and download the installer. During the installation process, he will ask if you need to add the path to the ruby to the Path variable - set the checkbox (for inexperienced users, “pros” may not do). And, yes, ATTENTION - AppFog heme does not work under Cygwin - it hangs after entering the login (their troubles).
So, after installing Ruby, open the console and enter
Next, go to the Update source code page and click on the Download source code button (attentive people have already noticed that this button is also present in the header of the kosoli). We will give zip with code. Unpack it in any folder and go to it through the console. Now we need to log in to AppFog:
And now let's change our code. First, open setting.py and make the following changes:
Next, create views.py and enter into it:
Open urls.py and make the following changes:
Create a base.html file in the templates folder, bring it to the form
Modify the index.html file
And create a file 404.html
By analogy, you can create a template for 500 errors.
After all the manipulations, we need to download the application back to the cloud. Again, go to the console and write
After completion, go to our Habratest and see the page. :) Congratulations, you just got the simplest application in the cloud!
I apologize for the lack of information about connecting the database and working with it - I just started to learn Django and have not yet taken hold of the database.
If someone does not want to regain an account - I can give the data from this test account, write in a personal.
Thank you very much for your attention, I hope not tired.
What allows us a free account?
- Two GB disc space that is divided into all your applications
- Connect up to 8 services
- 100 mb. for MySQL or PostgreSQL database
- 10 mb. RAM and up to 6 simultaneous connections for Redis, MongoDB and RabbitMQ
- 5 GB traffic per month
- 100 requests per second
- Community Assistance
- Applications are located on * .af.cm domains
Unfortunately, you need to pay for buns like SSH. The price itself . Well, we register a free account and get a message on the soap with a confirmation key (I already have a second day with this stage some crap). After that, we should be transferred to https://console.appfog.com/ , where we will create our application.
http://console.appfog.com
Create an application
Click on the New App button and select the platform we need. In principle, here I experienced a wow effect, because the list is impressive. Choose Django.
Choosing a platform
Next we need to choose the location of the server. As you can see, not all servers support different platforms. I chose AWS Europe West. Next, enter the domain name for our site.
Choose a server and enter the domain name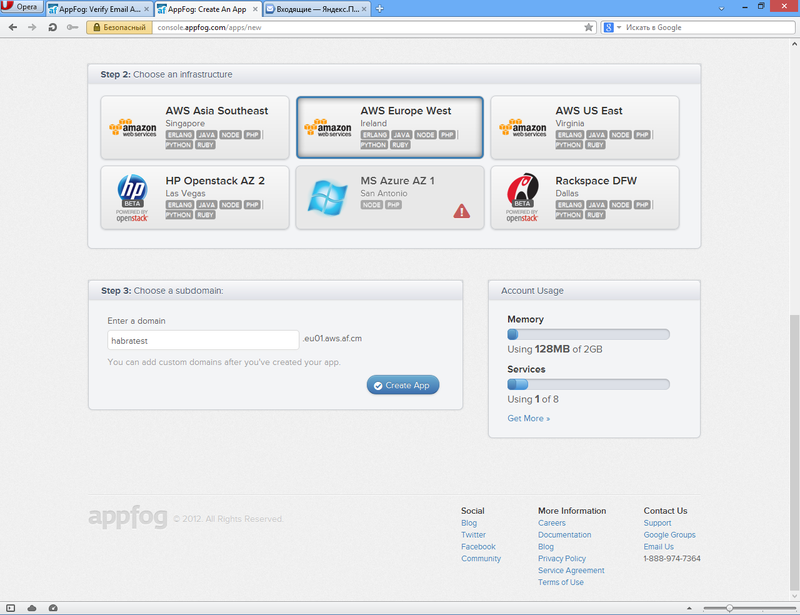
Click Create App. We get to the page where we will be shown the "log" of creating the application.
Create application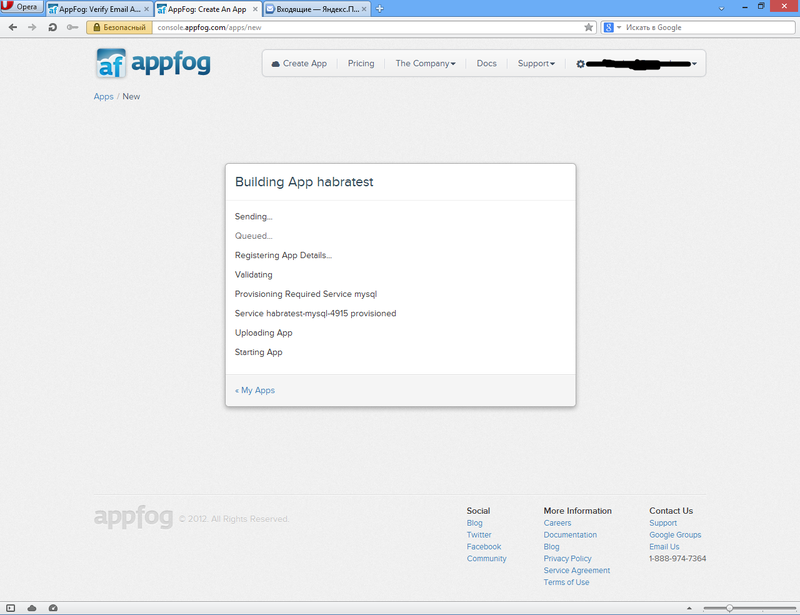
After creation, we will automatically be transferred to the application page.
Application page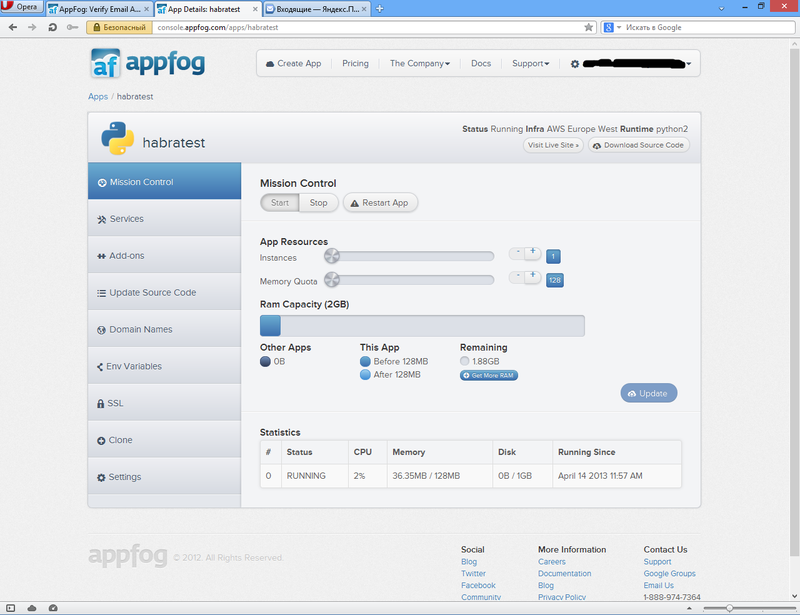
Services - we can manage the services of our application.
Services
Add-ons - you can install additional features. The page is big, so I’ll just give them a list:
Logentries, Redis Cloud, Xeround, Searchify, MongoHQ, MongoLab, Blitz, ClearDB, MemCachier, Cloudinary, IronMQ, Nexmo, IronWorker, CloudMailin, Mailgun
Update source code - a little lower.
Domain names - allows you to add your own domains. But ... * drum roll * Not available on a free account.
Env variables - allows you to add environment variables.
SSL - not available on a free account.
Clone - clones the application to another server.
Settings - one single button - Delete App.
')
And now again a fly in the ointment (although, as someone) - to update the application code, we need Ruby and the heme af . Since I have a Windows, we pull the installer. Go to the Ruby Installer page and download the installer. During the installation process, he will ask if you need to add the path to the ruby to the Path variable - set the checkbox (for inexperienced users, “pros” may not do). And, yes, ATTENTION - AppFog heme does not work under Cygwin - it hangs after entering the login (their troubles).
So, after installing Ruby, open the console and enter
gem update --system gem install af Next, go to the Update source code page and click on the Download source code button (attentive people have already noticed that this button is also present in the header of the kosoli). We will give zip with code. Unpack it in any folder and go to it through the console. Now we need to log in to AppFog:
af login [WARNING] DL is deprecated, please use Fiddle Attempting login to [https://api.appfog.com] Email: youremail@example.com Password: ************** Successfully logged into [https://api.appfog.com] The following will be written for the same crayfish like me :)
And now let's change our code. First, open setting.py and make the following changes:
- We put DEBUG in False
- Find the line PROJECT_ROOT = os.path.abspath (os.path.dirname (__ file__)) and move it to the beginning, under the line MANAGERS = ADMINS
- After the previous line, add the list of allowed hosts, to which we will add our domain: ALLOWED_HOSTS = ['habratest.eu01.aws.af.cm/',]
- Replace STATIC_ROOT = '' with STATIC_ROOT = os.path.join (PROJECT_ROOT, 'static')
Next, create views.py and enter into it:
views.py
from django.shortcuts import render_to_response def index(request): return render_to_response('index.html') Open urls.py and make the following changes:
urls.py
from django.conf.urls.defaults import patterns, include, url import settings from views import * urlpatterns = patterns('', url(r'^$', index), (r'^static/(?P<path>.*)$', 'django.views.static.serve', {'document_root': settings.STATIC_ROOT}), # ) Create a base.html file in the templates folder, bring it to the form
base.html
<!doctype html> <html lang="ru"> <head> <meta charset="UTF-8"> <title>{% block title %}{% endblock %}</title> </head> <body> {% block content %}{% endblock %} </body> </html> Modify the index.html file
index.html
{% extends "base.html" %} {% block title %}Django page{% endblock %} {% block content %} <h1>Welcome to habratest Django page!</h1> {% endblock %} And create a file 404.html
404.html
{% extends "base.html" %} {% block title %}404{% endblock %} {% block content %} <h1>404 ERROR</h1> {% endblock %} By analogy, you can create a template for 500 errors.
Update application
After all the manipulations, we need to download the application back to the cloud. Again, go to the console and write
af update habratest [WARNING] DL is deprecated, please use Fiddle Uploading Application: Checking for available resources: OK Packing application: OK Uploading (5K): Push Status: OK Stopping Application 'habratest': OK Staging Application 'habratest': ... Staging Application 'habratest': OK Starting Application 'habratest': .. Starting Application 'habratest': OK After completion, go to our Habratest and see the page. :) Congratulations, you just got the simplest application in the cloud!
Instead of an afterword
I apologize for the lack of information about connecting the database and working with it - I just started to learn Django and have not yet taken hold of the database.
If someone does not want to regain an account - I can give the data from this test account, write in a personal.
Thank you very much for your attention, I hope not tired.
Source: https://habr.com/ru/post/176607/
All Articles