Take control of cryptography in the cloud storage MEGA
 After the launch of the scandalous MEGA service to some extent, the talk about its security began to wane and subside a little. Today, the service lives its own life and no one even broke it. Of all the conversations, for some reason, the term “User Controlled Encryption” (UCE, or User Controlled Cryptography), which boasts MEGA, was missed. By the word "missed", I mean the fact that we did not consider all the possibilities that the cryptographic engine running in JavaScript on the client side gives us.
Of course, the MEGA service itself by this means only that the encryption keys are not stored on the server, and all their cryptography is performed in the context of the browser. At the same time, after the launch of the service, there was a lot of talk about the fact that it uses unstable cryptographic algorithms
In this article, I will partially sort out the magic that occurs in two megabytes of MEGA JavaScript code and show how you can redefine some methods in order to stop worrying and fall in love with cryptography. As a result, we get a cloud-based file storage service with two-factor authentication and hardware-based encryption of critical information.
')
MEGA, UCE and all-all-all
So, let's start by considering the technologies on which the client side of the service is built, how new users are registered, registered users are authenticated, the password is changed and files are downloaded / downloaded.Javascript
As you may already know, the entire client part of the service is based on JavaScript, the SHA-256 checksums for all scripts and pages that are loaded by the browser are written in the code for the main page. The download itself is as follows: all files are checked checksums, after which they are combined into one BLOB, which is given to the browser. From the source code of js-files, you can see that they were written by different people and sometimes there are funny pearls, such as the effects of copy-paste, meaningless conditions and just weird variables.
In the process of studying the source code of the site, I also noticed that it is quite actively updated, the developers correct minor errors and optimize the already written code, which is good news. The code itself is written in a very straightforward manner and without unnecessary cheating in the form of prototypes: the site costs three hundred global variables and more than 8,000 functions. Understanding the architecture of the site and changing its code was very simple.
From third-party frameworks, MEGA uses jQuery (nowhere without it), Ext JS and SJCL . The latter implements a cryptographic core with AES encryption. SJCL also provides an interesting format for storing keys and other byte arrays: instead of just driving bytes in a regular array, they are “compressed” into a format called a32. Its essence is that the contents of any byte array is packed into 32-bit numbers and written into a smaller array. That is, every 4 bytes of the array are converted into one trivial int. There are functions in the site code that perform various transformations on the improvised set {a32 array, string, base64 string}.
Key information
Before proceeding to the description of the registration and authentication processes, it is worth considering the information that is to be encrypted, namely:- The master key of the account , which is created randomly at the time of user registration and has a length of 128 bits. And in principle, the length of all keys used for symmetric encryption is 128 bits.
- RSA private key : created at the time of registration based on mouse movements and keyboard input. In this article, I will not focus on asymmetric cryptography, since it is used for sharing access to downloaded files, and my task was to change the process of authentication and encryption of user data.
- Individual keys of files and files themselves uploaded to the service. Keys are created randomly when a file is loaded, this key itself is used to encrypt the file data, and a key created based on the individual key of the file and its checksum is used to encrypt the attributes.
Closer to the code
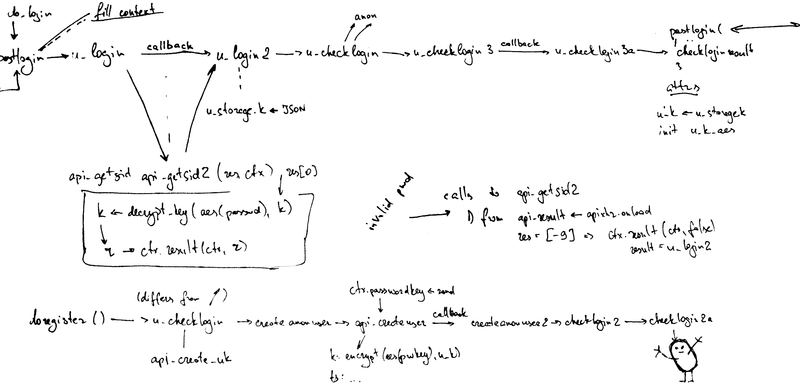
Now I propose to parse the registration and authentication processes, see how the master key is created and how it is encrypted.I tried to depict these processes on a piece of paper and in order to make you understand the whole essence of madness, I even made this picture:
New User Registration
The registration process itself is quite confusing, after the user has filled out the questionnaire, a powerful handful of functions are called, but we are interested in theapi_createuser function: // - function api_createuser(ctx, invitecode, invitename, uh) { var i; var ssc = Array(4); // session self challenge, will be used to verify password var req, res; if (!ctx.passwordkey) { ctx.passwordkey = Array(4); for (i = 4; i--;) ctx.passwordkey[i] = rand(0x100000000); } if (!u_k) api_create_u_k(); // - u_k for (i = 4; i--;) ssc[i] = rand(0x100000000); // if (d) console.log("api_createuser - masterkey: " + u_k + " passwordkey: " + ctx.passwordkey); // - ( k) // ts ssc req = { a: 'up', k: a32_to_base64(encrypt_key(new sjcl.cipher.aes(ctx.passwordkey), u_k)), ts: base64urlencode(a32_to_str(ssc) + a32_to_str(encrypt_key(new sjcl.cipher.aes(u_k), ssc))) }; if (invitecode) { req.uh = uh; req.ic = invitecode; req.name = invitename; } if (d) console.log("Storing key: " + req.k); api_req([req], ctx); } In this function, we are interested in the following things:
u_kis the master key itself, a global variable. Array of 4x 32-bit numbers, which is created by the functionapi_create_uksscis just a random array, which is encrypted on the master key, concatenated with its open value and sent to the server. Later it will be used to verify the master key for authentication.sjcl- AES cryptographic libraryrand()is a local implementation of a pseudo-random number generator based on RC4encrypt_key()is the cornerstone function of a symmetric service cryptography. Receives a key-initializedsjclobject and an array to be encrypted. The function code is given below and, I hope, needs no explanation.
// encrypt/decrypt 4- or 8-element 32-bit integer array function encrypt_key(cipher, a) { if (a.length == 4) return cipher.encrypt(a); var x = []; for (var i = 0; i < a.length; i += 4) x = x.concat(cipher.encrypt([a[i], a[i + 1], a[i + 2], a[i + 3]])); return x; } In the end, after registering on the server are sent:
- Master key encrypted on the key derived from the account password
- A string of the form
ssc||encrypt_AES-128(u_k, ssc)
User login
Now you can smoothly go to the authentication process. In short, it is produced as follows:- User enters login / password
- If the first stage of authentication is passed, then an encrypted master key and an authentication sequence (
ssc) created during registration comes from the server - The master key is decrypted using the password entered by the user.
- On the master key, the authentication sequence is decrypted and compared with its open value - this verifies the correctness of the master key and password.
api_getsid2 is api_getsid2 : // - function api_getsid2(res, ctx) { var t, k; var r = false; if (typeof res == 'object') { // sjcl-aes var aes = new sjcl.cipher.aes(ctx.passwordkey); // -... if (typeof res[0].k == 'string') { k = base64_to_a32(res[0].k); if (k.length == 4) { // ... k = decrypt_key(aes, k); // - sjcl-aes, - aes = new sjcl.cipher.aes(k); // ssc if (typeof res[0].tsid == 'string') { t = base64urldecode(res[0].tsid); // // - , if (a32_to_str(encrypt_key(aes, str_to_a32(t.substr(0, 16)))) == t.substr(-16)) r = [k, res[0].tsid]; } // RSA-, else if (typeof res[0].csid == 'string') { var t = mpi2b(base64urldecode(res[0].csid)); var privk = a32_to_str(decrypt_key(aes, base64_to_a32(res[0].privk))); var rsa_privk = Array(4); // decompose private key for (var i = 0; i < 4; i++) { var l = ((privk.charCodeAt(0) * 256 + privk.charCodeAt(1) + 7) >> 3) + 2; rsa_privk[i] = mpi2b(privk.substr(0, l)); if (typeof rsa_privk[i] == 'number') break; privk = privk.substr(l); } // check format if (i == 4 && privk.length < 16) { // TODO: check remaining padding for added early wrong password detection likelihood r = [k, base64urlencode(crypto_rsadecrypt(t, rsa_privk).substr(0, 43)), rsa_privk]; } } } } } ctx.result(ctx, r); } As a bonus to registration / authentication, you can look at the process of changing the password.
// function changepw(currentpw, newpw, ctx) { var pw_aes = new sjcl.cipher.aes(prepare_key_pw(newpw)); api_req([{ a: 'up', currk: a32_to_base64(encrypt_key(new sjcl.cipher.aes(prepare_key_pw(currentpw)), u_k)), k: a32_to_base64(encrypt_key(pw_aes, u_k)), uh: stringhash(u_attr['email'].toLowerCase(), pw_aes) }], ctx); } The code for this function speaks for itself: we encrypt the master key on two keys obtained from the old and new passwords, and then send these values to the server. If the current password came up, it is replaced with a new one. Here I wanted to pay more attention to the
prepare_key_pw function, which was implicitly present in all previous operations. Her task is to convert the string password to a32 array, and then perform the key derivation operation as follows: // convert user-supplied password array function prepare_key(a) { var i, j, r; var aes = []; var pkey = [0x93C467E3, 0x7DB0C7A4, 0xD1BE3F81, 0x0152CB56]; for (j = 0; j < a.length; j += 4) { key = [0, 0, 0, 0]; for (i = 0; i < 4; i++) if (i + j < a.length) key[i] = a[i + j]; aes.push(new sjcl.cipher.aes(key)); } for (r = 65536; r--;) for (j = 0; j < aes.length; j++) pkey = aes[j].encrypt(pkey); return pkey; } This function has caused many complaints, because it is based on a homegrown algorithm. During the writing of the article, the creators of the service managed to change its code a little, but I did not notice any significant changes here. Its essence lies in the fact that the transmitted password is encrypted 65,536 times on a constant key in order to obtain an indistinguishable from a random key. Why the creators of the service did not use existing algorithms (for example, PBKDF2) remains a mystery.
Download and Encrypt Files
In short, this whole process can be represented as follows:
I warn you, a long understanding of this picture is dangerous for the brain, so below I will tell you how it all happens.
As I said before, when loading, each file creates its own random key array of 6 32-bit numbers. The first four elements of this array are used to encrypt the contents of the file, and the last two are used as the initial values of the counter, by means of which the checksum of the file is calculated. This array is stored in the global variable
ul_key . Its contents are stored in the JSON-serialized string ul_KeyNonce .It goes beyond (races) encryption using the Web Worker (if the browser supports this technology) or just inside the main code of the page. When a file is ready to be sent, to encrypt its attributes (for the moment, attributes are only the file name), a new key is
filekey based on ul_key and the checksum of the file. This key is then encrypted on the master key and sent to the server along with the file attributes. The functions initupload3 and api_completeupload2 are responsible for all these actions. Creating the key filekey occurs in the function ul_chunkcomplete , below I will give part of it. // : function initupload3() { // ... =) // // ul_key , // ul_keyNonce Web Worker // ul_key = Array(6); for (i = 6; i--;) ul_key[i] = rand(0x100000000); ul_keyNonce = JSON.stringify(ul_key); ul_macs = []; // ... , ... // sjcl-aes ul_key ul_aes = new sjcl.cipher.aes([ul_key[0], ul_key[1], ul_key[2], ul_key[3]]); // ... // : // , onUploadStart(ul_queue_num); ul_dispatch_chain(); } // function ul_chunkcomplete(slot,pos,response) { // ... var t = []; // ul_macs - , worker' for (p in ul_macs) t.push(p); // , - t.sort(function(a,b) { return parseInt(a)-parseInt(b) }); for (var i = 0; i < t.length; i++) t[i] = ul_macs[t[i]]; // condenseMacs // "" 4 var mac = condenseMacs(t,ul_key); ul_settimeout(-1); // // var filekey = [ul_key[0]^ul_key[4],ul_key[1]^ul_key[5],ul_key[2]^mac[0]^mac[1],ul_key[3]^mac[2]^mac[3],ul_key[4],ul_key[5],mac[0]^mac[1],mac[2]^mac[3]]; // ... } // : function api_completeupload2(ctx, ut) { var p; if (ctx.path && ctx.path != ctx.n && (p = ctx.path.indexOf('/')) > 0) { var pc = ctx.path.substr(0, p); ctx.path = ctx.path.substr(p + 1); fm_requestfolderid(ut, pc, ctx); } else { // , ul_key // ctx.k == filekey a = { n: ctx.n }; if (d) console.log(ctx.k); var ea = enc_attr(a, ctx.k); if (d) console.log(ea); // - var req = { a: 'p', t: ut, n: [{ h: ctx.t, t: 0, a: ab_to_base64(ea[0]), // k: a32_to_base64(encrypt_key(u_k_aes, ctx.k)), // == AES_encrypt(u_k, filekey) fa: ctx.fa }] }; if (ut) { // a target has been supplied: encrypt to all relevant shares var sn = fm_getsharenodes(ut); if (sn.length) { req.cr = crypto_makecr([ctx.k], sn, false); req.cr[1][0] = ctx.t; } } api_req([req], ctx.ctx); } } Downloading and decrypting files
Obviously, these processes should simply be inverse to encrypting the file. The only thing that may be of interest is getting the key valueul_key from the encrypted filekey value that came from the server.At the time of downloading the file, the browser context already contains an object that stores the decrypted file keys. Therefore, first it makes sense to consider the process that occurs immediately after the user is authenticated, namely, the download of the file manager. After the user has been allowed to the service, he naturally wants to get access to his files (suppose that he already had them there). For this we need to decrypt the keys of the files first, and then their attributes. The next pack of functions deals with this, of which we are interested in
loadfm_callback and process_f_f .In short, the process of obtaining file attributes can be described by the following algorithm:
- Wait for the file manager to load (
loadfm_callback), where to get the JSON with the description of all the downloaded files - Create a
farrayarray in which to put an array with information about files - Run (recursively) for each file function
process_f_f - For each file that has a key, decrypt this key and attributes (the
crypto_processkeyfunction) and save them back into an array with information about files - After that, save the decrypted values to the
FileStorevariable (end of recursion inprocess_f_f)
Below I will provide excerpts from the code illustrating this algorithm.
// callback - function loadfm_callback(json, res) { // ... // JSON json = json[0]; if (d) console.log(json); if (d) console.log(json); if (json.u) process_u(json.u, false); if (json.ok) process_ok(json.ok); if (json.s) { for (i in json.s) { if (u_sharekeys[json.s[i].h]) { sharingData.push({ id: json.s[i].h + '_' + json.s[i].u, userid: json.s[i].u, folderid: json.s[i].h, rights: json.s[i].r, date: json.s[i].ts }); sharednodes[json.s[i].h] = true; } } } // ... ... // farray[fi] = new Object; farray[fi].f = json.f; // , callback // process_f(fi, false, callback); fi++; } // , // process_f function process_f_f(fid) { // - farray if (!farray[fid].f[farray[fid].i]) { if (farray[fid].ap) FileStore.suspendEvents(); // FileStore FileStore.loadData(farray[fid].mdata, true); if (farray[fid].ap) FileStore.resumeEvents(); if (d) console.log('call reqmissingkeys:'); crypto_reqmissingkeys(); if (farray[fid].callback) farray[fid].callback.fn(farray[fid].callback); return false; } var f = farray[fid].f[farray[fid].i]; f.attrs = fa; if (f.sk) u_sharekeys[fh] = crypto_process_sharekey(fh, f.sk); // , if ((ft !== 2) && (ft !== 3) && (ft !== 4) && (fk)) { crypto_processkey(u_handle, u_k_aes, f); // u_nodekeys[fh] = f.key; if ((typeof f.name !== 'undefined') && (fp == InboxID)) InboxCount++; } else { if (fa) { if (!missingkeys[fh]) { missingkeys[fh] = true; newmissingkeys = true; } } fk = ''; f.name = ''; } if (ft == 2) RootID = fh; else if (ft == 3) InboxID = fh; else if (ft == 4) TrashbinID = fh; else if ((ft < 2) || (ft == 5)) { // } else { // FileStore farray[fid].mdata.push({ id: fhreplace(/[^az^AZ^0-9^_^-]/g, ""), name: f.name, size: fs, type: filetype(f.name, ft), icon: fileicon(f.name, icontype), parentid: fp, folder: ft, owner: fu, date: f.ts, attrs: f.attrs, key: f.key, r: fr, su: f.su, fa: f.fa, }); if (fp == TrashbinID) trashbinfull = true; if (((ft) && (farray[fid].ap)) || (fp == InboxID)) refreshtree = true; } farray[fid].i++; // (, - ) timeoutcount++; if (!(timeoutcount & 63)) { // 63 - setTimeout("process_f_f(" + fid + ")", 1); timeoutcount2++; } // - else process_f_f(fid); } // function crypto_processkey(me, master_aes, file) { var id, key, k, n; if (!file.k) { if (!keycache[file.h]) return; file.k = keycache[file.h]; } id = me; // do I own the file? (user key is guaranteed to be first in .k) // "<file handle>:<key>/<share key>" var p = file.k.indexOf(id + ':'); // , if (p) { // I don't - do I have a suitable sharekey? for (id in u_sharekeys) { p = file.k.indexOf(id + ':'); if (p >= 0 && (!p || file.k.charAt(p - 1) == '/')) break; p = -1; } } // if (p >= 0) { delete keycache[file.h]; // - var pp = file.k.indexOf('/', p); if (pp < 0) pp = file.k.length; p += id.length + 1; key = file.k.substr(p, pp - p); // we have found a suitable key: decrypt! if (key.length < 46) { // short keys: AES k = base64_to_a32(key); // check for permitted key lengths (4 == folder, 8 == file) if (k.length == 4 || k.length == 8) { // -, k = decrypt_key(id == me ? master_aes : new sjcl.cipher.aes(u_sharekeys[id]), k); } else { if (d) console.log("Received invalid key length (" + k.length + "): " + file.h); return; } } else { // long keys: RSA if (u_privk) { var t = mpi2b(base64urldecode(key)); if (t) k = str_to_a32(crypto_rsadecrypt(t, u_privk).substr(0, file.t ? 16 : 32)); else { if (d) console.log("Corrupt key for node " + file.h); return; } } else { if (d) console.log("Received RSA key, but have no public key published: " + file.h); return; } } // var ab = base64_to_ab(file.a); // var o = dec_attr(ab, k); if (typeof o == 'object') { if (typeof on == 'string') { if (file.h) { u_nodekeys[file.h] = k; if (key.length >= 46) rsa2aes[file.h] = a32_to_str(encrypt_key(u_k_aes, k)); } // - file.key = k; file.name = on; } } } else { if (d) console.log("Received no suitable key: " + file.h); if (!missingkeys[file.h]) { newmissingkeys = true; missingkeys[file.h] = true; } keycache[file.h] = file.k; } } After that we can get the value of the source key
ul_key from the browser context as follows: dl_keyNonce = JSON.stringify([dl_key[0]^dl_key[4],dl_key[1]^dl_key[5],dl_key[2]^dl_key[6],dl_key[3]^dl_key[7],dl_key[4],dl_key[5]]); This conversion occurs in the
startdownload function. If we consider that the dl_key == filekey value dl_key == filekey from the ul_chunkcomplete function and perform simple modulo addition operations, we note that the dl_keyNonce variable will store the ul_key value generated when the file was loaded. An illustration of this can be seen in the lower left corner of the board in the photo at the beginning of the section on file uploading."Overload" of cryptographic operations
Despite the fact that the above principles of protecting files and keys are very safe, someone may not like it, that we still depend on the implementation of the algorithms that the service provides. In this case, we can develop our own browser extension, which will redefine some service functions, implementing additional encryption in them. Namely, I decided to implement protection of key information (master key and file keys) using hardware encryption on a non-recoverable key using the algorithm of GOST 28147-89. A bonus to this will also be the inclusion of two-factor authentication on the service.So, consider this use-case:
- User registers on the service.
- It then installs the extension.
- It is used to perform hardware encryption of the master key on the non-recoverable key from the token
- The master key encrypted in this way is uploaded to the server.
After that, it will be impossible to obtain the master key value without having a token and its PIN code. This will give:
- Two-factor authentication on the service (without the correctly decrypted master key, the function
api_getsid2“api_getsid2) - Without a token, it will also be impossible to change the current account password
The next step is to encrypt the file encryption key (also
ul_key ) with the help of the token and the file attribute key ( filekey ), which is stored on the server. Thus, we get that each file will be encrypted on a key that never gets to the server, where the filekey encrypted by us from the function api_completeupload2 . File attributes will be encrypted in the open filekey value. For clarity, I sketched the following diagram illustrating the process of downloading a file:
I want to note that here I used a very clever method. In this case, it is important for us that the attacker could not decrypt the file, even if he intercepts the file key that came from the server and knows the user's master key. Therefore, you can play on the features of the service architecture and use the value of the ul_keyNonce key (it is dl_keyNonce), obtained by encrypting the ul_key (or dl_key) key value on the token, for encrypting files.
Used technologies
To implement hardware encryption, the Rutoken EDS USB token will be used (Rutoken Web will also work) in conjunction with the Rutoken Web PKI Edition browser plug-in. We have already given a detailed description of the plugin in the articles Rutoken WEB PKI Edition and Shield and sword in RBS systems. Applied solution .From the moment of writing these articles, the possibility of hardware encryption according to the GOST 28147-89 algorithm has been added to our product. Beta-version of the plug-in with the functionality of hardware encryption according to the GOST 28147-89 algorithm can be downloaded here . This version of the plug-in has not yet been fully tested, so I warn you that there may be errors in it, about the presence of which I ask you to report to the PM.
In the plug-in interface, symmetric encryption is implemented by the encrypt function, which has the following syntax:
encrypt(deviceId, keyLabel, data, resultCallback, errorCallback) → {string} As input, the function accepts:
- Device id
number - Key label for encryption,
number(if there is no such key, it will be generated) - Encrypted data,
string(a string containing a byte array of the form"aa:bb:cc:dd") - Callback functions for successful and unsuccessful completion of the encryption operation
Decryption is performed similarly using the
decrypt function.Special attention should be paid to the key label, since it determines which key will be used for (rac) data encryption. A label is an arbitrary string and basically serves to conveniently identify a key. In this case, I use two key pairs: one for the (ra) encryption of the master key, and the other for encrypting the individual keys of the files.The key on which the master key is encrypted has a label equal to the user's password (I now had the idea to use the hash from the string
e-mail||, I will correct it soon). To encrypt the keys of the downloaded files, use a key with a label equal to the string representation of the master key (here you should also use the hash from the master key).Directly development
I just want to make a comment about my source code: it, in fact, is in the alpha version, although it implements the functionality described above. I did not check how much my rework turned out to be compatible with the other functions of the service, so I put all the source code on github and will be happy with any help to refine this system. Therefore, I will not litter the article further with huge listings, but only describe the general scheme of the expansion.The finished extension can be downloaded here . It was developed using the Crossrider service , which provides extensions for three browsers (Chrome, Firefox and IE), but it's better to check its operation in Chrome or Firefox, and in the first one it works much more stable.
The extension code to the banal is simple: it checks whether we are on the service page, and if so, it simply loads additional scripts. These scripts modify the page code by adding a couple of dialogs and override the following service functions:
changepw: is responsible for changing the passwordapi_getsid2: one of the login callbacksapi_completeupload2: callback file download completeloadfm_callback: file manager download callbackprocesspacket: another callback decrypting the attributes of the file just uploadedparsepage: responsible for drawing additional dialogsdologin: enhances authenticationinitupload3: responsible for creating the file encryption keystartdownload: reverse file key analysis and download initialization
- For a start, it’s good to get Rutoken EDS (or Rutoken Web) and install a browser plugin
- Install extension
- Log in to the service with the extension disabled
- Enable browser extension
- Go to account page
- Click on the button “Link a token”
- Enter the current password and perform this operation.
javascript:(function(){if(document.getElementById('cryptorutokenjs')){alert(' ');return}function loadRemoteScript(url){var script=document.createElement('script');script.type="text/javascript";script.src=url;document.head.appendChild(script)}function loadRemoteStyle(url){var style=document.createElement('link');style.rel='stylesheet';style.type="text/css";style.href=url;document.head.appendChild(style)}loadRemoteStyle("https://mega-crypto.googlecode.com/git/mega.css");loadRemoteScript("https://mega-crypto.googlecode.com/git/util.js");loadRemoteScript("https://mega-crypto.googlecode.com/git/rutoken-extra.js");loadRemoteScript("https://mega-crypto.googlecode.com/git/rutoken-crypto.js");loadRemoteScript("https://mega-crypto.googlecode.com/git/mega.js")})(); Demonstration of work
First, let's connect our creation to the site. For this:Login to the service and open the file manager page

We connect the extension or bookmarklet, after which we will need to enter the token PIN code

Go to the account page and bind the token to the account

Then you can exit the service and try to log in again using two-factor authentication:
Enter the login password
Enter the PIN

...
profit!
Authentication occurs as follows:
- Checking the login-password on the server
- If the login password is correct, then an encrypted master key comes from the server.
- By means of the plugin, the PIN is requested to the token
- If the PIN is entered correctly, the master key is decrypted on the key from the token
Instead of conclusion
Here I just want to write “to be continued ...”, because I didn’t cover the details of creating extensions and interesting ways of screwing the asynchronous encryption functions into the service, which in most cases uses synchronous calls. In conclusion of this article, I would like to once again turn to the idea of implementing client-side cryptography.The approach to the implementation of additional cryptographic functions on the client side can be applied to any web service that does not matter what is stored on the server: whether it be file storage, mail, or simple chat. For example, you can implement secure mail based on any mail service using encryption of messages in the CMS format and key exchange mechanisms using the VKO GOST R 34.10-2001 algorithm.
Thank you for your attention, waiting for your questions and comments.
PS: the first five who wish (from Moscow) to test the plugin, we can donate a token - write in a personal.
Source: https://habr.com/ru/post/176513/
All Articles