Development of business applications 1C + Android
Hello, dear.

In this article I want to introduce you to the new product “FBA Toolkit”, which greatly simplifies the process of developing a corporate mobile application on 1C + Android.
“FBA Toolkit” is:
- development of a “native” Android application in its native IDE in Java;
- 1C: Enterprise 8.1 (8.2) as a data source, corporate information system.
First of all, the framework will be useful for 1C programmers who would like to start developing business applications for Android, but have difficulty mastering a new platform for them. To begin developing, initial knowledge of Java will suffice. Next, I'll show you how to create a working prototype of a client-server application in just a couple of hours.
Before you begin the development process itself, you need to prepare a developer workplace. Would need:
')
1. Install and configure:
- Java SDK + Eclipse + Android SDK;
- Web server (IIS or Apache);
- 1C: Enterprise 8.1 (8.2)
2. For Eclipse, import two library projects: ActionBarSherlock and ru_profu1c_fba from the SVN repository.
3. Install the “FBA” configuration distribution kit and combine it with your application solution based on 1C.
In detail the whole process of pre-setting is described in the articles:
Preparation of a workplace of the developer
Installing the “FBA” configuration distribution
Combining the “FBA” configuration with the application solution and publishing it on a web server
Setup should not take a lot of time, and most likely, some of the necessary software is already installed.
Create a mobile application "Report to the head", designed to regularly inform the head of the state of affairs in the enterprise. The application will consist of 3 screens:
The application will implement 2 options for receiving data from 1C server:
Mobile application development begins in 1C, as it is not surprising. Here you are determined with the composition of the metadata, configure the exchange scheme and regenerate the template of your future mobile application.
Create a new item in the Mobile Applications directory with the name Report to Manager and the identifier SAMPLE_REPORT_HEAD .
Select the group “External data” in the “Metadata” list and click the “Add” button on the toolbar. Fill in the parameters of the new table as shown in the picture:

“Indicator” - test presentation of the report indicator, line (250)
"Value" - the numeric value of the indicator, the number (15.2)
The names of the columns and the table itself, as a rule, are set in Russian, they will be used to fill the table with data using the tools of the embedded language 1C. Click OK, the table will be added to the metadata tree, for the mobile application the names are automatically translated into Latin.
Thus, we have prepared the structure of the table of values (in terms of 1C) in which we will transmit data for the Financial Indicators report. For the second report “Goods in warehouses” the data will be transmitted as an external file.
On the “Exchange Scheme” tab, check that the “Upload” flag is checked. The flag "Download" is not important, because we are not going to process the resulting changes to this table from the mobile application in 1C.

Save the changes. Click on the “Mobile Application Template” button on the toolbar, set the parameters of your mobile application
Template Catalog is the path to the directory in which the generated mobile application template files will be saved.
On the “Basic” tab, specify the name of the package, it must be a unique identifier. If you have a website, use it to generate a prefix. In this example, I indicated ru.profi1c.samples.report.head
The “Web service” tab contains the IP address 10.0.2.2, the default is the address of your computer when accessing from the Android emulator. In the fields “Web service name” and “Application subdirectory”, enter the data that was specified when publishing the web service.
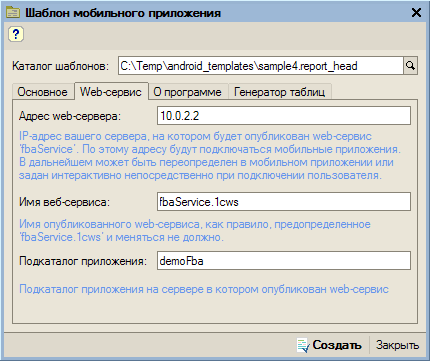
Please note that for 1C 8.2, most likely, you will have the application subdirectory with an additional subdirectory / ws , ie demoFba / ws, see here for more details.
Click Create , the Android project template will be generated.
Open the fba subscription to events module in the 1C configurator and add the following code to the procedure Before Sending an External Table :
In this example, the table is filled with dummy data; in a real application, you can transfer here an arbitrary number of report indicators.
With the data for the first report sorted out, it remains to prepare for the second. In the same module, fbaSubscribing for Events, add the following code to the PrepareBinaryData for Sending procedure:
I will comment on the code. When a mobile application requests arbitrary data (as a file) with the identifier "REPORT_PRODUCTS_IN_STOK", a report is executed in 1C and the result is stored in a temporary file. This temporary file is then read as binary data and transferred to the mobile application. The temporary file is deleted.
As in this case, the generated html file is not important for us. You can use the standard 1C mechanism for saving a tabular document as HTML or generate HTML manually. You can see an example of the output in the FBA demo configuration, the report “Goods in warehouses”.
With 1C everything, we proceed to the development of a mobile application on Android.
The template of the Android project created in 1C is imported into the Eclipse workspace.
Launch Eclipse and import the project: File> Import ... In the Android group, select the item “Exists Android Code Into Workspace” click Next , specify the path to the directory of the Android project template and click Finish , the new project will be added to the workspace. If there are difficulties, see here , the process is described in pictures.
1. Create a report "Financial indicators", the data source for which is a table of values obtained from 1C. To do this, add a new class ToChiefReport.java, here is the full source code:
2. We create the second report, it is still easier here:
3. Expand the predefined exchange procedure with the 1C server, i.e. Let's add one more step to it - receiving data for our second report in the form of a compiled file. Add the class MyExchangeTask from ExchangeTask:
4. Listing reports on the main form. Open the res \ activity_main.xml file and add a listView which will display the list of reports:
In MainActtiviy.java add:
a) local variable for the list
b) initialization method
and call it in onCreate () after setting the form layout
c) method of initializing the list of reports
d) the procedure for launching the exchange according to your rules
And we change the call to the startExchange exchange procedure (ExchangeVariant.FULL, true) in the onOptionsItemSelected handler to startExchangeMyRules (ExchangeVariant.FULL, true).
The application is ready , authorization forms and program settings will be created automatically, we will not change them.
Let's check it on the emulator. If you are not mistaken anywhere, the application will start. However, instead of the authorization window, the settings window will be displayed immediately, since the authorization data (user name and password) are not specified.
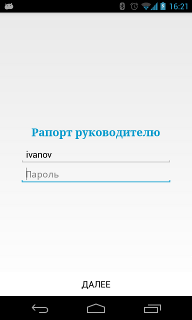
Enter username: ivanov
And password: 123456
Start the base 1C and open the directory "Mobile employees". As a mobile device, select the predefined item “Device Emulator”, add the “Report to the Manager” application in the table section “Mobile Applications” and set the same user name and password.
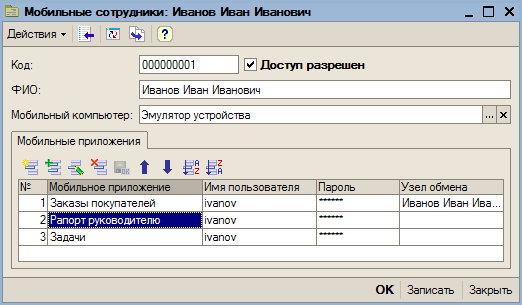
Run the exchange procedure on the emulator (the button with the “Up” arrow in the panel on the right)
The result of the exchange is displayed in the notification:

Click on it to launch your application (or to view detailed information about the error, if the exchange failed).
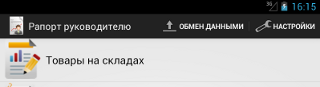
Check what happened. Click the report in the list:
The application is ready, it turned out quite functional and easily expandable. Adding other reports is easy.
You can transfer documents in various formats, for example * .doc or * .pdf and use external applications to view them. See the source code of the example, there are 3 more reports:
I will not describe in detail, and so the article turned out great. If you have any questions, ready to answer in the comments. Here is the output:
You can download the full code of the sample at https://xp-dev.com/svn/fba_toolkit_public/samples/fbaSample4ReportHead/
Using HTML to build reports allows you to create a variety of reports, including and with interactive elements. For example, in one of our projects the following report is used:
And of course, you are not limited by anything; you can use third-party libraries to display reports and charts, for example achartengine, or create your own graph / chart yourself (full examples, including those in the Android SDK).
That's all, with other examples you can find on the site http://profi1c.ru .
In the near future we plan to add lessons on interactive elements and adapters of the FBA library, as well as show how to work with offline mapsforge maps.
The product “FBA Toolkit” is planned to be distributed on a commercial basis, now it is in the status of “demo version”. You are free to use it for testing and study.
Limitations:

In the near future (no more than a month) there will be a commercial version, we will add information on the cost and licensing procedure to our site.
Thank you for reading to the end. Ready to answer your questions in the comments on both 1C and Android.
In this article I want to introduce you to the new product “FBA Toolkit”, which greatly simplifies the process of developing a corporate mobile application on 1C + Android.
“FBA Toolkit” is:
- development of a “native” Android application in its native IDE in Java;
- 1C: Enterprise 8.1 (8.2) as a data source, corporate information system.
First of all, the framework will be useful for 1C programmers who would like to start developing business applications for Android, but have difficulty mastering a new platform for them. To begin developing, initial knowledge of Java will suffice. Next, I'll show you how to create a working prototype of a client-server application in just a couple of hours.
We prepare the workplace
Before you begin the development process itself, you need to prepare a developer workplace. Would need:
')
1. Install and configure:
- Java SDK + Eclipse + Android SDK;
- Web server (IIS or Apache);
- 1C: Enterprise 8.1 (8.2)
2. For Eclipse, import two library projects: ActionBarSherlock and ru_profu1c_fba from the SVN repository.
3. Install the “FBA” configuration distribution kit and combine it with your application solution based on 1C.
In detail the whole process of pre-setting is described in the articles:
Preparation of a workplace of the developer
Installing the “FBA” configuration distribution
Combining the “FBA” configuration with the application solution and publishing it on a web server
Setup should not take a lot of time, and most likely, some of the necessary software is already installed.
Application Description
Create a mobile application "Report to the head", designed to regularly inform the head of the state of affairs in the enterprise. The application will consist of 3 screens:
- “Login” - user authorization when starting the program.
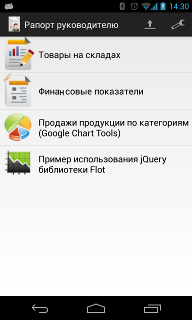
- “List of reports” is the main screen of our application. A list of available reports is displayed with the ability to view and update data from the 1C database.
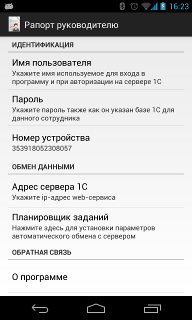
- “Program Settings” - here the user sets the authorization parameters and the address of the 1C server, sets up a schedule of automatic exchange with the 1C server.
The application will implement 2 options for receiving data from 1C server:
- Report "Goods in warehouses." It is generated on the server and compiled as an HTML document, simply displayed in the mobile application. The simplest option, the report form is fixed and can not be changed.
- Report "Financial indicators". Here, the initial data for the report are obtained in the form of a table, on which the report is then built. Advantages of this option: arbitrary report output, incl. in the form of graphs and charts; installation of selections and sorting is possible.
Creating a mobile application template in 1C
Mobile application development begins in 1C, as it is not surprising. Here you are determined with the composition of the metadata, configure the exchange scheme and regenerate the template of your future mobile application.
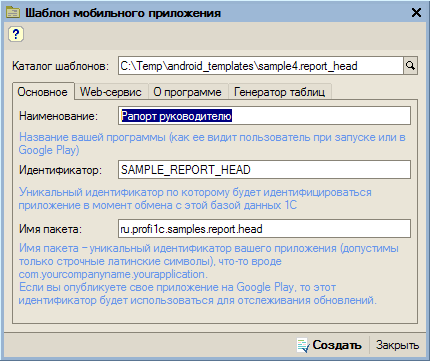
Create a new item in the Mobile Applications directory with the name Report to Manager and the identifier SAMPLE_REPORT_HEAD .
Select the group “External data” in the “Metadata” list and click the “Add” button on the toolbar. Fill in the parameters of the new table as shown in the picture:
“Indicator” - test presentation of the report indicator, line (250)
"Value" - the numeric value of the indicator, the number (15.2)
The names of the columns and the table itself, as a rule, are set in Russian, they will be used to fill the table with data using the tools of the embedded language 1C. Click OK, the table will be added to the metadata tree, for the mobile application the names are automatically translated into Latin.
Thus, we have prepared the structure of the table of values (in terms of 1C) in which we will transmit data for the Financial Indicators report. For the second report “Goods in warehouses” the data will be transmitted as an external file.
On the “Exchange Scheme” tab, check that the “Upload” flag is checked. The flag "Download" is not important, because we are not going to process the resulting changes to this table from the mobile application in 1C.
Save the changes. Click on the “Mobile Application Template” button on the toolbar, set the parameters of your mobile application
Template Catalog is the path to the directory in which the generated mobile application template files will be saved.
On the “Basic” tab, specify the name of the package, it must be a unique identifier. If you have a website, use it to generate a prefix. In this example, I indicated ru.profi1c.samples.report.head
The “Web service” tab contains the IP address 10.0.2.2, the default is the address of your computer when accessing from the Android emulator. In the fields “Web service name” and “Application subdirectory”, enter the data that was specified when publishing the web service.
Please note that for 1C 8.2, most likely, you will have the application subdirectory with an additional subdirectory / ws , ie demoFba / ws, see here for more details.
Click Create , the Android project template will be generated.
Preparation of source data for reports in 1C
Open the fba subscription to events module in the 1C configurator and add the following code to the procedure Before Sending an External Table :
(.) = "SAMPLE_REPORT_HEAD" = "" // = fba.(" , , , , , "); = (123456789); = .(); . = .; . = .(0,999999) + Sin(.(0,999)); ; ; In this example, the table is filled with dummy data; in a real application, you can transfer here an arbitrary number of report indicators.
With the data for the first report sorted out, it remains to prepare for the second. In the same module, fbaSubscribing for Events, add the following code to the PrepareBinaryData for Sending procedure:
= ; (.) = "SAMPLE_REPORT_HEAD" = "REPORT_PRODUCTS_IN_STOK" = ("html"); = ..(); .HTML() = (); (); ; ; ; ; I will comment on the code. When a mobile application requests arbitrary data (as a file) with the identifier "REPORT_PRODUCTS_IN_STOK", a report is executed in 1C and the result is stored in a temporary file. This temporary file is then read as binary data and transferred to the mobile application. The temporary file is deleted.
As in this case, the generated html file is not important for us. You can use the standard 1C mechanism for saving a tabular document as HTML or generate HTML manually. You can see an example of the output in the FBA demo configuration, the report “Goods in warehouses”.
With 1C everything, we proceed to the development of a mobile application on Android.
Design Android - applications
The template of the Android project created in 1C is imported into the Eclipse workspace.
Launch Eclipse and import the project: File> Import ... In the Android group, select the item “Exists Android Code Into Workspace” click Next , specify the path to the directory of the Android project template and click Finish , the new project will be added to the workspace. If there are difficulties, see here , the process is described in pictures.
1. Create a report "Financial indicators", the data source for which is a table of values obtained from 1C. To do this, add a new class ToChiefReport.java, here is the full source code:
Show
I will comment on the code. The abstract class SimpleMapHtmlReport, from which it is inherited, is intended for building a simple HTML report with a two-column table.
The first 2 methods getResIdIcon () and getResIdTitle () return the icon and the name of our report to display in the list. In the event handler of the “build” event, the makeReport method is called, in which our implementation of the report compilation.
When building a report, first the report header and table are set, then all records from the local sqlite table are read as rows of the report table. Finally, in the setTableData () method, set the data for the report table.Ugh, how difficult it is to comment on obvious things.
/** * sqlite. * « » * */ public class ToChiefReport extends SimpleMapHtmlReport { @Override public int getResIdIcon() { return R.drawable.report_01; } @Override public int getResIdTitle() { return R.string.report_name_to_chief; } @Override public void build(Context context, IReportBuilderResult builderResult) { try { makeReport(context); } catch (SQLException e) { e.printStackTrace(); setHeader1(", !"); } super.build(context, builderResult); } private void makeReport(Context context) throws SQLException { DBHelper helper = new DBHelper(context); // setHeader2(" "); setTableHeader(" ", ", ."); // Map<Object, Object> mapData = new LinkedHashMap<Object, Object>(); // sqlite, // « » ExTableRaportRukovoditelyuDao dao = helper .getDao(ExTableRaportRukovoditelyu.class); List<ExTableRaportRukovoditelyu> rows = dao.select(); for (ExTableRaportRukovoditelyu row : rows) { mapData.put(row.pokazatel, row.znachenie); } setTableData(mapData); } } I will comment on the code. The abstract class SimpleMapHtmlReport, from which it is inherited, is intended for building a simple HTML report with a two-column table.
The first 2 methods getResIdIcon () and getResIdTitle () return the icon and the name of our report to display in the list. In the event handler of the “build” event, the makeReport method is called, in which our implementation of the report compilation.
When building a report, first the report header and table are set, then all records from the local sqlite table are read as rows of the report table. Finally, in the setTableData () method, set the data for the report table.
2. We create the second report, it is still easier here:
Show
/** * , Html . * 1 * */ public class ProductsInStokReport extends SimpleCompiledHtmlReport { // , 1 (. // MyExchangeTask) public static final String REPORT_FILE_NAME = "products_in_stok.html"; public ProductsInStokReport(File file) { super(file); } @Override public int getResIdIcon() { return R.drawable.report_02; } @Override public int getResIdTitle() { return R.string.report_name_products_in_stok; } } 3. Expand the predefined exchange procedure with the 1C server, i.e. Let's add one more step to it - receiving data for our second report in the form of a compiled file. Add the class MyExchangeTask from ExchangeTask:
Show
To retrieve the report data, the getLargeData web service method is used , which, if successful, saves the result to a file at the specified path. Pay attention to the ID_REPORT_PRODUCTS_IN_STOK, it should be the same as in 1C in the method Prepare Binary Data For Sending.
/** * . * – . * */ public class MyExchangeTask extends ExchangeTask { // 1 private static final String ID_REPORT_PRODUCTS_IN_STOK = "REPORT_PRODUCTS_IN_STOK"; public MyExchangeTask(ExchangeVariant exchangeVariant, WSHelper wsrvHelper, DBOpenHelper dbOpenHelper) { super(exchangeVariant, wsrvHelper, dbOpenHelper); } @Override protected boolean doExecute() throws Exception { // boolean success = super.doExecute(); if (success) { // - 2- onStepInfo(" …"); String fPath = appSettings.getCacheDir().getAbsolutePath() + "/" + ProductsInStokReport.REPORT_FILE_NAME; File f = wsHelper.getLargeData(ID_REPORT_PRODUCTS_IN_STOK, null, "", fPath); success = (f != null); } return success; } } To retrieve the report data, the getLargeData web service method is used , which, if successful, saves the result to a file at the specified path. Pay attention to the ID_REPORT_PRODUCTS_IN_STOK, it should be the same as in 1C in the method Prepare Binary Data For Sending.
4. Listing reports on the main form. Open the res \ activity_main.xml file and add a listView which will display the list of reports:
<RelativeLayout xmlns:android="http://schemas.android.com/apk/res/android" xmlns:tools="http://schemas.android.com/tools" android:layout_width="match_parent" android:layout_height="match_parent" tools:context=".MainActivity" > <ListView android:id="@android:id/list" android:layout_width="match_parent" android:layout_height="wrap_content" android:layout_alignParentLeft="true" android:layout_alignParentTop="true" > </ListView> </RelativeLayout> In MainActtiviy.java add:
a) local variable for the list
private ListView list; b) initialization method
private void init() { list = (ListView) findViewById(android.R.id.list); // ReportListAdapter adapter = new ReportListAdapter(this,createReportList()); list.setAdapter(adapter); list.setOnItemClickListener(new OnItemClickListener() { @Override public void onItemClick(AdapterView<?> parent, View view, int position, long id) { // IReport report = (IReport) list.getItemAtPosition(position); report.onShow(MainActivity.this); } }); } and call it in onCreate () after setting the form layout
setContentView(R.layout.activity_main); init(); c) method of initializing the list of reports
/* * */ private List<IReport> createReportList() { List<IReport> lst = new ArrayList<IReport>(); // , // IReport report = new ProductsInStokReport(new File(getAppSettings() .getCacheDir(), ProductsInStokReport.REPORT_FILE_NAME)); lst.add(report); // lst.add(new ToChiefReport()); } d) the procedure for launching the exchange according to your rules
/* * . , * ( ) */ private void startExchangeMyRules(ExchangeVariant variant,boolean cancelable) { // web- WSHelper wsHelper = new WSHelper(getExchangeSettings()); MyExchangeTask task = new MyExchangeTask(variant, wsHelper, getHelper()); startExchange(task, cancelable); } And we change the call to the startExchange exchange procedure (ExchangeVariant.FULL, true) in the onOptionsItemSelected handler to startExchangeMyRules (ExchangeVariant.FULL, true).
The application is ready , authorization forms and program settings will be created automatically, we will not change them.
Let's check it on the emulator. If you are not mistaken anywhere, the application will start. However, instead of the authorization window, the settings window will be displayed immediately, since the authorization data (user name and password) are not specified.
Enter username: ivanov
And password: 123456
Start the base 1C and open the directory "Mobile employees". As a mobile device, select the predefined item “Device Emulator”, add the “Report to the Manager” application in the table section “Mobile Applications” and set the same user name and password.
Run the exchange procedure on the emulator (the button with the “Up” arrow in the panel on the right)
The result of the exchange is displayed in the notification:
Click on it to launch your application (or to view detailed information about the error, if the exchange failed).
Check what happened. Click the report in the list:
Show

Fine! Reports are displayed, you can zoom by button or gestures.
Fine! Reports are displayed, you can zoom by button or gestures.
The application is ready, it turned out quite functional and easily expandable. Adding other reports is easy.
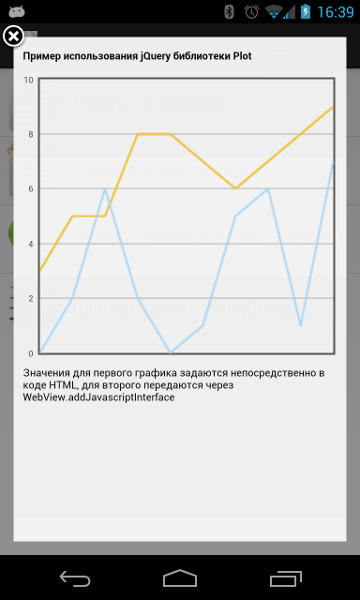
You can transfer documents in various formats, for example * .doc or * .pdf and use external applications to view them. See the source code of the example, there are 3 more reports:
- chart using Google Chart Tools
- graph using jQuery plugin Plot
- PDF output by external application (PdfReport.java)
I will not describe in detail, and so the article turned out great. If you have any questions, ready to answer in the comments. Here is the output:
Show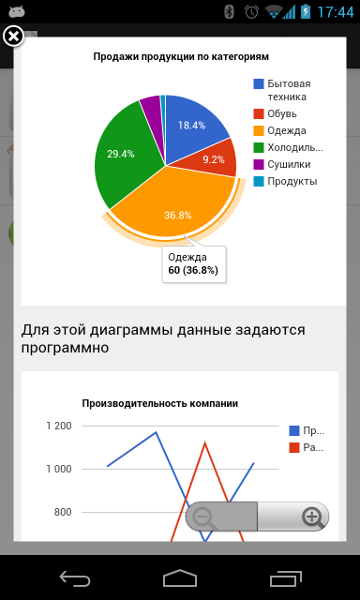
You can download the full code of the sample at https://xp-dev.com/svn/fba_toolkit_public/samples/fbaSample4ReportHead/
Using HTML to build reports allows you to create a variety of reports, including and with interactive elements. For example, in one of our projects the following report is used:
Show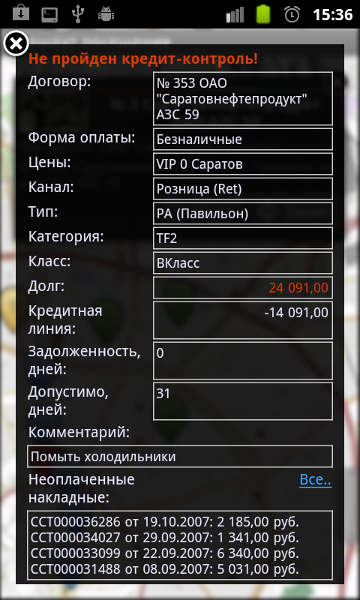
- for the field “Debt” conditional color design is used depending on the amount;
- The full list of unpaid invoices is opened only when you click on the “All” marker, by default, only the last 4 are displayed.
And of course, you are not limited by anything; you can use third-party libraries to display reports and charts, for example achartengine, or create your own graph / chart yourself (full examples, including those in the Android SDK).
That's all, with other examples you can find on the site http://profi1c.ru .
In the near future we plan to add lessons on interactive elements and adapters of the FBA library, as well as show how to work with offline mapsforge maps.
A spoon of tar
The product “FBA Toolkit” is planned to be distributed on a commercial basis, now it is in the status of “demo version”. You are free to use it for testing and study.
Limitations:
- the program stops working when the demo license expires after 12/31/13;
- When starting, a notification is displayed:
In the near future (no more than a month) there will be a commercial version, we will add information on the cost and licensing procedure to our site.
Thank you for reading to the end. Ready to answer your questions in the comments on both 1C and Android.
Source: https://habr.com/ru/post/176371/
All Articles