Homemade bot with camera and wifi control
After reading the published article Once upon a time plywood, atmega, yes raspberry , I decided to share my hand-made article, which is available (not difficult) for repetition.
When creating a bot, the following tasks were set:
')
For the onboard computer, I chose the dual-core android minicomputer UG-802, which was at hand. As an operating system - a full-fledged Linux distribution, build Ubuntu from Linaro.
To begin with, it was necessary to do something with the problematic built-in wifi adapter, which stubbornly refused to run under the reassembled kernel. The cardinal decision was to drop it and install a second USB host connector into which you can plug in a normal usb wifi (or even a 3G modem). No sooner said than done, the built-in wifi board was sealed off and a second host was soldered in its place.
First check the internal USB host:
The final view of the installed USB host:

Once I ordered the Ardubot platform and wheels with motors to it, but my hands did not reach it. Without hesitation, it was decided to use it. A converter board with 12 to 5 volts was assembled on it, torn out of the automotive charging store that was bought at the store (the chip used in it has a wider input voltage range). A lithium polymer battery at 11.1V / 1250mA was already available from a broken, in the past, model aircraft. The Ardubot board had to undergo a light modification due to the features of the control board (the track is cut off from D9 and sealed to D7). A usb connector was also installed, to which only 5 volt power is connected:

Behind the wires are visible from the wheel encoder:
Initially, the Ardubot platform was designed to be shared with the Arduino, so why not take advantage of it. Instead of Arduino, I took the connector-compatible OLIMEX PIC32-PINGUINO-MX220. It turned out an unpleasant trifle - one of the pins of the motor control was used for the LED on the PINGUINO board. All would be fine, but this LED blinked in the download mode of the firmware, turning the wheel at the same time. So I had to rewire the track, as described above.
For ease of debugging and versatility, the control board is connected via USB. PINGUINO firmware emulates a CDC-ACM device that is visible to the user as the serial port / dev / ttyACM0. The control commands being sent look like this:
The numbering of the motors: 0 - left, 1 - right.
States: 0 - stopped, 1 - forward, -1 - back.
For example, to turn on the rear LED on the platform, it is enough to send commands from the console:
To go ahead:
One USB port of the onboard computer is used by the wifi adapter, and the other is a platform control board. Where to connect the camera? There is a solution - use the hub. One of the cheapest webcams and a suspicious USB hub was purchased at one of the computer stores.
In the process of searching from which to mold the bot, a plastic box-package from under IPOD TOUCH was successfully found, in which the UG802 and the disassembled USB hub were ideally inserted. For the three hub connectors in the side was a notch. The camera was inserted into the fourth (internal) connector (with a pre-shortened cable). The cover also had a cutout for the USB connector on the UG802, which did not allow it to close:
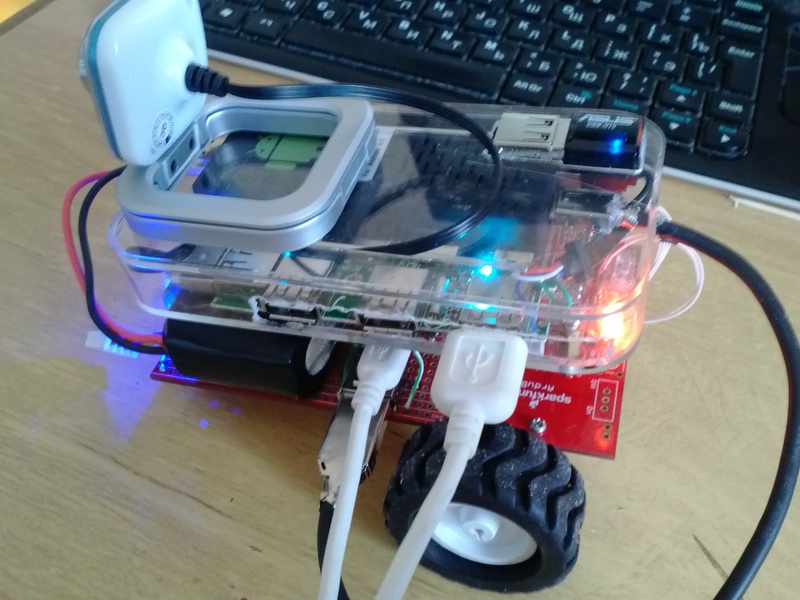
The whole thing is screwed on top of the PINGUINO-MX220 - platform control board:
It is time to put it all together:

All wiring was stuck where they were supposed to - PINGUINO in the hub, UG802 powered in USB connector on Ardubot:
The on-board computer is configured for ssh access, all the necessary tools for operation (compiler, libraries, mc) are installed from the Linaro repository. Come in, write, compile and debug right on it. Beauty!
For testing, a management console has been developed that shows an online image from a bot camera and sends it commands where to go, what lamps to turn on and off. Soft bot accepts commands and sends online video to the management console. The current status is deep beta. However, you can already use the system!
It is not necessary to use sparkled ardubot, there are cheaper and better options.
You can also replace the UG802 with low-cost counterparts (MK802, CX-01), but you need to look for the kernel sources to work on a specific clone device. Otherwise, the installation of a full-fledged Linux will be either problematic or impossible.
Project on googol code (source)
Linaro
PIC32-PINGUINO-MX220 on OLIMEX website
Ardubot on Sparkfun
When creating a bot, the following tasks were set:
- Controlling the bot over the wireless network
- Availability of online camera
- Convenience programming
On-board computer
')
For the onboard computer, I chose the dual-core android minicomputer UG-802, which was at hand. As an operating system - a full-fledged Linux distribution, build Ubuntu from Linaro.
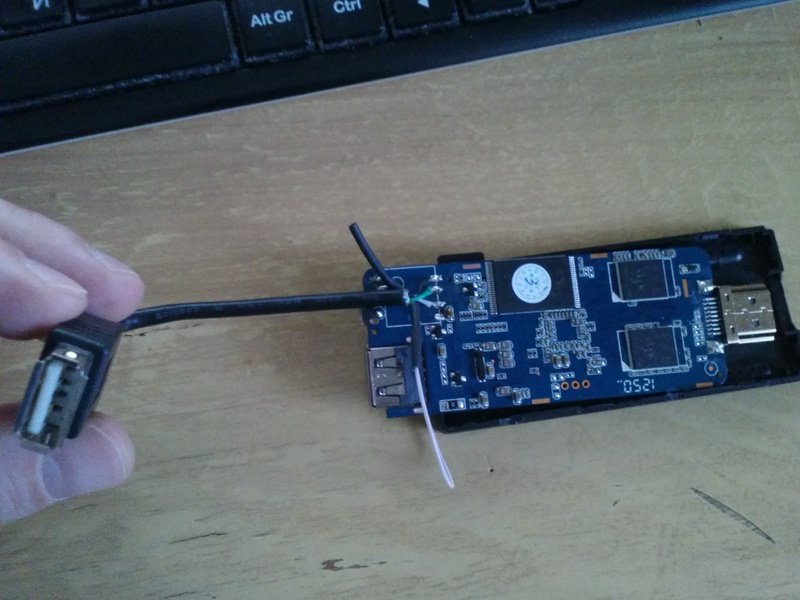
To begin with, it was necessary to do something with the problematic built-in wifi adapter, which stubbornly refused to run under the reassembled kernel. The cardinal decision was to drop it and install a second USB host connector into which you can plug in a normal usb wifi (or even a 3G modem). No sooner said than done, the built-in wifi board was sealed off and a second host was soldered in its place.
First check the internal USB host:
The final view of the installed USB host:
Wheel platform
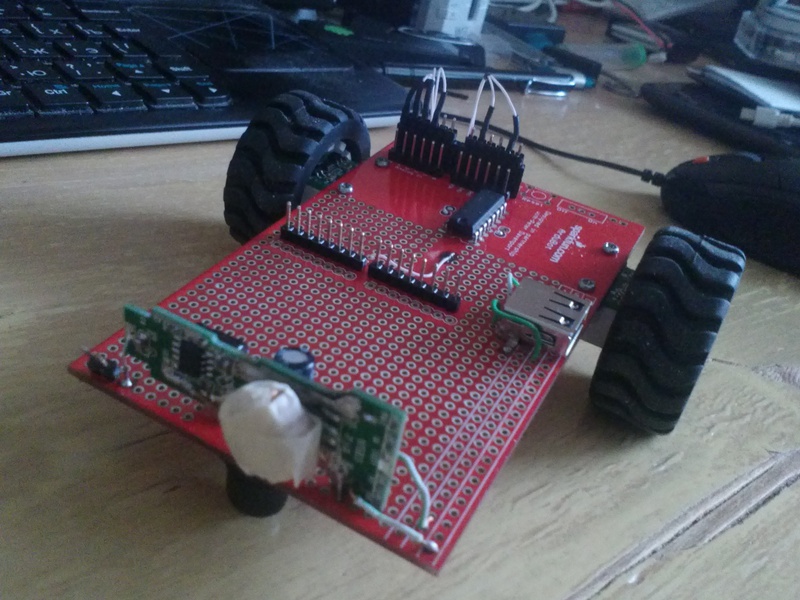
Once I ordered the Ardubot platform and wheels with motors to it, but my hands did not reach it. Without hesitation, it was decided to use it. A converter board with 12 to 5 volts was assembled on it, torn out of the automotive charging store that was bought at the store (the chip used in it has a wider input voltage range). A lithium polymer battery at 11.1V / 1250mA was already available from a broken, in the past, model aircraft. The Ardubot board had to undergo a light modification due to the features of the control board (the track is cut off from D9 and sealed to D7). A usb connector was also installed, to which only 5 volt power is connected:
Behind the wires are visible from the wheel encoder:
Engine, light control
Initially, the Ardubot platform was designed to be shared with the Arduino, so why not take advantage of it. Instead of Arduino, I took the connector-compatible OLIMEX PIC32-PINGUINO-MX220. It turned out an unpleasant trifle - one of the pins of the motor control was used for the LED on the PINGUINO board. All would be fine, but this LED blinked in the download mode of the firmware, turning the wheel at the same time. So I had to rewire the track, as described above.
For ease of debugging and versatility, the control board is connected via USB. PINGUINO firmware emulates a CDC-ACM device that is visible to the user as the serial port / dev / ttyACM0. The control commands being sent look like this:
| MOTOR XY | X is the number of the motor, Y is the state |
| LIGHT XY | X is the lamp number, Y is the state |
| CLEAR | reset everything to default |
| COMMIT | To apply |
The numbering of the motors: 0 - left, 1 - right.
States: 0 - stopped, 1 - forward, -1 - back.
For example, to turn on the rear LED on the platform, it is enough to send commands from the console:
echo "LIGHT 1 1" > /dev/ttyACM0 echo "COMMIT" > /dev/ttyACM0 To go ahead:
echo "MOTOR 0 1" > /dev/ttyACM0 echo "MOTOR 1 1" > /dev/ttyACM0 echo "COMMIT" > /dev/ttyACM0 Camera and hub
One USB port of the onboard computer is used by the wifi adapter, and the other is a platform control board. Where to connect the camera? There is a solution - use the hub. One of the cheapest webcams and a suspicious USB hub was purchased at one of the computer stores.
Electronics placement
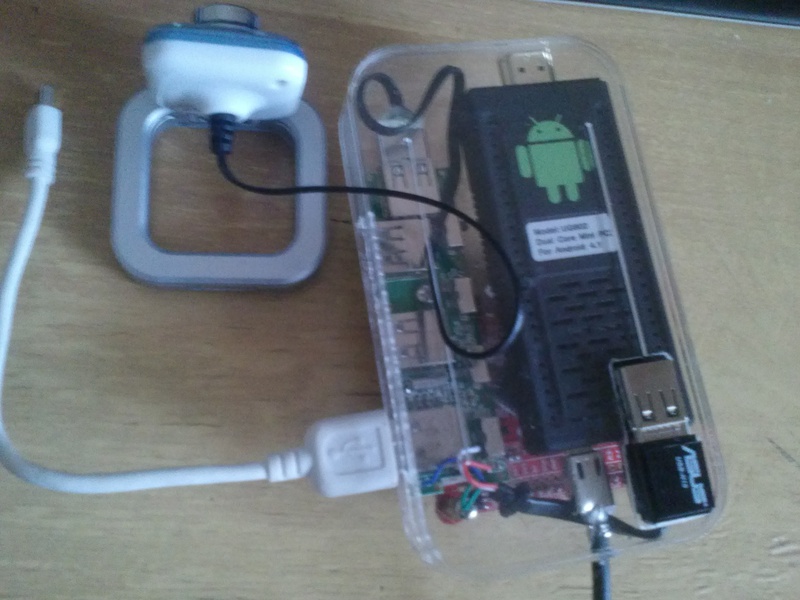
In the process of searching from which to mold the bot, a plastic box-package from under IPOD TOUCH was successfully found, in which the UG802 and the disassembled USB hub were ideally inserted. For the three hub connectors in the side was a notch. The camera was inserted into the fourth (internal) connector (with a pre-shortened cable). The cover also had a cutout for the USB connector on the UG802, which did not allow it to close:
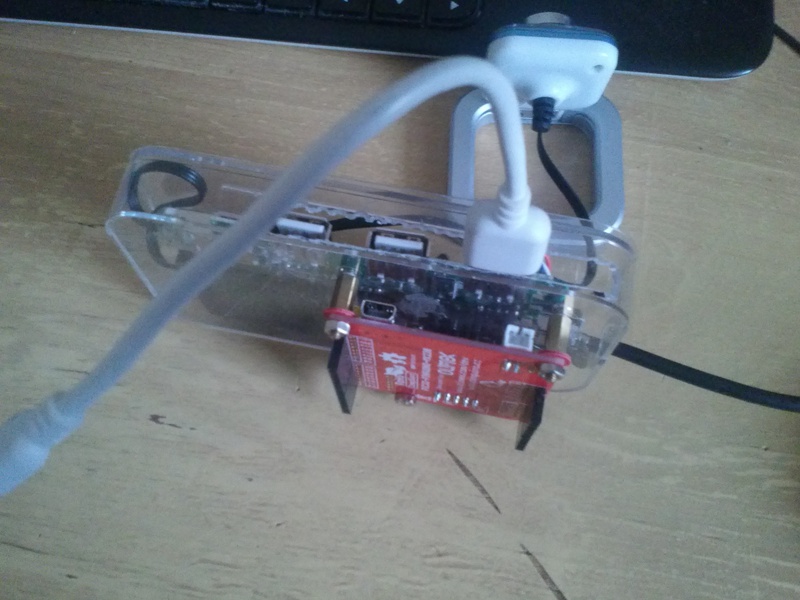
The whole thing is screwed on top of the PINGUINO-MX220 - platform control board:
Final assembly and testing
It is time to put it all together:
All wiring was stuck where they were supposed to - PINGUINO in the hub, UG802 powered in USB connector on Ardubot:
The on-board computer is configured for ssh access, all the necessary tools for operation (compiler, libraries, mc) are installed from the Linaro repository. Come in, write, compile and debug right on it. Beauty!
For testing, a management console has been developed that shows an online image from a bot camera and sends it commands where to go, what lamps to turn on and off. Soft bot accepts commands and sends online video to the management console. The current status is deep beta. However, you can already use the system!
Video demo
Recommendations
It is not necessary to use sparkled ardubot, there are cheaper and better options.
You can also replace the UG802 with low-cost counterparts (MK802, CX-01), but you need to look for the kernel sources to work on a specific clone device. Otherwise, the installation of a full-fledged Linux will be either problematic or impossible.
Links
Project on googol code (source)
Linaro
PIC32-PINGUINO-MX220 on OLIMEX website
Ardubot on Sparkfun
Source: https://habr.com/ru/post/176307/
All Articles