ASP.NET MVC Lesson 9. Configuration and File Upload
The purpose of the lesson. Learn how to use the Web.config configuration file. Application section, creating your own ConfigSection and IConfig. Learn how to download files, use file-uploader to download a file, then process the file.
In this tutorial, we will look at working with the Web.config configuration file. This is an xml file and the program settings are stored in it.
Let's take a closer look at what this file consists of:
')
Similar to Repository, we will create a configurator as a service. Create an IConfig and Config implementation in the Global folder (/Global/Config/IConfig.cs):
AND
Add a line to RegisterServices (/App_Start/NinjectWebCommon.cs):
And output to BaseController:
Now we will do the CultureInfo re-remapping in the stream in the controller initialization (/Controllers/BaseController.cs):
And add the date output in Index.cshtml (/Areas/Default/Views/Home/Index.cshtml):
We get the output:

And really connect this with Web.Config. Add a line to the Web.config appSettings:
In Config.cs (/Global/Config/Config.cs):
We start - the result is the same, now we change the value in Web.config to fr:
We get the date:
Fine! You can try a few more languages. The list of abbreviations is here http://msdn.microsoft.com/en-us/goglobal/bb896001.aspx
In this part we will look at creating your own ConfigSection. In this chapter, we will implement file uploads and the creation of previews. We need the following data: first, the dependence of mime-type on the extension, and the file icon (for downloading, for example):
and secondly, the data to create a preview:
Both types are done the same way, so I will only sign for the creation of one of them. Let it be IconSize, to create a preview. The first thing to do is to create a class inherited from ConfigurationElement (/Global/Config/IconSize.cs):
Consider more:
The next step is to create a collection class (since we will have many elements) and sections (/Global/Config/IconSize.cs):
Add to Web.config:
Now you need to declare the parsing class of this section in the configSection:
Please note that in the description of the type you must specify the name of the dll (
Let's create a single config for smtp mail settings. We will need:
File (/Global/Config/MailSetting.cs):
Add to Web.config:
AND
Add all this now to IConfig.cs and Config.cs (/Global/Config/IConfig.cs):
AND
We will add MailTemplates - templates that we will need for sending email at registration, or when reminding the password.
Now consider the standard example of uploading a file to the server, and will never use this method again. SimpleFileView class for interaction (/Models/Info/SimpleFileView.cs):
Pay attention to the class name for receiving files. So, we will create the controller SimpleFileController (/Areas/Default/Controllers/SimpleFileController.cs):
And add a View:
Notice the enctype in the form attributes and the type in the TextBox attributes (in fact, the type is still password, checkbox, radio, but for them there are corresponding methods in the @ Html class). Enctype must be set to “multipart / form-data” in order to be able to download large amounts of information.
Download and check. Our file is safely loaded, you only need to save the InputStream to a certain file. But let's leave for now and consider the shortcomings.
The first drawback is that in all browsers the file selection form looks different:
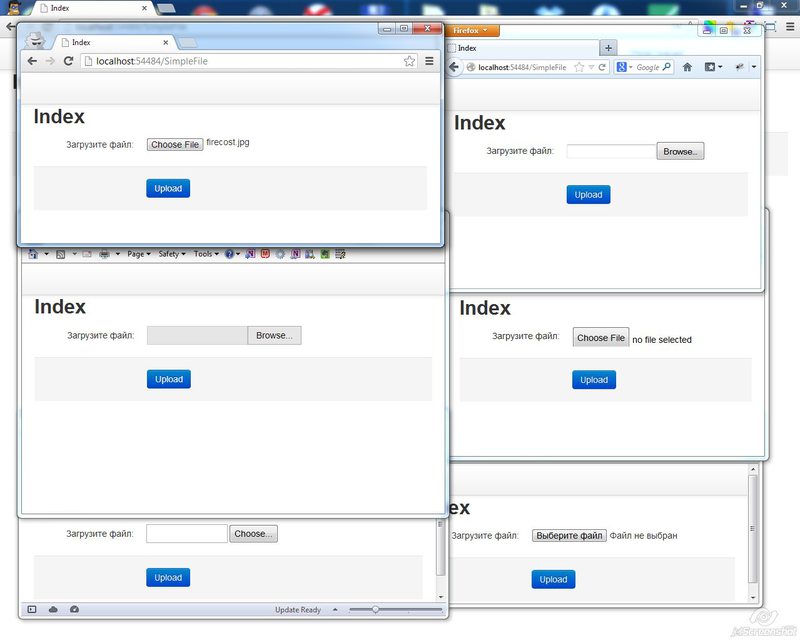
Of course, because the designer imagines that downloading files is performed as in Safari, and the customer checks in Chrome and IE, and starts asking the developers: “What amateur activity?”
The second drawback is that if the form is not validated, then these fields must be selected again. Those. There is such a form:
And suddenly you typed the password incorrectly, or you entered the wrong captcha, or the passport's second reversal picture is too big, or you forgot to overtake from the raw format into jpeg.
As a result, photos, registration and captcha must be re-entered. Naturally, this is not user friendly at all, and it annoys the customer (besides, the designer drew beautifully, but looks miserable).
Let's define how the file loading should behave:
This is called ajax-loading and for it we use fineuploader ( http://fineuploader.com/ ). The library is paid, but we will download and compile the source code (we also have a bundle!). Download the source at the link: https://github.com/valums/file-uploader . Move the js-files to the / Scripts / fine-uploader folder. Css-files are moved to / Content and images in / Content / images. Let's rewrite the url correctly in fineuploader.css for images:
We initialize the files in BundleConfig.cs (/App_Start/BundleConfig.cs):
Create a FileController.cs controller (/Areas/Default/Controllers/FileController.cs):
The action-upload method takes a qqfile string value, I will discuss below why. Now let's create a View for Index. For this:
View for Index:
Our button with id = UploadImage. Add the file-index.js file for processing (/Scripts/default/file-index.js):
Now let's process the load:
Add the files folder to the Content - this will be the user data folder. Let's sort the code:
Check whether everything is loaded, and proceed to create a preview.
First of all, we cheated a bit with mime-type = “image \ ...”, because bmp and tiff files that are not supported by browsers belong to them.
So, let's create a PreviewCreator class in the LessonProject.Tools project (PreviewCreator.cs):
And replaceable in FileController.cs (/Areas/Default/Controller/FileController.cs):
PreviewCreator has many features for creating previews, so I will list various options for creating an image and sort out one of them in detail. It is worth considering that all previews are created in jpeg format. So, what are the options:
Create a preview (
We start. Loadable Files should be loaded, and a preview will be created.
Now we will do the processing in file-index.js (/Scripts/default/file-index.js):
Now our file is loaded with previews. The path of a large file can also be transferred separately, and recorded, for example, in a hidden field and saved later in the database as a string.
What is wrong with this design are the following two problems:
There is another file upload method. The file hangs freely on the Internet, and we indicate the path to it (for example, when logging in with facebook), and we already save this file by reference.
This is done like this:
Where url is the path to the file. It can be more complicated using HttpWebRequest:
Here the file is specified through the generation of Guid.NewGuid. Checking:
File uploaded and processed. Everything is super!
I recommend to go through the debugger on the work PreviewCreator, to understand how everything is arranged.
All sources are located at https://bitbucket.org/chernikov/lessons
In this tutorial, we will look at working with the Web.config configuration file. This is an xml file and the program settings are stored in it.
Let's take a closer look at what this file consists of:
- configSection . This section is responsible for which classes will further process the declared sections. It consists of the attribute name - this is the tag, then the declared section, and type - which class it belongs to.
- connectionStrings . This section is responsible for working with the lines of initialization of database connections.
- appSettings . Parameters section of type key / value.
- system.web, system.webServer . Parameters sections for web application operation.
- runtime. Runtime setup section. Determination of dependencies between dll.
- The remaining sections. Other sections with parameters declared in configSection.
')
IConfig (and implementation).
Similar to Repository, we will create a configurator as a service. Create an IConfig and Config implementation in the Global folder (/Global/Config/IConfig.cs):
public interface IConfig { string Lang { get; } } AND
public class Config : IConfig { public string Lang { get { return "ru"; } } } Add a line to RegisterServices (/App_Start/NinjectWebCommon.cs):
kernel.Bind<IConfig>().To<Config>().InSingletonScope(); And output to BaseController:
[Inject] public IConfig Config { get; set; } Now we will do the CultureInfo re-remapping in the stream in the controller initialization (/Controllers/BaseController.cs):
protected override void Initialize(System.Web.Routing.RequestContext requestContext) { try { var cultureInfo = new CultureInfo(Config.Lang); Thread.CurrentThread.CurrentCulture = cultureInfo; Thread.CurrentThread.CurrentUICulture = cultureInfo; } catch (Exception ex) { logger.Error("Culture not found", ex); } base.Initialize(requestContext); } And add the date output in Index.cshtml (/Areas/Default/Views/Home/Index.cshtml):
@DateTime.Now.ToString("D") We get the output:
And really connect this with Web.Config. Add a line to the Web.config appSettings:
<add key="Culture" value="ru" /> In Config.cs (/Global/Config/Config.cs):
public string Lang { get { return ConfigurationManager.AppSettings["Culture"] as string; } } We start - the result is the same, now we change the value in Web.config to fr:
<add key="Culture" value="fr" /> We get the date:
mardi 5 mars 2013 Fine! You can try a few more languages. The list of abbreviations is here http://msdn.microsoft.com/en-us/goglobal/bb896001.aspx
Creating your own types ConfigSection
In this part we will look at creating your own ConfigSection. In this chapter, we will implement file uploads and the creation of previews. We need the following data: first, the dependence of mime-type on the extension, and the file icon (for downloading, for example):
- expansion
- mime-type
- large icon
- small icon
and secondly, the data to create a preview:
- the name of the preview (for example, UserAvatarSize)
- width
- height
Both types are done the same way, so I will only sign for the creation of one of them. Let it be IconSize, to create a preview. The first thing to do is to create a class inherited from ConfigurationElement (/Global/Config/IconSize.cs):
public class IconSize : ConfigurationElement { [ConfigurationProperty("name", IsRequired = true, IsKey = true)] public string Name { get { return this["name"] as string; } } [ConfigurationProperty("width", IsRequired = false, DefaultValue = "48")] public int Width { get { return (int)this["width"]; } } [ConfigurationProperty("height", IsRequired = false, DefaultValue = "48")] public int Height { get { return (int)this["height"]; } } } Consider more:
- ConfigurationProperty consists of a name, this is the name of the attribute in the string
- IsRequired - required or not
- IsKey - is the key (as the primary key in the database)
- DefaultValue is the default value.
The next step is to create a collection class (since we will have many elements) and sections (/Global/Config/IconSize.cs):
public class IconSizesConfigSection : ConfigurationSection { [ConfigurationProperty("iconSizes")] public IconSizesCollection IconSizes { get { return this["iconSizes"] as IconSizesCollection; } } } public class IconSizesCollection : ConfigurationElementCollection { protected override ConfigurationElement CreateNewElement() { return new IconSize(); } protected override object GetElementKey(ConfigurationElement element) { return ((IconSize)element).Name; } } Add to Web.config:
<iconConfig> <iconSizes> <add name="Avatar173Size" width="173" height="176" /> … </iconSizes> </iconConfig> Now you need to declare the parsing class of this section in the configSection:
<section name="iconConfig" type="LessonProject.Global.Config.IconSizesConfigSection, LessonProject" /> Please note that in the description of the type you must specify the name of the dll (
LessonProject ), in which it is contained. This is important, but will be considered in unit tests.Mailsettings
Let's create a single config for smtp mail settings. We will need:
- SmtpServer. Server name
- SmtpPort. Port, usually 25th.
- SmtpUserName. Login.
- SmtpPassword. Password.
- SmtpReply. The return address in the Reply-to line.
- SmtpUser. Username in the From line.
- EnableSsl. Yes / no, whether to use work on ssl.
File (/Global/Config/MailSetting.cs):
public class MailSetting : ConfigurationSection { [ConfigurationProperty("SmtpServer", IsRequired = true)] public string SmtpServer { get { return this["SmtpServer"] as string; } set { this["SmtpServer"] = value; } } [ConfigurationProperty("SmtpPort", IsRequired = false, DefaultValue="25")] public int SmtpPort { get { return (int)this["SmtpPort"]; } set { this["SmtpPort"] = value; } } [ConfigurationProperty("SmtpUserName", IsRequired = true)] public string SmtpUserName { get { return this["SmtpUserName"] as string; } set { this["SmtpUserName"] = value; } } [ConfigurationProperty("SmtpPassword", IsRequired = true)] public string SmtpPassword { get { return this["SmtpPassword"] as string; } set { this["SmtpPassword"] = value; } } [ConfigurationProperty("SmtpReply", IsRequired = true)] public string SmtpReply { get { return this["SmtpReply"] as string; } set { this["SmtpReply"] = value; } } [ConfigurationProperty("SmtpUser", IsRequired = true)] public string SmtpUser { get { return this["SmtpUser"] as string; } set { this["SmtpUser"] = value; } } [ConfigurationProperty("EnableSsl", IsRequired = false, DefaultValue="false")] public bool EnableSsl { get { return (bool)this["EnableSsl"]; } set { this["EnableSsl"] = value; } } } Add to Web.config:
<section name="mailConfig" type="LessonProject.Global.Config.MailSetting, LessonProject" /> AND
<mailConfig SmtpServer="smtp.gmail.com" SmtpPort="587" SmtpUserName="lxndrpetrov" SmtpPassword="**********" SmtpReply="lxndrpetrov@gmail.com" SmtpUser="test" EnableSsl="true" /> Add all this now to IConfig.cs and Config.cs (/Global/Config/IConfig.cs):
public interface IConfig { string Lang { get; } IQueryable<IconSize> IconSizes { get; } IQueryable<MimeType> MimeTypes { get; } MailSetting MailSetting { get; } } AND
public IQueryable<IconSize> IconSizes { get { IconSizesConfigSection configInfo = (IconSizesConfigSection)ConfigurationManager.GetSection("iconConfig"); return configInfo.IconSizes.OfType<IconSize>().AsQueryable<IconSize>(); } } public IQueryable<MimeType> MimeTypes { get { MimeTypesConfigSection configInfo = (MimeTypesConfigSection)ConfigurationManager.GetSection("mimeConfig"); return configInfo.MimeTypes.OfType<MimeType>().AsQueryable<MimeType>(); } } public MailSetting MailSetting { get { return (MailSetting)ConfigurationManager.GetSection("mailConfig"); } } We will add MailTemplates - templates that we will need for sending email at registration, or when reminding the password.
Simple file upload
Now consider the standard example of uploading a file to the server, and will never use this method again. SimpleFileView class for interaction (/Models/Info/SimpleFileView.cs):
public class SimpleFileView { public HttpPostedFileBase UploadedFile { get; set; } } Pay attention to the class name for receiving files. So, we will create the controller SimpleFileController (/Areas/Default/Controllers/SimpleFileController.cs):
public class SimpleFileController : DefaultController { [HttpGet] public ActionResult Index() { return View(new SimpleFileView()); } [HttpPost] public ActionResult Index(SimpleFileView simpleFileView) { return View(simpleFileView); } } And add a View:
@model LessonProject.Models.Info.SimpleFileView @{ ViewBag.Title = "Index"; Layout = "~/Areas/Default/Views/Shared/_Layout.cshtml"; } <h2>Index</h2> @using (Html.BeginForm("Index", "SimpleFile", FormMethod.Post, new {enctype = "multipart/form-data", @class = "form-horizontal" })) { <fieldset> <div class="control-group"> <label class="control-label" for="Email"> :</label> <div class="controls"> @Html.TextBox("UploadedFile", Model.UploadedFile, new { type = "file", @class = "input-xlarge" }) @Html.ValidationMessage("UploadedFile") </div> </div> <div class="form-actions"> <button type="submit" class="btn btn-primary"> Upload</button> </div> </fieldset> } Notice the enctype in the form attributes and the type in the TextBox attributes (in fact, the type is still password, checkbox, radio, but for them there are corresponding methods in the @ Html class). Enctype must be set to “multipart / form-data” in order to be able to download large amounts of information.
Download and check. Our file is safely loaded, you only need to save the InputStream to a certain file. But let's leave for now and consider the shortcomings.
The first drawback is that in all browsers the file selection form looks different:
Of course, because the designer imagines that downloading files is performed as in Safari, and the customer checks in Chrome and IE, and starts asking the developers: “What amateur activity?”
The second drawback is that if the form is not validated, then these fields must be selected again. Those. There is such a form:
- Name
- Surname
- Date of Birth
- The photo
- Photo of the first turn of the passport
- Photo of the second passport reversal
- Passport photo with registration
- Password
- The password again
- Captcha
And suddenly you typed the password incorrectly, or you entered the wrong captcha, or the passport's second reversal picture is too big, or you forgot to overtake from the raw format into jpeg.
As a result, photos, registration and captcha must be re-entered. Naturally, this is not user friendly at all, and it annoys the customer (besides, the designer drew beautifully, but looks miserable).
Downloading the file (s) using Ajax
Let's define how the file loading should behave:
- User clicks on "download".
- The file selection form opens.
- User selects file
- The file is being loaded, or an error is reported that something is wrong.
- Even if the form does not pass validation, the file remains loaded and it does not need to be loaded again.
This is called ajax-loading and for it we use fineuploader ( http://fineuploader.com/ ). The library is paid, but we will download and compile the source code (we also have a bundle!). Download the source at the link: https://github.com/valums/file-uploader . Move the js-files to the / Scripts / fine-uploader folder. Css-files are moved to / Content and images in / Content / images. Let's rewrite the url correctly in fineuploader.css for images:
.qq-upload-spinner { display: inline-block; background: url("images/loading.gif"); width: 15px; height: 15px; vertical-align: text-bottom; } .qq-drop-processing { display: none; } .qq-drop-processing-spinner { display: inline-block; background: url("images/processing.gif"); width: 24px; height: 24px; vertical-align: text-bottom; } We initialize the files in BundleConfig.cs (/App_Start/BundleConfig.cs):
bundles.Add(new ScriptBundle("~/bundles/fineuploader") .Include("~/Scripts/fine-uploader/header.js") .Include("~/Scripts/fine-uploader/util.js") .Include("~/Scripts/fine-uploader/button.js") .Include("~/Scripts/fine-uploader/ajax.requester.js") .Include("~/Scripts/fine-uploader/deletefile.ajax.requester.js") .Include("~/Scripts/fine-uploader/handler.base.js") .Include("~/Scripts/fine-uploader/window.receive.message.js") .Include("~/Scripts/fine-uploader/handler.form.js") .Include("~/Scripts/fine-uploader/handler.xhr.js") .Include("~/Scripts/fine-uploader/uploader.basic.js") .Include("~/Scripts/fine-uploader/dnd.js") .Include("~/Scripts/fine-uploader/uploader.js") .Include("~/Scripts/fine-uploader/jquery-plugin.js") ); bundles.Add(new StyleBundle("~/Content/css/fineuploader") .Include("~/Content/fineuploader.css")); Create a FileController.cs controller (/Areas/Default/Controllers/FileController.cs):
public class FileController : DefaultController { [HttpGet] public ActionResult Index() { return View(); } public ActionResult Upload(HttpPostedFileWrapper qqfile) { return Json(new { result = "ok", success = true}); } } The action-upload method takes a qqfile string value, I will discuss below why. Now let's create a View for Index. For this:
- Create a button, when clicked, we load the file.
- File is uploaded and previews are created.
- File and preview saved to file system
- The method returns the link where the file and preview were loaded via the Json response
- If the files could not be uploaded, the corresponding error is issued.
- We process the json-result and notify that the file and preview are loaded
- Verification of the form and writing to the database are not needed.
View for Index:
@{ ViewBag.Title = "Index"; Layout = "~/Areas/Default/Views/Shared/_Layout.cshtml"; } @section styles { @Styles.Render("~/Content/css/fineuploader") } @section scripts { @Scripts.Render("~/bundles/fineuploader") @Scripts.Render("~/Scripts/default/file-index.js") } <h2>Index</h2> <fieldset> <div class="control-group"> <label class="control-label" for="Text"> Image </label> <div class="controls"> <div id="UploadImage"> Upload </div> </div> </div> <div> <img src="" alt="" id="ImagePreview" /> </div> </fieldset> Our button with id = UploadImage. Add the file-index.js file for processing (/Scripts/default/file-index.js):
function FileIndex() { _this = this; this.ajaxFileUpload = "/File/Upload"; this.init = function () { $('#UploadImage').fineUploader({ request: { endpoint: _this.ajaxFileUpload }, }).on('error', function (event, id, name, reason) { //do something }) .on('complete', function (event, id, name, responseJSON) { alert(responseJSON); }); } } var fileIndex = null; $().ready(function () { fileIndex = new FileIndex(); fileIndex.init(); }); Now let's process the load:
public ActionResult Upload(HttpPostedFileWrapper qqfile) { var extension = Path.GetExtension(qqfile.FileName); if (!string.IsNullOrWhiteSpace(extension)) { var mimeType = Config.MimeTypes.FirstOrDefault(p => string.Compare(p.Extension, extension, 0) == 0); // if (mimeType.Name.Contains("image")) { // var filePath = Path.Combine("/Content/files", qqfile.FileName); qqfile.SaveAs(Server.MapPath(filePath)); return Json(new { success = true, result = "error", data = new { filePath } }); } } return Json(new { error = " ", success = false }); } Add the files folder to the Content - this will be the user data folder. Let's sort the code:
- We get qqfile (there is nothing to change, this parameter is due to fineuploader).
- From it we get the extension.
- On extension we find mimeType. For .jpg, .gif, .png - we get the image / ... type mime-type. Thus, we verify that this file can be downloaded.
- Next, using the file name, we compose the absolute path to the folder / Content / files (which we created in advance) using Server.MapPath.
- Next, save the file using SaveAs.
- We return the name of the file in json data.filePath.
Check whether everything is loaded, and proceed to create a preview.
Creating a preview
First of all, we cheated a bit with mime-type = “image \ ...”, because bmp and tiff files that are not supported by browsers belong to them.
So, let's create a PreviewCreator class in the LessonProject.Tools project (PreviewCreator.cs):
public static class PreviewCreator { public static bool SupportMimeType(string mimeType) { switch (mimeType) { case "image/jpg": case "image/jpeg": case "image/png": case "image/gif": return true; } return false; } } And replaceable in FileController.cs (/Areas/Default/Controller/FileController.cs):
if (mimeType != null && PreviewCreator.SupportMimeType(mimeType.Name)) PreviewCreator has many features for creating previews, so I will list various options for creating an image and sort out one of them in detail. It is worth considering that all previews are created in jpeg format. So, what are the options:
- Color and black and white version. Controlled by the grayscale parameter (default = false)
- Preview (
CreateAndSavePreview) If the original image is smaller than the size of the preview, the image is placed in the middle of the white canvas. If in relation to the size of the original size has a vertical orientation (a square from a portrait format) - cut the upper part. If the ratio is horizontally oriented relative to the size, then cut out the middle. - Avatar (
CreateAndSaveAvatar) If the original image is smaller than the preview size, the image is simply saved. If in relation to the size of the original size has a vertical orientation (a square from a portrait format) - then reduce, in height. If the ratio is horizontally oriented relative to the size, then cut out the middle. - Picture. (
CreateAndSaveImage) If the image is smaller than the maximum size, then save the original one. If the image does not fit into the borders, then reduce it so that it does not exceed the maximum size, and save. - To size. (
CreateAndSaveFitToSize) If the image is smaller than the size, it will be stretched to the required size. With the loss of quality, of course. - Crop. (
CropAndSaveImage) In addition to the standard parameters, coordinates are passed to trim the image.
Create a preview (
CreateAndSavePreview ) by taking the dimensions from the configuration to create the AvatarSize preview (/Areas/Default/Controllers/FileController.cs): var filePreviewPath = Path.Combine("/Content/files/previews", qqfile.FileName); var previewIconSize = Config.IconSizes.FirstOrDefault(c => c.Name == "AvatarSize"); if (previewIconSize != null) { PreviewCreator.CreateAndSavePreview(qqfile.InputStream, new Size(previewIconSize.Width, previewIconSize.Height), Server.MapPath(filePreviewPath)); } return Json(new { success = true, result = "error", data = new { filePath, filePreviewPath } }); We start. Loadable Files should be loaded, and a preview will be created.
Now we will do the processing in file-index.js (/Scripts/default/file-index.js):
$('#UploadImage').fineUploader({ request: { endpoint: _this.ajaxFileUpload }, }) .on('error', function (event, id, name, reason) { //do something }) .on('complete', function (event, id, name, responseJSON) { $("#ImagePreview").attr("src", responseJSON.data.filePreviewPath); }); Now our file is loaded with previews. The path of a large file can also be transferred separately, and recorded, for example, in a hidden field and saved later in the database as a string.
What is wrong with this design are the following two problems:
- files can be overwritten, but this is solved by the fact that you can take only the extension, and assign the name to the file separately, or add a little salt
- Files can be loaded and not associated with the database. This can be solved by recording files for each table in a separate folder, and then doing a search and deleting unwritten files.
Receiving files by reference
There is another file upload method. The file hangs freely on the Internet, and we indicate the path to it (for example, when logging in with facebook), and we already save this file by reference.
This is done like this:
var webClient = new WebClient(); var bytes = webClient.DownloadData(url); var ms = new MemoryStream(bytes); Where url is the path to the file. It can be more complicated using HttpWebRequest:
public ActionResult Export(string uri) { HttpWebRequest webRequest = (HttpWebRequest)WebRequest.Create(uri); webRequest.Method = "GET"; webRequest.KeepAlive = false; webRequest.PreAuthenticate = false; webRequest.Timeout = 1000; var response = webRequest.GetResponse(); var stream = response.GetResponseStream(); var previewIconSize = Config.IconSizes.FirstOrDefault(c => c.Name == "AvatarSize"); var filePreviewPath = Path.Combine("/Content/files/previews", Guid.NewGuid().ToString("N") + ".jpg"); if (previewIconSize != null) { PreviewCreator.CreateAndSavePreview(stream, new Size(previewIconSize.Width, previewIconSize.Height), Server.MapPath(filePreviewPath)); } return Content("OK"); } Here the file is specified through the generation of Guid.NewGuid. Checking:
http://localhost/File/Export?uri=https://st.free-lance.ru/users/chernikov/upload/sm_f_81850beffd0d0c89.jpg File uploaded and processed. Everything is super!
I recommend to go through the debugger on the work PreviewCreator, to understand how everything is arranged.
All sources are located at https://bitbucket.org/chernikov/lessons
Source: https://habr.com/ru/post/176069/
All Articles