Quick Start: Visual Database Design in MySQL Workbench

The purpose of this post is to help a novice developer quickly become comfortable and design a simple database using the MySQL Workbench visual database design tool from Oracle and get its ER model and SQL dump.
Well, less words, but more sense! The appearance of the program window, the section "Data Modeling" looks like this:
')
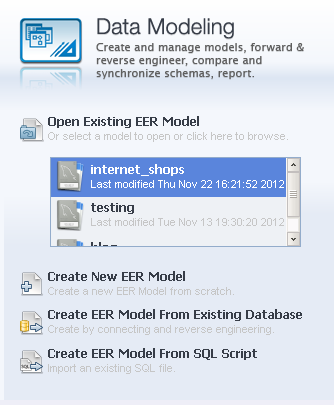
To open an existing model, click on the link: Open Existing EER Model , to create a new model — select the parameter: Create New EER Model ; to create an entity-relationship model from an existing database — click on the parameter: Create EER Model From Existing Database , and to create an EER model from a SQL script, select: Create EER Model From SQL Script .
To create a new model, use the Create New EER Model link, after clicking on it, a window with parameters will appear:
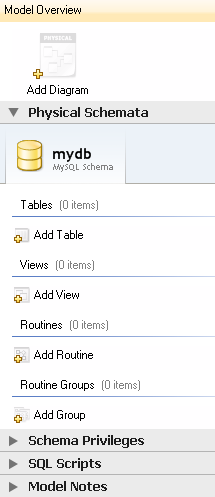
First you need to create a table, for this we click on the Add Table button, the following form will appear:
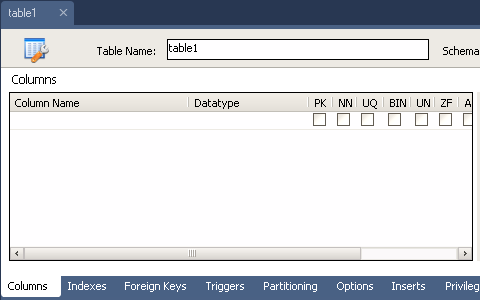
First, we will create the users table, which will store data about the users of the information system, enter the name of the table in the table Name field, create the table fields in the Columns form section:
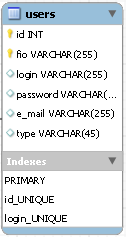
- The first id field will contain a unique user number, set its properties: Auto Increment, Not Null, Primary key and Unique , in the Data type section, select the integer type integer.
- The second fio field, where the full name will be stored. user, set the property field: Not Null , Primary key , in the Data type section, select the VARCHAR string type and set the number of characters to 255 .
- The third login field will contain the user login, it should be unique, like the id field, so we set it the Unique property and set the number of characters to 255 .
- The following fields: password containing the password, e_mail containing the email address and type field containing the user type will be without special properties, with the VARCHAR string type 255 characters long, except for the last type field which is sufficient with 45 characters.
After the manipulations, the form with the name of the users table will look like this:

The chart will display the users table with fields and indices:
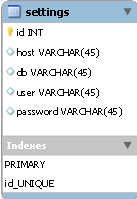
In a similar way, we will create a settings table with the settings for access to the IP database containing the id , host fields to specify the host name (server address), db database name, user and password with user name and password, to install the IC on the remote server.
Next, using the already known method, we will create a table shops which will store data about stores in the fields: integer type id is a key, non-zero, unique with auto increment, the name field stores the store name, the address field is its physical address, tel is the store phone, site - Online store site and email field with the store's email address.
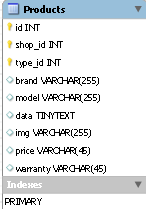
Then we will create a products table that stores store data in the fields: integer type id is a key, non-zero, unique with auto-increment, name field stores the name of the store, key non-zero field of integer type shop_id stores the store number, type_id field with information about the item number from the table types of products. The brand field is a 255 character manufacturer's brand, the model field is with the product model, the data field is with the data and characteristics of a Tinytext product , an img field with a full address of 255 characters long, and a price field with a product price and warranty with information on the warranty period for a product of 45 characters.
The settings, shops and products tables we created look like this:

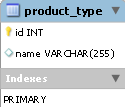
Next, we need a table storing the product_type product type, it consists of a unique, non-zero key id field with an autoincrement of an integer type, and a unique name field 255 characters long that contains the name of the product type.
Table view is as follows:
The last two tables are orders and deliveries , the first contains information about customer orders, and the latest data on product delivery.
The orders : id table fields are a key, non-zero, unique integer type field with auto increment, shop_id field containing the store number is a key, non-zero integer type, product_id field that stores the product number is a key non-zero integer type, fio field with the number of the user who made the order is key, a non-zero integer, date c field order date - type on dATE field quantity with the amount of goods ordered - integer field tel with the customer phone number - a string type in 255 characters long and the field confirm Containing ie information on the order confirmation - logical type.
The fields of the deliveries : order_id table with the order number are a key, non-zero, unique integer type field with auto-increment, the fio field with the number of the user who made the order is a key non-zero integer type, the address field holds the shipping address specified by the client, 255 characters long , the time field storing the desired time of delivery of the goods is a string type of 255 characters long, the date field with the date of the order being made by the customer is of the DATE type, and the logical type confirm the storing information on the delivery of the goods.
The orders and deliveries tables look like this:

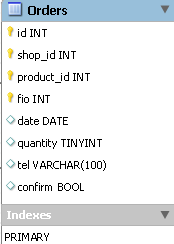
Table links
We have created a database consisting of seven tables, now we need to link tables, we have already created key fields of integer type, they will become the basis for linking.
In order to associate two tables for the products and product_type example, double-click the diagram with the products table and select the Foreign keys tab, then enter the unique name of the foreign key in the Foreign key name field, double-click the Referenced tab table and select the product_type table, then select the type_id field in the form to the right and select the id field in the pop-up list.
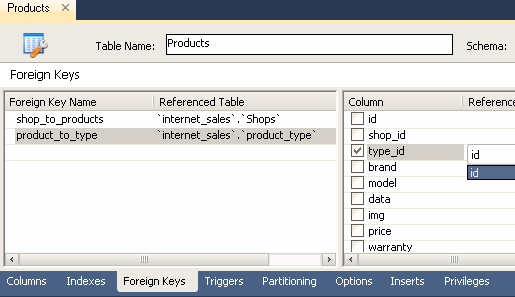
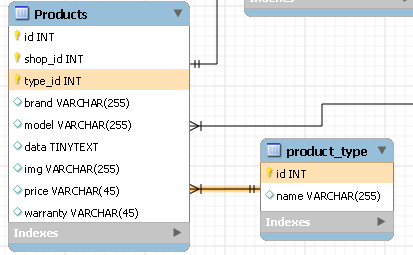
Thus, both fields of the table are connected, then you need to set the type of relationship between the tables, open the window, click on the appeared relationship between the tables, and select the Foreign Key tab and in the Cardinality section select the one-to-many connection type, and close the window. The diagram displays the relationship of the tables:
Similarly, we connect all the key fields in the tables so that they are logically interrelated, then we need to make sure that the designed database corresponds to the third normal form.
The normal form is a relation property in the relational data model, which characterizes it in terms of redundancy, which can potentially lead to logically erroneous results of sampling or changing data. Normal form is defined as the set of requirements that a relation must satisfy.
In a relational model, a relation is always in first normal form by definition of the concept of relation. As for the various tables, they may not be correct representations of relations and, accordingly, may not be in the first normal form. A relation variable is in the second normal form if and only if it is in the first normal form and each non-key attribute is irreducibly (functionally fully) dependent on its potential key. The database will be in third normal form if it is reduced to the second normal form and each non-key column is independent of each other.
Thus, our base is in the third normal form, since each non-key column is independent of each other. This is clearly seen in the diagram of our database:
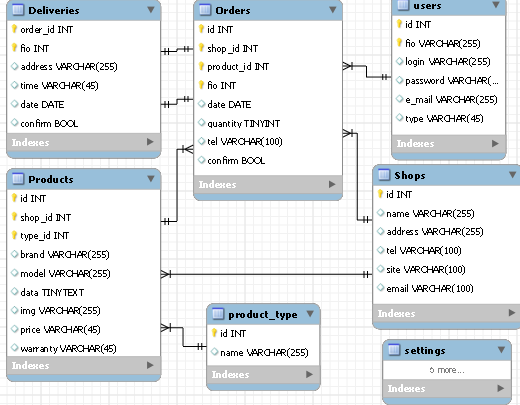
Most tables are in a one-to-many relationship, with the exception of the deliveries and orders tables being in a one-to-one relationship, since Only one order can be delivered, i.e. one order has only one delivery. The remaining links are clearly indicated above.
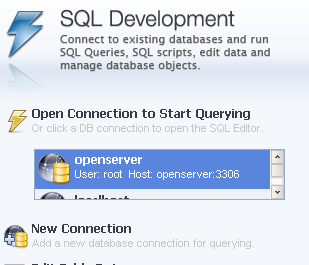
Now we will upload our database to the server. To do this, create a new connection to the database by clicking the New connection link in the start window of the program:
Then fill in the fields in the window that opens:
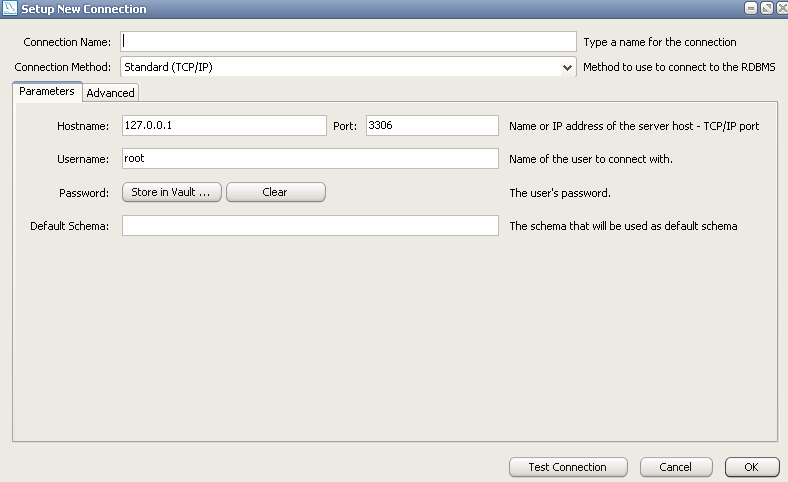
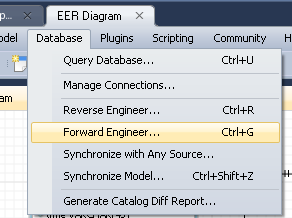
Specify the connection name in the Connection Name field, select the connection method in the Connection Method list, set the host name and port in the Parameters tab, specify the user name and password if there is one, and click OK. Then open the EER Diagram tab, select the Database item in the panel and click the Forward Engineer parameter:
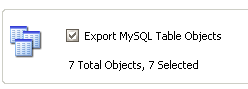
After the window appears, click on the “Next” button, select the Export MySQL Table Objects option and click on the “Next” button:
After clicking the button, a tab with the SQL code will appear, you can save it by clicking the “Save to file” button if necessary, and then click on the “Next” button. A window appears with the connection parameters:
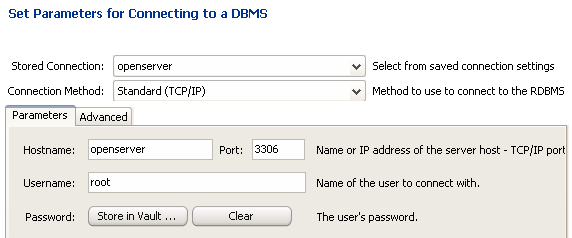
We check if the connection parameters are correct and click on the “Execute” button, if the SQL code does not contain errors, then after the execution of the code we will see a window with a list of tables, otherwise an error message will be displayed. Now our database is uploaded to the server.
Thank you for your attention, you can download the program itself here .
UPD :
Some habravchan interested in the ability to display lines of relations of tables in field-to-field mode
on the advice of one of the users, I will give a small explanation of how to change the type of relationships and tables, for this you need to select the following parameter in the menu section Relationship Notation :
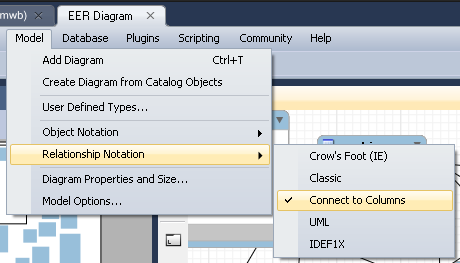
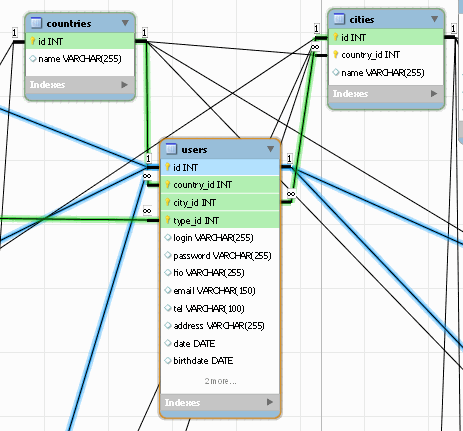
After this, the table links will look like this:
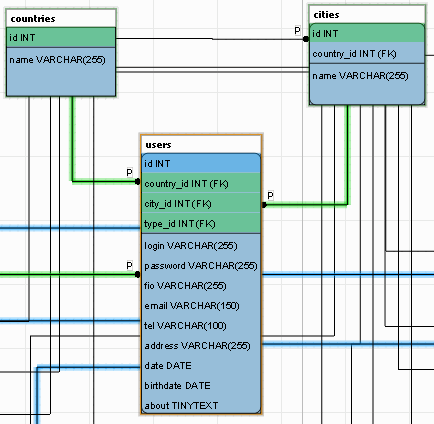
It is also possible to change the appearance of the tables, for this you need to put a tick in the above section of the menu and in the following Object Notation :

This is how the table on the diagram is shown to the IDEF1X standard:
Thank you for your comments!
After this, the table links will look like this:
It is also possible to change the appearance of the tables, for this you need to put a tick in the above section of the menu and in the following Object Notation :
This is how the table on the diagram is shown to the IDEF1X standard:
Thank you for your comments!
Source: https://habr.com/ru/post/175985/
All Articles