Coolpix P7700 and Coolpix P310 - two practical compact from Nikon
While I am waiting for a new product from Samsung - a Samsung Galaxy Note 8 tablet, I decided to try to describe 2 compact cameras from Nikon - the Coolpix P7700 and Coolpix P310 models.
The younger of the models described fits easily into the inner pocket of the jacket, and, despite its compact dimensions, makes it possible to take decent pictures. The older Coolpix P7700 is equipped with a higher-quality matrix, the high-aperture NIKKOR zoom lens with a 7.1x magnification and a fast aperture, thanks to which the space for photo and video experiments that opens up this tool is huge.
')
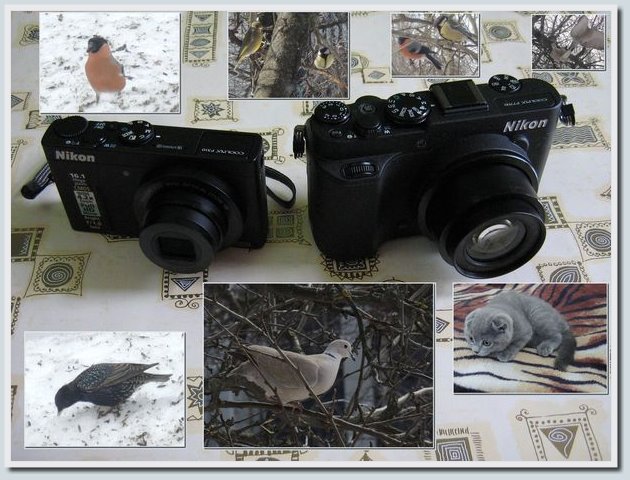
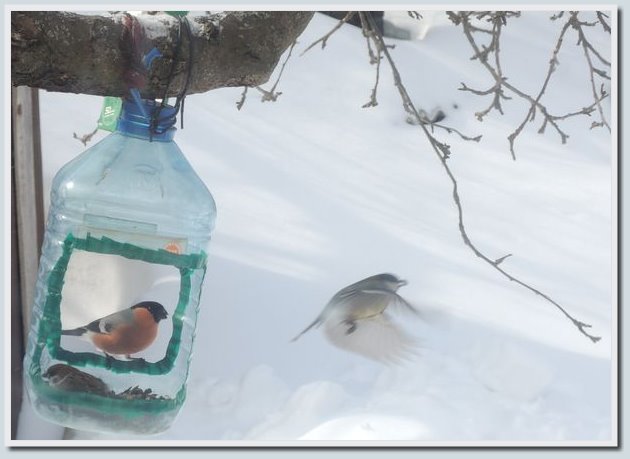
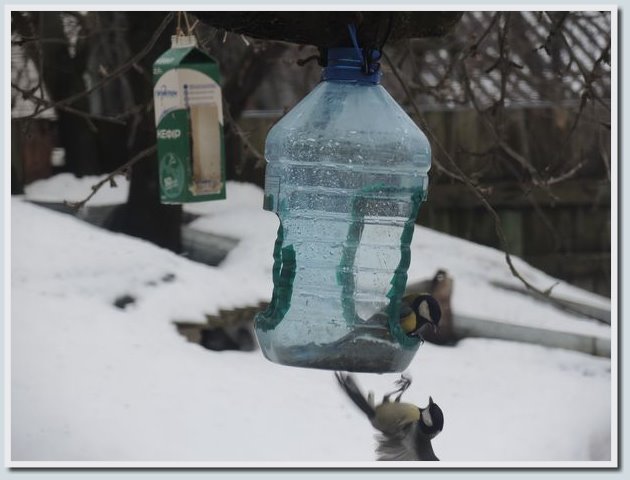
At the time when I tested these cameras, the weather in Kiev, despite the end of March, was snowy-winter ( 1 , 2 , 3 ). It is freezing outside, there is a blizzard outside the window, roads and sidewalks under a thick snow layer. In general, it was fun! Although the blizzard had calmed down with time, but the frost lasted for many more days, so most of the photos for this test review had to be taken in indoor conditions. In such a difficult situation, the feeder helped me out, which can be seen from the windows of my house, as well as the birds who kindly agreed to pose for the camera for sunflower seeds.
The manual control capabilities in both cameras are very pleased: the shutter speed and aperture controls are exactly where you need it, quick access to white balance, sensitivity (ISO) and exposure compensation in the COOLPIX P7700, programmable buttons in the two models under consideration, all this is very, very by the way. You can find more information about cameras, examples of images and video footage with birds of different types under Habrakat (Caution, traffic — photos and slideshows).
Thanks to Nikon Ukraine, I had the opportunity to experiment with Nikon cameras from the Performance series (I was in the hands of the COOLPIX P300, COOLPIX P310, COOLPIX P7100 and COOLPIX P7700), but I haven’t described the cameras before that and this will be my first review of photo equipment .
Before starting this review, I looked through most of the articles from the Photo Equipment hub. I thought that some articles from this Hub should be added to this review, as pointers to theoretical materials and practical recommendations on photography, I cite the links below:
- Theory of photography:
Photo basics: shutter speed, aperture, DOF, photosensitivity , Learning to photograph , What is the crop factor , Mirrorless revolution - Digitization of negatives and positives:
Digitizing 35mm film , Digitizing large negatives , As I digitally film, and not only - A few practical things for the future:
12 ways not to tinker with the flash , Nikon Hand Strap II wrist strap as an alternative to the neck strap , A couple of useful sites for choosing photographic equipment
And now, actually, let's proceed to the continuation of the review.
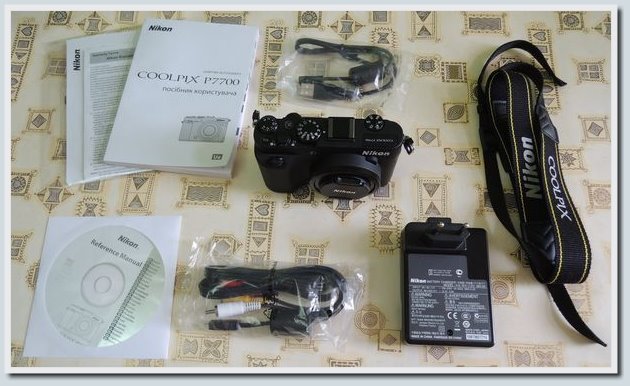
Complete set, appearance of devices, technical characteristics
Package of cameras looks like this:
Nikon COOLPIX P310:
Camera strap, rechargeable Li-ion Battery EN-EL12 (with protective cover), mains charger EH-69P, UC-E6 USB cable, EG-CP16 audio / video cable, ViewNX 2 installation CD, CD with detailed user manual

Nikon COOLPIX P7700:
Camera strap, LC-CP26 lens cap (attached to the camera body), EN-EL14 rechargeable Li-ion battery (with protective cover), MH-24 charger, UC-E17 USB cable, EG-CP16 audio / video cable, ViewNX 2 installation CD, detailed user manual CD
Technical characteristics of both devices bring below in the form of a comparative table
(for compactness, hid the table under habrakat):
Nikon COOLPIX P310 and Nikon COOLPIX P7700 Specifications
Further information on the Nikon COOLPIX P310 and Nikon COOLPIX P7700 models can be found on the official website.
| Nikon COOLPIX P310 | Nikon COOLPIX P7700 | |
|---|---|---|
| Effective number of pixels | 16.1 million | 12.2 million |
| Matrix | 1 / 2.3 inches, type: CMOS; total pixels: approx. 16.79 million | 1 / 1.7 inches, type: CMOS; total pixels: approx. 12.76 million |
| Lens | NIKKOR lens with 4.2x optical zoom | NIKKOR lens with 7.1x optical zoom |
| Focal length | 4.3–17.9 mm (angle of view equivalent to a 24–100-mm lens size 35 mm [135]) | 6.0–42.8 mm (angle of view equivalent to a 28–200 mm lens in a 35 mm format [135]) |
| F-number | f / 1.8–4.9 | f / 2–4 |
| Lens design | 7 elements in 6 groups | 13 elements in 10 groups (2 ED glass elements) |
| Increase with digital zoom | Up to 2x (angle of view equivalent to approx. 200 mm lens size 35 mm [135]) | digital zoom Images: Up to 4 times (angle of view equivalent to approx. 800 mm lens in 35 mm format [135]), movies: Up to 2 times (angle of view equivalent to approx. 400 mm lens in 35 mm format [135]) |
| Vibration suppression | Extended with lens offset | Lens shift |
| Autofocus (AF) | Contrast Detection AF | Contrast Detection AF |
| Focus Distance Range | [W]: Approx. 30 cm to infinity, [T]: Approx. from 60 cm to infinity; in macro mode: approx. from 2 cm (wide angle) to infinity | [W]: Approx. 50 cm to infinity, [T]: approx. from 80 cm to infinity; in macro mode: approx. from 2 cm (at the wide-angle zoom position behind the triangle sign) to infinity (all distances are measured from the center of the front surface of the lens) |
| Focus area selection | Priority of face, auto (automatic selection of 9 zones), center, manual with 99 focus areas, subject tracking, AF with object detection | Priority of face, auto (automatic selection of 9 zones), center (wide angle, normal), manual with 99 focus areas, subject tracking, AF with object detection |
| Monitor | LCD TFT monitor with a diagonal of 7.5 cm, a resolution of approx. 921 thousand points, wide viewing angle, anti-reflective coating and 5-level brightness adjustment | TFT LCD monitor with a diagonal of 7.5 cm, a resolution of approx. 921 thousand points, wide viewing angle, anti-reflective coating, five-level brightness control and variable tilt angle |
| Frame coverage (in shooting mode and viewing mode) | Approx. 100% horizontal and 100% vertical (compared to real snapshot) | Approx. 100% horizontal and 100% vertical (compared to real snapshot) |
| Carriers | Internal memory (approx. 90 MB), SD / SDHC / SDXC memory card | Internal memory (approx. 86 MB), SD / SDHC / SDXC memory card, no compatibility with Multi Media Memory Cards (MMC) |
| File system | Compatible with DCF, Exif 2.3, DPOF and MPF | Compatible with DCF, Exif 2.3, DPOF and MPF |
| File formats | Photos: JPEG 3D images: MPO sound files (sound note): WAV video clips: MOV (video: H.264 / MPEG-4 AVC, sound: stereo AAC) | Images: JPEG, NRW (RAW) (Nikon's own format), 3D images: MPO, sound files (sound note): WAV, video clips: MOV (video: H.264 / MPEG-4 AVC, sound: AAC stereo) |
| Image size (pixels) | 16 M [4608 x 3456], 8 M [3264 x 2448], 4 M [2272 x 1704], 2 M [1600 x 1200], VGA [640 x 480], 16: 9 12M [4608 x 2592] 16: 9 2M [1920 x 1080] 3: 2 [4608 x 3072] 1: 1 [3456 x 3456] | 12M [4000 x 3000], 8M [3264 x 2448], 4M [2272 x 1704], 2M [1600 x 1200], VGA [640 x 480], 3: 2 [3984 x 2656], 16: 9 9M [3968 x 2232], 1: 1 [3000 x 3000] |
| Shooting modes | “Auto”, “Plot” (“Automatic plot selection”, “Macro”, “Portrait”, “Food”, “Landscape”, “Museum”, “Sport”, “Fireworks”, “Night portrait”, “Black and white copy ”,“ Celebration / indoor ”,“ Backlighting ”,“ Beach ”,“ Panorama ”,“ Snow ”,“ Pet portrait ”,“ Sunset ”,“ Special effects ”,“ Twilight / dawn ”,“ 3D photography ”,“ Night landscape ”), P, S, A, M,“ User settings ” | “Auto”, “Plot” (“Automatic plot selection”, “Portrait”, “Landscape”, “Sport”, “Night portrait”, “Celebration / indoors”, “Beach”, “Snow”, “Sunset”, "Twilight / Dawn", "Night Landscape", "Macro", "Food", "Museum", "Fireworks", "Black and White Copy", "Backlighting", "Panorama", "Pet Portrait", "3D -photographing ")," Special effects ", P, S, A, M, User settings |
| Continuous shooting | “Single shot” (default setting), “Continuous B” (continuous shooting images at 7 frames per second), “Continuous H” (shooting up to 30 images at a speed of approx. 1 frame per second), pre-shooting buffer ( shooting up to 20 frames at a speed of approx. 15 frames per second), “Continuous B”: shooting at 120 frames per second (shooting 60 frames with a shutter speed of 1/125 s or less), “Continuous B”: shooting at 60 frames per second (shooting 60 frames with a shutter speed of 1/60 s or less), BSS (best shot selection), Multi-shot 16, Shooting with an interval of " | Single frame (default setting), Continuous B (approx. Up to 6 shots are continuously taken at a speed of approx. 8 frames per second), Continuous C (approx. 6 shots are continuously taken at a speed of approx. 4 frames per second), “Continuous H” (approx. up to 30 images are continuously performed at a speed of approx. 1 frame per second), BSS (best shot selection), “Multi-shot 16”, “Continuous. B: 120 frames per second "(60 frames taken at a speed of approx. 1/125 s or faster)," Continuous. B: 60 frames per second "(60 frames taken at a speed of approx. 1/60 s or faster)," Interv. filming |
| Video | HD 1080p (High Quality) (default setting): 1920 x 1080 / Approx. 30 frames per second, HD 1080p: 1920 x 1080 / approx. 30 frames per second, HD 720p: 1280 x 720 / approx. 30 frames per second, iFrame 540: 960 x 540 / approx. 30 frames per second, VGA: 640 x 480 / approx. 30 frames per second, HS 120 frames per second: 640 x 480 / approx. 120 frames per second, HS 60 frames per second: 1280 x 720 / approx. 60 frames per second, HS 15 frames per second: 1920 x 1080 / approx. 15 frames per second | HD 1080p (High Quality) (default setting): 1920 x 1080 / Approx. 30 frames per second, HD 1080p: 1920 x 1080 / approx. 30 frames per second, HD 720p: 1280 x 720 / approx. 30 frames per second, VGA: 640 x 480 / approx. 30 frames per second, HS 120 frames per second: 640 x 480, HS 60 frames per second: 1280 x 720, HS 15 frames per second: 1920 x 1080 |
| ISO sensitivity (standard output sensitivity) | (standard output sensitivity) 100, 200, 400, 800, 1600, 3200 ISO units, Hi 1 (equivalent to 6400 ISO units), auto (automatic gain in the range from 100 to 1600 ISO units), auto with range fixation (100– 400, 100–800 ISO units), Hi 2 (equivalent to 12800 ISO units) (high ISO sensitivity, “Monochrome” in special effects mode) | 80–1600 ISO, 3200 ISO, Hi 1 (equivalent to 6400 ISO) (available when using P, S, A, or M mode) |
| Exposure metering | 224-segment matrix, center-weighted, point | Matrix (224-segment), center-weighted or spot. Also, if you set the AF zone mode “Manual”, the AF zone can be combined with the measuring range using the “Metering Expos. on fok. ". |
| Exposure control | Programmed automatic with flexible program, shutter-priority auto mode, aperture-priority auto mode, manual mode, exposure bracketing, motion detection, exposure compensation (from -2.0 to +2.0 EV in 1/3 EV increments) | Programmed auto with flexible program, shutter-priority auto mode, aperture-priority auto mode, manual mode, exposure bracketing (Tv, Av, Sv), exposure compensation (in 1/3 EV steps in the range of ± 3.0 EV for images and ± 2.0 EV for videos) |
| Gate | Mechanical and electronic CMOS shutter | CMOS mechanical and electronic shutter |
| Exposure | Auto mode, scene mode: from 1/2000 * to 1 s, from 1/2000 * to 2 s (when using the “Tripod” setting in the “Night landscape” scene mode), 4 s (in the “Fireworks” scene mode) , modes “P”, “S”, “A” and “M”: from 1/2000 * to 8 s (if you set the sensitivity value to 100 ISO in “M” mode: including the “Auto” and “Auto with fixed . ”range”), from 1/2000 * to 4 s (with a sensitivity setting of 100, 200 or 400 ISO in “P”, “S” or “A” modes, as well as with a sensitivity setting of 200 or 400 ISO in “M” mode), from 1/2000 * to 2 s (when the sensitivity is set to 800 ISO), t 1/2000 * up to 1 s (at a sensitivity setting of 1600 ISO, as well as at “Auto” and “Auto with fixed range” settings in “P”, “S” or “A” modes), from 1 / 2000 * up to 1/2 s (at a sensitivity setting of 3200 ISO or Hi 1 units), from 1/4000 to 1/125 s (“Continuous B”: 120 frames per second), from 1/4000 to 1/60 s ( “Continuous B”: 60 frames per second) * - When setting the f / 1.8 aperture value (maximum aperture), the fastest shutter speed is 1/1600 second. If the aperture value is set to f / 8 and the zoom is at the maximum wide-angle position or moves one step to the telescopic position, the shortest shutter speed is 1/1600 seconds (except for the “S” and “M” modes). | From 1/4000 ** to 1 s, from 1/4000 ** to 60 s (when setting ISO sensitivity from 80 to 400 in “M” mode) ** - If the aperture value is set to f / 4.5 - f / 8 (wide-angle position) or f / 7.1 - f / 8 (telescopic lens position) |
| Diaphragm | Six-petal iris diaphragm with electronic control | 7-blade iris diaphragm with electronic control |
| Aperture range | 14 steps 1/3 EV (W) (modes "A", "M") | 13 steps 1/3 EV (W) (modes "A", "M") |
| Self-timer | The ability to select values in 10 s and 2 s | Ability to select values in 1, 2 or 10 seconds |
| Shooting distance with built-in flash (approx. ISO sensitivity): “Auto”) | [W]: 0.5 to 6.5 m; [T]: 0.5 to 2.5 m | [W]: 0.5–10 m, [T]: 0.5–5.5 m |
| Flash control | TTL auto flash mode with test preflash | TTL auto flash with test preflash and manual flash |
| Accessory shoe | not | ISO 518 “hot shoe” with connector, sync contact, as well as a data contact and safety lock |
| Nikon Creative Lighting System | not | I-TTL flash control support in conjunction with Nikon's creative lighting system flashlights (in the spot metering mode, only standard i-TTL flash control is supported). Supported information on the color temperature of the flash. Improved wireless control is supported when the SB-910, SB-900, SB-800 or SB-700 is set as the main flash or when the SU-800 is set to control mode (the remote flash setting applies only to group A). Improved wireless control is supported when the built-in flash is set to control mode (applies only to group A and is fixed at 3 CH). |
| Interface | High Speed USB | High Speed USB |
| Data transfer protocol | MTP, PTP | MTP, PTP |
| Video output | NTSC or PAL | NTSC or PAL |
| HDMI output | The set of values available is Automatic, 480p, 720p, and 1080i | The set of values available is Automatic, 480p, 720p, and 1080i |
| I / O connectors | Audio / video output; digital input / output (USB); HDMI mini connector (type C) (HDMI output) | Audio / video output; digital input-output (USB), HDMI mini connector (type C) (HDMI output), connector for an external microphone (stereo mini-connector (3.5 mm diameter), power is supported when connected), connector for accessories |
| Power sources | One EN-EL12 lithium-ion rechargeable battery (included), EH-62F AC adapter (optional) Charging time: approx. 4 hours (when using the Charging AC Adapter EH-69P when the camera is fully discharged) | one EN-EL14 lithium-ion rechargeable battery (included), an EH-5b power adapter (used with EP-5A power connector) (sold separately) |
| Battery life | Snapshots: Approx. 230 shots, based on the CIPA standard for measuring battery life. Videos: Approx. 1 h 5 min (HD 1080p (high quality) (1920 x 1080)) | Pictures: Approx. 330 shots using EN-EL14, based on CIPA (Camera and Imaging Products Association) standards. Video recording (actual battery life when recording): Approx. 1 h 10 min when using EN-EL14. The maximum file size and maximum recording time for a single video clip are 4 GB and 29 minutes respectively, even if there is enough free space on the memory card. When the camera heats up, video recording may stop before these limits are reached. |
| Tripod jack | 1/4 (ISO 1222) | 1/4 (ISO 1222) |
| Dimensions (W x H x D) | Approx. 103.0 x 58.3 x 32.0 mm (without protruding parts) | Approx. 118.5 x 72.5 x 50.4 mm (without protruding parts) |
| Weight | Approx. 194 g (including battery and SD card) | Approx. 392 g (including battery and SD card) |
| Temperature mode | 0 ° C to 40 ° C | 0 ° C to 40 ° C |
| Permissible humidity | Less than 85% (non-condensing) | Not more than 85% (non-condensing) |
| Accessories included | Camera strap, rechargeable Li-ion Battery EN-EL12 (with protective cover), EH-69P Mains Charger, UC-E6 USB cable, EG-CP16 audio / video cable, ViewNX 2 installation CD, CD with detailed user manual | Camera strap, LC-CP26 lens cap (attached to the camera body), EN-EL14 rechargeable Li-ion battery (with protective cover), MH-24 charger, UC-E17 USB cable, EG-CP16 audio / video cable, ViewNX 2 installation CD, detailed user manual CD |
| Optional accessories | Battery Charger MH-65, AC Adapter EH-62F | Screw-on filter 40.5 NC with diameter 40.5 mm, Lens hood HN-CP17, power connector EP-5A, AC adapter EH-5b, hand strap AH-CP1, stereo microphone ME-1, remote controller ML-L3, cable remote control MC-DC2, GPS device GP-1, SB-910, SB-700, SB-400 |
Further information on the Nikon COOLPIX P310 and Nikon COOLPIX P7700 models can be found on the official website.
Photos of Nikon COOLPIX P310 and Nikon COOLPIX P7700 cameras in different angles see below.

Front view: COOLPIX P310 , COOLPIX P7700
Nikon COOLPIX P310 and Nikon COOLPIX 7700 cameras are equipped with high-aperture lenses, which make it possible to take high-quality images in a variety of lighting conditions. The younger model is equipped with a NIKKOR lens with 4.2x optical zoom, the Nikon COOLPIX 7700 is equipped with a NIKKOR lens with 7.1x optical zoom. A wide range of available shutter speeds and apertures (COOLPIX P310: f / 1.8–4.9, COOLPIX P7700: f / 2–4) makes it possible to get clear photos with good color reproduction.
On the front panel of the Nikon COOLPIX P7700, there is a wheel for controlling the diaphragm, with the camera gripping, the index finger exactly lies on this ribbed control element.
To the right of the camera lens at the bottom of the front panel of both cameras are additional device control buttons (Fn - on the COOLPIX P310, Fn1 - on the COOLPIX P7700). During my experiments with the cameras in question, I did not use these buttons, but while working on this review, I decided to still see what they were for.
Learn more about the Fn and Fn1 buttons in the COOLPIX P310 and COOLPIX P7700 cameras
Fn Nikon COOLPIX P310 .
: , B, H, . , B: 120 /, B: 60 /, BSS, 16, . (30s, 1m, 5m, 10m).
, Fn.
COOLPIX P7700 , Fn1 , .
: , B, H, . , B: 120 /, B: 60 /, BSS, 16, . (30s, 1m, 5m, 10m).
, Fn.
COOLPIX P7700 , Fn1 , .

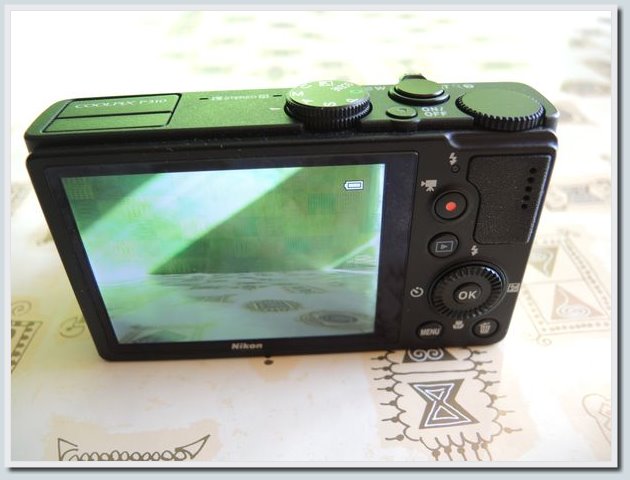
Rear view: COOLPIX P310 , COOLPIX P7700
On the back panel of the Nikon COOLPIX P310 you will find a non-rotatable contrast screen with a wide viewing angle, a button for recording video (setting video options: MENU -) go to the left panel -) choosing a video camera icon -) Options video), a button to switch from the snapshot mode to the photo view mode, the rotary multi selector, the MENU button and the button to delete pictures in the photo view mode.
Read more about the multi-selector features of the COOLPIX P310
:
, «», .
- ( «» ; 2 10 , );
- : , , , ( «» );
- ( , «» ; : , « », , , , ).
, «», .
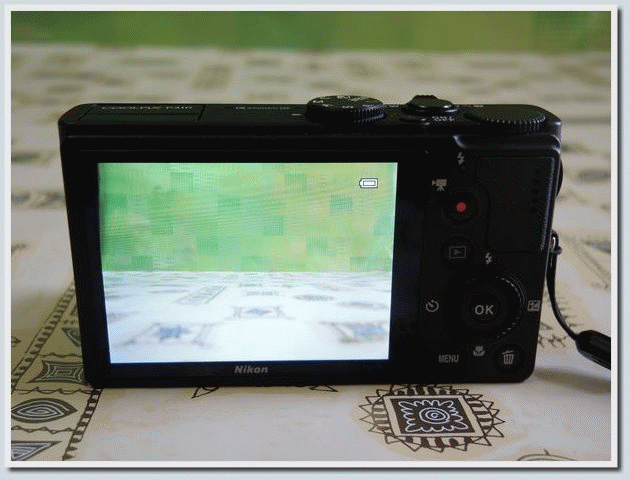
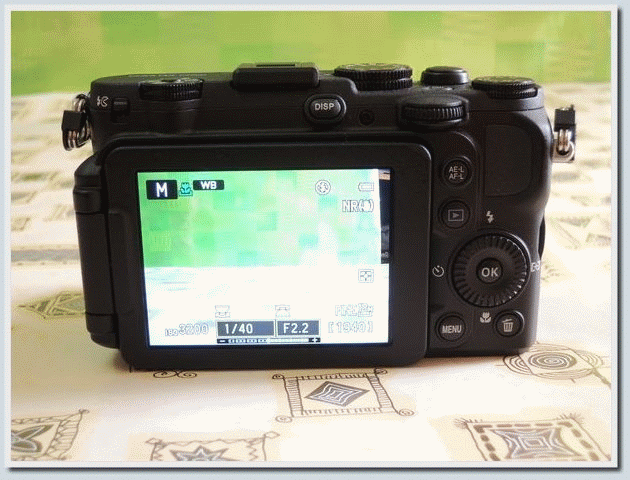
On the back of the Nikon COOLPIX P7700, you will find a contrasting swivel screen with a wide viewing angle, a flash opener switch, a DISP button (changes the way information is displayed on the screen), a shutter speed dial (for thumb), an exposure lock / focus lock switch ( AE-L / AF-L), button to switch from picture taking mode to photo view mode, rotary multi selector, MENU button and button to delete pictures in photo view mode.
Read more about the multi-selector features of the COOLPIX P7700
:

- «» — ( 1, 2 10), ( , 1 , 2 10 );
- «» — ( : , , , , );
- «» — : , , , (), (), , ;
- «» — , : , « », , ( 5 : Full, 1/2, 1/4, 1/8, 1/16), , , .
Optical viewfinder in Nikon COOLPIX P7700 and Nikon COOLPIX P310 models no. Right view: COOLPIX P310 , COOLPIX P7700
On the right panel of the Nikon COOLPIX P310 you will find the HDMI connector. In the case of the Nikon COOLPIX P7700, there are HDMI and USB / AV connectors on the right, covered with a plastic door.
On the left panel of the COOLPIX P310, there is a lever on top to open the flash. On the left panel of the COOLPIX P7700 you will find a connector for connecting an external microphone, as well as a jack for connecting an external GPS receiver.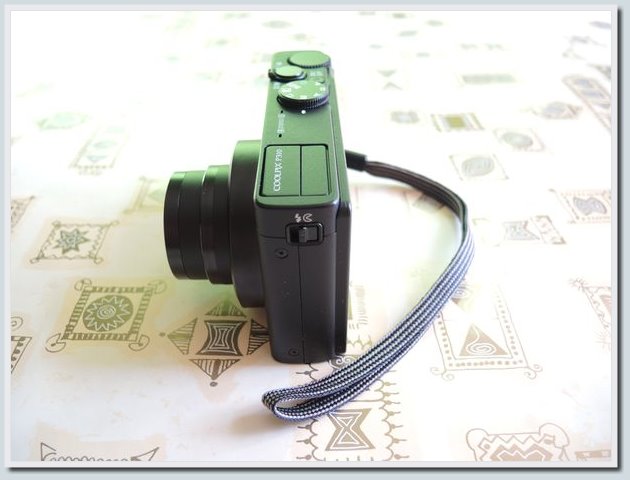


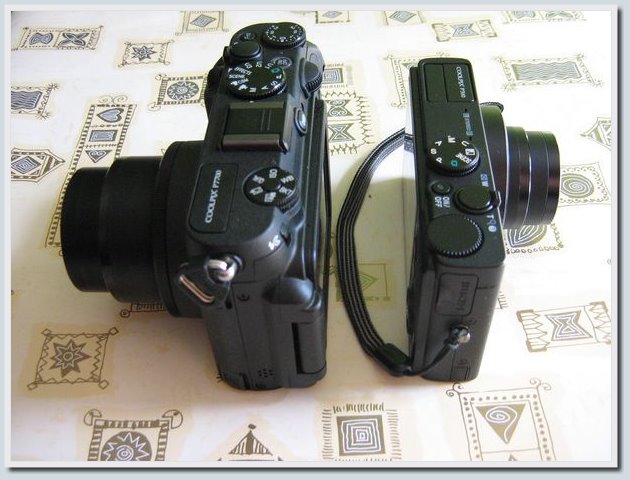
Left side view: COOLPIX P310 , COOLPIX P7700 The top panel of the Nikon COOLPIX P310 contains the following elements: a flash pop-up flash, a shooting mode dial, a device power button, a shutter speed adjustment knob and a shutter combined with a zoom control.
Nikon COOLPIX P310 - top view
, :
M , A , S , .. P , , / , , U .
, :
M , A , S , .. P , , / , , U .
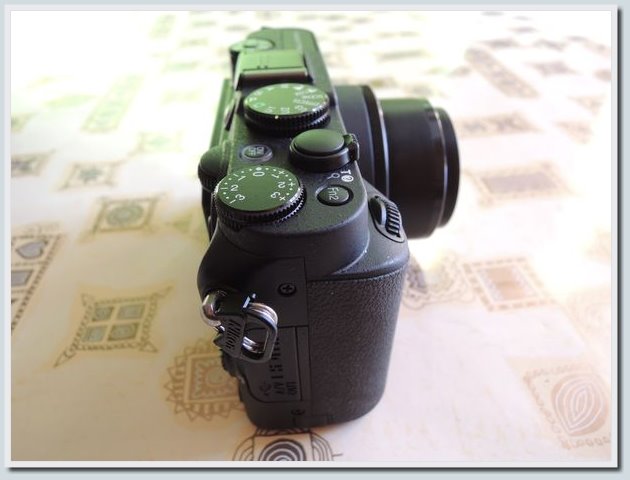
The top panel of the Nikon COOLPIX P7700 contains the following elements: a pop-up flash, a quick access disk for settings, a hot shoe for connecting a flash, a dial for shooting modes, a device power button, a wheel for manual exposure compensation, a second Fn2 programmable button and a shutter, combined with a zoom lever.
Nikon COOLPIX P7700 - top view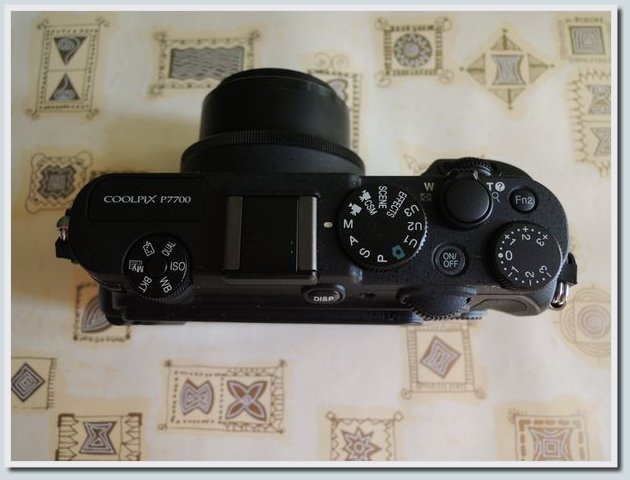
, : M , , , / , , 3 U1 , U2 U3 , , .. P , S , A .
, « », ( QUAL ), ( ISO ), ( WB ), .
, : M , , , / , , 3 U1 , U2 U3 , , .. P , S , A .
, « », ( QUAL ), ( ISO ), ( WB ), .

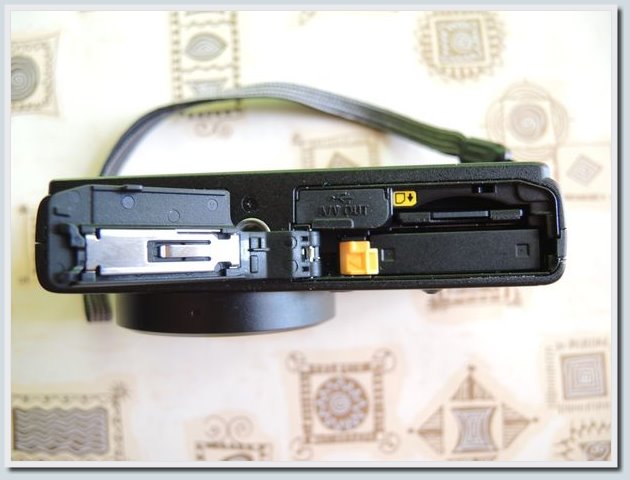
Bottom view: COOLPIX P310 , COOLPIX P7700
The bottom panel of the COOLPIX P310 and COOLPIX P7700 cameras contain compartments for the battery and memory card, as well as a tripod socket (ISO 1222). The younger model on the bottom panel in addition to this, has a universal microUSB connector, designed to connect the AV- and data-cable, through which the battery is also charged.
Look at the cameras Nikon COOLPIX P310 and Nikon COOLPIX in different angles, you can also, revealing spoilers:
The exterior of the camera Nikon COOLPIX P310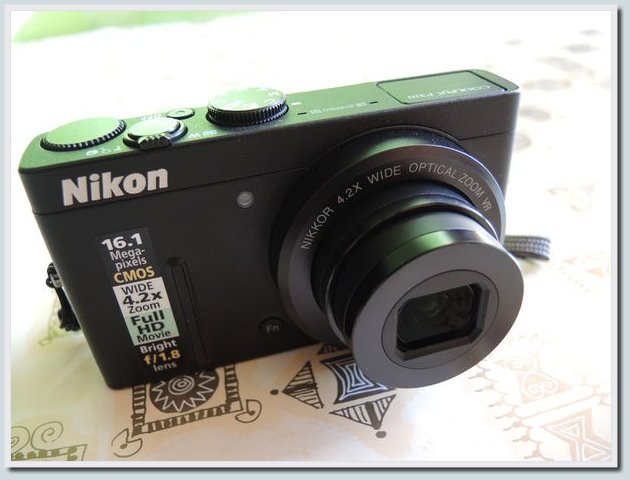
The exterior of the camera Nikon COOLPIX P7700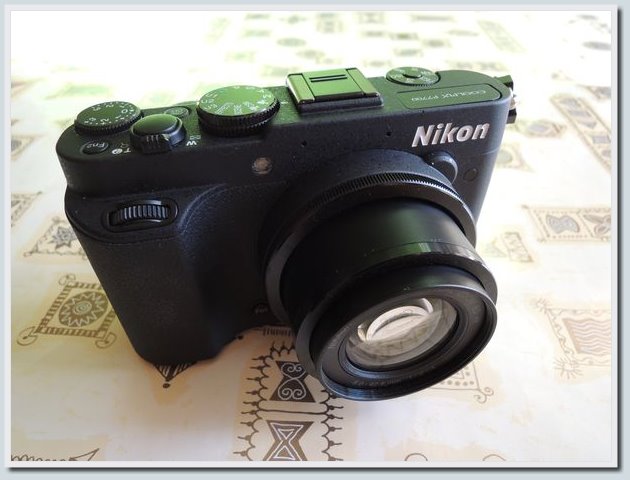


Also, these photos can be viewed in a folder on Dropbox .
Nikon COOLPIX P310 and Nikon COOLPIX P7700 - manual shooting mode
Both cameras give you the opportunity to photograph in several automatic modes, there is also a large set of pre-set scene modes, but personally it was most interesting for me to photograph manually.
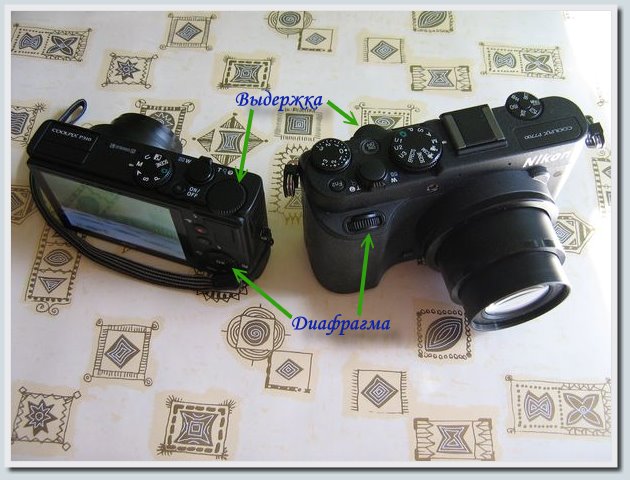
When photographing in manual shooting mode, the parameters that have to be changed most often are the shutter speed and the aperture size. In both considered camera models, these parameters are controlled by two wheels.
In the case of the Nikon COOLPIX P7700, the wheels for adjusting the shutter speed and aperture are placed on the back and front panel of the camera, made very convenient (control of the exposure with the thumb of the right hand, exposure control - index):

In the case of the Nikon COOLPIX P310, the aperture in shooting mode can be changed using the multi selector wheel, the shutter speed is adjusted with the dial on the top panel. It is most convenient to change both parameters with the thumb of the right hand. Such important options as a timer (and remote control for the COOLPIX P7700), focusing method and flash control in both models are placed on a circular multi selector located on the back of the camera, to the right of the screen. I have already listed the list of available options for these parameters above under the spoiler. For clarity, I made a slideshow in which I showed the possibilities that the multi-selector wheel and joystick on the back of the camera provide to the user: Nikon COOLPIX P310 , Nikon COOLPIX P7700 .

In the COOLPIX P7700, you can also select the appropriate autofocus zone mode (for the COOLPIX 310, changing this parameter is only possible through the menu).
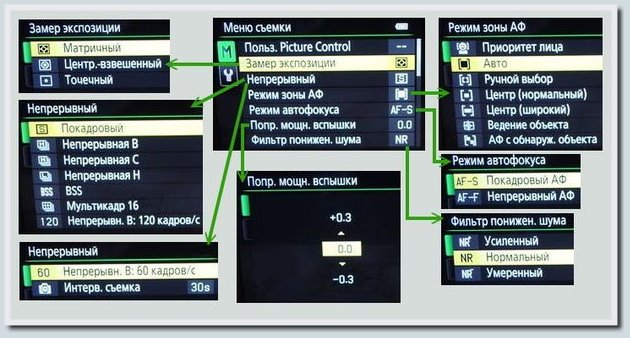
The list of settings of the COOLPIX P310 and COOLPIX P7700 cameras, which can be accessed by pressing the MENU button on the back of the camera, will be shown below as a slideshow. Before that, I wanted to show you some of the options of the COOLPIX P7700, which can be accessed much faster than through the menu thanks to the additional disk manipulator on the top panel of the camera.

QUAL - here it is interesting to look at the available resolution images. The number of pictures with the selected parameters is displayed in square brackets, with enough free space on the flash drive.
With the Nikon COOLPIX P7700, you can save images in RAW format . You can also adjust the ISO
sensitivity of the Nikon COOLPIX P7700 using the additional control dial located on the top of the camera. Available ISO values are from 80 to 3200, there is also an option Hi1 (equivalent to ISO 6400). You can also adjust the white balance ( WB ) on the COOLPIX P7700 using this disk manipulator, the available options are listed below in the form of a slideshow: You can see other settings available for manual shooting using the menu by opening the spoilers:

Nikon COOLPIX P310 - camera settings available through the menu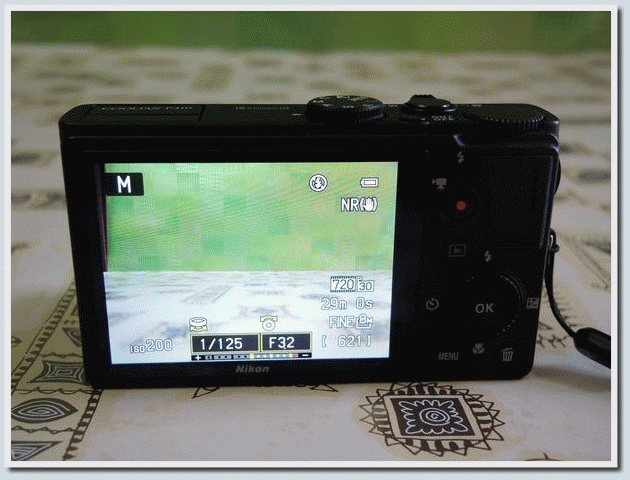
- , :

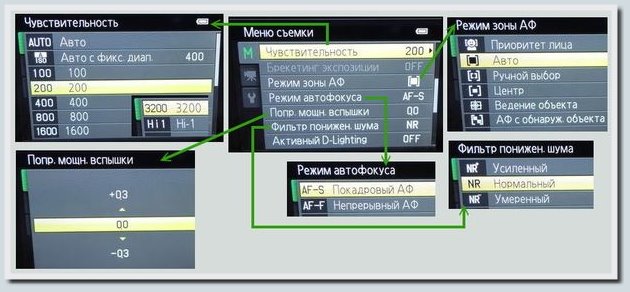

, , ( ):
- , :
, , ( ):
Nikon COOLPIX P7700 - ,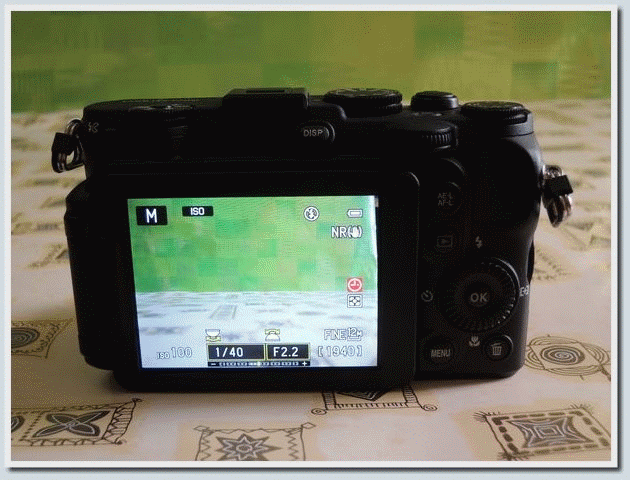
. , , , , .
Nikon COOLPIX P7700 ( ) -:

COOLPIX P310, Nikon COOLPIX P7700 , . ( QUAL ), ( ISO ), ( WB ), , . , , .
, , :
. , , , , .
Nikon COOLPIX P7700 ( ) -:
COOLPIX P310, Nikon COOLPIX P7700 , . ( QUAL ), ( ISO ), ( WB ), , . , , .
, , :
Below are the photos of birds taken by Nikon COOLPIX P310 and Nikon COOLPIX P7700 cameras. With the maximum use of the optical zoom capabilities, in addition to the birds themselves, less interesting objects also fell into the frame, which I would like to lower, fully focusing on the birds. Therefore, many of those photos that I will give below are rectangular fragments of those pictures that I took with the help of the cameras described in this topic. I was advised to apply autofocus and autoton to some photos, but after thinking about it, I decided to leave it as it was (without editing).
To begin, let me show you a photo showing the approximate height of snow that fell in Kiev in March of this year:

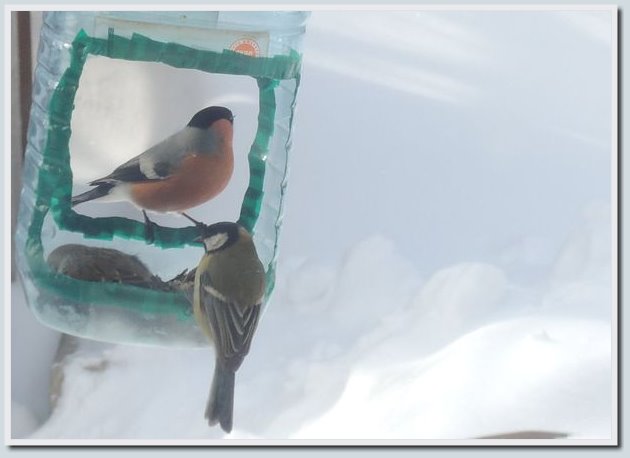
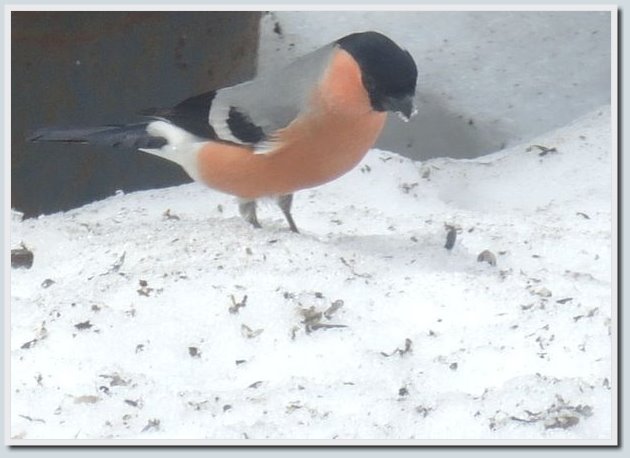
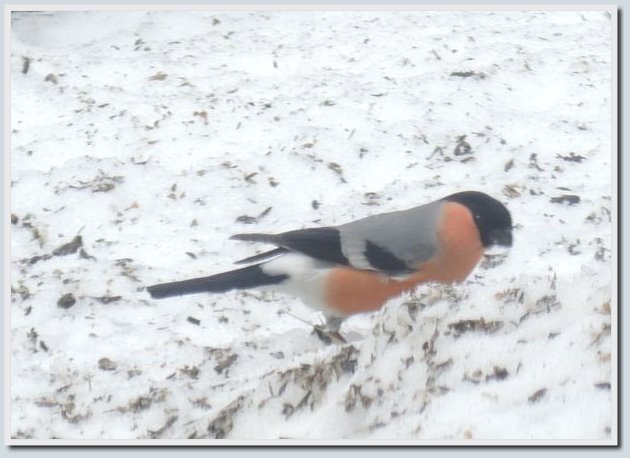
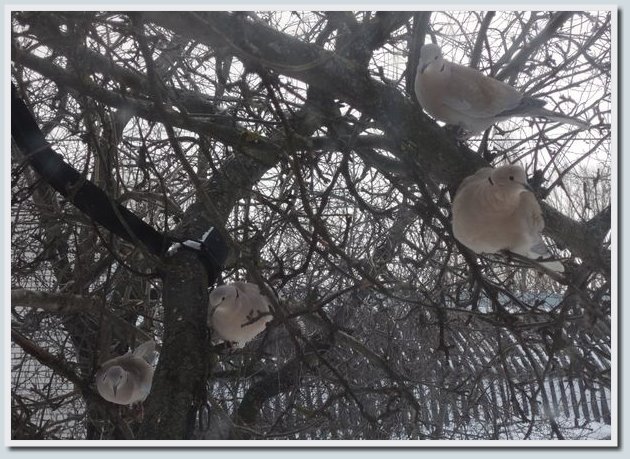
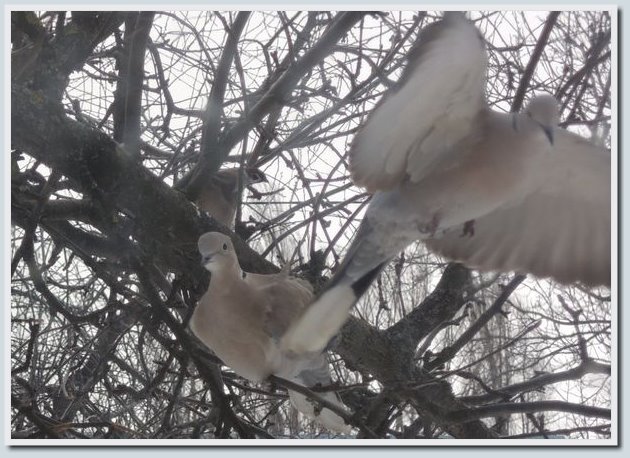
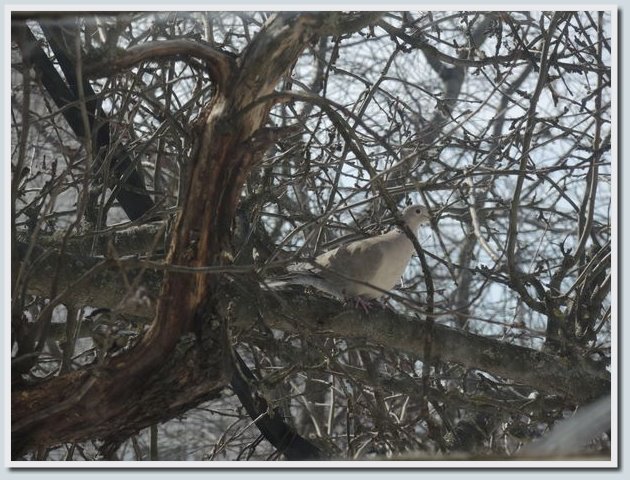
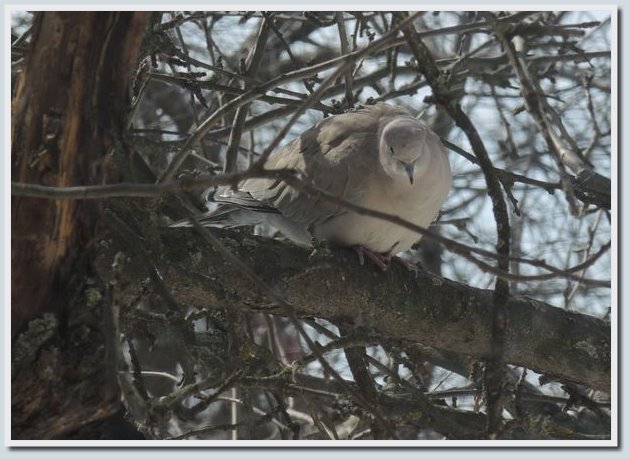
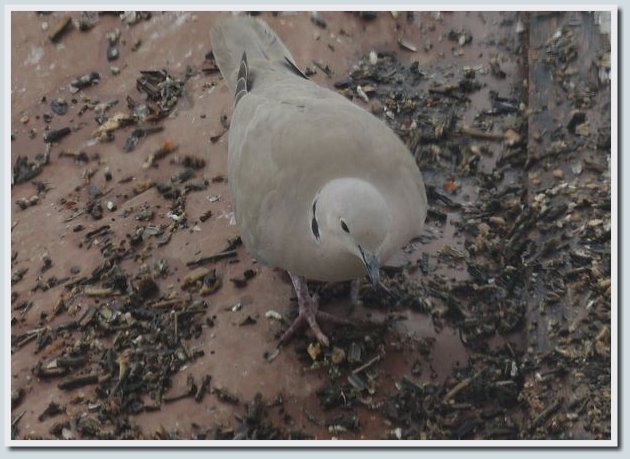
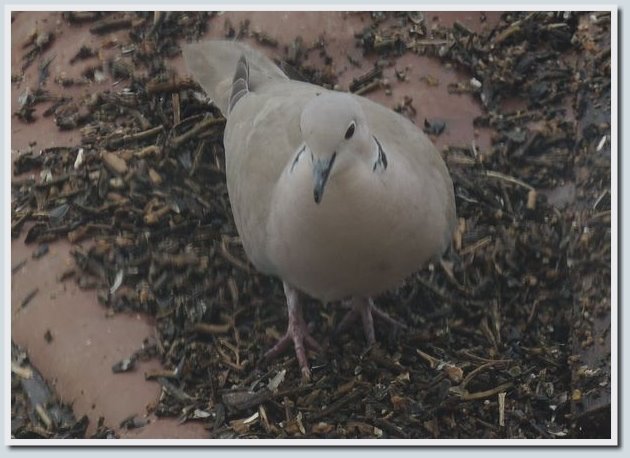
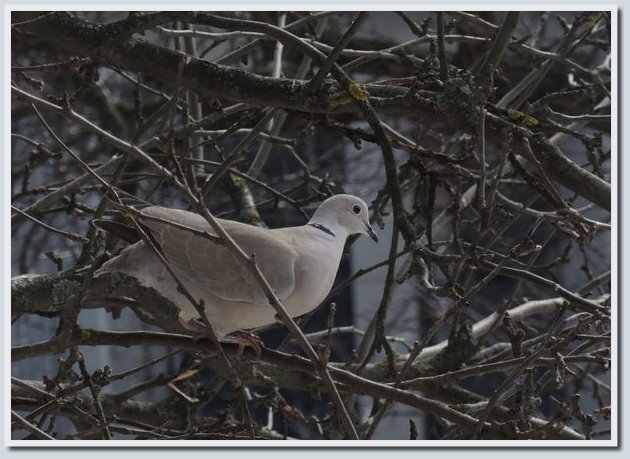
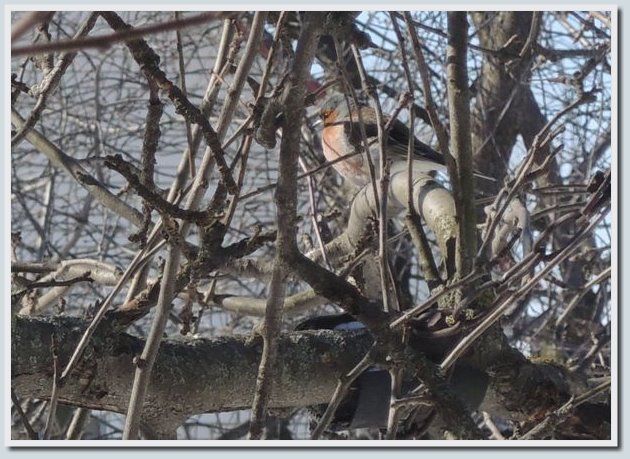
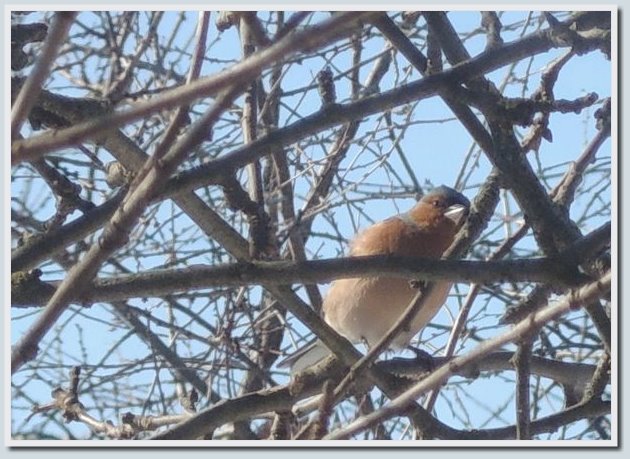
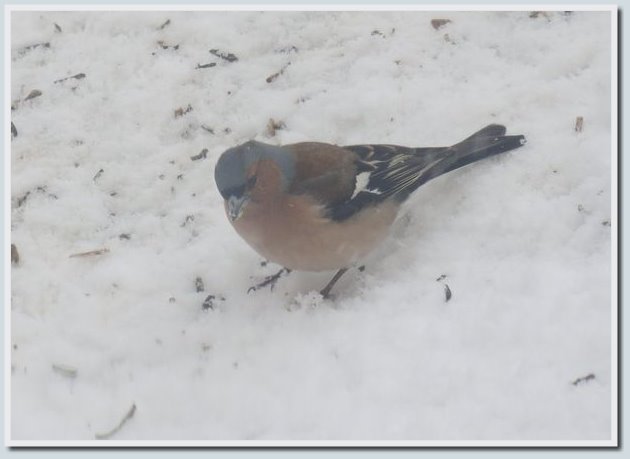
In such a bad weather to the trough, which can be seen from my window, various kinds of birds flew. It was possible to recognize not all birds, but tits , sparrows, ringed turtle doves , finches and bullfinches were exactly. I managed to capture some birds, here are the photos below.

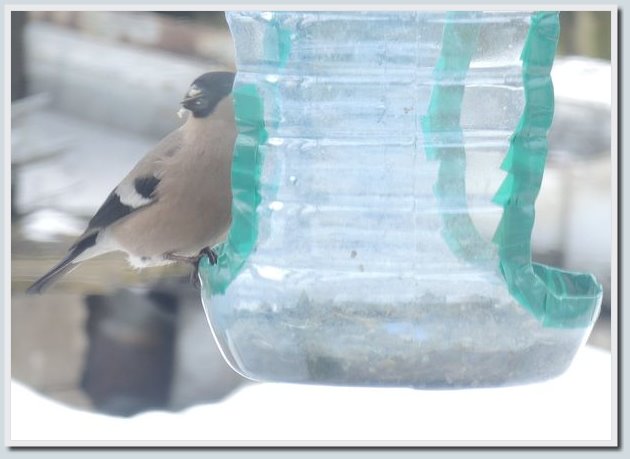

Ringed Dove:
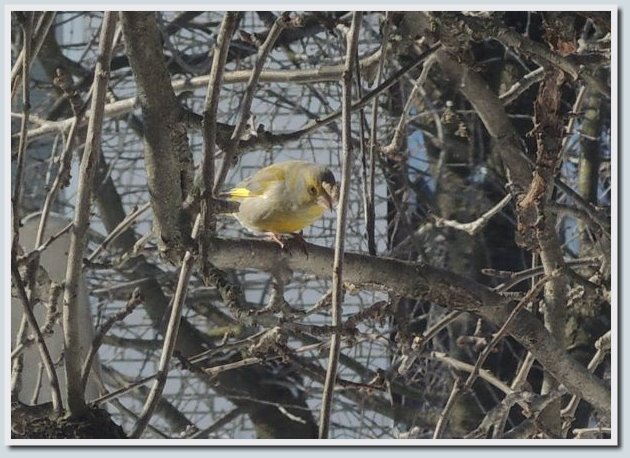
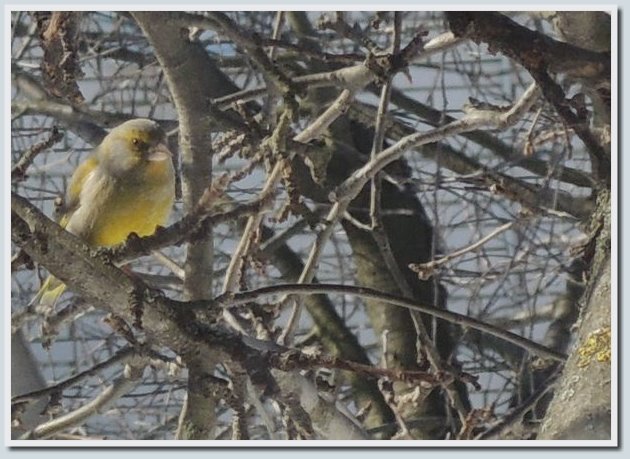
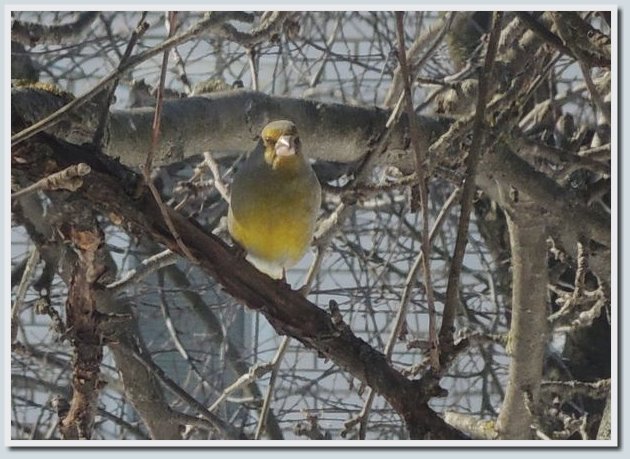
Zelenushka ordinary:
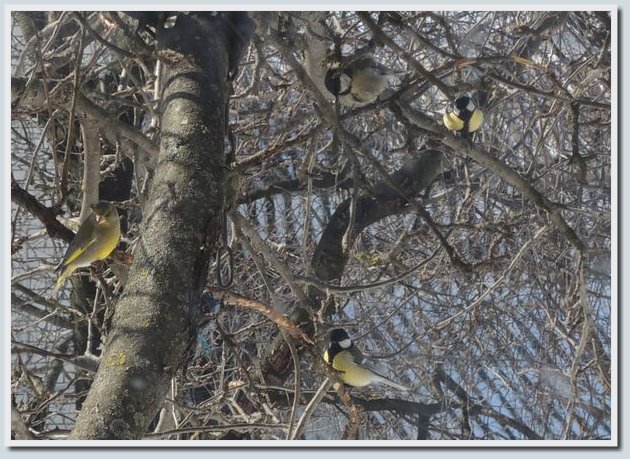


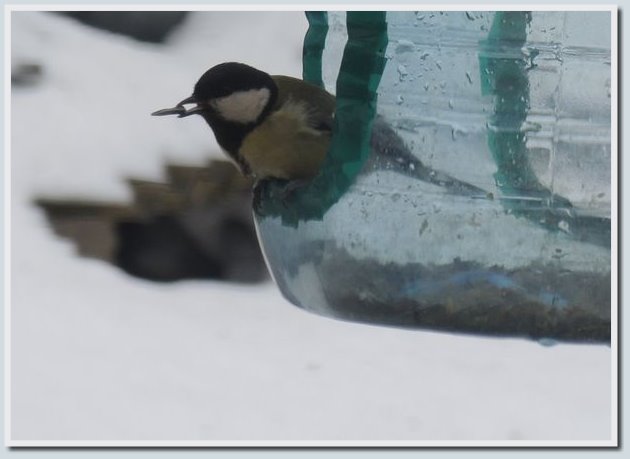
Great Tit:


Finch:


More photos of birds taken with Nikon COOLPIX P310 and Nikon COOLPIX P7700 cameras can be found in the album on Dropbox .
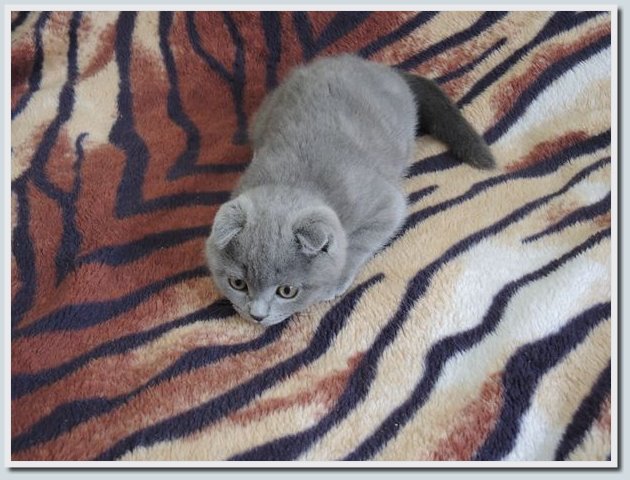
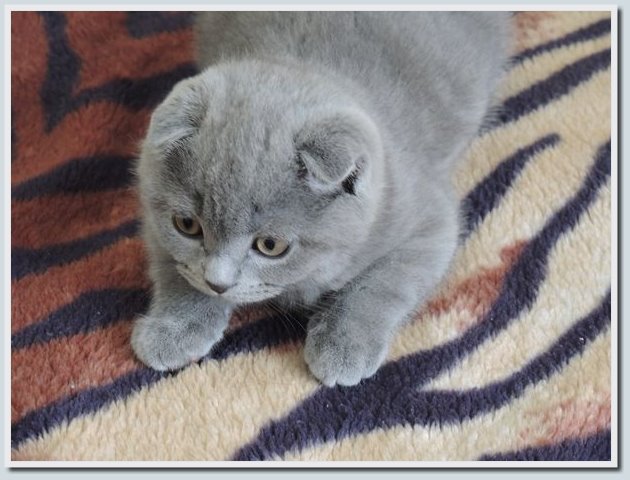
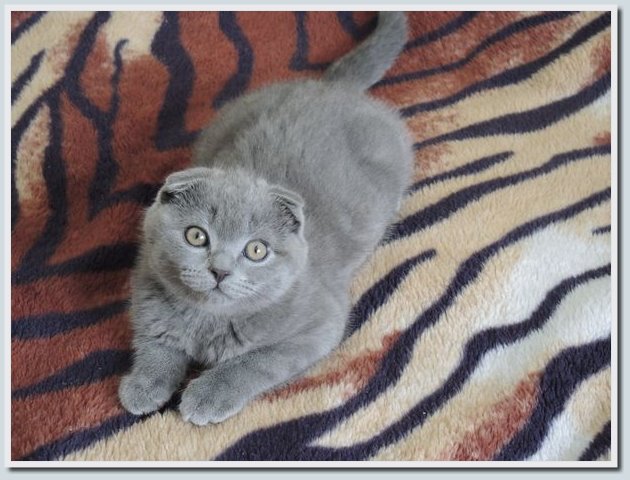
Also, as examples of pictures taken with the help of Nikon COOLPIX P7700, I want to give photos of a young cat Maximilian, who recently settled with my friend. Photos of the kitten uploaded to the dropbox, if you wish, you can see them in this album .
Maximilian the Cat:

More photos under the spoiler

In addition to the photos of the birds and the kitten, the quality of the pictures taken by the COOLPIX P310 and P7700 cameras can be seen from the photographs of the devices in this review (I hid a lot under the spoilers; those photos that captured 2 devices at the same time, made an old soap box, pictures, where only one of the cameras is presented was doing the second test camera from the Performance series).
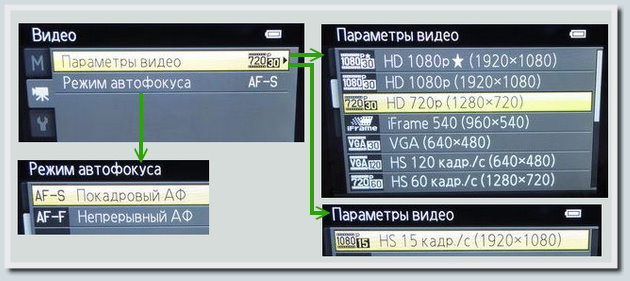
Video shooting
Nikon COOLPIX P310 and Nikon COOLPIX P7700 cameras have the ability to shoot video as FULL HD (1920 x 1080, 1080p), but I personally have 720p (1280 x 720) for comfortable viewing on a 23 inch monitor with a head.
Since the birds often visited the trough in the cool-snowy March, I decided to test the possibilities of shooting video on test cameras. To do this, I took the Slik Sprint Pro II 3 Way tripod for a while (I will briefly describe the tripod photos and my impressions of working with it below), set up a camera on it and started shooting.
I didn’t have enough COOLPIX P310 4x optical zoom to close up the birds, but the test video I shot from this camera (both in 1080p and 720p) was quite decent quality. But the 7-fold optical zoom of the older model Nikon COOLPIX P7700 turned out to be very useful, thanks to which I captured more than 3 hours of video on birds with this camera. In both cameras there is a limit on video shooting - 29 minutes, so most of the commercials that I shot for 25-27 minutes.
Having selected the most interesting moments, I edited a short 7-minute video that I bring to your attention to assess the quality of the video captured with the Nikon COOLPIX P7700:
I recommend to watch in full screen at a sufficient volume level.
When the video was mounted, the task was to extract the video track from the MOV container and place the same track in the MPEG-4 media container (the program in which it mounted the video did not support files with the .mov extension). The Avidemux program did an excellent job with this task.
Four models of the Performance series of cameras passed through my hands: the COOLPIX P300, the COOLPIX P310, the COOLPIX P7100 (I even made a couple of video additions to the reviews of the Kindle and Nook Simple Touch readers) and the COOLPIX P7700 with this camera. Did not record video only with the COOLPIX P300. The remaining 3 models when recording video save the footage to files with the extension .mov.
I thought maybe someone for editing the video, captured using one of the cameras described in this review, can be useful information about how you can quickly transfer the video from the MOV container to MPEG-4 (.mov -) .mp4). Who cares, the information below under the spoiler.
MOV to MPEG-4 with Avidemux
Moving video from .mov to .mp4 entirely:
Launch the Avidemux program -) open the video file with the extension .mov ( File -) Open ) -) on the Output Format switch select the MP4 Muxer option -) save the video in a new file by selecting its location and specifying the name ( File -) Save )
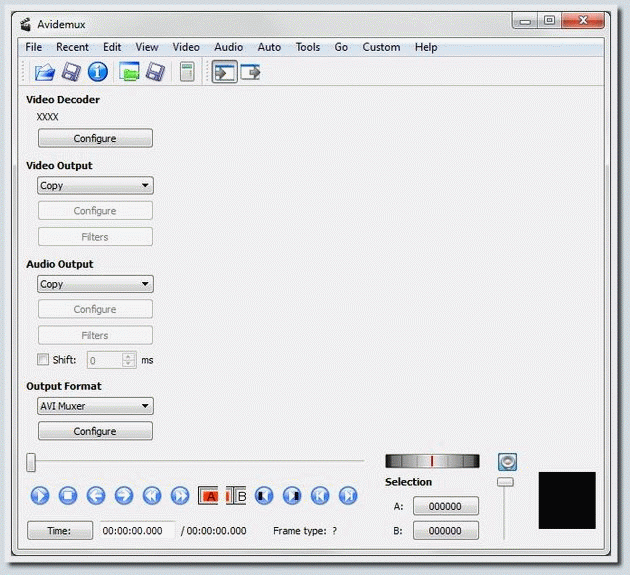
Transfer of a fragment of the .mov video to a separate file with the extension .mp4:
Run the program -) open the video file in .mov format -) drag the slider on the timeline to the starting position of the video fragment you are interested in -) click the button for selecting the beginning of the fragment (on the panel under the 7th time scale on the left) -) drag the slider to the end of the fragment you are interested in video -) press the button for selecting the end of the video fragment (8th left in the bottom panel) -) save the selected fragment ( File -) Save )
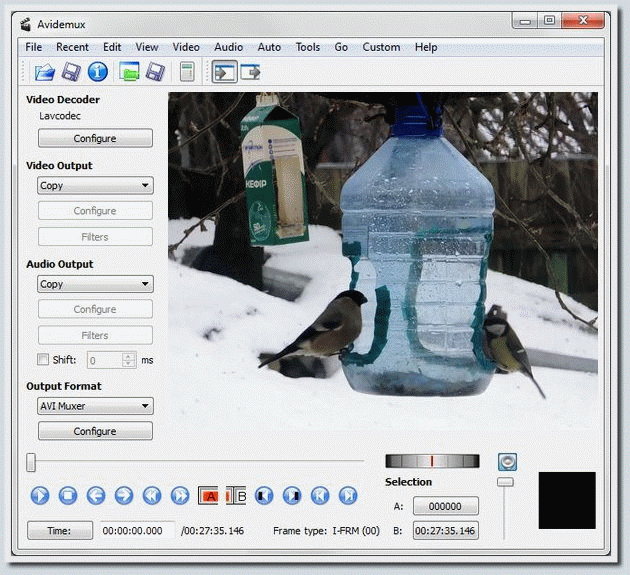
I can not guarantee that this solution is suitable for all cases, but for the cameras I have tested (Nikon COOLPIX P310, Nikon COOLPIX P7100 and Nikon COOLPIX P7700) this method works.
Launch the Avidemux program -) open the video file with the extension .mov ( File -) Open ) -) on the Output Format switch select the MP4 Muxer option -) save the video in a new file by selecting its location and specifying the name ( File -) Save )
Transfer of a fragment of the .mov video to a separate file with the extension .mp4:
Run the program -) open the video file in .mov format -) drag the slider on the timeline to the starting position of the video fragment you are interested in -) click the button for selecting the beginning of the fragment (on the panel under the 7th time scale on the left) -) drag the slider to the end of the fragment you are interested in video -) press the button for selecting the end of the video fragment (8th left in the bottom panel) -) save the selected fragment ( File -) Save )
I can not guarantee that this solution is suitable for all cases, but for the cameras I have tested (Nikon COOLPIX P310, Nikon COOLPIX P7100 and Nikon COOLPIX P7700) this method works.
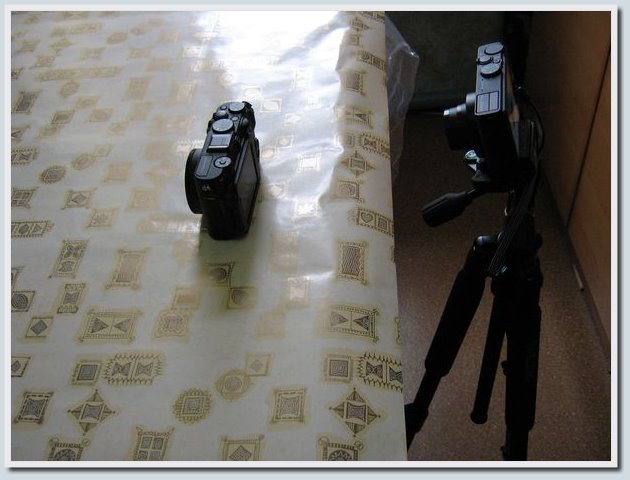
Slik Sprint Pro II 3 Way Tripod, MeiKe MLL3 Remote Control and Lenspen DSLR PRO KIT Cleaning Kit
Experimenting with Nikon COOLPIX P310 and Nikon COOLPIX P7700 cameras, I bought some accessories in addition to cameras (a remote control and a set for cleaning optics), and also took a tripod to be able to shoot video. I decided at the end of the review to talk briefly about them.
I really liked the tripod, a manufacturer from Japan, but the tripods of this model are assembled in Thailand.
The tripod looks like this:

Slik Sprint Pro II 3 Way - some more photos
With this position of the tripod, you can photograph devices for test reviews:


I used the shooting position close to the strictly horizontal one when I took pictures for the slideshow, which showed the interface of the software filling of the camera:
I used the shooting position close to the strictly horizontal one when I took pictures for the slideshow, which showed the interface of the software filling of the camera:
The tripod is very convenient: it is possible to rotate a fixed camera around 3 axes out of the box (you do not need to buy special tripod heads for this purpose), light but at the same time durable and reliable, compact (when folded), in general, I really liked it. In the legs, you can push up to 3 sections, declared a maximum height of 162 cm, designed for cameras weighing up to 2 kilograms. Very practical and useful thing, I appreciated!
I took most of the pictures of the birds from the window, but some of the birds are afraid of people. Turtle doves noticing me near the camera often flew away, I thought that I should try to shoot with the remote (the camera is fixed on a tripod, I am on the side, the shutter is triggered when the button on the remote is pressed). For this purpose, he took the Chinese MeiKe MLL3 console, which coped with the task assigned to it.
This remote looks like this:
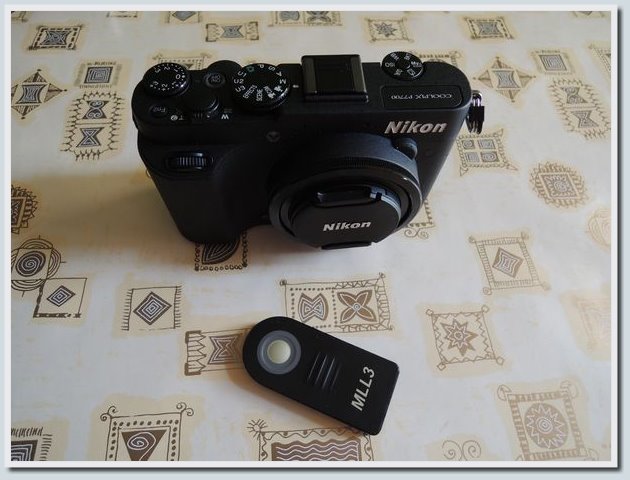
equipment: remote + manual
By inexperience, I took those pictures that I took with a tripod in the auto focus mode. But, I think that it is better to use the focus on the center.
With the Nikon COOLPIX P7700, when using the remote control, you can select the shutter release option from the following options: shutter release by click, 1 second, 2 seconds after pressing, or 10 seconds.
During my experiments with cameras, I accidentally put an imprint on a Nikon COOLPIX P7700 camera lens. It was necessary to clean the lens, which I had not done before. Googling, found information on how to do it better. Choosing a kit for cleaning optics, he stopped at the Lenspen DSLR PRO KIT.

More photos
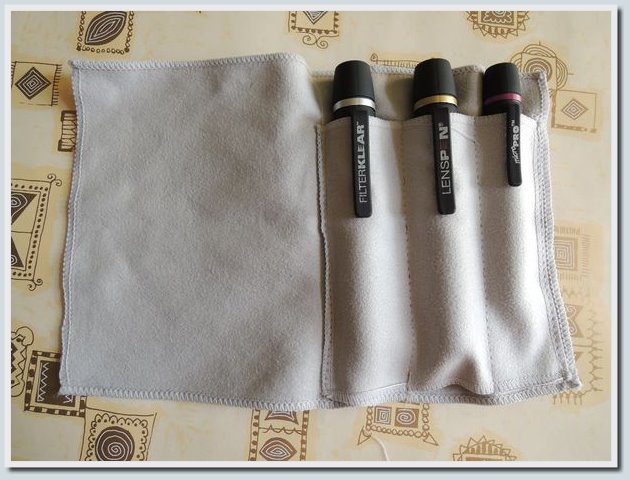
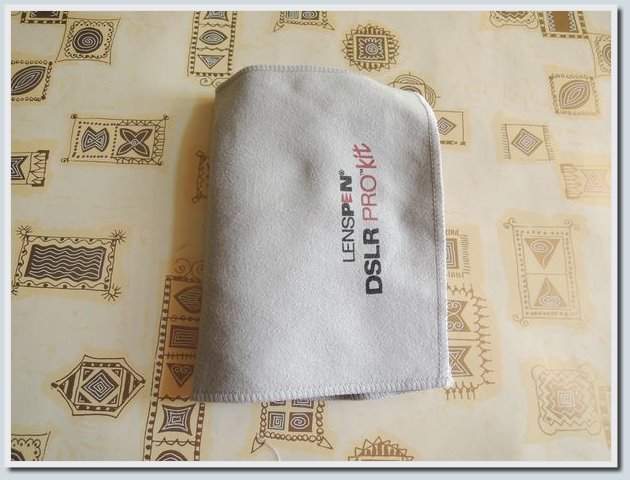
Choosing looking for a cleaning kit that is suitable for both DSLRs and compact cameras.
Stopped on a set of Lenspen, which includes:
- 1 "pencil" for cleaning filters Lenspen Filterklear (diameter cleaning pad - 13 mm);
- 2 “pencils” for cleaning lenses: Lenspen Original (diameter 13 mm) - for cleaning lenses of DSLRs and advanced compacts and Lenspen MicroPro (diameter 4 mm) - for cleaning mini lenses in compact digital cameras, and also for cleaning optical viewfinders in mirrors;
- Microfibre napkin with pockets stitched on it under "pencils" (serves as a "case" - convenient and practical).
I personally cleaned the Nikon COOLPIX P7700 lens with a Lenspen Original “pencil”, and the Nikon COOLPIX P310 lens with a Lenspen MicroPro “pencil”. Convenient and fast, after cleaning the lenses as new.
This is a small review of Nikon’s COOLPIX P310 and Nikon COOLPIX P7700 compact cameras. It is difficult to list the advantages of devices, since there are so many of them. Excellent image quality under different lighting conditions, convenient and thought-out control, the ability to shoot high-quality video in different resolutions up to FULL HD - these are all the strengths of both cameras.
- Nikon COOLPIX P310 is a compact and lightweight camera that fits easily into the inside pocket of your jacket or jacket. The picture quality is excellent; you can adjust shutter speed, aperture, light sensitivity, white balance and a number of other useful parameters when choosing the manual mode. A large number of preset shooting modes are available.
- Nikon COOLPIX P7700 - an advanced compact, providing even more opportunities to experiment with photos and video. Lens with 7.1x optical zoom; high-quality matrix, which in conjunction with the high-aperture lens makes it possible to make high-quality images; the ability to shoot great video; remote control support; the ability to connect an external flash through a hot shoe is an incomplete list of the advantages of this model.
I really liked both cameras, it’s really nice to photograph them! Those who are planning to buy a camera better than cheap soap trays but easier DSLRs, I recommend to pay attention to these models. If you plan to take a photo tightly, these cameras are also good in that the control of these devices is similar to the control of SLRs (it will be easier with time to switch to a more serious camera).
At this point I will put the final point, I hope the review turned out to be interesting and informative.
I am grateful to Nikon Ukraine for providing the Nikon COOLPIX P310 and Nikon COOLPIX P7700 cameras , as well as to the PROPHOTO company, which provided an excellent Slik Sprint Pro II 3 Way tripod, which was very helpful in videotaping birds.
Thank you all for your attention, good pictures and great mood!
Source: https://habr.com/ru/post/175971/
All Articles