Centralized configuration of the lock screen and operating system power plan
 One of the possibilities that Microsoft's latest client operating system is famous for is the ability to customize the background of the computer’s lock screen, which was so lacking in previous operating systems, due to which users had to invent various tweaks and, in most cases, use third-party software products, which, by the way, could even harm the user's workplace. I think many people remember that if you don’t want to use any third-party software, you had to make changes to the OEMBackground and UseOEMBackground registry settings in the same Windows 7, create images with certain screen resolutions and certain names, and put them in the folder C: \ Windows \ System32 \ oobe \ info \ backgrounds . In short, a very tedious procedure for some trifles, without which, by and large, you could live.
Actually, now in Windows 8 it can be much easier to change the screen images of the system lock, and this can be done, roughly speaking, by any user, including those who are afraid even to approach computers. That is, to do this, on the same initial screen, click on the “Change avatar” link, and then in the “Lock screen” group the required picture is indicated. In other words, 4 clicks, not counting the search for the picture itself. Well, nowhere is easier. But, again, even here there is one small limitation. By default, the operating system displays the lock screen for only 1 minute, and then the screen goes blank, and it doesn’t matter if you are working on battery power or on mains. And, unfortunately, by default it is simply impossible to find any options that remove this restriction.
Here, naturally, the following question may arise: “Can I somehow remove this restriction and add an option to the GUI?”. This is what we are going to do in this article. But to make it all the more interesting, we will do everything centralized for each user, that is, using group policy. Well, let's get started.
Due to the fact that the solution of the task will be carried out by means of group policy, you can also make the picture set for the user on his own.
So, further on the program:
- Setting the lock screen image;
- Detection of the parameter responsible for the waiting time before the lock screen is turned off;
- Setting such a parameter;
- Testing the results.
We will begin now in order, namely with
Picture Lock Screen Settings
Naturally, now the user interface, that is, the four clicks that I mentioned in the introduction, is not very interesting, which means that we will change the image itself using means of group policy functionality.
In the latest client and server operating systems from Microsoft, of course, there are new policy settings in the administrative templates used only for the latest functionality, and one of these parameters is the parameter responsible for the use of a customized lock screen image. What should be done for this? Now to perform such a change, perform the following actions:
- In the Group Policy Management snap- in, you need to create a new or select an existing group policy object, associate it with the department in which your target computers belong, and then open the Group Policy Management Editor for it;
- In the displayed snap-in, go to Computer Configuration \ Policies \ Administrative Templates \ Control Panel \ Personalization ( Computer Configuration \ Policies \ Administrative Templates \ Control Panel \ Personalization ) and select the " Use a special default lock screen image " policy option ( Force a specific default lock screen image );
- Now, in the displayed dialog box, it remains only to set the switch to the “Enabled” option, and then in the corresponding text field you will need to specify the local or UNC path to the desired image.
At this stage, since each user will definitely not have the same required images in a specific folder, you can choose one of the following two options:- You can specify a UNC path for an image that is located, say, on a dedicated file server, and user computers will load it when executing a group policy;
- It is possible by means of Group Policy preferences to copy once a specific image into the image library of users who have Windows 8 operating system installed, and already use the local file path in the corresponding text field.
Since the article will still consider many different nuances, we will focus on the first version with a UNC path. For example, as seen in the following illustration, this will be the path \\ SERVER02 \ Img \ LockScrn \ IM3.jpg:
Fig. 1. Dialog box of the policy parameter responsible for the lock screen images
In principle, this phase comes to an end. That is, immediately after the user's computer restarts, a new image will appear on its lock screen.
Finding the parameter that is responsible for the wait time before the lock screen turns off
 First of all, if you were unable to find the required policy setting among the available administrative templates, you should try to find a suitable setting in the system registry of the operating system, allowing you to change a specific component of the system on your computer. How is this usually done? Naturally, for the organization of such a task should be some monitoring of the registry when changing such a parameter. That is, for example, the same Mark Roussinovich Process Monitor utility is taken, filtering is configured to display the required records, for example, in most cases these will be RegCreateKey and RegSetValue operations for a specific PID or process name. In some cases, of course, you want to monitor the operations that allow you to delete specific parameters from registry keys. After that, naturally, among the output information, you will need to localize the required entries in the registry, test the same parameters again, but in the open registry editor, and, in fact, the tweak itself will be almost ready. It will only remain in some way to extend such a parameter to your users or to their computers. There are not so many common methods, in fact, three: by creating a reg-file and its distribution by means of entry scripts or autorun, by writing your own, say, custom administrative template, and also by setting the registry preference item directly from Group Policy Management Editor. By the way, in most cases it is advisable to use the last two methods.
However, in this particular case, it is impossible to apply registry monitoring, since the required parameter is simply absent in the graphical interface. It remains only to look for such a parameter in the registry editor manually. At first it may seem that such a task from the category of “Mission Impossible”, but in reality everything turns out to be much simpler.
Look, since it is most logical if the parameter responsible for the waiting time before the lock screen is turned off is in the advanced power options dialog, the parameter that is responsible for the control panel components will change. This parameter should be displayed for any user on the computer, therefore, it will need to be searched in the root section of HKEY_LOCAL_MACHINE. In principle, this already narrows the search range.
We look further. In the HKLM section you can also easily get confused, since there are many sections where our parameter could live. Where to look? We change the parameter from the control panel - so we should look for it in the SYSTEM section. Further, if you start a little researching the contents of the registry of Windows operating systems, then it becomes clear that most of the control panel settings are in the CurrentControlSet \ Control section.
Now, out of the total number of registry keys, we only have up to a thousand sections to search for the desired parameter (s). But it is still a lot, and no one will revise every available section and parameter. But here everything turns out to be simpler than it might seem at first glance. You can find such a section as Power , which is obviously responsible for the power supply parameters. Well, the PowerSettings section is already responsible for the power settings themselves, as you can imagine. Thus, we have already come to a section in which all possible power supply parameters of Windows operating systems are located. It remains the case for small - to find the correct section, and then localize a special parameter.
In the PowerSettings section, each child section, represented in alphanumeric format, is responsible for a group of parameters in the Advanced Power Options dialog box. In other words, we need to try to find the right section. How can this be done? In fact, here, too, everything is very simple. For each child section, you can localize a parameter called Description . Again, if you think a little logical, the parameter responsible for the attenuation of the screen should be in the dialog box in the "Screen" group . So, having localized the section with the description “Video and Display power management settings and configurations”, we can assume that we have found the necessary section. This will be section 7516b95f-f776-4464-8c53-06167f40cc99 .
The last thing left to do is find the section responsible for the required parameter from the screen section. Fortunately, there are only 10 child sections left, and this procedure will not take us long. Here, each section also has Description parameters, where you can find out exactly what the resulting parameter will be responsible for. Take for example the first section, that is, section 17aaa29b-8b43-4b94-aafe-35f64daaf1ee . Using the description of the section, you can immediately understand that this section is responsible for the “Extinguish the screen after” parameter, since the description “Specify how long your computer dims” can be translated as “Specify how long an inactive computer will not be extinguished screen . Here we note that in this section the value of the Attributes parameter is two. The following conclusion can be made: each section for which the value of the Attributes parameter is 0x00000002 is responsible for the parameter that will be displayed in the GUI. Therefore, we need to look for a section for which the value of this parameter will be equal to one.
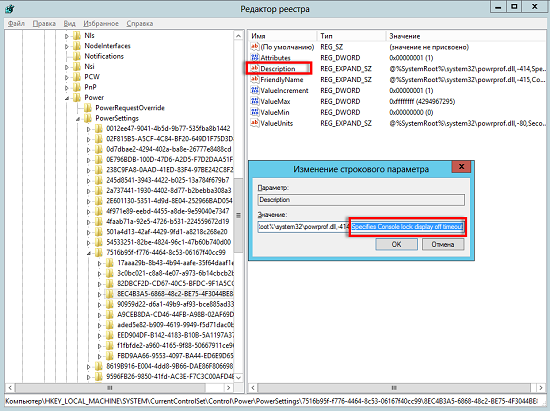
Fig. 2. Required registry key
This is much simpler, since there are only 5 such sections. It turns out that the required section is section 8EC4B3A5-6868-48c2-BE75-4F3044BE88A7 , since its attribute value is 1, and the description is appropriate. Change the value of the Attributes parameter to 2 and check if something has changed in the GUI.
As you can see in the following illustration, a new parameter has appeared in our dialog box, which is called “Waiting time for disabling the console lock screen” . That is, we found the desired section, as well as a variable parameter!
')
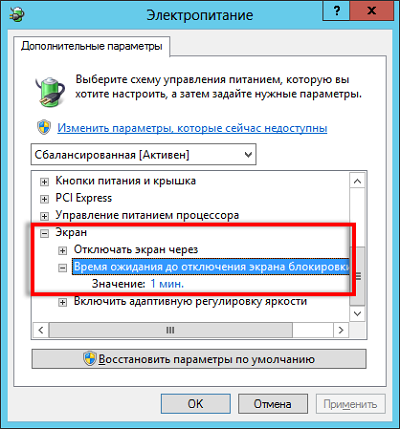
Fig. 3. Advanced power settings dialog with new parameter
It turns out that the required section is HKEY_LOCAL_MACHINE \ SYSTEM \ CurrentControlSet \ Control \ Power \ PowerSettings \ 7516b95f-f776-4464-8c53-06167f40cc99 \ 8EC4B3A5-6868-48c2-BE75-4F3044BE88A7 , and the required parameter is Attributes .
In addition to this parameter, we will also need to predetermine its values for the end user, since it is not a fact that users will look at the power settings at all. It's all just as simple.
In the HKEY_LOCAL_MACHINE \ SYSTEM \ CurrentControlSet \ Control \ Power section, you can localize the child section responsible for setting power plan parameters. This is the \ User \ PowerSchemes section, where you can find several unreadable sections, each of which is responsible for a specific power plan.
For example, in this example, we will work with the “Balanced” power supply plan, for which the child section 381b4222-f694-41f0-9685-ff5bb260df2e is responsible for the parameters.
The structure of this section is as follows: there are child sections with customizable parameters. In other words, if we predetermine the values of the parameter found, then there should be sections 7516b95f-f776-4464-8c53-06167f40cc99 \ 8EC4B3A5-6868-48c2-BE75-4F3044BE88A7 .
Which parameters should be configured here? If you look at the values for the “Extinguish the screen after” option, you can find two parameters here: ACSettingIndex and DCSettingIndex . Here, in hexadecimal format, the values for the operation of the parameter from the battery and from the network should be indicated. DCSettingIndex is responsible for battery operation , and ACSettingIndex for network operation .
Now, for sure, we have found everything, and this means that we can move on to the next phase - to spread the parameter by means of group policy functionality.
Distribution of parameters by means of GPO
The distribution of parameters by means of group policy in this example is best done by creating elements of group policy preferences. In order not to write a lot of useless sentences, without which you can do, perhaps, just go to the point.
For more convenience, we will change the parameters found for all users - owners of Windows 8 operating systems throughout the organization. So, in order to distribute the values of the registry parameters found on the target computers of users, we perform the following actions:
- First of all, in the Group Policy Management snap-in , create a new group policy object, for example, “New Power Settings” , and link it to the entire domain. After that, you can go to the Group Policy Management Editor itself;
- In the displayed snap-in, expand the Computer Configuration node, then go to the Settings \ Windows Configuration node and select the " Computer " node ( Computer Configuration \ Preferences \ Windows Settings \ Registry ).
Since the registry settings that are responsible for the additional power settings can be assigned to one particular category, it makes sense for such created parameters to create a separate collection used to group such parameters. In principle, it is advisable to create such collections in the event that a single GPO will include many of the parameters of the registry at once. To do this, click on the "Registry" node with the right mouse button and from the context menu, select the "Create" command and then the " New> Collection Item ". A folder named “Collection” will be created in the console tree. You can rename such a collection, for example, in “Power Settings” , and then press the Enter key. The collection is shown in the following illustration:
Fig. Figure 4. Group Policy Preference Registry Collection. - Now, in order to finally create a registry item, go to the collection you created earlier, right-click on the folder you created and from the context menu, select the New> Registry Item commands;
- Now, as seen in the following illustration, in the New Registry Properties dialog box that appears, on the General tab, you can choose one of four standard actions:
- Create - create a new parameter or registry key;
- Replace - deletion followed by the creation of an existing parameter or registry key with all attached parameters and child subsections;
- Update - update the registry settings defined in the preferences item without deleting the latter;
- Delete - deletes the specified parameter or registry key.
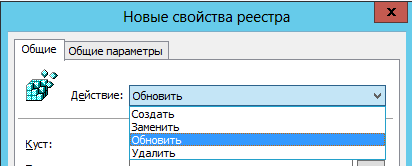
Fig. 5. Drop-down list of actions created by the Group Policy Preference Item
It should be noted that the “Update” action is selected by default, which is best left untouched in most scenarios of working with the current GPO preference item.
After you select the desired action, you still have to specify in the new preference item the registry key, the parameter, as well as its value.
In the “ Hive :” ( Hive ) drop-down list, select the registry hive in which the parameter to be changed is located. You can choose any of the five available registry hives, I suppose. It should be noted that since the preference item was originally created in the Computer Configuration section, the section “HKEY_LOCAL_MACHINE” will be selected by default in the drop-down list (otherwise HKEY_CURRENT_USER would be selected); - The Registry Path text field ( Key Path ) allows you to specify a section containing the required registry value. It should be remembered that in this text field you do not need to specify a hive, and also do not need to specify a slash before the parent section, because otherwise the section will not be found. For example, in this case, specify the SYSTEM \ CurrentControlSet \ Control \ Power \ PowerSettings \ 7516b95f-f776-4464-8c53-06167f40cc99 \ 8EC4B3A5-6868-48c2-BE75-4F3044BE88A7 section .
In the group “Name of the parameter” ( Value name ) you can specify the parameter that will be subject to change. In the event that you change the “Default” parameter (@), check the box for the option of the same name. Since in most cases you do not need to change the default parameter, you can enter the name of the parameter yourself in the corresponding text field. In our case, the parameter is Attributes .
This parameter can be accessed by clicking on the corresponding button, which is located near the text field of the path of the registry key. Using the Registry Item Browser dialog box that appears, you can easily localize the desired section without manually entering it, and you can also use it to select the desired parameter. The elements browser dialog can be seen below:
Fig. 6. The Registry Elements Browser Dialog Box - Let's go back to the previous dialog box. The “Parameter Type” drop-down list ( Value type ) allows you to select the desired parameter type. Despite the fact that in total there are 15 data types, in most cases only parameters of the type REG_DWORD, REG_BINARY, and also REG_SZ are used. Here we will specify the DWORD value;
- The last text field available on this tab, the “ Value data ” field, allows you to specify values for the selected registry key. We will have a value of 00000002 .
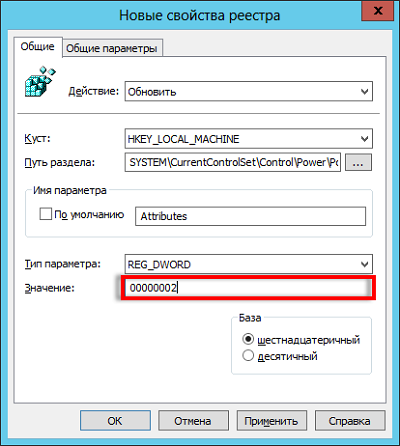
Fig. 7. Dialog box of properties of the created preference item
You can save changes. Now it remains to create as many as 2 registry settings. Let's get started
[HKEY_LOCAL_MACHINE \ SYSTEM \ CurrentControlSet \ Control \ Power \ User \ PowerSchemes \ 381b4222-f694-41f0-9685-ff5bb260df2e \ 7516b95f-f776-4464-8c53-06167f40cc99 \ 8ec4b -7575, 88
- "DCSettingIndex" = dword: 000004b0
- "ACSettingIndex" = dword: 00000258
The Group Policy Management Editor snap-in window with the three elements created is displayed in the following illustration:
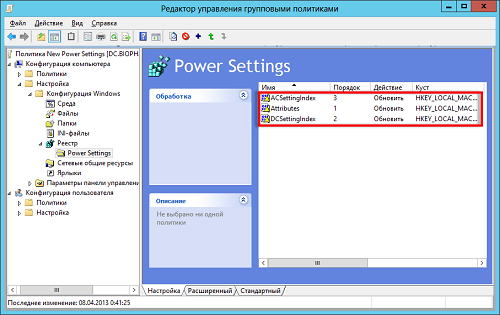
Fig. 8. GPME snap-in with created preference items
Now, according to the condition, we should also indicate to each element of preference that it should be used only for computers with Windows 8 operating systems. What needs to be done for this ...
In the properties dialog box of each preference item created earlier, go to the Common tab ( Common ), where you need to check the Item-level targeting option and then click on the appropriate button. In the targeting editor dialog box, from the New Item drop-down list, select the Operating system element. There are very few settings for this item, namely: select the operating system “Windows 8” from the drop-down list “Product” , from the drop-down list “Release” specify the required revision, for example, “Enterprise” , and that’s it. Your filtering is already configured, and the preference item will be distributed only to computers that have the Windows 8 operating system installed.
The targeting editor dialog for the preference item just discussed is shown below:

Fig. 8. Element targeting editor window
Testing the results
The most important thing is to check what we have been able to do for the end user in all this time. In other words, you and I should automatically establish a picture for the lock screen, a new parameter should appear in the properties dialog box of the advanced power options, and the default settings should be changed for this parameter. So it's high time to check the whole thing.
On the client computer, use the gpupdate command with the / force and / boot parameters to update the policy settings and restart the computer to be sure. After rebooting, a new picture should already be on the screen lock screen. If something is wrong, you should first check whether the parameter was applied using the resulting group policy, and also make sure that the correct parameters were specified in the policy parameter itself. Otherwise, everything should be as good as you can see in the following illustration:
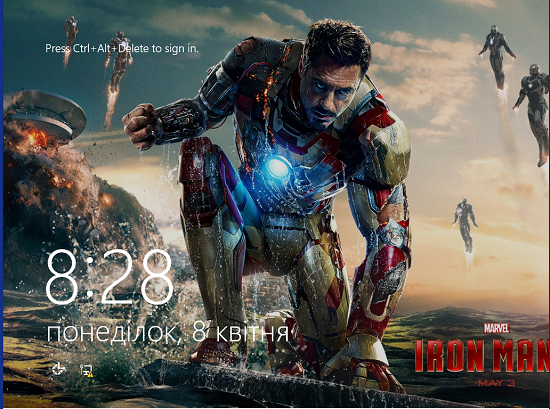
Fig. 9. Lock screen on target computer
Now, on the following point: in the power setting dialog box, a new parameter should appear in the screen settings category, and for such a plan as “Balanced” , the preset values, in our opinion, should be correct. Naturally, it makes sense to check whether it is so. For starters, you can try to open the registry editor and check the 3 required parameters in it. If everything is in order with them, then practically it is possible not to worry about anything. But, nevertheless, it is necessary to go to the dialog box itself for the parameters of this power plan and check whether everything is as good as we would like. As you can see in the following illustration, indeed, the parameters were correctly defined, and now everything is beautiful (since the screenshot was not created on a laptop, the value of the “on battery” parameter is simply absent):
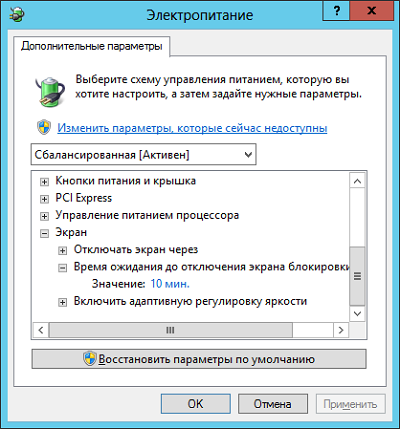
Fig. 10. New advanced power plan options
So ...
What have you learned during the reading of the current article? In this article, I talked about how you can perform several operations, namely: how to centrally set a custom image on the lock screen of Windows 8 operating systems, how to localize additional power plan settings that are initially missing from the user interface, and about , .I hope that this article was interesting for you and you learned something from it.
And finally, colleagues, I have a small question for you: did you have a need to localize any additional power settings, and how do you monitor and distribute the parameters that can be found in the system registry, but which are missing in the set standard administrative templates?
Source: https://habr.com/ru/post/175895/
All Articles