OwnCloud installation and configuration
Hello, dear.
This article is devoted to the current product at the moment, the cloud where you can keep all sorts of content.
I don’t argue that there are a lot of offers such as DropBox, iCloud and others about which maybe I don’t know, but we don’t always trust these giants with their beloved photos, music, documents, etc ...
Here we ask ourselves the question of whether such proposals from the OpenSource community do not exist, and here it is a solution.
OwnCloud .
')
Next I want to consider the installation process in my opinion a very useful product.
For installation we need:
-Apache
-MySQL
-PHP> 5.3 (php-zip, php-zlib, php-mbstring)
I think the installation of the above products will not cause problems for readers, but if that is another story.
Let's start, for the beginning we need to download a stable version of the cloud from the official website of developers
Link to download .
Unpack the file and add it to our localhost, in my case it is / srv / www / htdocs / and try to switch to our newly created cloud, for this we type localhos / owncloud and see the following:

Enter the login and password of the system administrator.
Then we get into the working interface of OwnCloud, a very convenient and intuitive interface is made as clear as possible with localization support.
In order to start synchronizing our data from a computer or mobile systems ( Android and there is also an application for iOS), in our case, consider the PC option.
Link to download
Next, we will set up file synchronization in a PC application, this is done very easily and a user-friendly interface will help to do this even to a not very talented PC user.
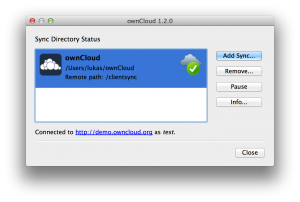
After installation, we will see the OwnCloud icon in the taskbar, when clicked, we will see a window where there is already a standard setting, you can change it or add a new setting.
To add a new setting, click AddSync and then specify which folder from the PC to synchronize with the server.
And after a couple of seconds our data on the server happened and we can safely clean up the place on the computer.
This article is devoted to the current product at the moment, the cloud where you can keep all sorts of content.
I don’t argue that there are a lot of offers such as DropBox, iCloud and others about which maybe I don’t know, but we don’t always trust these giants with their beloved photos, music, documents, etc ...
Here we ask ourselves the question of whether such proposals from the OpenSource community do not exist, and here it is a solution.
OwnCloud .
')
Next I want to consider the installation process in my opinion a very useful product.
For installation we need:
-Apache
-MySQL
-PHP> 5.3 (php-zip, php-zlib, php-mbstring)
I think the installation of the above products will not cause problems for readers, but if that is another story.
Let's start, for the beginning we need to download a stable version of the cloud from the official website of developers
Link to download .
Unpack the file and add it to our localhost, in my case it is / srv / www / htdocs / and try to switch to our newly created cloud, for this we type localhos / owncloud and see the following:
Enter the login and password of the system administrator.
Then we get into the working interface of OwnCloud, a very convenient and intuitive interface is made as clear as possible with localization support.
In order to start synchronizing our data from a computer or mobile systems ( Android and there is also an application for iOS), in our case, consider the PC option.
Link to download
Next, we will set up file synchronization in a PC application, this is done very easily and a user-friendly interface will help to do this even to a not very talented PC user.
After installation, we will see the OwnCloud icon in the taskbar, when clicked, we will see a window where there is already a standard setting, you can change it or add a new setting.
To add a new setting, click AddSync and then specify which folder from the PC to synchronize with the server.
And after a couple of seconds our data on the server happened and we can safely clean up the place on the computer.
Source: https://habr.com/ru/post/175645/
All Articles