Tree View with "CRUD operations", "drag and drop (DnD)" and "delayed loading" using Dojo Tree, Entity Framework, SQL Server and ASP.NET MVC

Introduction
The Dojo Toolkit is an open source modular JavaScript library designed to facilitate the rapid development of cross-platform JavaScript / Ajax-oriented applications and websites, which provides some really powerful features for the user interface. The Dojo Tree component provides a complete, familiar, intuitive, expandable view of hierarchical data. This component supports deferred branch loading, which makes it well scalable for large amounts of data. Dojo Tree is a great widget for presenting data with ancestor-child relationships.
This article shows the process of creating a tree that supports “CRUD operations”, “drag and drop (DnD)” and “deferred loading”. To create such a tree, we will use Dojo Tree, Entity Framework, SQL Server and Asp .Net MVC.
Create MVC applications using the Entity Framework
This example uses the Entity Framework “first model” approach. But this does not mean that you cannot use other approaches, such as “first code” or “first database”. Julie Lerman has a great article “Creating MVC 3 applications with a“ model first ”approach and Entity Framework 4.1” here . You can use this article to create your model, class and database. Creating the same controllers and views will be consecrated here.
')
RESTful service in ASP.NET MVC
Since the Dojo JsonRest Store sends and receives JSON data to provide CRUD operations on entities, we need a RESTful service with ASP.NET MVC 3. You can find a good article “Building a RESTful API Architecture in ASP.NET MVC 3 Applications” written by Justin Schwartzenberger here . We will not use it all, but I used part of the ideas from this article.
First we need our own
ActionFilterAttribute , which we will create to facilitate the management of several operations (verb) using a single controller action. Create a class ( RestHttpVerbFilter.cs ) in the model folder, using code: using System.Web.Mvc; namespace DojoTree.Models { public class RestHttpVerbFilter : ActionFilterAttribute { public override void OnActionExecuting(ActionExecutingContext filterContext) { var httpMethod = filterContext.HttpContext.Request.HttpMethod; filterContext.ActionParameters["httpVerb"] = httpMethod; base.OnActionExecuting(filterContext); } } } “This code will intercept HTTP operations (HTTP verb) of the request and store them in the
ActionParameters collection. By applying this attribute to the controller action, we can add the httpVerb parameter and RestHttpVerbFilter will control the attachment of the value of the HTTP request operation to it. Our controller must support an action method with the same parameters, but accepting different actions based on HTTP operations. It is impossible to override a method with the same parameters, but with different attributes of HTTP operations. This custom attribute will allow us to have one controller action method that will work depending on the HTTP operation, without concern for the logic of the operation definition. ”[6]Model
Add a class of the model containing information about the nodes of the tree. The class and model are shown in the listing:
public partial class Node { public int Id { get; set; } public int ParentId { get; set; } public string NodeName { get; set; } } 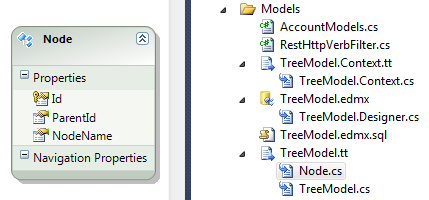
Representation
To add the root generation link, you need to change part of the menu in the
"_Layout.cshtml" file as shown below: <ul id="menu"> <li>@Html.ActionLink("Home", "Index", "Home")</li> <li>@Html.ActionLink(" ", "generateRoot", "Home")</li> </ul> Home / generateRoot view
Create a view for the "generateRoot" action as shown below:
@{ ViewBag.Title = "generateRoot"; } <h2>@ViewBag.Message</h2> Home / Index view
Code for this view:
@{ ViewBag.Title = "Dojo Tree"; } <h2>@ViewBag.Message</h2> <link rel="stylesheet" href="http://ajax.googleapis.com/ajax/libs/dojo/1.7.1/dojo/resources/dojo.css"> <link rel="stylesheet" href="http://ajax.googleapis.com/ajax/libs/dojo/1.7.1/dijit/themes/claro/claro.css"> <!-- load dojo and provide config via data attribute --> <script src="http://ajax.googleapis.com/ajax/libs/dojo/1.7.1/dojo/dojo.js" data-dojo-config="async: true, isDebug: true, parseOnLoad: true"></script> <script src="/js/tree.js" type="text/javascript"></script> <div style=" width: 400px; margin: 10px;"> <div id="tree"></div> </div> <div id="add-new-child"></div> <div id="remove-child"></div> Full article about the code above and below you can see here .
As can be seen from the code above, we have a link to
js/tree.js , below is its content.Description js / tree.js
tree.js contains several parts:This part of the script loads the Dojo modules required for this example:
require(["dojo/store/JsonRest", "dojo/store/Observable", "dojo/_base/Deferred", "dijit/Tree", "dijit/tree/dndSource", "dojox/form/BusyButton", "dojo/query", "dojo/domReady!"], function (JsonRest, Observable, Deferred, Tree, dndSource, BusyButton, query) { This part creates a
treeStore connection to the TreeController using "target: "/tree/data/"" .mayHaveChildrenproperty that indicates whether the node has descendantsgetChildrenreturns a copy of all the children of the object.getRootreturns the root element, we will a get () and callback the result. In this example, the root id = 1getLabelreturns the namepasteItemused to drag and drop actions, changes the Id of the descendant of the item being moved.putforces thestoreto access the database for changes
treeStore = JsonRest({ target: "/tree/data/", mayHaveChildren: function (object) { // see if it has a children property return "children" in object; }, getChildren: function (object, onComplete, onError) { // retrieve the full copy of the object this.get(object.id).then(function (fullObject) { // copy to the original object so it has the children array as well. object.children = fullObject.children; // now that full object, we should have an array of children onComplete(fullObject.children); }, function (error) { // an error occurred, log it, and indicate no children console.error(error); onComplete([]); }); }, getRoot: function (onItem, onError) { // get the root object, we will do a get() and callback the result this.get("1").then(onItem, function (error) { alert("Error loading Root"); }); }, getLabel: function (object) { // just get the name return object.NodeName; }, pasteItem: function (child, oldParent, newParent, bCopy, insertIndex) { // This will prevent to add a child to its parent again. if (child.ParentId == newParent.id) { return false; } var store = this; store.get(oldParent.id).then(function (oldParent) { store.get(newParent.id).then(function (newParent) { store.get(child.id).then(function (child) { var oldChildren = oldParent.children; dojo.some(oldChildren, function (oldChild, i) { if (oldChild.id == child.id) { oldChildren.splice(i, 1); return true; // done } }); store.put(oldParent); //This will change the parent of the moved Node child.ParentId = newParent.id; store.put(child); newParent.children.splice(insertIndex || 0, 0, child); store.put(newParent); }, function (error) { alert("Error loading " + child.NodeName); }); }, function (error) { alert("Error loading " + newParent.NodeName); }); }, function (error) { alert("Error loading " + oldParent.NodeName); }); }, put: function (object, options) { this.onChildrenChange(object, object.children); this.onChange(object); return JsonRest.prototype.put.apply(this, arguments); } }); This part of the script defines the Dojo Tree and attaches it to the
treeStore and then runs it: tree = new Tree({ model: treeStore, dndController: dndSource }, "tree"); // make sure you have a target HTML element with this id tree.startup(); The following part of the script adds a “claro” theme for the page:
dojo.query("body").addClass("claro"); This part of the script defines the
BusyButton : addNewChildButton and removeChildButton .You can read detailed documentation about this item here.
var addNewChildButton = new BusyButton({ id: "add-new-child", busyLabel: "Wait a moment...", label: "Add new child to selected item", timeout: 500 }, "add-new-child"); var removeChildButton = new BusyButton({ id: "remove-child", busyLabel: "Wait a moment...", label: "Remove selected item", timeout: 500 }, "remove-child"); This part of the script defines the action to click on the
add-new-child button. First, it is determined whether the user has selected a tree item. Then the selected item selectedObject synchronized with the server and if everything is in order, it is proposed to enter the name of the new item. Next, a new element is newItem and is added as a descendant of the selected item selectedObject and sent to the server treeStore.put(newItem); . After 500 ms, the selected item selectedObject reloaded to get the id of the added child. To reboot after 500 ms, we use "Deferred.when/dojo.when" , the documentation on this can be viewed here . query("#add-new-child").on("click", function () { var selectedObject = tree.get("selectedItems")[0]; if (!selectedObject) { return alert("No object selected"); } //Sync selectedObject with server treeStore.get(selectedObject.id).then(function (selectedObject) { var name = prompt("Enter a name for new node"); if (name != null && name != "") { var newItem = { NodeName: name, ParentId: selectedObject.id, children: "" }; selectedObject.children.push(newItem); treeStore.put(newItem); //Loading recently added node 500ms after puting it var nodeId = new Deferred(); Deferred.when(nodeId, reloadNode); setTimeout(function () { nodeId.resolve(selectedObject.id); }, 500); } else { return alert("Name can not be empty."); } }, function (error) { alert("Error loading " + selectedObject.NodeName); }); }); This part defines click on the
remove-child button. First, it is checked whether the user has selected any element and that the selected element is not the root of the tree. Next, there is a request for confirmation of the execution of the action: "Are you sure that you want to permanently delete this node and all its descendants?" If the answer is yes, then the selectedObject object is synchronized with the server, and if everything is in order, the removeAllChildren(selectedObject); method will be called to delete all children and the selected node itself removeAllChildren(selectedObject); . After 500 ms, the parent of the selected item selectedObject.ParentId reboots. query("#remove-child").on("click", function () { var selectedObject = tree.get("selectedItems")[0]; if (!selectedObject) { return alert("No object selected"); } if (selectedObject.id == 1) { return alert("Can not remove Root Node"); } var answer = confirm("Are you sure you want to permanently delete this node and all its children?") if (answer) { treeStore.get(selectedObject.id).then(function (selectedObject) { removeAllChildren(selectedObject); //Reloading the parent of recently removed node 500ms after removing it var ParentId = new Deferred(); Deferred.when(ParentId, reloadNode); setTimeout(function () { ParentId.resolve(selectedObject.ParentId); }, 500); }, function (error) { alert("Error loading " + selectedObject.NodeName); }); } }); This part of the script defines a double click on
dblclick to rename the tree node. First, the selected item is synchronized with the server and if everything is in order, a new name for the node is requested. Then the new name is transferred to the server treeStore.put(object) . tree.on("dblclick", function (object) { treeStore.get(object.id).then(function (object) { var name = prompt("Enter a new name for the object"); if (name != null && name != "") { object.NodeName = name; treeStore.put(object).then(function () { }, function (error) { // On Error revert Value reloadNode(object.ParentId); alert("Error renaming " + object.NodeName); }); } else { return alert("Name can not be empty."); } }, function (error) { alert("Error loading " + object.NodeName); }); }, true); }); This function reloads the node by the value of id and all descendants of the same level.
function reloadNode(id) { treeStore.get(id).then(function (Object) { treeStore.put(Object); }) }; This function recursively deletes all descendants of a node.
function removeAllChildren(node) { treeStore.get(node.id).then(function (node) { var nodeChildren = node.children; for (n in nodeChildren) { removeAllChildren(nodeChildren[n]); } treeStore.remove(node.id); }, function (error) { alert(error); }); }; Controller
Now you need to create a controller.
Treecontroller
Copy the code below in
"TreeController.cs": using System; using System.Collections.Generic; using System.Linq; using System.Web; using System.Web.Mvc; using System.Data.Entity; using DojoTree.Models; using System.Data; using System.Net; namespace DojoTree.Controllers { public class TreeController : Controller { private TreeModelContainer db = new TreeModelContainer(); // GET /Tree/Data/3 // POST /Tree/Data // PUT /Tree/Data/3 // DELETE /Tree/Data/3 [RestHttpVerbFilter] public JsonResult Data(Node node, string httpVerb, int id = 0) { switch (httpVerb) { case "POST": if (ModelState.IsValid) { db.Entry(node).State = EntityState.Added; db.SaveChanges(); return Json(node, JsonRequestBehavior.AllowGet); } else { Response.TrySkipIisCustomErrors = true; Response.StatusCode = (int)HttpStatusCode.NotAcceptable; return Json(new { Message = "Data is not Valid." }, JsonRequestBehavior.AllowGet); } case "PUT": if (ModelState.IsValid) { db.Entry(node).State = EntityState.Modified; db.SaveChanges(); return Json(node, JsonRequestBehavior.AllowGet); } else { Response.TrySkipIisCustomErrors = true; Response.StatusCode = (int)HttpStatusCode.NotAcceptable; return Json(new { Message = "Node " + id + " Data is not Valid." }, JsonRequestBehavior.AllowGet); } case "GET": try { var node_ = from entity in db.Nodes.Where(x => x.Id.Equals(id)) select new { id = entity.Id, NodeName = entity.NodeName, ParentId = entity.ParentId, children = from entity1 in db.Nodes.Where (y => y.ParentId.Equals(entity.Id)) select new { id = entity1.Id, NodeName = entity1.NodeName, ParentId = entity1.ParentId, children = "" // it calls checking children // whenever needed } }; var r = node_.First(); return Json(r, JsonRequestBehavior.AllowGet); } catch { Response.TrySkipIisCustomErrors = true; Response.StatusCode = (int)HttpStatusCode.NotAcceptable; return Json(new { Message = "Node " + id + " does not exist." }, JsonRequestBehavior.AllowGet); } case "DELETE": try { node = db.Nodes.Single(x => x.Id == id); db.Nodes.Remove(node); db.SaveChanges(); return Json(node, JsonRequestBehavior.AllowGet); } catch { Response.TrySkipIisCustomErrors = true; Response.StatusCode = (int)HttpStatusCode.NotAcceptable; return Json(new { Message = "Could not delete Node " + id }, JsonRequestBehavior.AllowGet); } } return Json(new { Error = true, Message = "Unknown HTTP verb" }, JsonRequestBehavior.AllowGet); } } } As you can see, the controller performs “GET / POST / PUT / DELETE” operations in a single URL
"/Tree/Data/" , this is possible thanks to RestHttpVerbFilter .- POST adds new node
- PUT edits node
- GET returns data about a node and its descendants of the same level. This serves to support deferred loading.
- DELETE deletes the node.
Homecontroller
I changed the
HomeController only to add the method of generating the root of the tree. Bring your HomeController to the following form: using System; using System.Collections.Generic; using System.Linq; using System.Web; using System.Web.Mvc; using DojoTree.Models; namespace DojoTree.Controllers { public class HomeController : Controller { public ActionResult Index() { ViewBag.Message = "Tree supporting CRUD operations Using Dojo Tree, Entity Framework, Asp .Net MVC"; return View(); } public ActionResult generateRoot() { try { TreeModelContainer db = new TreeModelContainer(); Node node = new Node(); node= db.Nodes.Find(1); if (node == null) { //If you deleted Root manually, this couldn't make Root again //because Root Id must be "1", so you must drop the //Tree table and rebuild it //or change the Root Id in "tree.js" Node rootNode = new Node(); rootNode.NodeName = "Root"; rootNode.ParentId = 0; db.Nodes.Add(rootNode); db.SaveChanges(); ViewBag.Message = "Some Nodes have been generated"; } else { ViewBag.Message = "Root Exists."; } } catch { ViewBag.Message = "An Error occurred"; } return View(); } } } Visual demonstration
Now it's time to look at the result. Build the solution and click on root generation, then add | rename | drag and paste | remove any tree nodes.
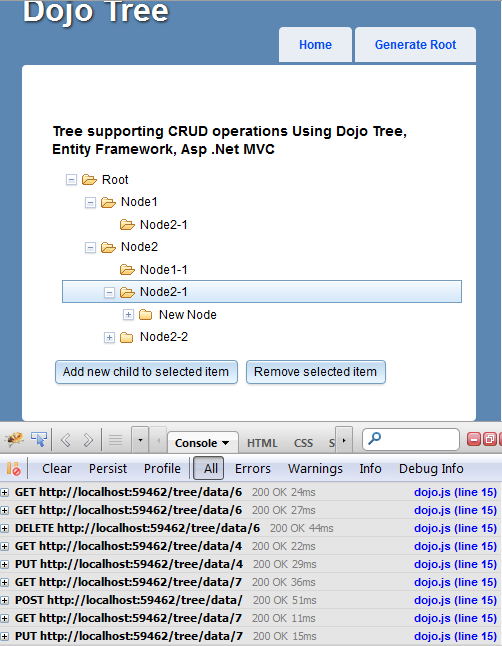
As you can see in fireBug, data is sent and received via Json REST.
Links
This material is a translation of the article "Tree View with" CRUD operations "," drag and drop (DnD) "and" Lazy Loading “using Dojo Tree, Entity Framework, SQL Server, ASP.NET MVC” from here . You can also download the source code of this example.
Source: https://habr.com/ru/post/175571/
All Articles