Admin in 10 minutes
 Hello, dear Habrasoobschestvo!
I am developing web sites. As a rule, these are solutions for individual needs of customers. Therefore, I do not use ready-made CMS, but prefer to lay the bricks on my own. Of course, the admin part has to be written independently, since it must perform the functions that the customer needs, but nothing superfluous should be. And if you write a few methods for editing the data, this is half the trouble, then you also had to create a nice and convenient interface.
For a long time I used Twitter Bootstrap , but it could not satisfy all needs. I had to impose additional buttons and write scripts. But once, I met Telerik 's wonderful KendoUI UI framework. What came out of it under the cut.
')
An article on Habré has already been written about the framework itself. We will use the KendoUI Web library of controls. To understand that you can create with it, you can visit a page with a demo . To build controls, you can use both helpers for ASP.NET, JSP or PHP, and javascript widgets. The latter are distributed under the GPL v3 License, so I used them. Download this or that package here . On the server side, I use ASP.NET MVC 4 with Microsoft ASP.NET Web API OData 4.0.0, which can be fixed with the command PM> Install-Package Microsoft.AspNet.WebApi.OData
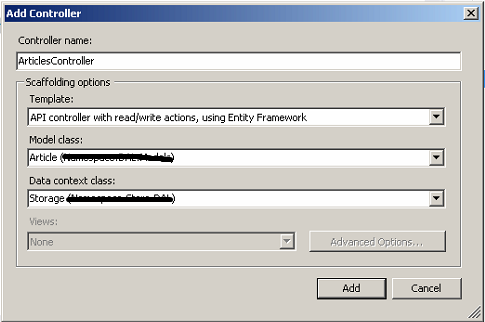
To demonstrate, we will create a simple Article class, and add three properties of different types to it.
public class Article { public int ID { get; set; } public string Title { get; set; } public bool Hidden { get; set; } } Next, create an ApiController to work with data. In my example, I use the Entity Framework, so I immediately specify the Scaffolding options
After that, I only change the action of GetArticles, as shown in the example below. First of all, now it returns ODataResult. And as a parameter, it takes ODataQueryOptions, a collection of serialized query string parameters. In the action itself, we get a collection and the total number of elements in it. And after that we apply incoming parameters to it. As a result, we return the collection after applying the parameters and the total to it, it is necessary for pagination.
public class ArticlesController : ApiController { private Storage db = new Storage(); // GET api/Articles public ODataResult<Article> GetArticles(ODataQueryOptions options) { var items = db.Articles; var count = items.Count(); var res = (IEnumerable<Article>)options.ApplyTo(items); return new ODataResult<Article>(res, null, count); } // GET api/Articles/5 public Article GetArticle(int id) { Article article = db.Articles.Find(id); if (article == null) { throw new HttpResponseException(Request.CreateResponse(HttpStatusCode.NotFound)); } return article; } // PUT api/Articles/5 public HttpResponseMessage PutArticle(int id, Article article) { if (ModelState.IsValid && id == article.ID) { db.Entry(article).State = EntityState.Modified; try { db.SaveChanges(); } catch (DbUpdateConcurrencyException) { return Request.CreateResponse(HttpStatusCode.NotFound); } return Request.CreateResponse(HttpStatusCode.OK); } else { return Request.CreateResponse(HttpStatusCode.BadRequest); } } // POST api/Articles public HttpResponseMessage PostArticle(Article article) { if (ModelState.IsValid) { db.Articles.Add(article); db.SaveChanges(); HttpResponseMessage response = Request.CreateResponse(HttpStatusCode.Created, article); response.Headers.Location = new Uri(Url.Link("DefaultApi", new { id = article.ID })); return response; } else { return Request.CreateResponse(HttpStatusCode.BadRequest); } } // DELETE api/Articles/5 public HttpResponseMessage DeleteArticle(int id) { Article article = db.Articles.Find(id); if (article == null) { return Request.CreateResponse(HttpStatusCode.NotFound); } db.Articles.Remove(article); try { db.SaveChanges(); } catch (DbUpdateConcurrencyException) { return Request.CreateResponse(HttpStatusCode.NotFound); } return Request.CreateResponse(HttpStatusCode.OK, article); } } That's all. It's time to go to the client side. First, let's connect KendoUI and JQuery to the page.
<link href="~/Content/kendo/kendo.common.min.css" rel="stylesheet" /> <link href="~/Content/kendo/kendo.default.min.css" rel="stylesheet" /> <script src="//ajax.googleapis.com/ajax/libs/jquery/1.8.0/jquery.min.js"></script> <script src="~/Scripts/kendo/kendo.web.min.js"></script> After that, install and configure the widget. Read more about the widget settings here .
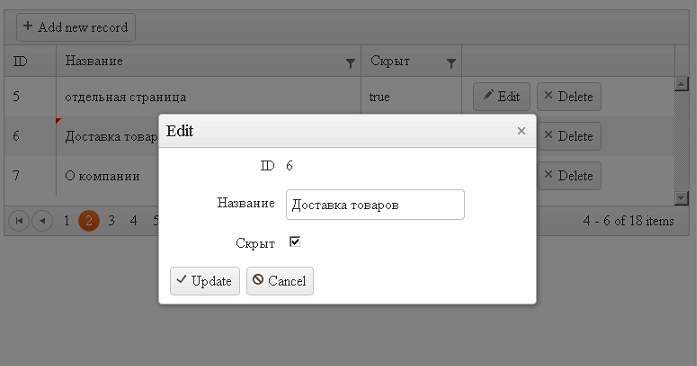
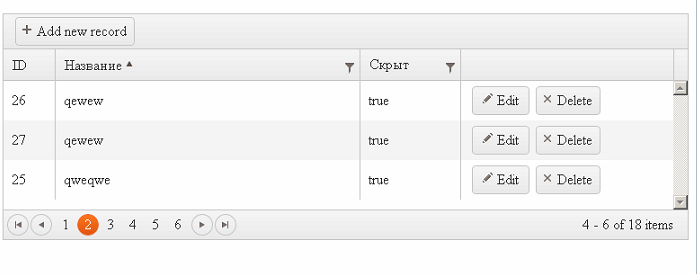
<div id="grid"></div> <script> $(document).ready(function () { $("#grid").kendoGrid({ dataSource: { pageSize: 3, serverSorting: true, serverFiltering: true, serverPaging: true, type: 'odata', transport: { read: { url: "/api/articles", dataType: "json", type: "GET" }, create: { url: "/api/articles", dataType: "json", type: "POST" }, update: { url: function (article) { return "/api/articles/" + article.ID }, dataType: "json", type: "PUT" }, destroy: { url: function (article) { return "/api/articles/" + article.ID }, dataType: "json", type: "DELETE" } }, schema: { data: function (data) { return data.Items; }, total: function (data) { return data.Count; }, model: { id: "ID", fields: { ID: { editable: false }, Title: { type: "string", editable: true, nullable: false, validation: { required: true } }, Hidden: { type: "boolean", editable: true } } } } }, height: 250, filterable: true, sortable: true, pageable: true, toolbar: ["create"], editable: "popup", columns: [ { field: "ID", filterable: false, width: 50 }, { field: "Title", title: "", width: 300 }, { field: "Hidden", title: "", width: 100 }, { command: ["edit", "destroy"], title: " ", width: "210px" } ] }); }); </script> Done! Now you can run and check. In less than 10 minutes we created a full-fledged interface for data management, with the possibility of pagination, sorting and filtering. Comfortable and pleasant. Thank you KendoUI and format OData, and you for your attention.


R.S. By the way, it is possible to localize widgets. To do this, you need to connect the corresponding script from the js / cultures folder, which comes in the archive with the framework.
Source: https://habr.com/ru/post/175457/
All Articles