We publish Citrix applications in WEB
We publish Citrix applications in WEB
I want to dwell on a very interesting question in the form of a hardware solution from Citrix NetScaler.
The device c huge functionality and features. In this article I dwell on the issue of publishing applications and vdi in the WEB.
Moreover, besides the safe delivery of the application, it is also provided with batch optimization for faster and better transfer.
We assume that we already have NetScaler MPX or VPX (mpx is a piece of hardware, vpx is a virtual application). As a test, you can use NetScaler VPX Express. Moreover, it is free with full functionality, only limited in bandwidth.
Before we begin, let's recall some terms. The main thing to know are the four different IP addresses that NetScaler uses.
types of IP addresses in NetScaler
NetScaler IP address (NSIP) —a control IP address for accessing the system, heartbeat interface for HA, syslog source, etc;
Virtual IP address (VIP) - IP associated with the virtual server. Often it is the public IP address to which clients connect;
Mapped IP address (MIP) - The MIP address is used for server connections. Often, it is the address that looks towards your servers for which you need to load balance and / or provide access through the Access Gateway and / or protect applications using the Web Application Firewall
Subnet IP address (SNIP) - when Netscaler interacts with multiple SNIP subnets, it can be configured as MIP to provide access to these subnets. SNIP can be tied to VLANs and interfaces.
We will also assume that the initial NS tincture has been produced (IP addresses are configured and licenses are installed).
')
Caution, under the hood a lot of pictures
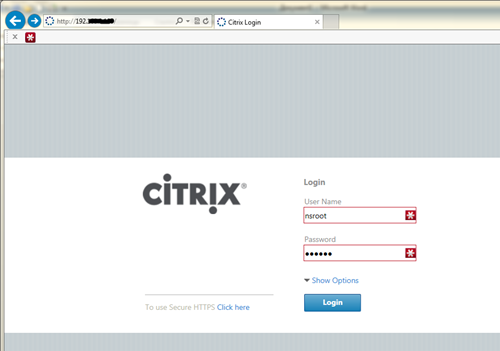
Connect to NS WEB console:
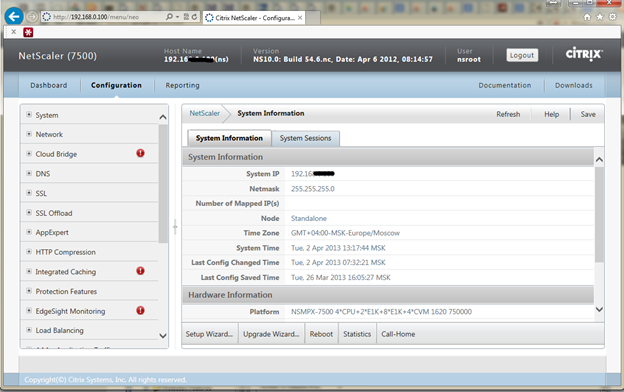
Check that the IP addresses are configured by clicking on Network -> IPs in the console

We turn to the most interesting:
Setting up the web interface ...
Now we finally get to the part we care about. Adding a web interface and XML to NetScaler. After this step we will be able to get to the web interface page through the VIP that we create. We need to create 2 virtual servers.
But before creating servers, I will create the necessary service groups for balancing.


Balancing members
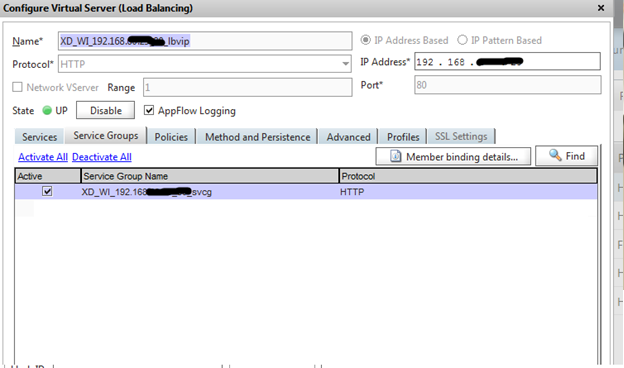
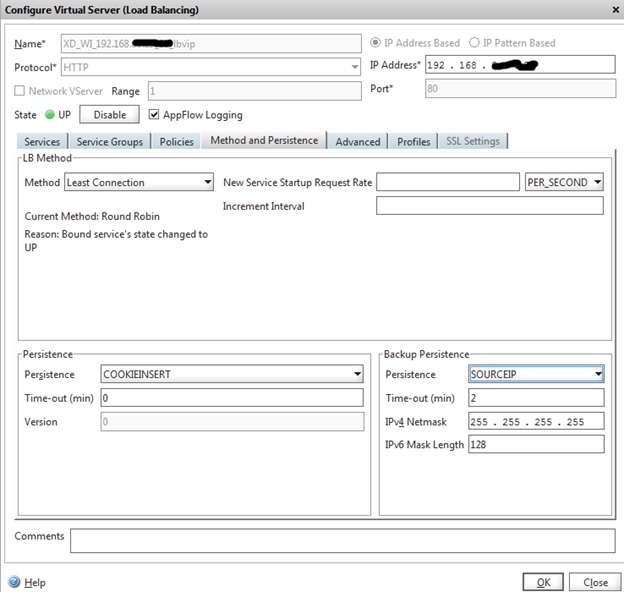
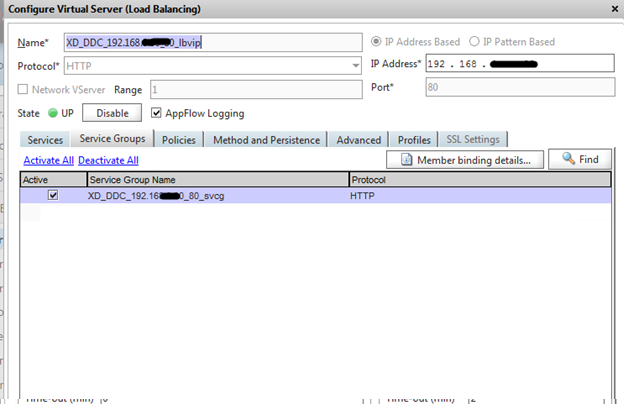
Now, on the basis of this group, we are creating an LB server. To create a virtual server, go to Load Balancing -> Virtual Servers. Click the Add button at the bottom of the screen. Enter the Virtual Server name (I recommend to call the LB server according to its tasks, in my case XenDesktop_WebInterface_serverIPaddress_port_LoadBalancingIP - XD_WI_192.168..__lbvip). Enter the IP address that will be used as the VIP for the two Web Interface servers. Choose HTTP protocol, port 80
On the Services tab, check the box for the two web-based services created earlier. On the Method and Persistence tab and select the Least Connection method. We save.
Now we will create an LB server for XML.
In order to use these functions, you need to create a new monitor. This new monitor uses XML to send a request to the XenApp / Desktop farm. It should be noted that this only works for XenApp and XenDesktop.
To create a monitor in Load Balancing -> Monitors. Click create. Create a new monitor name and select CITRIX-XD-DDC and XD-WEB-INTERFACE. The name of the monitor I propose to use as LB servers.

Brief summary: We set up 2 server load balancer, created monitors for monitoring end servers.
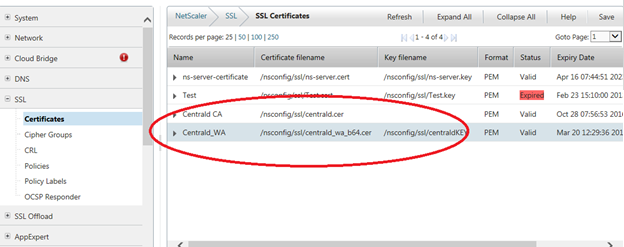
Certificates:
It is easiest to configure using the WEB interface by logging into NSIP Netscaler.
A full description of the process is here.
Briefly: (if I answer questions, but in my opinion, generation should not cause questions if there is a deployed certification authority).
Generates RSA key (Configuration> SSL> Create RSA key);
CSR is created (Configuration> SSL> Create CSR);
Certificates are installed (Configuration> SSL> Certificates> Install);
The server certificate is linked to the CA and Intermediate Authority, forming a chain (Configuration> SSL> Certificates> Link).
As a result, we should get 2 installed certificates - server and CA.
And only now we create Access Gateway virtual server. To do this, open Access Gateway -> Virtual Servers and click the ADD button. Specify the server name. This name must match the name of the certificate that you registered earlier. Assign an IP address to be used as the VIP for this connection. Finally, add the certificate created earlier.
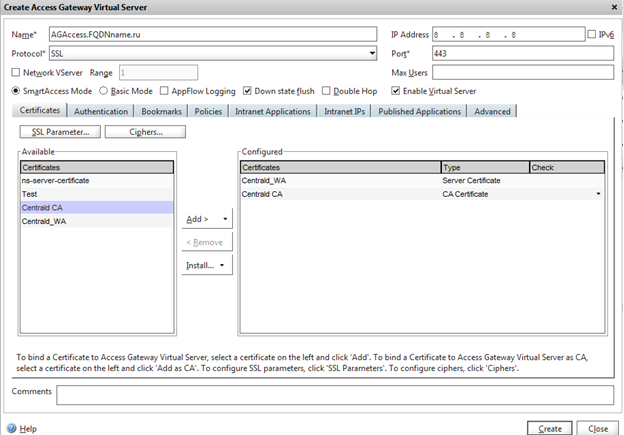
Now you can test the AG server. Open a web browser and go to https: // server name (of course, use the FQDN we created). Be sure to use HTTPS. The page should show a certificate without warning. If there are warnings, you need to check the certificates.

AG server is up but not configured. Configure LDAP authorization
To configure, we need to create an LDAP server. Go to System -> Authentication -> Server -> Add ...
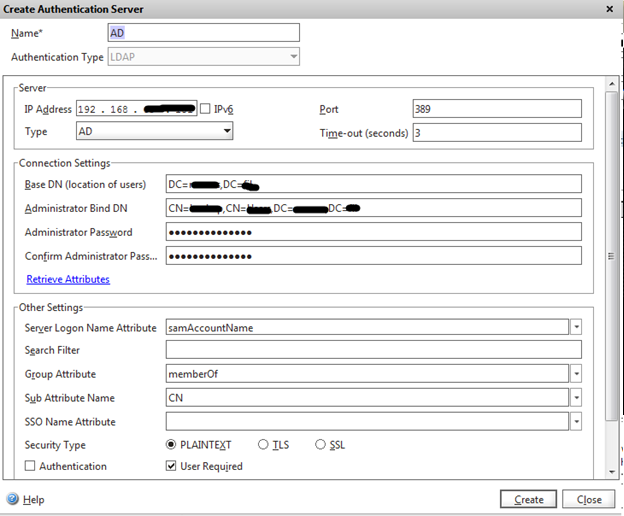
Name: AD (which is convenient for the soul)
Authentication Type: LDAP
IP address: 192.168.xx (using the IP address of one of the domain controllers)
Base DN: DC = your DC = domain (DN for your domain)
Administrator Bind DN: CN = DC account = your DC = domain (account for access to the domain).
Administrator password: password (password for the user specified above)
We create.
Having a connection to AD we will create a policy for authorization on NS. System -> Authentication -> Policies -> Add
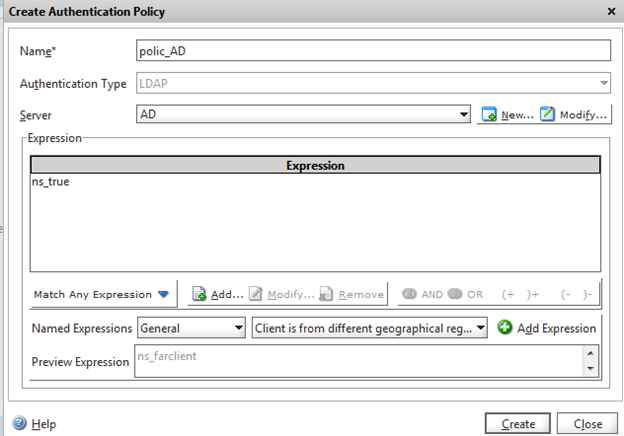
Name: policy_AD (or any name)
Authentication Type: LDAP
Server: AD (this is the server you created in the previous step)
Expression: Search for any expression -> General -> True value (click the Create button)
Now we will connect the created LDAP policy with the AG virtual server created earlier.

Already almost everything is ready.
And only now we translate to the settings on the Cirtix XenDesktop / XenApp WEB server.
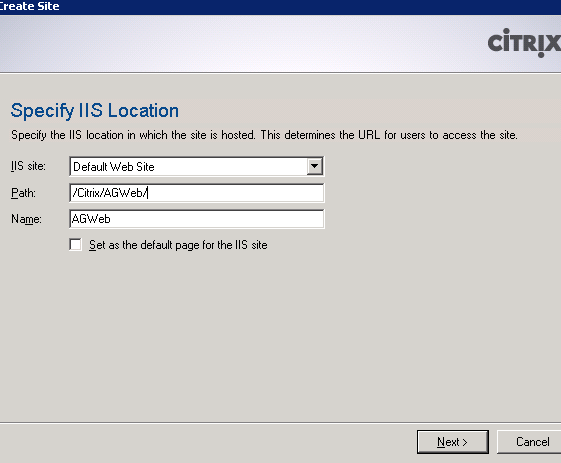
For cleanliness we will create a new site.
Here everything is clear with the settings (the name of the site and the path to the files)
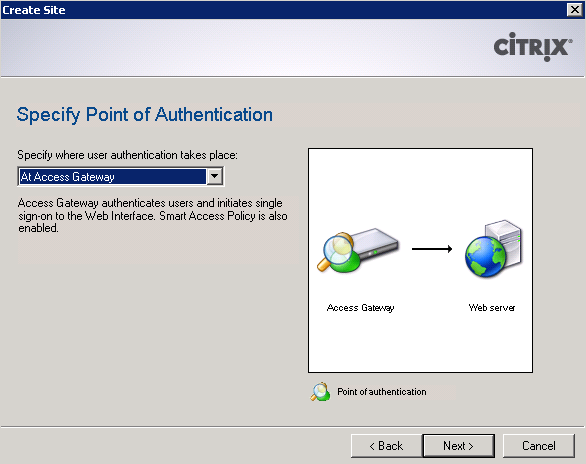
In the next step, select the authentication point. We select Access Gateway.
For authentication of the service URL, we indicate: your FQDN / CitrixAuthService / AuthService.asmx

After creating the site open it to configure. To configure XML, specify the IP address of the LB server that we created earlier. Those. NS will control the load on web / xml servers by itself.

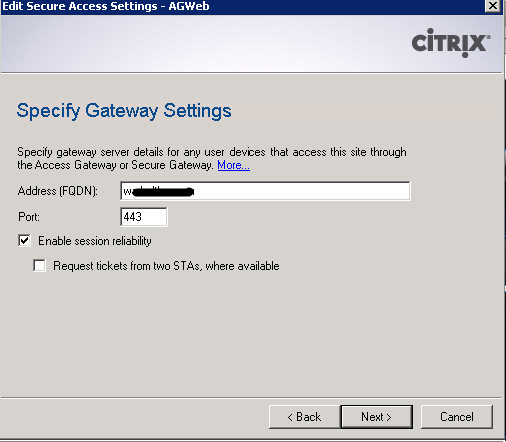
Once the site is created, we need to set the Access Gateway access type. Right-click on the new site and select Secure Access.

After changing the gateway access method from Direct to Gateway direct, click Next. In the Specify screen field In the gateway parameters, enter the FQDN address. Click the next button to continue.
From Specify the security administration ticket (STA) screen, click Add. Enter the path to the STA, as https: // your citrix server XD / App / scripts / ctxsta.dll. Next great Finish button. (Let me remind you who has the XD cluster - must be done on all WEB nodes).

Now we have to add the STA to the Access Gateway Virtual Server. Open Access Gateway -> Virtual Servers, open the Access Gateway server and open the Published Applications tab. In the STA section, click Add. Enter in the format https: // ip address (replace your IP specified in the previous step). Save by clicking OK.

It remains to configure the session access policies Create Access Gateway Session Policy
Name: cag_xd_vser_wi (again following the rule adopted above) CitrixAccessGateway_XenDesktop_VirtualServer_WebInterfase

Expression (expression): any expression -> General -> True value (click Add Expression)
Click OK and take the next step.
ICA Proxy: ON
Web Interface Address: https://192.168.xx/Citrix/AccessGateway/auth/login.aspx (Specify the IP address of the LB server assigned to WEB balancing) r.
Single Sign-on Domain your.domain (FQDN of your domain)
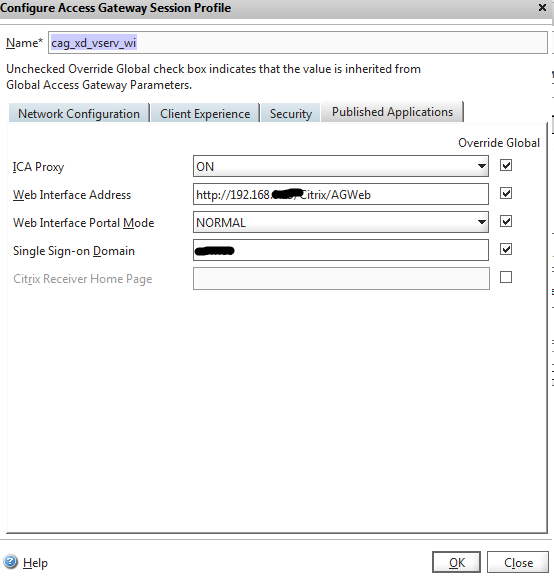
The final touch - on the Security tab of the Default Authorization Action, install ALLOW.

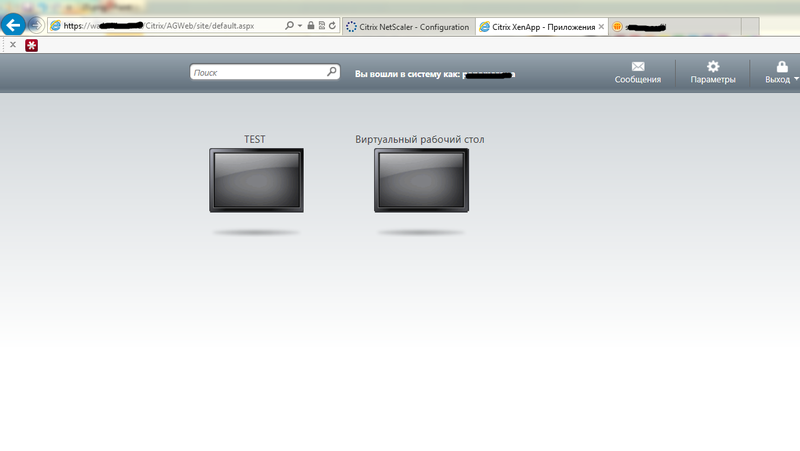
You can now safely connect from anywhere in the world to your published applications on Citrix Xendesktop / XenApp using the SSS-VPN tunnel.
Thank you for your attention, if you have any questions, comments please ask. The topic is complex, but interesting and necessary.
Original article here
I want to dwell on a very interesting question in the form of a hardware solution from Citrix NetScaler.
The device c huge functionality and features. In this article I dwell on the issue of publishing applications and vdi in the WEB.
Moreover, besides the safe delivery of the application, it is also provided with batch optimization for faster and better transfer.
A bit of description:
We assume that we already have NetScaler MPX or VPX (mpx is a piece of hardware, vpx is a virtual application). As a test, you can use NetScaler VPX Express. Moreover, it is free with full functionality, only limited in bandwidth.
Before we begin, let's recall some terms. The main thing to know are the four different IP addresses that NetScaler uses.
types of IP addresses in NetScaler
NetScaler IP address (NSIP) —a control IP address for accessing the system, heartbeat interface for HA, syslog source, etc;
Virtual IP address (VIP) - IP associated with the virtual server. Often it is the public IP address to which clients connect;
Mapped IP address (MIP) - The MIP address is used for server connections. Often, it is the address that looks towards your servers for which you need to load balance and / or provide access through the Access Gateway and / or protect applications using the Web Application Firewall
Subnet IP address (SNIP) - when Netscaler interacts with multiple SNIP subnets, it can be configured as MIP to provide access to these subnets. SNIP can be tied to VLANs and interfaces.
We will also assume that the initial NS tincture has been produced (IP addresses are configured and licenses are installed).
')
Caution, under the hood a lot of pictures
Connect to NS WEB console:
Check that the IP addresses are configured by clicking on Network -> IPs in the console
We turn to the most interesting:
Setting up the web interface ...
Now we finally get to the part we care about. Adding a web interface and XML to NetScaler. After this step we will be able to get to the web interface page through the VIP that we create. We need to create 2 virtual servers.
But before creating servers, I will create the necessary service groups for balancing.
Balancing members
Now, on the basis of this group, we are creating an LB server. To create a virtual server, go to Load Balancing -> Virtual Servers. Click the Add button at the bottom of the screen. Enter the Virtual Server name (I recommend to call the LB server according to its tasks, in my case XenDesktop_WebInterface_serverIPaddress_port_LoadBalancingIP - XD_WI_192.168..__lbvip). Enter the IP address that will be used as the VIP for the two Web Interface servers. Choose HTTP protocol, port 80
On the Services tab, check the box for the two web-based services created earlier. On the Method and Persistence tab and select the Least Connection method. We save.
Now we will create an LB server for XML.
In order to use these functions, you need to create a new monitor. This new monitor uses XML to send a request to the XenApp / Desktop farm. It should be noted that this only works for XenApp and XenDesktop.
To create a monitor in Load Balancing -> Monitors. Click create. Create a new monitor name and select CITRIX-XD-DDC and XD-WEB-INTERFACE. The name of the monitor I propose to use as LB servers.
Brief summary: We set up 2 server load balancer, created monitors for monitoring end servers.
Certificates:
It is easiest to configure using the WEB interface by logging into NSIP Netscaler.
A full description of the process is here.
Briefly: (if I answer questions, but in my opinion, generation should not cause questions if there is a deployed certification authority).
Generates RSA key (Configuration> SSL> Create RSA key);
CSR is created (Configuration> SSL> Create CSR);
Certificates are installed (Configuration> SSL> Certificates> Install);
The server certificate is linked to the CA and Intermediate Authority, forming a chain (Configuration> SSL> Certificates> Link).
As a result, we should get 2 installed certificates - server and CA.
And only now we create Access Gateway virtual server. To do this, open Access Gateway -> Virtual Servers and click the ADD button. Specify the server name. This name must match the name of the certificate that you registered earlier. Assign an IP address to be used as the VIP for this connection. Finally, add the certificate created earlier.
Now you can test the AG server. Open a web browser and go to https: // server name (of course, use the FQDN we created). Be sure to use HTTPS. The page should show a certificate without warning. If there are warnings, you need to check the certificates.
AG server is up but not configured. Configure LDAP authorization
To configure, we need to create an LDAP server. Go to System -> Authentication -> Server -> Add ...
Name: AD (which is convenient for the soul)
Authentication Type: LDAP
IP address: 192.168.xx (using the IP address of one of the domain controllers)
Base DN: DC = your DC = domain (DN for your domain)
Administrator Bind DN: CN = DC account = your DC = domain (account for access to the domain).
Administrator password: password (password for the user specified above)
We create.
Having a connection to AD we will create a policy for authorization on NS. System -> Authentication -> Policies -> Add
Name: policy_AD (or any name)
Authentication Type: LDAP
Server: AD (this is the server you created in the previous step)
Expression: Search for any expression -> General -> True value (click the Create button)
Now we will connect the created LDAP policy with the AG virtual server created earlier.
Already almost everything is ready.
And only now we translate to the settings on the Cirtix XenDesktop / XenApp WEB server.
For cleanliness we will create a new site.
Here everything is clear with the settings (the name of the site and the path to the files)
In the next step, select the authentication point. We select Access Gateway.
For authentication of the service URL, we indicate: your FQDN / CitrixAuthService / AuthService.asmx
After creating the site open it to configure. To configure XML, specify the IP address of the LB server that we created earlier. Those. NS will control the load on web / xml servers by itself.
Once the site is created, we need to set the Access Gateway access type. Right-click on the new site and select Secure Access.
After changing the gateway access method from Direct to Gateway direct, click Next. In the Specify screen field In the gateway parameters, enter the FQDN address. Click the next button to continue.
From Specify the security administration ticket (STA) screen, click Add. Enter the path to the STA, as https: // your citrix server XD / App / scripts / ctxsta.dll. Next great Finish button. (Let me remind you who has the XD cluster - must be done on all WEB nodes).
Now we have to add the STA to the Access Gateway Virtual Server. Open Access Gateway -> Virtual Servers, open the Access Gateway server and open the Published Applications tab. In the STA section, click Add. Enter in the format https: // ip address (replace your IP specified in the previous step). Save by clicking OK.
It remains to configure the session access policies Create Access Gateway Session Policy
Name: cag_xd_vser_wi (again following the rule adopted above) CitrixAccessGateway_XenDesktop_VirtualServer_WebInterfase
Expression (expression): any expression -> General -> True value (click Add Expression)
Click OK and take the next step.
ICA Proxy: ON
Web Interface Address: https://192.168.xx/Citrix/AccessGateway/auth/login.aspx (Specify the IP address of the LB server assigned to WEB balancing) r.
Single Sign-on Domain your.domain (FQDN of your domain)
The final touch - on the Security tab of the Default Authorization Action, install ALLOW.
You can now safely connect from anywhere in the world to your published applications on Citrix Xendesktop / XenApp using the SSS-VPN tunnel.
Thank you for your attention, if you have any questions, comments please ask. The topic is complex, but interesting and necessary.
Original article here
Source: https://habr.com/ru/post/175429/
All Articles