Website transfer from Visual Studio 2012 to hosting. Parallels Plesk Panel
Hello!
About the development of the site on ASP.NET MVC 3/4 is written enough. At least, what would begin to develop itself. however, almost nothing is written about how to transfer it to a hosting / server. To me, as a person who came from Linux hosting and PCP, the panel itself, the folders, and the project compilation - everything was new. There are manuals - if you suffer for a long time, then you can google. However, it turned out that the requests "to lay out the site, transfer the site, expand the site, create a site" practically do not produce results. Or you need to flip far enough. The correct query in this situation is the “publishing site”. However, on Habré there is the whole of Creating a Windows Azure Web Site site and deploying there ASP.NET MVC 4 applications and Publishing an ASP.NET MVC site to an updated Windows Azure . however, this is for Azure.
Also, I ran into the problem that there is no possibility to directly publish the site directly from Visual Studio 2012 to hosting - there is a proxy that does not allow it. although connect via FileZilla - allows. I do not know what the problem is, I went to the administrators - they threw up their hands and said that the problem was in my Windows 8 Pro. Okay. Not such a problem.
')
Well, the hosting control panel itself. There are manuals, but in one place, specifically at the beginning of working with it and deploying the site, there is not enough information. Especially for "newbies" or PCPs who are used to a bit of the "other" logic of this process. And some of the information in English. A programmer is not supposed to be surprised or confused. But anything can happen.
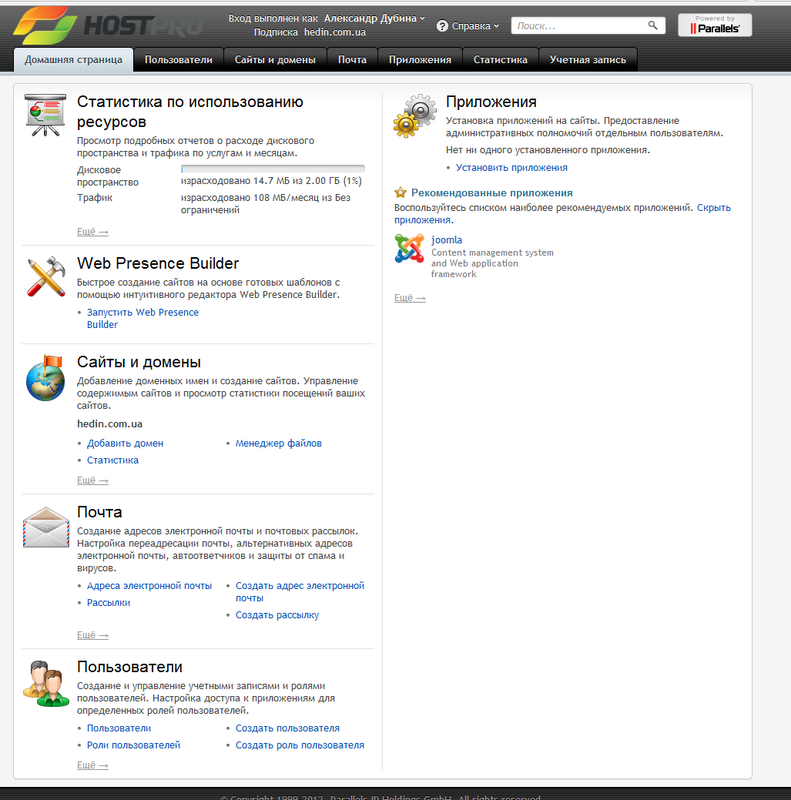
I'll start with hosting. the panel looks like this:
Carefully pictures!


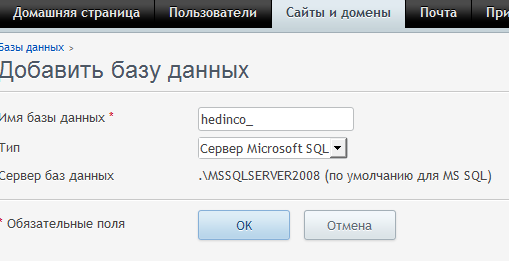
First, create a database. To do this, go to "Sites and domains" - "Databases" - "Add a database." Choose which database to create. I have a choice between MySql and MsSql. Enter the name.
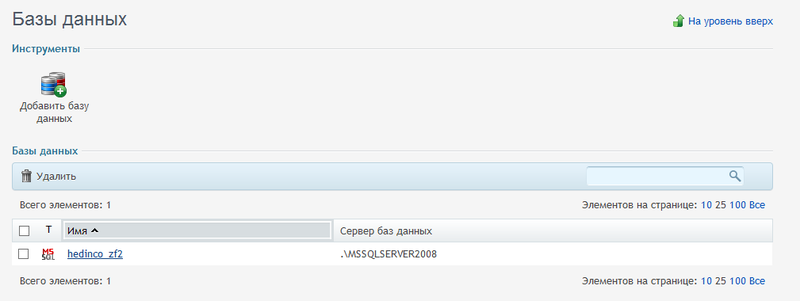
We return to the "Database". Select just created.
Select "Add user". Enter the required data.

Everything. We remember all the data. Open Web.config and change the connection string to the database, where “Catalog” is the database name, “User” is the user name, and “Password” is the password, respectively.
Also, when transferring a project, I had an error because of the name of the connection, with the name “LocalSqlServer”. I found a solution in Google. Add a connection string with that name. As a result, the connection section is as follows:
Add your connection for DbContext if necessary.
You need to add in the same Web.config line:
It is necessary to check that the dll row is copied to the bin daddy during compilation.
To do this, in the “References” Solution Explorer, we find the necessary libraries, and in the properties, if necessary, change “Copy locally” from “False” to “True”. Normally initially worth True. But check does not hurt.
Also, I would like to note that there were problems with the output of the default page. Physically, the addresses " hedin.com.ua " and " hedin.com.ua/home/index " refer to the same controller and method. But in the first case I was thrown at " hedin.com.ua/cgi-sys/defaultwebpage.cgi " and gave an error
I added a route for an empty address to the RouteConfig.cs file and everything became normal:
Stop debugging if it was running.
Select the desired project in the decision browser, click the right mouse button and select "Publish ..."
The first thing that appears is the profile. If not, select “Create” in the drop-down list.
The next tab is “Connection”. Since there is no direct access via FTP, we select “File System”. We select a daddy where to copy the compiled site, ready for uploading to the server. You can also select "FTP" and upload directly to the hosting. Then you will need to specify the connection data.
Further. "Options". Choose Release / Debug. Put a tick "Delete existing files." In order to always get an exact copy of the site that worked for us in Visual Studio.
Click the "Publish" button in the lower right corner of the window.
So. We received the necessary files that are left to be copied to the server.
Open FileZilla or another convenient FTP client. Connect to the server. I have the following directory tree:

We go to the daddy "httpdocs" (analogue of "www / public / public_html" on Linux servers). And delete all the content (if the hosting is new), or just update the necessary folders / files. Copy into it the contents of the directory where we Visual Studio published the site.
In the admin panel "Sites and Domains", select the button "Show (hide) advanced operations", "ASP.NET Settings".
There will be a button "Change version". Choose the right one. By default, I was 2. I chose 4. Note that you need to create a project in Visual Studio with a netframework that supports hosting. I tried to create it under 4.5 - it did not start. (Although, if, for example, you create a site on php 5.4 and hosting 5.3, but the project does not use "5.4 chips", the site will work fine).
Click save.
Everything. We go into the browser, and if your DNS has already been updated and attached (hosting domain), you will see your website running on the Internet.
I studied on a standard project created by VS.
If the domain is not yet attached to the hosting, or has not yet been purchased, you can view it using your hosting IP. To do this, go to the admin panel on the “Sites and Domains”. Scroll to the bottom. We see the name of our domain, but against the button. The first of them allows you to preview the site.

P.S. If you have found inaccuracies, errors, or there is a way to do better, I will be glad to know and, if possible, correct.
About the development of the site on ASP.NET MVC 3/4 is written enough. At least, what would begin to develop itself. however, almost nothing is written about how to transfer it to a hosting / server. To me, as a person who came from Linux hosting and PCP, the panel itself, the folders, and the project compilation - everything was new. There are manuals - if you suffer for a long time, then you can google. However, it turned out that the requests "to lay out the site, transfer the site, expand the site, create a site" practically do not produce results. Or you need to flip far enough. The correct query in this situation is the “publishing site”. However, on Habré there is the whole of Creating a Windows Azure Web Site site and deploying there ASP.NET MVC 4 applications and Publishing an ASP.NET MVC site to an updated Windows Azure . however, this is for Azure.
Also, I ran into the problem that there is no possibility to directly publish the site directly from Visual Studio 2012 to hosting - there is a proxy that does not allow it. although connect via FileZilla - allows. I do not know what the problem is, I went to the administrators - they threw up their hands and said that the problem was in my Windows 8 Pro. Okay. Not such a problem.
')
Well, the hosting control panel itself. There are manuals, but in one place, specifically at the beginning of working with it and deploying the site, there is not enough information. Especially for "newbies" or PCPs who are used to a bit of the "other" logic of this process. And some of the information in English. A programmer is not supposed to be surprised or confused. But anything can happen.
I'll start with hosting. the panel looks like this:
Carefully pictures!
Appearance of Parallels Plesk Panel
Creating a database. Changing the settings for connecting to the database.
First, create a database. To do this, go to "Sites and domains" - "Databases" - "Add a database." Choose which database to create. I have a choice between MySql and MsSql. Enter the name.
We return to the "Database". Select just created.
Select "Add user". Enter the required data.
Everything. We remember all the data. Open Web.config and change the connection string to the database, where “Catalog” is the database name, “User” is the user name, and “Password” is the password, respectively.
<add name="DefaultConnection" connectionString="Data Source=.\MSSQLSERVER2008;Integrated Security=false;Initial Catalog=hedinco_zf2;User ID=dub;Password=1qaz2wsx" providerName="System.Data.SqlClient" /> Also, when transferring a project, I had an error because of the name of the connection, with the name “LocalSqlServer”. I found a solution in Google. Add a connection string with that name. As a result, the connection section is as follows:
<connectionStrings> <add name="DefaultConnection" connectionString="Data Source=.\MSSQLSERVER2008;Integrated Security=false;Initial Catalog=hedinco_zf2;User ID=dub;Password=1qaz2wsx" providerName="System.Data.SqlClient" /> <remove name="LocalSqlServer" /> <add name="LocalSqlServer" connectionString="Data Source=.\MSSQLSERVER2008;Integrated Security=false;Initial Catalog=hedinco_zf2;User ID=dub;Password=1qaz2wsx" providerName="System.Data.SqlClient" /> </connectionStrings> Add your connection for DbContext if necessary.
Additional settings before compiling the site
You need to add in the same Web.config line:
<system.web> <customErrors mode="Off"/> .... It is necessary to check that the dll row is copied to the bin daddy during compilation.
- System.Web.Helpers
- System.Web.Mvc
- System.Web.Razor
- System.Web.WebPages
- System.Web.WebPages.Deployment
- System.Web.WebPages.Razor
To do this, in the “References” Solution Explorer, we find the necessary libraries, and in the properties, if necessary, change “Copy locally” from “False” to “True”. Normally initially worth True. But check does not hurt.
Also, I would like to note that there were problems with the output of the default page. Physically, the addresses " hedin.com.ua " and " hedin.com.ua/home/index " refer to the same controller and method. But in the first case I was thrown at " hedin.com.ua/cgi-sys/defaultwebpage.cgi " and gave an error
Server Error in '/' Application. The resource cannot be found. Description: HTTP 404. The resource you are looking for (or one of its dependencies) could have been removed, had its name changed, or is temporarily unavailable. Please review the following URL and make sure that it is spelled correctly. Requested URL: /cgi-sys/defaultwebpage.cgi I added a route for an empty address to the RouteConfig.cs file and everything became normal:
routes.MapRoute( name: "Root", url: "", defaults: new { controller = "Home", action = "Index" } ); Compiling and publishing site
Stop debugging if it was running.
Select the desired project in the decision browser, click the right mouse button and select "Publish ..."
The first thing that appears is the profile. If not, select “Create” in the drop-down list.
The next tab is “Connection”. Since there is no direct access via FTP, we select “File System”. We select a daddy where to copy the compiled site, ready for uploading to the server. You can also select "FTP" and upload directly to the hosting. Then you will need to specify the connection data.
Further. "Options". Choose Release / Debug. Put a tick "Delete existing files." In order to always get an exact copy of the site that worked for us in Visual Studio.
Click the "Publish" button in the lower right corner of the window.
So. We received the necessary files that are left to be copied to the server.
Copying a site to hosting via FTP
Open FileZilla or another convenient FTP client. Connect to the server. I have the following directory tree:
We go to the daddy "httpdocs" (analogue of "www / public / public_html" on Linux servers). And delete all the content (if the hosting is new), or just update the necessary folders / files. Copy into it the contents of the directory where we Visual Studio published the site.
Edit ASP.NET settings
In the admin panel "Sites and Domains", select the button "Show (hide) advanced operations", "ASP.NET Settings".
There will be a button "Change version". Choose the right one. By default, I was 2. I chose 4. Note that you need to create a project in Visual Studio with a netframework that supports hosting. I tried to create it under 4.5 - it did not start. (Although, if, for example, you create a site on php 5.4 and hosting 5.3, but the project does not use "5.4 chips", the site will work fine).
Click save.
Everything. We go into the browser, and if your DNS has already been updated and attached (hosting domain), you will see your website running on the Internet.
I studied on a standard project created by VS.
If the domain is not yet attached to the hosting, or has not yet been purchased, you can view it using your hosting IP. To do this, go to the admin panel on the “Sites and Domains”. Scroll to the bottom. We see the name of our domain, but against the button. The first of them allows you to preview the site.
P.S. If you have found inaccuracies, errors, or there is a way to do better, I will be glad to know and, if possible, correct.
Source: https://habr.com/ru/post/175139/
All Articles