Using Photon Cloud in Unity3D
In the process of creating my first game on Unity3D, I realized the need to organize a network mode in which players could cripple computer avatars of their opponents. If you have not previously engaged in creating client-server applications, did not raise your game servers, do not want to invest strength and resources in their installation and support, but you just want to understand the principles of organizing multiplayer and in 15-20 minutes to upgrade your project so that conscience to add the word Online to its title, then this article is for you.
A little about Photon itself. This company specializes in server engines. A convenient site where you can register and get AppID in just a couple of minutes. Extensive documentation, though in the original language, a bunch of manuals and demos. The network even has video tutorials in Russian, although all of this applies to the Photon Server. If you do not want to bother with installing and configuring the server, then you can use the Photon Cloud cloud service, for this you only need to get AppID upon registration, which guarantees you a license for 20 simultaneously connected users.
The site claims that you can connect to the Cloud in just a few minutes. And this is true ... if, of course, before that you spend several hours or days studying the documentation, because everything is not as obvious as the developers would like to think.
So what do we need for happiness?
')
1. Connect to the Cloud.
2. Create a test room, or join it if it already exists.
3. Ensure that all players interact with each other in the same scene.
The connection is organized using the built-in static class PhotonNetwork:
I think the values of the parameters are clear. The last parameter is needed to distinguish the versions of your applications from each other.
If in the Assets \ Photon Unity Networking \ Resources directory you have a PhotonServerSettings script,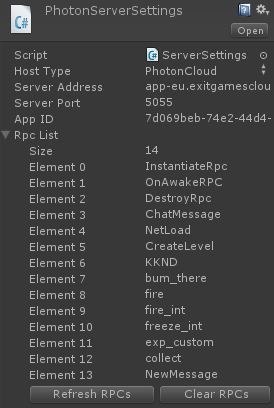 ,
,
then you can use the procedure
Create or join a test room:
When creating a room, in addition to its name, you can indicate whether it is also visible to others, whether it is open or not, as well as the maximum number of players. When you join it is enough to specify only the name.
If you are already in a room, you can view its properties in PhotonNetwork.room
Note : When loading a new scene, the connection to the server and the room is not broken.
Now it remains to synchronize the scenes and movements of the players on it. It all depends on the project itself. There are several main options:
1. You need an object to move synchronously for all players. For this, it is enough to add to the synchronized objects the PhotonView component - “Components / Miscellaneous / PhotonView”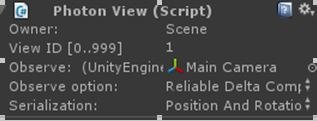 .
.
For Observe, specify the object to be synchronized, and the synchronized parameters in Serialization.
Each PhotonView component has a View ID.
2. You need to create the same object during the game at the request of the user. For example, a player must throw a grenade. To do this, you need to create a game object, where instead of Instaniate, you use the procedure
In contrast to Instaniate, you first need to specify the name of the prefab, and at the end specify its group (just any integer). Created by one of the players, such an object appears in all the others.
It is with the help of this procedure you need to create the main character. However, you will face the fact that all the characters will respond to your control. To avoid this, you must add a condition defining a local player to the character management script. Sort of:
Note : To use the photonView.isMine property, you must specify Photon.MonoBehaviour as the parent class for the script.
You can only create prefabs that are Assets \ Photon Unity Networking \ Resources
3. To manage the objects, RCP (Remote Call Procedure) will help you, with the help of which you will be able to perform procedures on remote applications passing them the necessary arguments. To do this, you need to add a [RPC] tag before declaring a procedure in the script, and add a PhotonView component to the object to which the script is attached, so that you can later access it.
For example:
Accordingly, in order to remotely run the procedure on the client, you need to define PhotonView:
or
And then perform the procedure
where as arguments specify the name of the called procedure, the recipients, and the arguments of the original function.
Note : As parameters, RPC understands only basic types, i.e. int, float, bool, string, etc.
4. As the synchronization object, the PhotonView component, by default, selects the Transform component, which is responsible for the position of the object in space. If we need to pass some information, then we need to specify the script as the synchronization object.
 ,
,
and in the script to insert the procedure
Although, in theory, this procedure should be called every time one of the parameters is changed, in this case, when changing the position, position or state of the character, you can also face the situation when it was called only by the master client. In order to forcefully run this procedure on a regular client, you can use this script:
Thank you for attention. Next time I plan to take a closer look at the Photon Cloud functionality.
A little about Photon itself. This company specializes in server engines. A convenient site where you can register and get AppID in just a couple of minutes. Extensive documentation, though in the original language, a bunch of manuals and demos. The network even has video tutorials in Russian, although all of this applies to the Photon Server. If you do not want to bother with installing and configuring the server, then you can use the Photon Cloud cloud service, for this you only need to get AppID upon registration, which guarantees you a license for 20 simultaneously connected users.
The site claims that you can connect to the Cloud in just a few minutes. And this is true ... if, of course, before that you spend several hours or days studying the documentation, because everything is not as obvious as the developers would like to think.
So what do we need for happiness?
')
1. Connect to the Cloud.
2. Create a test room, or join it if it already exists.
3. Ensure that all players interact with each other in the same scene.
The connection is organized using the built-in static class PhotonNetwork:
PhotonNetwork.Connect("app.exitgamescloud.com",5055," AppID","v 0.1"); I think the values of the parameters are clear. The last parameter is needed to distinguish the versions of your applications from each other.
If in the Assets \ Photon Unity Networking \ Resources directory you have a PhotonServerSettings script,
,then you can use the procedure
PhotonNetwork.ConnectUsingSettings(“ ”); Create or join a test room:
if (PhotonNetwork.countOfRooms==0) {PhotonNetwork.CreateRoom("test",true,true,4); } else {PhotonNetwork.JoinRoom("test");} When creating a room, in addition to its name, you can indicate whether it is also visible to others, whether it is open or not, as well as the maximum number of players. When you join it is enough to specify only the name.
If you are already in a room, you can view its properties in PhotonNetwork.room
Note : When loading a new scene, the connection to the server and the room is not broken.
Now it remains to synchronize the scenes and movements of the players on it. It all depends on the project itself. There are several main options:
1. You need an object to move synchronously for all players. For this, it is enough to add to the synchronized objects the PhotonView component - “Components / Miscellaneous / PhotonView”
.For Observe, specify the object to be synchronized, and the synchronized parameters in Serialization.
Each PhotonView component has a View ID.
2. You need to create the same object during the game at the request of the user. For example, a player must throw a grenade. To do this, you need to create a game object, where instead of Instaniate, you use the procedure
GameObject grenade = PhotonNetwork.Instantiate ("grenad", Vector3.zero, Quaternion.identity, 0); In contrast to Instaniate, you first need to specify the name of the prefab, and at the end specify its group (just any integer). Created by one of the players, such an object appears in all the others.
It is with the help of this procedure you need to create the main character. However, you will face the fact that all the characters will respond to your control. To avoid this, you must add a condition defining a local player to the character management script. Sort of:
if (photonView.isMine) {/* */} Note : To use the photonView.isMine property, you must specify Photon.MonoBehaviour as the parent class for the script.
You can only create prefabs that are Assets \ Photon Unity Networking \ Resources
3. To manage the objects, RCP (Remote Call Procedure) will help you, with the help of which you will be able to perform procedures on remote applications passing them the necessary arguments. To do this, you need to add a [RPC] tag before declaring a procedure in the script, and add a PhotonView component to the object to which the script is attached, so that you can later access it.
For example:
[RPC] void Chat(string NewMessage) { Debug.Log(NewMessage); } Accordingly, in order to remotely run the procedure on the client, you need to define PhotonView:
PhotonView photonView = PhotonView.Find(view ID); or
PhotonView photonView = PhotonView.Get(gameobject); And then perform the procedure
photonView.RPC("Chat ", PhotonTargets.All, “ ”); where as arguments specify the name of the called procedure, the recipients, and the arguments of the original function.
Note : As parameters, RPC understands only basic types, i.e. int, float, bool, string, etc.
4. As the synchronization object, the PhotonView component, by default, selects the Transform component, which is responsible for the position of the object in space. If we need to pass some information, then we need to specify the script as the synchronization object.
,and in the script to insert the procedure
void OnPhotonSerializeView(PhotonStream stream, PhotonMessageInfo info) { if (stream.isWriting) { //We own this player: send the others our data stream.SendNext((int)controllerScript._characterState); stream.SendNext(transform.position); stream.SendNext(transform.rotation); } else { //Network player, receive data controllerScript._characterState = (CharacterState)(int)stream.ReceiveNext(); correctPlayerPos = (Vector3)stream.ReceiveNext(); correctPlayerRot = (Quaternion)stream.ReceiveNext(); } } Although, in theory, this procedure should be called every time one of the parameters is changed, in this case, when changing the position, position or state of the character, you can also face the situation when it was called only by the master client. In order to forcefully run this procedure on a regular client, you can use this script:
if (!PhotonNetwork.isMasterClient) { PhotonStream PS=new PhotonStream(true, null); PhotonMessageInfo PI= new PhotonMessageInfo(); OnPhotonSerializeView(PS,PI); } Thank you for attention. Next time I plan to take a closer look at the Photon Cloud functionality.
Source: https://habr.com/ru/post/175037/
All Articles