ACE: the most functional code editor

Hello, gentlemen!
I was quite pleasantly surprised when I learned that the Ajax.org project, called Ace, was almost never mentioned in Habré. Ace is the web editor for the new generation of source code. It supports a lot of different functions, including: the presence of syntax highlighting for more than 60 programming languages, support for a crazy number of color schemes from various popular IDEs, including: extensive customization, syntax checking for several scripting languages. It so happens that this article is likely to be versatile, i.e. contain material for web developers and C ++ programmers, whom I campaign so successfully towards Qt. So, what can you read in this article?
')
- Quick start with Ace. Where can I use Ace? Why?
- Porting Ace to Qt and wrapping its API: How-To for the creators of Qt5-based libraries (such as my port Ace - Novile
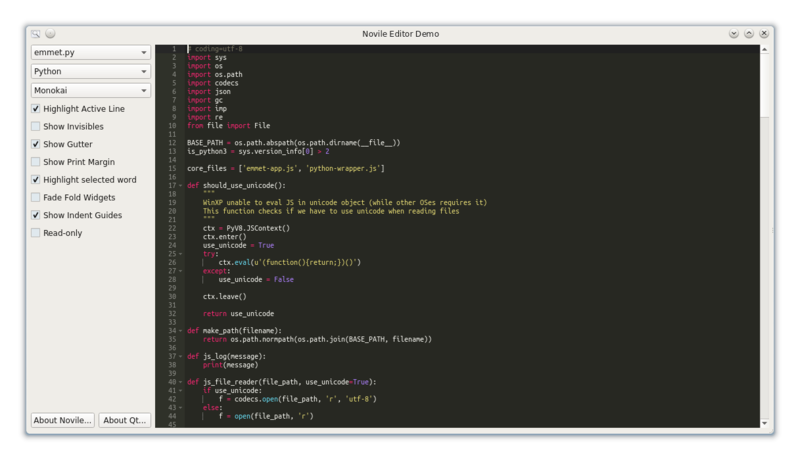
Now let me show a couple of screenshots of the example application that uses my Novile library:

What is Ace?
Ace (English Ajax.org Cloud9 Editor) is an online source code editor with syntax highlighting, themes, and hotkeys, written in Javascript, distributed under MPL / LGPL / GPL licenses, and easily embedded in any web page. Ace designed as the main editor of Cloud9 IDE is a continuation of the Mozilla Skywriter (Bespin) project. Now the project is hosted on GitHub and is actively developing.
Ace can be interesting to those who need to install a beautiful and most importantly - convenient source code editor on the site or embed it in their application. Of the advantages of the editor are:
- Highlighting for more than 60 languages (there is an import of .tmlanguage files)
- There are more than 20 themes (.tmtheme are also imported)
- Real-time syntax check (javascript / php / css / etc.)
- Works on large documents (they say it pulls 4,000,000 lines of code)
- Code folding, in the presence of its programming language
- Easily customizable hotkeys and combinations
- Multiple Cursors and Selections
- Display non-printable characters (which is very important)
- Automatic code alignment
- Search and replace on regulars
- Soft and hard tabs
This makes Ace a very convenient and easily embedded editor!

API and documentation
The presence of documentation determines its absence. In short, there is no normal documentation for Ace. There is one on the site, but to call it API Reference is too loud to say. For now, let's interactively set up this editor. Step-by-step, so to speak.
Step 1. Elementary tuning
Start by creating the proposed page with the editor. Create a template:
<!DOCTYPE html> <html lang="en"> <head> <title>Ace Editor Demo</title> <style type="text/css"> #editor { position: absolute; top: 0; right: 0; bottom: 0; left: 0; } </style> </head> <body> <div id="editor"></div> <script src="http://d1n0x3qji82z53.cloudfront.net/src-min-noconflict/ace.js" type="text/javascript" charset="utf-8"></script> <script> var editor = ace.edit("editor"); // editor // ! </script> </body> </html> Fine! Now we have a simple page with a simple code editor. This is already something. By the way, you can use other sources ace.js. Not to mention that you will need other files, it is better to generally compile it yourself (node-ohm) or assemble it in pieces from built-files with different functionality.
Step 2. More colors!
Now is the time to add color to our intended JavaScript code. This can be easily done by a few simple calls. Well, let's add a couple of lines:
editor.setTheme("ace/theme/monokai"); editor.getSession().setMode("ace/mode/javascript"); What have we done? The theme of the editor is specified by a string containing the path of the format ace / theme / <theme_name>. It is important to note that the theme is the Editor attribute . Next, we set the backlight mode, the backlight - the EditSession attribute . It is set in the same way as the topic, except that it is set not for the editor directly, but for his session. Now, let's make something dark. For example, you can practice writing a sophisticated jquery-based AJAX request :)
Step 3. We manage the text on API-level
Writing code is good, but it is even better to be able to do something with it at the program level. In this step, I will try to understand the main functions of the editor and their API. As said Gagarin, let's go!
Get and set the content:
editor.setValue("<source code>"); // editor.getValue(); // -> String () A bit of work with highlighting:
var selectionRange = editor.getSelectionRange(); // Range - var selectionText = editor.getSession().getTextRange(selectionRange); // -> String ( ) And now let's play a little with the cursor:
var pos = editor.getCursorPosition(); // Object {row: N, column: M} editor.insert("I know how to insert text"); // , editor.gotoLine(lineNumber); // #lineNumber ( ) What about advanced coding management?
var lines = editor.session.getLength(); // editor.getSession().setUseSoftTabs(true); // "" Tab-. document.getElementById('editor').style.fontSize='12px'; // #editor editor.getSession().setUseWrapMode(true); // text wrapping editor.setShowPrintMargin(false); // - (40, 80 , ) editor.setReadOnly(true); // , false - By the way, if suddenly you want to change the size of the div # editor, without changing the size of the window itself, then you need to run
editor.resize() Step 4. Search and events
Unfortunately, I will say a few words about the search, as for some reason there is no desire to describe his work here now. In short, it supports regular expressions, case sensitivity, and many other parameters. API comes down to
editor.find('needle', { // "needle" backwards: false, // wrap: false, // caseSensitive: false, // wholeWord: false, // regExp: false // }); editor.findNext(); editor.findPrevious(); editor.replaceAll('pub'); We listen to various events:
// - editor.getSession().on('change', function(e) { // e.type, etc }); // editor.getSession().selection.on('changeSelection', function(e) { // e.type, etc }); // editor.getSession().selection.on('changeCursor', function(e) { // e.type, etc }); And now very cool - hot keys and shortcuts:
editor.commands.addCommand({ name: 'myCommand', // bindKey: {win: 'Ctrl-M', mac: 'Command-M'}, // PC Mac exec: function(editor) { // // editor.* }, readOnly: true // false, readOnly }); In theory, having this knowledge (+ specifics from the full api reference), you can write an editor similar to the Cloud9 IDE editor. Of course you need to expand it very much, but it's worth it.
Novile Component for Qt
Now we will talk about the project Novile , the project on which I worked last week. Those who are courageous will continue to read, and those who are not particularly waved by it can scroll through to the Conclusion. And I will ask the Jedi to stay. I'm going to talk about how to use Novile, why you need it, and most importantly, I will tell you
Who needs it?
When I started working on Novile, I first of all thought about how it could be used. According to reviews of familiar programmers, I decided that you can use Novile in various desktop (and not only) applications where you need to edit the code, or at least the configuration files. There are quite a few such applications, but with Novile there should be more.
Novile, in particular, created with Qt, created for Qt. Who does not know, Qt is a framework for developing cross-platform software in C ++ (you can still use Python, Java, but this is not the case). Googling, you can understand that Qt is something that Qt is the Linux Mac Window Symbian Android iOS Embedded. Novile is a bridge between the low-level JavaScript editor API to high-level C ++ code through QtWebKit.
Assembly system
Despite the fact that Qt is very actively promoting QMake, and QBS-mania will soon begin, I think that for libraries the best option is definitely CMake. It gives the level of customization of the assembly, which is really needed.
Now to build and install Novile with the documentation, debug output and an example you need to run (Linux):
cd path/to/novile mkdir build && cd build cmake -DCMAKE_BUILD_TYPE=Debug -DCMAKE_INSTALL_PREFIX=path -DVERBOSE_OUTPUT=Yes -DBUILD_DOCS=Yes -DBUILD_EXAMPLE=Yes .. make # make install Convenient, isn't it? Today I will try to teach you how to make such libraries (in this case for Qt 5). By the way, I will not tell how SMake works, and how to work with it , since there is already such an article on Habré. It takes you just a couple of minutes. And now, if you are not interested in CMake, you can scroll through the following article.
Qt 5 in CMake 2.8.8+
How to force CMake to collect Qt 5 projects? Yes, very simple. We read the code and comments (by the way, it's nice that there is a highlighter for CMake on the habr):
# .h - set(CMAKE_AUTOMOC ON) # # ( include_directories(.) set(CMAKE_INCLUDE_CURRENT_DIR ON) # QtWebKitWidgets ( ) # , , cmake- Qt $PATH find_package(Qt5WebKitWidgets REQUIRED) # .cpp set(NOVILE_SOURCES # .cpp editor.cpp ) # set(NOVILE_HEADERS # .h editor.h novile_export.h novile_debug.h editor_p.h ) # QRC - Qt. uic .qrc qrc_*.cpp , # . NOVUILE_RCC_SRC - qrc_*.cpp qt5_add_resources(NOVILE_RCC_SRC ../data/shared.qrc) # qrc_*.cpp add_library(novile SHARED ${NOVILE_SOURCES} # shared- ${NOVILE_HEADERS} ${NOVILE_RCC_SRC} ../data/shared.qrc # IDE (.cbp ) ) qt5_use_modules(novile WebKitWidgets) # link Qt 5 set_target_properties(novile PROPERTIES # DEFINE_SYMBOL NOVILE_MAKEDLL # define EXPORT/IMPORT PUBLIC_HEADER "${NOVILE_HEADERS}" # ) install(TARGETS novile LIBRARY DESTINATION ${CMAKE_INSTALL_PREFIX}/lib PUBLIC_HEADER DESTINATION ${CMAKE_INSTALL_PREFIX}/include ) If you create your own library, then you can not avoid it. You may also need to collect .ui user interface files. For this there is a special macro:
# EXAMPLE_UIC_HDR - ui_*.h qt5_wrap_ui(EXAMPLE_UIC_HDR mainwindow.ui) Import / Export Switchers
When working with the library, some symbols must go into export, and then, at the stage of using, to be imported from it, it is therefore convenient to use the following structure:
#ifndef NOVILE_EXPORT # if defined(NOVILE_MAKEDLL) # define NOVILE_EXPORT Q_DECL_EXPORT // # else # define NOVILE_EXPORT Q_DECL_IMPORT // # endif #endif class NOVILE_EXPORT MyClass { Q_OBJECT // ... So, now, during the build, you need to declare -DNOVILE_MAKEDLL (remember, we installed it in cmake above). When using the library, there will be no macro, and the export will be called.
How to use Novile?
An example of using Novile is coolly described in a project from the example folder, which is well built with the configuration key -DBUILD_EXAMPLE = Yes, which will do everything for you.
But here I am ready to give a small example of how conveniently everything is done from pluses (C ++ 11 + Qt 5)
#include <Novile/Editor> using namespace std; // somewhere in the code... Editor *editor = new Editor; editor->setHighlightMode(Editor::ModePython); editor->setTheme(Editor::ThemeMonokai); editor->setFontSize(13); editor->setPrintMarginShown(false); connect(editor, &Editor::textChanged, [=]() { // const QString &text = editor->text(); doSmth(text); }); editor->show(); // C ++ 11, powerful Qt and Novile added allow you to build a fast and cross-platform IDE with all the necessary functionality.
Conclusion
I hope that this article really helped both web developers and programmers. I can not imagine how well I sagitated the people on Qt, but I tried. Fair. I would like to say a few words in the direction of Novile. Frankly, now Novile is not an absolutely good product, so that I did not speak about it. Now it covers the strength of 50% of the functionality of Ace. If there is someone interested, you can always help the project on GitHub . Even the smallest pull request will be useful.
References
Thanks for attention,
namespace
Source: https://habr.com/ru/post/174987/
All Articles