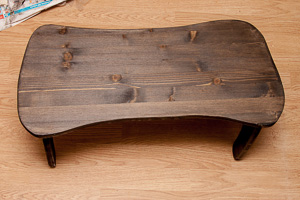
Making a folding bedside table for a laptop
 The topic of bedside tables for
 In fact, the idea to make some kind of notebook stand, with which it would be convenient to lie in bed, came to me quite a long time ago, for the first time, probably three years ago. But will you do something for yourself? And then, two weeks ago, my beloved one once admitted that she really lacks a table for her to have a table on which she could watch a movie on a laptop in the evening. In general, the desire to wait long did not make.
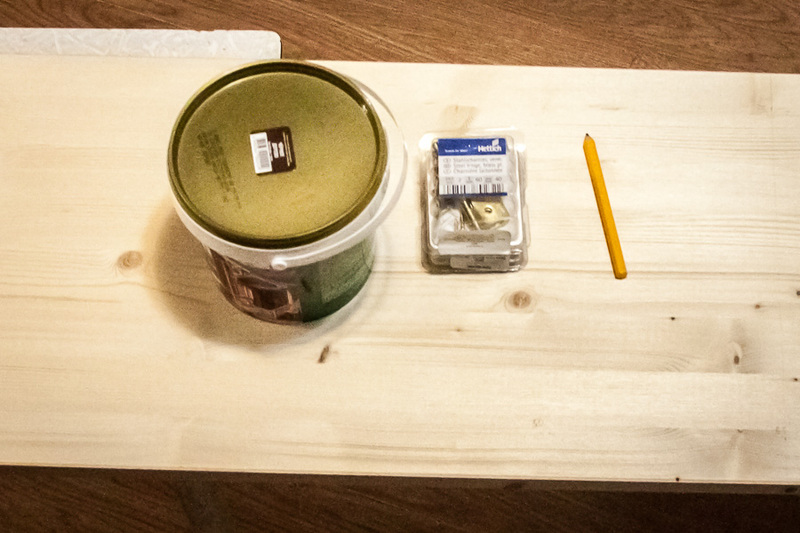
Ingredients
To buy everything I was going to make a table from, I went to Obi, but you probably can do it with the same success in other stores that exist in your city. I can only say that I really liked the fact that there are so qualified consultants in Ob that with their help any goods, at least for assembling furniture, can easily choose even a
')
All this, again, you are free to choose to your taste - the size of furniture panels depends on the size of the future table. For example, I bought two 300x1000 boards, on one I had a tabletop and a leg fit, most of the second remained untouched. By the way, instead of furniture panels, you can use chipboard or plywood, but even before the trip to the store I refused, because I wanted a
I chose paint in such a way that the table would fit the walls of the room of the future owner. There is a wide choice of paints in the shops, and that is absolutely cool - there are samples of pieces of parquet already painted with these colors (usually).
Let's get to work
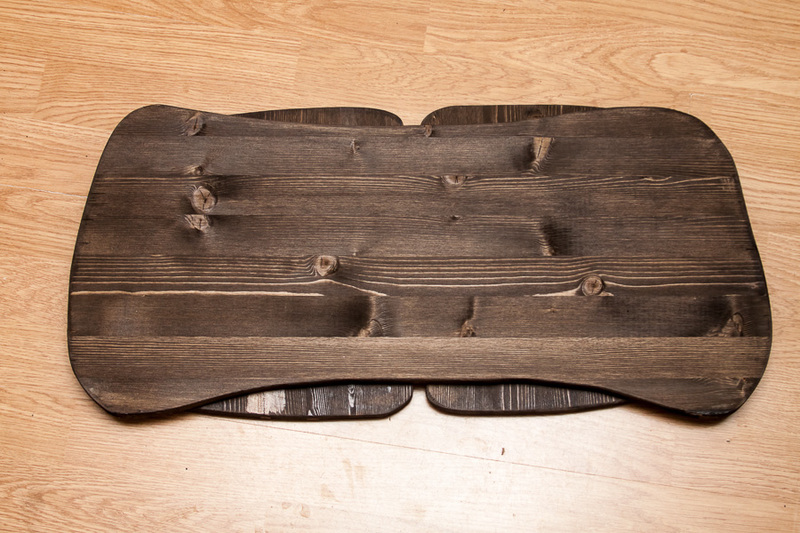
For a start, I printed out the “drawings” of the future product and transferred them to the tree with a pencil. The most successful way to do this would be to create the correct pattern and its stroke, but for some reason I did not bother with it and drew the shape of the table top and legs by hand. To help myself, I simply noted the control points along the ruler, and I drew the curves to the eye. I strongly recommend the future creator not to be lazy and make a quality pattern in any way you like, and then transfer the pattern to a tree from it. By the way, I advise you to arm with a ruler longer, the fewer rearrangements with intermediate marks you make - the smoother the straight line and the less likely you are to make a mistake.

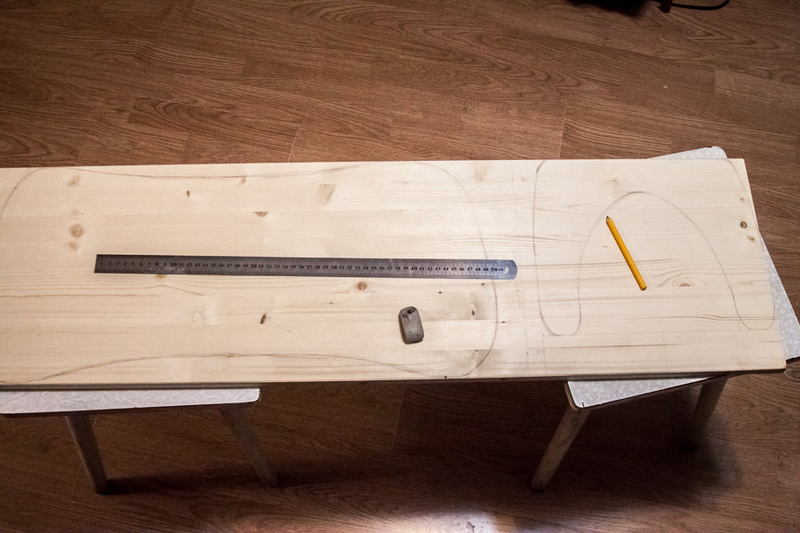
Now, almost the most interesting and difficult part, from my point of view, is cutting out our forms. I used the jigsaw and, frankly, I held it in my hands for the first time in my life. This is an indescribable feeling when you can saw and rotate at the same time ... In the process of making a part, remember the rule “measure seven times, cut once”. Do not be lazy once again not just to look at your drawing, but also to measure it with a ruler, whether everything is symmetrical, whether you have the right distances. Once you have verified the correctness of the lines several times, you can start cutting.


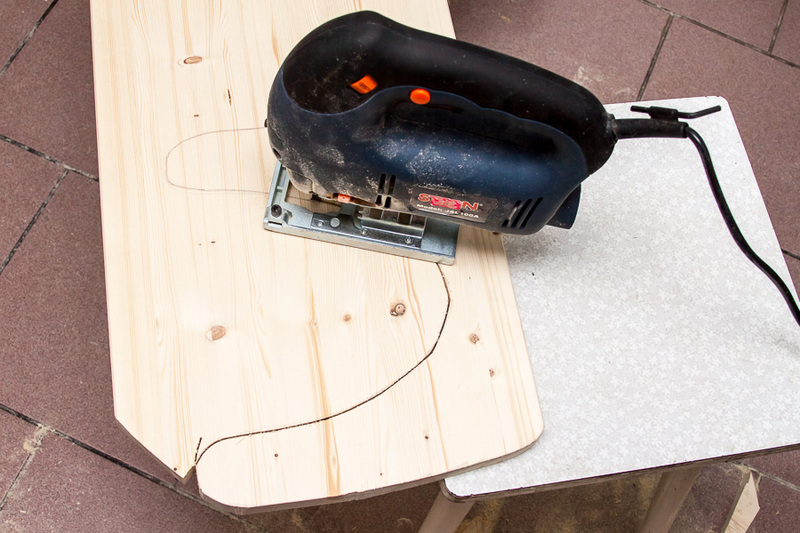
As can be seen in the photographs, I put the furniture shield on two stools and constantly moved them under it at those moments when this was required by another bend of the saw. I recommend that you do not be lazy and do the same, do not try to cut the shape from one side, not moving yourself and not moving the support - it is better when you always have a fulcrum and you can saw without fear that you will touch your stand.
Another small nuance - if you are a beginner, then begin to train on more subtle details, then the main details will be smoother (as you will learn already). Let me explain, I always started with the legs, as they are less noticeable than the tabletop. Those. I “rehearsed” on my legs, so on the tabletop I ended up with far fewer different shortcomings. This applies to drawing, and cutting, and painting.
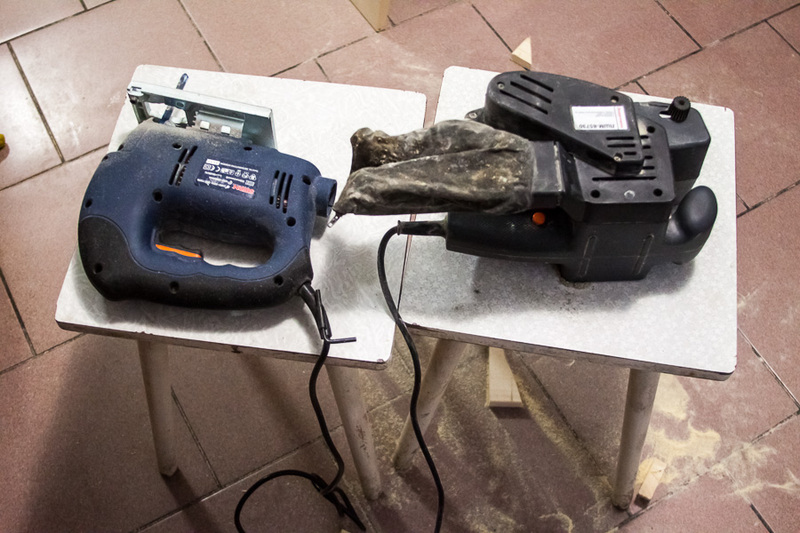
After we have cut out all the details, you can proceed to sanding. I was lucky, and in my apartment was a grinding machine. It is such a tool with two rotating shafts on which the skin is stretched. True, the passage of the grinding-machine got not all the details, because I had a burr of leather in the process, and I had to take it off and finish it manually - this is noticeably slower. I recommend not to do with one skin, but to have at least two - with large and small grains. With a large grain sandpaper, we remove all our flaws of cutting, and with fine sandpaper we make the elements smooth and tactilely pleasant.

When all the parts are sawed and sanded, the place of work tidied up, you can proceed to painting. I applied the paint in several layers because the wood very readily absorbed, leaving almost nothing on the surface. Despite the fact that the manufacturer stated that the paint dries in 4 hours, I, just in case, left everything painted overnight, moving the parts to the balcony. The paint after the first drying will be barely noticeable and will not meet your expectations - do not worry, we will definitely have a second painting. Most likely, the tree, even in those places where after sanding it was possible to let the silk scarf, a little "bristling." If the “bristling” is not very pronounced, then you can rely on lacquer, but if your fibers are completely reared, then it will not be superfluous to re-sand and re-dye exactly the sandy areas so that the whole product will be evenly colored in the future. Doing so indefinitely will not have to, because the second time the tree no longer absorbs so much moisture.
In the process of painting with a brush, drive only along the fibers and constantly monitor and avoid smudges. As with everything else, paint first the places that will be less noticeable in the future and only at the end, having trained, go on to those parts that will always be visible. It's great if you have several brushes of different sizes, at least one for surfaces and one for ends. But in principle, you can do without one, like me.

I painted the table twice, respectively, it took two days, because each drying lasted the night, and the next morning I went to study / work and spent time on the table only in the evening. After two stains, the color satisfied me a little more than completely, so it was possible to move on to the table varnishing. There was no lacquer at home, I had to go separately to the Order located next to the house - there is also a very large selection of different paintwork materials. I needed a matte, colorless varnish. I didn’t dwell on the manufacturer, so I chose a jar of semi-matt yacht varnish with the most beautiful label. By the way, it was also not difficult to choose what I needed, because already prepared samples were added to the rows of numerous cans. Again, you can choose a varnish to your liking, try a gloss or semi-gloss, I just

Drying the varnished parts took me another half day of work. By the way, the varnish was applied much faster, since after two paints practically did not soak into the tree at all. Again, beware of smudges and lachite products strictly in the direction of the fibers, and not across them.
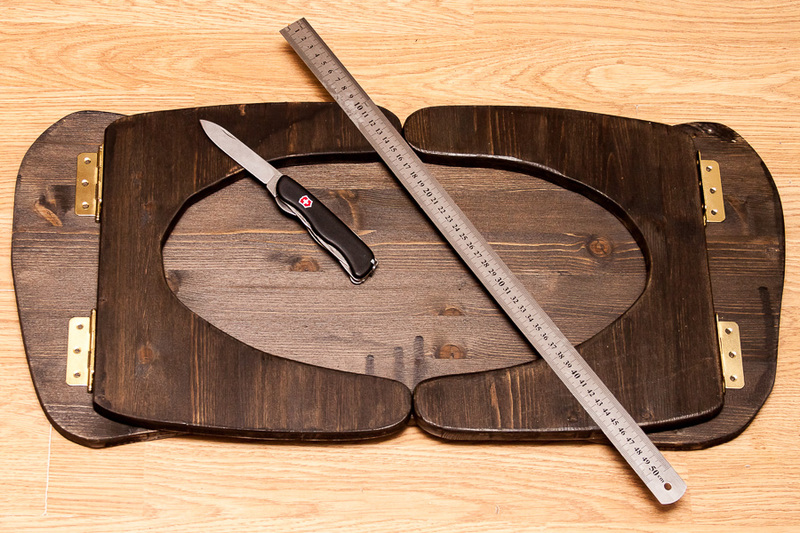
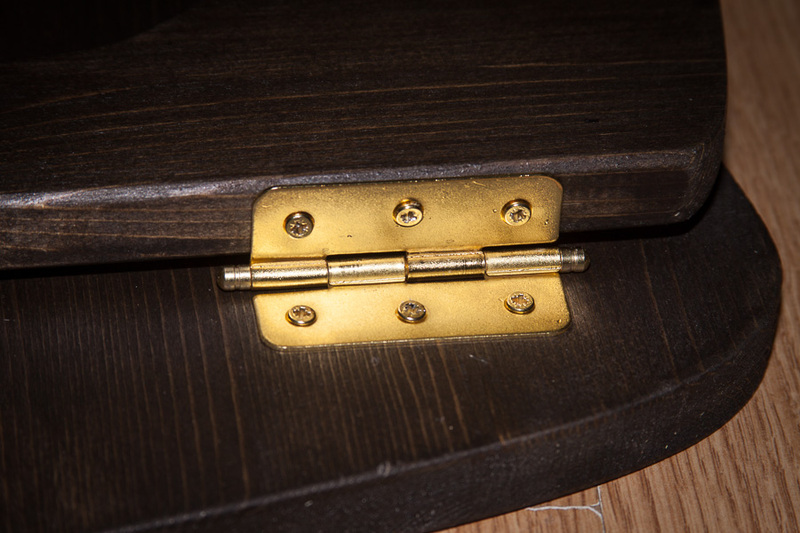
If everything is dry after varnishing, we have the smallest part left - the assembly. First, I have long placed the legs and loops on the table top to achieve symmetry. After my eye was satisfied, the measurements with a ruler ruined the whole of my design and everything had to be put again. Do not rush to build. Ten times attach and try to lay / lay out the legs, so that they are cleaned, laid out to the end and were symmetrical. If you have arranged everything as needed, you can make notes. I made notes with a knife, you can use a marker, I was just afraid to get something superfluous.
Well, it remains only to screw everything. Our table is ready!

As a bonus, I attach a photo of the main inspirer of the project, who knew nothing until the very last moment!

Unrealized ideas or what you can beat
I really wanted to make a deepening under the cup in the table, but I could not figure out how to achieve this. There was a variant of cutting out the cutter and then smoothing the edges with the sandpaper, but the cutter has a drill in the center that would pierce my worktop through. A few more people offered me the same option - drill a through hole, and then paste some plastic jar in there and paint it along with the table top. I refused this option because for me, aesthetics were more important than functionality.
Also, I thought it would be cool to make the tabletop slightly sloping and in the lower (or front, as you wish) parts, to make some kind of support for a laptop, or a pencil, so that nothing slides and does not move out. Perhaps this is unnecessary.
(UPD) Cost
In the comments a couple of times asked to indicate the cost.
The cost of two furniture panels, a bucket of paint and two pairs of loops - 1000 rubles;
A separate dokuplennaya small jar of lacquer - another ~ 250 rubles.
But the paint and varnish still left tables for 5, from the remaining part of the furniture board you can cut two more pairs of legs.
Links and thanks
I definitely would not have made my table without the following articles:
- Bedside table do it yourself in 15 minutes - habrahabr.ru/en/post/85891
- Laptop table - habrahabr.ru/post/56577
- And here I saw an image of what I would like to do - sergelin.ru/furniture/061.asp
I express my deep gratitude to the authors of the first two articles and the author of the drawings on the third link.
I hope after this article even more young people will let go of the keyboard and take the tools in their hands, and even more girls will be made happy by a new small but terribly pleasant piece of furniture. Dare!
UPD: Thanks to all who voted, the topic is moved to DIY
UPD2: Updated the table! Redid the loop, as in the diagram

Source: https://habr.com/ru/post/174877/
All Articles