RaZberry - smart home based on Z-Wave and Raspberry Pi
 Many are trying to build a "smart home" with their own hands. When choosing a system, it is necessary to take into account not only the range and cost of end devices, but also the capabilities of the controller. Most controllers are immediately ready to work out of the box, but represent limited capabilities. However, it is often the flexibility and possibility of easy integration that is the fundamental criterion in the selection.
And so, the long-awaited “Lego cube” for automation systems based on Z-Wave technology, which has the desired flexibility and at the same time great functionality and low price, appeared.
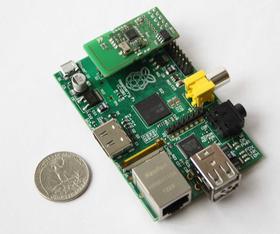
The RaZberry expansion card for the Raspberry Pi turns the most popular and cheap mini-computer into a Z-Wave home automation controller.
')
RaZberry is a three-in-one solution:
- Z-Wave ZM3102 Transceiver Board
- firmware for ZM3102, extending the capabilities of standard stick firmware
- Z-Way software

Iron
In Linux, RaZberry is visible as com-port / dev / ttyAMA0. The board essentially consists of a ZM3102 transceiver, an EEPROM memory for storing Z-Wave network data, a PCBA antenna, and a UART foot connector for the Raspberry Pi GPIO. Only Vcc, Gnd, TX and RX feet are really used. The rest of the legs are not used to work the board and only help to fix it more tightly. In theory, these legs can be used for other needs.
Firmware
The board provides an interface fully compatible with Sigma Designs Serial API, which makes it possible to use not only the supplied Z-Way software, but also any other software for Z-Wave (Open Z-Wave, LinuxMCE, FHEM or self-written), as well as cloud service Z -Cloud (see instructions ). The board also provides an extension of the Sigma Designs Serial API protocol from Z-Wave.Me, which is necessary for the operation of the Z-Way software.
The firmware also allows you to update yourself via UART, which will not only fix possible bugs in the future, but also change the firmware version from the one installed by default (SDK 4.54.01) to the older 5.03, which does not have the useful features of NWI, Explorer Frame and Random HomeId, but including SUC / SIS functionality. (For attentive: yes, I was not mistaken, 4> 5;)
Software
Z-Way is installed on top of the Raspbian wheezy by running the command
wget ‐q ‐O ‐ razberry.z-wave.me/install | sudo bashThe installation script will install the Z-Way into / opt / z-way-server, set the script to start in /etc/init.d/Z-Way, add it to the auto launch and configure the ttyAMA0 port. After rebooting (to apply kernel settings for ttyAMA0 — by default, Raspbian uses UART for the console) the server is ready for operation. In the browser, open
IP_OF_RASPBERRY:8083 IP_OF_RASPBERRY:8083 and start building a Z-Wave network.Consider in more detail the bundled Z-Way software with RaZberry. It consists of several parts:
- libzway library - the basis of the Z-Wave engine, providing a C API for simple work with Z-Wave (depends on pthreads, zlib, openssl)
- library libzwayjs - binding between C and JavaScript engine of Google V8. Provides a simple JS API for working with the Z-Wave network (depends on libv8 and libzway)
- library libzwayhttp - HTTP service for serving external clients, including user interfaces. Provides JSON API (depends on libmicrohttpd, openssl, libzwayjs and libzway)
- main.cpp - binding for running all services together, reading configs and command line parameters
This structure allows the use of different levels of integration with the components of the Z-Way. For projects where performance is important, a C-level API is available (there are header files for libzway included), for projects where operational development is needed, it is easier to use the JS API. It is important that both interfaces have a similar structure, which allows you to simply port the code from JavaScript to C after rapid prototyping.
Next, I will describe the JavaScript API level and show you how to create simple automation rules. Interface level C will remain outside the scope of this article. It is worth noting that the syntax in the Z-Way JavaScript engine on the server side is made by analogy with what was implemented for the Z-Cloud client-side - see the Z-Cloud API description . For further reading, it is assumed that the reader is already familiar with the features of the Z-Wave protocol (see the detailed description of the Z-Wave protocol ).
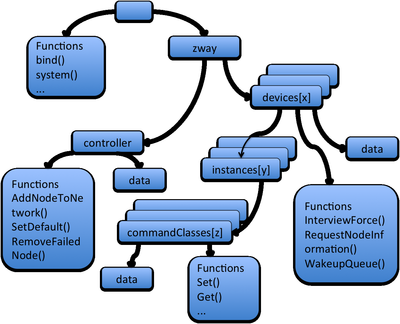
Everything related to Z-Wave in the namespace JavaScript is located in the global zway object, which provides a complete tree of data and methods over Z-Wave devices.
The child controller object contains data specific to the Z-Wave controller, as well as a list of devices. Each device contains a data structure (data), as well as a list of device channels (instances). Each channel has a list of Z-Wave Command Classes supported by the device. On the Command Class there are methods for calling functions (Set, Get, ...), as well as a data tree (data) where all information about the Class is stored.
Graphically, this can be illustrated like this (picture from the documentation):
The API structure is asynchronous and is divided into two parts:
- sending commands and requests
- receiving state change events
Commands are
zway.devices[2].instances[0].commandClasses.Basic.Set(0) by requests of the form zway.devices[2].instances[0].commandClasses.Basic.Set(0) (this example will turn off the light). The .Get () function will send a value request to the device. zway.devices[2].RequestNodeNeighbourUpdate() will ask the device to update its neighbors, and the zway.AddNodeToNetwork(1) command zway.AddNodeToNetwork(1) start the process of adding a new device to the network. In more detail all the commands are described in the documentation on the documentation page of the project RaZberry . Each request can add two additional parameters: callback functions for successful and unsuccessful sending.Teams are queued to send the appropriate packages. Sending is carried out through Sigma Designs Serial API, implemented on the RaZberry expansion board. All Z-Wave magic is hidden under this level of abstraction: for battery powered devices, these packages are marked as awaiting awakening, a preliminary key exchange is in progress for encryption, to save battery power and time on air, some packages are joined together and much more ... As in any protocol , Z-Wave has a lot of its cockroaches, all of which are under the Z-Way API carpet and do not crawl out.
All data received from devices is recorded in a data tree belonging to a device or a Command Class. Each element of the data tree has attributes value (element value), updateTime, and invalidateTime (timestamp update dates and value obsolescence), name (name). The tree structure is also described in detail in the documentation. To receive notifications about changes in tree values, there is an event subscription system. The bind function for each element of the tree allows you to bind the callback function to change data.
zway.devices[2].instances[0].commandClasses.Basic.data.level.bind(function (type[, arg]) {}, [arg, [watchChildren=false]]);The optional arg argument passed to bind will be passed to the callback function and will be useful for passing additional parameters to separate different events that have a common callback handler. The watchChildren (true or false) parameter allows you to track not only changes to this element of the tree, but also children. The this object in the callback function is the element of the data tree on which the bind runs: this.value is the value, this.updateTime is the date of the last update, etc. The type argument contains the bit mask of the type of change (changed, updated, deleted, obsolete, ... - all values are described in detail in ZDefsPublic.h, which is included in the software package).
Similarly, there is a bind function on the global zway object, which allows you to track changes in the arrays of devices, instances and commandClasses:
zway.bind(function(type, nodeId, instanceId, commandClassId) {}, [mask = 0xffff])The type argument indicates the nature of the change (a device / channel / command class has been added / deleted or a data tree file has been saved to disk (ZDDX file). The nodeId triplet, instanceId, commandClassId indicates a modified object.
Unbind can unsubscribe from events.
To simplify the syntax, you can omit the words commandClasses , instances [0] (exactly zero channel!), .Value (
level == 0 similar to level.value == 0 , but with JSON serialization without .value, the entire tree element with its attributes will be serialized , and not just the value).It should be noted that the zway global object is native in v8, i.e. This is not an ordinary JavaScript object: it can only change the data of tree elements. All other changes in the tree are ignored.
Here are some examples:
Running shell commands when a Basic Set event controller receives from other devices on the network (for example, a switch is associated with a controller with channel 1 using MultiChannelAssociation)
var instanceId = 1; var ctrlNodeId = zway.controller.data.nodeId.value; // Get controler Node Id if (zway.devices[ctrlNodeId] && zway.devices[ctrlNodeId].instances[instanceId]) { // Check that instance object exists var basicCC = zway.devices[ctrlNodeId].instances[instanceId].Basic; if (basicCC) { // check that Basic exists basicCC.data.level.bind(function() { // bind to Basic level value system("echo " + this.value); }); } } Automatic shutdown of the dimmer light 10 seconds after switching on (for the relay, use SwitchBinary instead of SwitchMultilevel). (Here it is assumed that the device is able to send reports and is associated with the controller)
var nodeId = 2; var instanceId = 0; var _tmr = null zway.devices[nodeId].instances[instanceId].SwitchMultilevel.data.level.bind(function() { var node = args[0]; var instance = args[1]; if (_tmr) { clearTimeout(_tmr); } _tmr = null; if (this.value > 0) { _tmr = setTimeout(function () { zway.devices[nodeId].instances[instanceId].SwitchMultilevel.Set(0); _tmr = null; }, 10*1000); } }); (here it is worth noting that to run this code several times you need to enter the _tmr array for each device / channel)
Execute javascript code
Where to embed this javascript code? There are several ways to execute this code:
- Write the code to a file and put it on the Raspberry Pi SD card in the / opt / z-way-server / [your folder] folder. Further this code can be executed from automation / main.js: executeFile (pathToJavaScriptFile).
- You can also register your own javascript file in config.xml instead of the native razberry file.
- Send it over HTTP via the Z-Way JSON API
Now we will describe the Z-Way HTTP / JSON API
This interface to the Z-Way server uses the HTTP protocol and the JSON format for data transfer. Using it is not difficult to create your own graphical interface for the automation server.
Commands are encoded directly in the URL request, and the answers come in the usual JSON ajaxera format.
The request / ZWaveAPI / Data / <timestamp> provides a JSON structure for the complete update tree from the time <timestamp>. She has a look
{
path1: object1,
path2: object2,
...
updateTime: <timestamp>
}
Here pathN is the path to the changed element of the tree, objectN is the new value of this element. updateTime - update generation time (you need to specify it in the next request in order to receive updates)
If you request / ZWaveAPI / Data / 0 , the server will return the full data structure.
Query / ZWaveAPI / Run / <cmd> runs the JavaScript code
zway.<cmd> . This request is similar to the more general / JS / Run / and is designed to be compatible with the Z-Cloud API service.The query / JS / Run / <cmd> executes the <cmd> in the v8 engine and returns in JSON the result of the execution of this command.
Other commands are described in the documentation.
A few examples:
localhost:8083/ZWaveAPI/Run/devices[2].SwitchMultilvel.data.level.valuelocalhost:8083/ZWaveAPI/Run/devices[2].SwitchMultilvel.data.level.value- returns the last brightness level received from the device (it is necessary to send SwitchMultilevel.Get () before reading)localhost:8083/ZWaveAPI/Run/devices[3].instances[1].SensorMultilvel.data.level.valuelocalhost:8083/ZWaveAPI/Run/devices[3].instances[1].SensorMultilvel.data.level.value- returns the last sensor value received from the device (it is necessary to read SensorMultilevel.Get () before reading)localhost:8083/ZWaveAPI/Run/devices[2].Basic.Set(0)localhost:8083/ZWaveAPI/Run/devices[2].Basic.Set(0)- turns off the device
Recall that instances [0] , commandClasses and value can be omitted.
! Do not forget that some characters must be explicitly encoded before sending (url encode): for example, + {}.
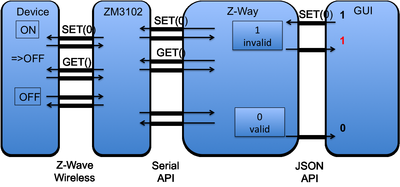
Together with the software comes a basic interface for the browser. He also uses the Z-Way JSON API to interact with the server. Its code is convenient to use to learn how the API works. An extension to jQuery to track tree updates received by the query / ZWaveAPI / Data / <timestamp> may also be useful .
This is how the interaction of different layers of the system looks like (picture from the documentation):
After some time, it is planned to write JS scripts for automation intended for ordinary users (the billet curves are already in the automation folder). They can be used in conjunction with the user's own scripts, i.e. You can already start writing your own scripts and using them in your projects.
Where to get?
Raspberry Pi are sold on RS components or Farnell sites.
The RaZberry board and other Z-Wave equipment is available in the online store Z-Wave.Me and others.
It's time to automate!
I am sure that RaZberry will be a convenient solution for building low-cost automation systems based on Z-Wave.
Source: https://habr.com/ru/post/174825/
All Articles