Mobile phone do it yourself. Part 2
In the first part, we looked at the “iron” part of the project, in this part we will begin to experiment with the device.
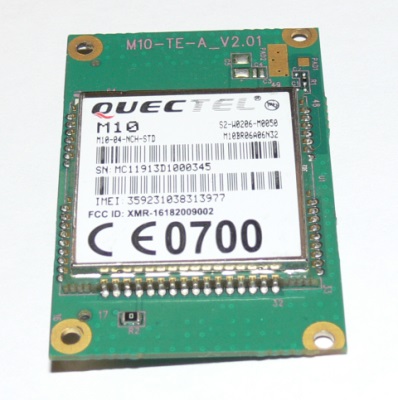
Module M10-TE-A, the basis of our telephone.
So, we connect the device to the COM port of the computer (I used the COM-USB adapter for this). We start the terminal (you can use the standard Windows terminal, but I use the Putty program), supply power to the device. Press the power button of the module, the network status LED starts flashing quickly.
')
By the flashing period of the LED, you can distinguish between the device states:
LED is off - the module does not work
64ms on / 800ms off - network not found
64ms on / 2000ms off - network found
64ms on / 600ms off - GPRS exchange
Enter the characters "AT" into the terminal until we receive a response. This is necessary for the module to automatically determine the exchange rate. Press Enter, we get the answer:
+ CME ERROR: 3
Now the module is ready to receive commands.
Despite the fact that while the network is not found, you can already check the work of some AT-commands. We will consider the work of only some of the most interesting commands; a full list of them is given in the documentation for the module.
Please note that some commands end with a question mark, some do not. They need to be entered exactly as they are shown here.
Also, to make the text more compact, empty lines are removed from the module’s responses.
So,
Information about the manufacturer of the module:
Module identification:
Module revision and software version:
Global ID:
Get IMEI:
Check network status:
here "2" means that the device did not find the network, but is in a search state.
We can also find out about the availability of a SIM card:
The first zero means that the card detection mode is turned off. Let's try to turn on the mode of detecting the presence of a SIM card:
Error 11 means that the PIN is not entered.
The command to turn off the module:
Turn on the module again with the button and move on. Now you can enter a PIN (if the SIM card requires, of course).
PIN entry:
The last line means that we received SMS!
Now you can see which operator you are connected to:
Check the signal quality:
The first number indicates the signal level: 0 corresponds to -113dBm or less, 31 corresponds to the level -51dBm or more. The second number indicates the intensity of the error bits in the channel (from 0 to 7), where 0 is the best value.
Moving on to the more interesting part.
Let's send an SMS to our device with the text “Hello world”. The line appears in the terminal window:
This means that we have as many as 6 SMS.
SMS reading is performed by the command
where 6 is the index of the SMS in memory. In response, we get a long string of numbers. It can be decrypted by any online SMS PDU (Protocol Data Unit) decoder. In order to receive and send SMS in text form, set the text mode SMS:
Now repeat the command AT + CMGR = 6, (where 6 is the number of the message in memory, you must enter the value you need), and see the message in readable form:
Now we will try to send SMS from the device:
After entering the command, the module enters text entry mode. Enter "Hello world" and press Ctrl-Z to exit text input mode. Message sent:
Call the device. We hear the ringtone, the string RING appears in the terminal.
Pick up the phone:
Put the phone down:
Call from device:
To talk through the headset, switch the device to the second set of audio inputs / outputs:
Checking ... Yes, it is quite possible to talk!
Of course, no Plug'n'Play will work, so the modem in the Windows system will have to be installed by hand. Let's give an example (Windows7 Home Extended). Go to the Device Manager / Action / Install the old device / Next / Install the equipment selected from the list manually / Next / Modems / Do not determine the type of modem (select from the list) / Next / Standard modem 56000 bps / Next.
Select the COM port, click Next / Finish.
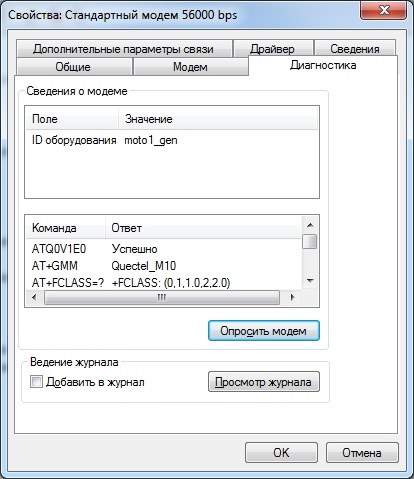
Now we find our modem in the Device Manager, open Properties / Diagnostics / Interrogate the modem.
We should see something like this:
Also, you may need to manually enter some commands required by your operator to configure gprs. This is done in the same modem properties window, in the "Advanced Communication Settings" tab. There is also a “Change Default” button where you can set up flow control (the “absent” option should be selected).
Now, theoretically, you can configure the connection in accordance with the settings of your operator, enter the number (* 99 #) and work on the Internet.
Unfortunately, however, the connection does not occur. We look at the exchange log on the tab "Diagnostics" (in the properties of the modem), and see the following. Modem "freezes" on the command:
Unfortunately, numerous attempts to set up a connection failed. But, for example, the Quectel M95 module works perfectly perfectly as an external modem.
There are two possible data transfer modes: transparent (transparent) and opaque (non-transparent). In the opaque mode, each sending and receiving data from the server is carried out by a separate command. We will not consider this mode. The most interesting is the transparent mode. In this mode, a direct channel is established with a TCP or UDP socket, and data can be sent and received via the module's UART port. The connection is established by the command
where "TCP" is the protocol, xxx.xxx.xxx.xxx is the IP address (in quotes), 23 is the port
after the connection is established, the modem responds with “OK” and enters the mode of data receiving / transmitting Upon completion of the exchange modem writes "CLOSED".
Yes, you can determine the coordinates and the exact time and without GPS. To do this, use the AT + QGSMLOC command. Do the following:
How are the coordinates determined? They are calculated on the operator’s side using known coordinates of the nearest base stations and signal strength. The accuracy of determining the coordinates is worse than the GPS, of course. If you believe the received coordinates and maps of Yandex, I am in a nearby street. But, unlike GPS, it works indoors. Here, too, there is one nuance: this function has earned only one SIM-card from the three.
Of course, in the post, far from all the possibilities of the module were considered, however, I tried to cover those topics that, in my opinion, would be most interesting to the device developer using gsm modules.
The “phone” that I presented to your attention, of course, can be improved by screwing a microcontroller to it, a display, and implementing various functions that we used to see in “real” phones. However, it is unlikely that I have enough desire for it. But, as I hope, the above information is enough to understand that the development of devices based on GSM modules is not such a complicated matter.
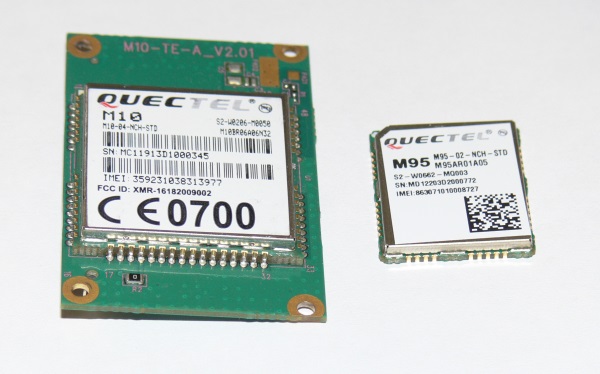
In addition, in the practical activities of the developer, the most frequent task is to transfer data. In this case, you can use the module without the “telephone” component, for example, the Quectel M95, which is cheaper.
M10-TE-A and M95 Modules
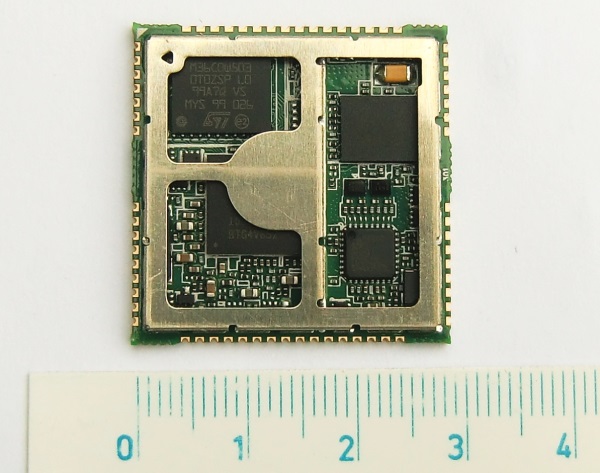
M10 module with cover removed
In the previous post there was a link to the archive with PDF documentation for the module. I will duplicate it here:
download archive
I will be glad to answer your questions, constructive criticism and suggestions are also welcome.
Thanks for attention.
Module M10-TE-A, the basis of our telephone.
Getting Started
So, we connect the device to the COM port of the computer (I used the COM-USB adapter for this). We start the terminal (you can use the standard Windows terminal, but I use the Putty program), supply power to the device. Press the power button of the module, the network status LED starts flashing quickly.
')
By the flashing period of the LED, you can distinguish between the device states:
LED is off - the module does not work
64ms on / 800ms off - network not found
64ms on / 2000ms off - network found
64ms on / 600ms off - GPRS exchange
Enter the characters "AT" into the terminal until we receive a response. This is necessary for the module to automatically determine the exchange rate. Press Enter, we get the answer:
+ CME ERROR: 3
Now the module is ready to receive commands.
Despite the fact that while the network is not found, you can already check the work of some AT-commands. We will consider the work of only some of the most interesting commands; a full list of them is given in the documentation for the module.
Please note that some commands end with a question mark, some do not. They need to be entered exactly as they are shown here.
Also, to make the text more compact, empty lines are removed from the module’s responses.
So,
The first steps
Information about the manufacturer of the module:
AT+GMI //: Quectel_Ltd Quectel_M10 Revision: MTK 0828 OK Module identification:
AT+GMM //: Quectel_M10 OK Module revision and software version:
AT+GMR //: Revision: M10BR06A06N32 OK Global ID:
AT+GOI //: M10 OK Get IMEI:
AT+GSN //: xxxxxxxxxxxxxxx //15- OK Check network status:
AT+CREG? //: +CREG: 0,2 OK here "2" means that the device did not find the network, but is in a search state.
We can also find out about the availability of a SIM card:
AT+QSIMDET? //: +QSIMDET: 0,0 OK The first zero means that the card detection mode is turned off. Let's try to turn on the mode of detecting the presence of a SIM card:
AT+QSIMDET=1 //: (SIM- ) +CME ERROR:10 OK //: (SIM- ) +CME ERROR:11 OK Error 11 means that the PIN is not entered.
The command to turn off the module:
AT+QPOWD=1 //: NORMAL POWER DOWN Turn on the module again with the button and move on. Now you can enter a PIN (if the SIM card requires, of course).
PIN entry:
AT+CPIN=XXXX (PIN-) //: +CPIN: READY OK Call Ready +CMTI: "SM",3 The last line means that we received SMS!
Now you can see which operator you are connected to:
AT+QSPN? //: +QSPN: "MegaFon",0 OK Check the signal quality:
AT+CSQ //: +CSQ:18,0 OK The first number indicates the signal level: 0 corresponds to -113dBm or less, 31 corresponds to the level -51dBm or more. The second number indicates the intensity of the error bits in the channel (from 0 to 7), where 0 is the best value.
Moving on to the more interesting part.
SMS sending
Let's send an SMS to our device with the text “Hello world”. The line appears in the terminal window:
+CMTI: "SM",6 This means that we have as many as 6 SMS.
SMS reading is performed by the command
AT+CMGR=6 where 6 is the index of the SMS in memory. In response, we get a long string of numbers. It can be decrypted by any online SMS PDU (Protocol Data Unit) decoder. In order to receive and send SMS in text form, set the text mode SMS:
AT+CMGF=1 //: OK Now repeat the command AT + CMGR = 6, (where 6 is the number of the message in memory, you must enter the value you need), and see the message in readable form:
+CMGR: "REC READ","xxxxxxxxxxxx","","2013/03/29 21:15:14+24" Hello world OK Now we will try to send SMS from the device:
AT+CMGS="+7xxxxxxxxxx" // After entering the command, the module enters text entry mode. Enter "Hello world" and press Ctrl-Z to exit text input mode. Message sent:
+CMGS:11 //11 - SMS Calls
Call the device. We hear the ringtone, the string RING appears in the terminal.
Pick up the phone:
ATA Put the phone down:
ATH Call from device:
ATDxxxxxxxxxxxx // To talk through the headset, switch the device to the second set of audio inputs / outputs:
AT+QAUDCH=1 Checking ... Yes, it is quite possible to talk!
Modem
Of course, no Plug'n'Play will work, so the modem in the Windows system will have to be installed by hand. Let's give an example (Windows7 Home Extended). Go to the Device Manager / Action / Install the old device / Next / Install the equipment selected from the list manually / Next / Modems / Do not determine the type of modem (select from the list) / Next / Standard modem 56000 bps / Next.
Select the COM port, click Next / Finish.
Now we find our modem in the Device Manager, open Properties / Diagnostics / Interrogate the modem.
We should see something like this:
Also, you may need to manually enter some commands required by your operator to configure gprs. This is done in the same modem properties window, in the "Advanced Communication Settings" tab. There is also a “Change Default” button where you can set up flow control (the “absent” option should be selected).
Now, theoretically, you can configure the connection in accordance with the settings of your operator, enter the number (* 99 #) and work on the Internet.
Unfortunately, however, the connection does not occur. We look at the exchange log on the tab "Diagnostics" (in the properties of the modem), and see the following. Modem "freezes" on the command:
ATS7=60L0M1&KN1X4 Unfortunately, numerous attempts to set up a connection failed. But, for example, the Quectel M95 module works perfectly perfectly as an external modem.
Data transfer
There are two possible data transfer modes: transparent (transparent) and opaque (non-transparent). In the opaque mode, each sending and receiving data from the server is carried out by a separate command. We will not consider this mode. The most interesting is the transparent mode. In this mode, a direct channel is established with a TCP or UDP socket, and data can be sent and received via the module's UART port. The connection is established by the command
AT+QIOPEN="TCP","xxx.xxx.xxx.xxx",23 where "TCP" is the protocol, xxx.xxx.xxx.xxx is the IP address (in quotes), 23 is the port
after the connection is established, the modem responds with “OK” and enters the mode of data receiving / transmitting Upon completion of the exchange modem writes "CLOSED".
Coordinates and time
Yes, you can determine the coordinates and the exact time and without GPS. To do this, use the AT + QGSMLOC command. Do the following:
AT+QIFGCNT=0 // GPRS OK // AT+QICSGP=1,"CMNET" // APN OK // AT+QGSMLOC=1 // , +QGSMLOC:0,60.xxxxxx,56.xxxxxx,2013/03/31,12:06:24 // OK // AT+QGSMLOC=2 // +QGSMLOC:0,2013/03/31,12:07:03 // How are the coordinates determined? They are calculated on the operator’s side using known coordinates of the nearest base stations and signal strength. The accuracy of determining the coordinates is worse than the GPS, of course. If you believe the received coordinates and maps of Yandex, I am in a nearby street. But, unlike GPS, it works indoors. Here, too, there is one nuance: this function has earned only one SIM-card from the three.
Conclusion
Of course, in the post, far from all the possibilities of the module were considered, however, I tried to cover those topics that, in my opinion, would be most interesting to the device developer using gsm modules.
The “phone” that I presented to your attention, of course, can be improved by screwing a microcontroller to it, a display, and implementing various functions that we used to see in “real” phones. However, it is unlikely that I have enough desire for it. But, as I hope, the above information is enough to understand that the development of devices based on GSM modules is not such a complicated matter.
In addition, in the practical activities of the developer, the most frequent task is to transfer data. In this case, you can use the module without the “telephone” component, for example, the Quectel M95, which is cheaper.
M10-TE-A and M95 Modules
M10 module with cover removed
In the previous post there was a link to the archive with PDF documentation for the module. I will duplicate it here:
download archive
I will be glad to answer your questions, constructive criticism and suggestions are also welcome.
Thanks for attention.
Source: https://habr.com/ru/post/174803/
All Articles