Installing applications with .EXE installers using GPO
 It is no secret to anyone that in organizations the installation of applications on client computers should be (or, frankly, it is recommended that it be) automated. Naturally, complex products, such as Microsoft System Center Configuration Manager, can perfectly cope with such a task, however, there have always been, are and will be organizations that, for one reason or another, have not acquired such a product. Therefore, it is necessary to install software products using the same standard tools of Windows operating systems, and for such a task, Group Policy functionality becomes preferable.
Also, everyone is well aware that with the expansion of the client side of the Group Policy Software Installation - GPSI , applications can be deployed to client machines in two ways: either by publishing only to users, or by assigning to users or computers.
What are ZAP files for?
By and large, both MSI installers and * .zap files can be used to publish applications, and both installation packages are handled differently. For example, the MSI software installation package file contains a database with all the necessary instructions for installing or uninstalling the application, and the Windows Installer service, which uses the Msi.dll library to read the * .msi files, is responsible for installing the program on the client computer. Accordingly, on the basis of the information declared in the installation package, this service copies the program files to the hard disk, and also makes changes to the registry and performs other tasks specified in the installer. Most often, all the information specified in the installation msi file is specified by the developer of the software being installed.
However, since not all software vendors use Windows Installer installation files, in some cases it may be necessary to create low-level application packages based on a zero administration initiative (in the original it sounds like ZAW - Zero Administration for Windows), that is, * .zap files which are text files with the necessary instructions for installing the application. After creating such a file, it must be placed in the folder with the installation package so that the client side extension can follow the installation instructions, after publishing which the application will appear in the “Programs and Features” control panel component and users can install it. But, unlike the MSI-installer, zap-files have such significant limitations as, for example, the fact that you cannot configure the installation process of the application, if the installer does not contain installation parameters.
Immediately I would like to note that this method is not as flexible as installing software using MSI installation packages, however, if you are unable to convert the installation file and the application must be centrally deployed, this method can be never by the way. Since the text file contains instructions for installing an existing exe file for both 32-bit and 64-bit applications, the possibilities to install software products using this method do not include the following features:
- Run applications with elevated privileges;
- Roll back changes in case of unsuccessful software installation process;
- Detection of damage to the installation process and the subsequent restoration of this process;
- Installing software components when first accessed;
- Use and embed transformation files.
And this is only the main part of those things that you cannot perform during software deployment using ZAP files. By the way, deploying applications in this way can only be accomplished by publishing applications. So users, as I mentioned several lines above, will be able to install such products directly from the “ Install a program from the network ” page of the “Programs and Features” control panel component .
Before we begin to create such a file and try using it, solely for test purposes, to deploy such a software product as Irfan View, I think it would be right if I tell you a little about the structure of such files. In such a file, only the first two lines are required, where such parameters as:
- FriendlyName - that is, this is the name that will be displayed in the "Programs and Features" control panel component ;
- SetupCommand - this is where the path to the application installation file is defined. Naturally, if necessary, you can specify either the UNC path or use the mapped drive. Also, if the application can be installed with additional parameters, these parameters should be specified after the installation path.
In other words, when using this method, you should first examine all the additional parameters of the installation files for each product.
In addition to these two parameters, in order to see the application version and other information in the “Program Installation” extension CSE or in the Programs and Features control panel component, you can add several additional parameters while writing such a file. For example, the following optional parameters are considered the most common:
- DisplayVersion = 2.13.1.5 . As you understand, this parameter is responsible for the displayed version of the software;
- Publisher is the name of the company that produces the application. This name will be displayed in the “Programs and Features” control panel component, as well as in the “Program Installation” client side extension itself;
- URL - naturally, this is an Internet address intended for obtaining additional information about the application.
Limitations of ZAP Files
 As I have already mentioned, unlike the msi installation packages, applications deployed by means of zap files cannot be assigned to computers or users. It is also worth noting that when installing the application using the current method, the standard installation program is launched. In other words, besides the added parameters, with the help of any additional parameters of this file you cannot customize the software installation process. Another limitation is the fact that the application cannot be installed as an administrator account, which can be extremely inconvenient in some cases. That is, applications are always installed by the local administrator.
When creating ZAP files, you should definitely take note of the following points (I already spoke about some of them a few lines above):
- Firstly, due to the fact that by running the ZAP file, the installation program is simply launched, as I said before, this tool does not allow the installation process to be performed with elevated permissions, which can be implemented using MSI packages. Therefore, if an application requests elevation during its installation, only those users for whom such permission is explicitly stated will be able to install it;
- Secondly, due to the fact that ZAP files are text documents, when saving such a file, you can accidentally create a file with the extension .zap.txt, which, for obvious reasons, will not be able to work correctly. In other words, make sure the file is saved with the correct extension;
- Thirdly, if you have computers with 64-bit operating systems on your network, you should definitely test the installation and operation of 32-bit applications on such operating systems. This is a very important step, as many 32-bit applications that are deployed using ZAP files can fail during their installation;
- And fourth, if you do not change its behavior when creating a ZAP file with 32-bit software, it will not be displayed in the “Programs and Features” control panel component under 64-bit operating systems.
I think about the purpose and application of these files intended for publishing software, you have already learned some information, and it is time to try to create and distribute the application by this method.
The deployment process is as follows: first of all, information about the installation process of the software product is recorded in detail in the ZAP file. The installer, of course, must be in a public location, otherwise it will not work. After that you need to place the generated file in a public distribution point of the software. This is done so that the GPO you created can localize this file. And in the end, the GPO itself is created, it is associated with the necessary department, and with the help of the client side extension “Software Installation”, the distributed software product is published for users.
Consider these processes, starting with creating the ZAP file itself.
Creating a ZAP file
 We will now publish, as I wrote above, a software product such as Irfan View, so it is advisable to download the pre-installation file from somewhere and place it in a public folder.
Now, as I have already said, having simply registered the path to the executable file, during the deployment of the software, its installer will be launched for the user. and the latter will have to go through all the steps of the wizard before the program is installed. For many users, this will be a big problem, and for this reason, along with the path to the installation file, you need to specify the parameters intended for a silent installation. Fortunately, this software product provides the possibility of such an installation.
The Irfan View installer has a whole list of various options that can help you during a silent installation of this product. Let's consider them:
- Silent - performing silent installation, that is, without user intervention;
- Folder - destination folder. If it is not specified with this parameter, then the old folder IrfanView will be used. If there is none, then the “Program Files \ IrfanView” folder is used;
- Desktop - creates a shortcut on the desktop; 0 = no, 1 = yes (default: 0);
- Thumbs - creates a shortcut for thumbnails; 0 = no, 1 = yes (default: 0);
- Group - creates a group in the Start menu; 0 = no, 1 = yes (default: 0);
- Allusers - desktop / start menu shortcuts for users; 0 = for the current user, 1 = for all;
- Assoc - allows you to set file associations; 0 = do not install, 1 = images only, 2 = select all (default: 0);
- Assocallusers - if this parameter is used, file associations are set for all users (works only in Windows XP);
- Ini - if used, sets the user folder for the INI file (system variables are valid).
Therefore, to install this software, we will use approximately the following command:
iview435_setup.exe / silent / desktop = 1 / thumbs = 1 / allusers = 1 / assoc = 1
Now that we know for sure which command will be used to install this software, we can start writing the zap file itself. Therefore, to compile such a file, perform the following actions:
- Open any text editor, for example, the same Notepad ;
- In the very first line of the file being created, the Application section is specified, enclosed in square brackets. That is, we write in this line as follows: [Application] ;
- As I have already written above, here two lines are mandatory, namely: the string FriendlyName and the string SetupCommand . Both in the first and in the second line the values are indicated after the equal in quotes. The sign is equally framed by spaces. That is, we get the following lines:
FriendlyName = “Irfan View”
SetupCommand = “\\ nameserver \ Install \ ... , and then comes the name of our installation file with all the parameters “ iview435_setup.exe ”/ silent / desktop = 1 / thumbs = 1 / allusers = 1 / assoc = 1
If necessary, you can also add comments by putting a semicolon at the beginning of the line. For example, on a new line, add a comment where we will write how our program will be installed:
; The program is installed in a quiet mode, with the creation of shortcuts on the desktop, a shortcut for thumbnails, and for all users with the association of graphic images only - Now we can deal with additional parameters, with the help of which we will determine the version of the program, its publisher and the URL address for support. In other words, the DisplayVersion, Publisher, and URL parameters will be applied:
DisplayVersion = 4.35
Publisher = IrfanView
URL = www.irfanview.com - Save the resulting file with the zap extension. For example, let this file be called “IrfanView.zap” .
In other words, you should get something like this: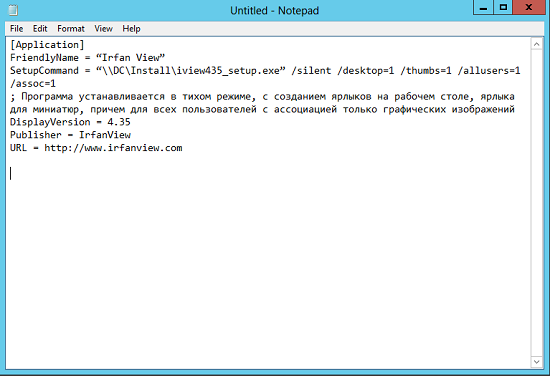
Fig. 1. Ready ZAP file
The file is almost ready for further deployment. We only need to place it in the public distribution point of the software. For example, if our SDP is the Install folder, we will create the ZAP Files folder there and place this file there. Is done. Now you can go directly to the distribution of software.
Deploying Irfan View with a previously generated ZAP file
Now, at the final stage, you should go to the “Group Policy Management” snap- in and perform the following actions:
- A new GPO is created (of course, if you wish, you can also use any of the existing GPOs), even if it is called “ZAP Files Publication” . It communicates either with a specific department, which includes user accounts, or with the level of the entire domain, and from the context menu of this object, select the appropriate command to open the Group Policy Management Editor;
- After that, already being in the Group Policy Management Editor , we need to expand the User Configuration \ Policies \ Software Settings node, then go to the Software Installation node. In order for the application to be published normally, you should go to the settings of this site. In other words, select the “ Properties ” command from the context menu of this node;
- Here, as I have already said, so that we can publish our application without any problems, we should indicate the path to the distribution point, that is, “\\ OURSERVER \ Install” in the properties of this client side extension. In addition, on the tab “ Advanced ” it is necessary to check the box “ Make 32-bit X86 down-level (ZAP) applications available to Win64 machines ”. These settings are enough for us, we save all the changes made;
')
Fig. 2. Customize the CSE GPSI extension - Now you can create a software distribution policy. In other words, from the context menu of this node, select the command intended for creating a new package. Now in the displayed dialog box, select from the drop-down list of file types the type “ ZAW Down-level applications package (* .zap) ”, and then go to the folder with the previously created ZAP file. Naturally, at this stage you should select this file, as shown in the following illustration:
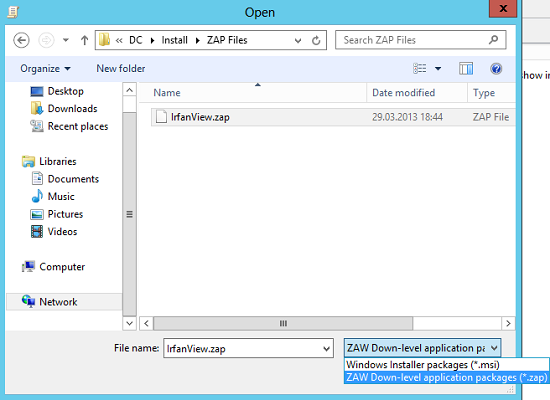
Fig. 3. Adding a ZAP file for software deployment - Due to the fact that we don’t need to add any additional options for this package, in the Deploy Software dialog box that appears, among all the available options, we’ll stop at “ Published ” and create an installation package.
Ultimately, the “Software Installation” node of this snap-in should look like this:
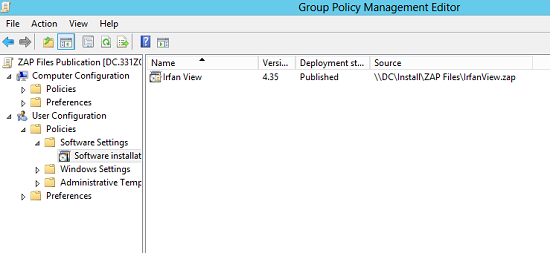
Fig. 4. Snap Group Policy Management Editor after creating the package
Done, it remains only to check all the changes. Now you can even update the policy settings on the current machine. We do this by force, that is, along with the Gpupdate command , we specify the parameters / force / boor / logoff .
It remains only to install the published package. To do this, we go to the control panel and go to the “Programs and Features” component. Then, in order to get to the location where the published product will be installed, you should follow the link “Install a program from the network” .
As you can see in the following illustration, here you can find our Irfan View.
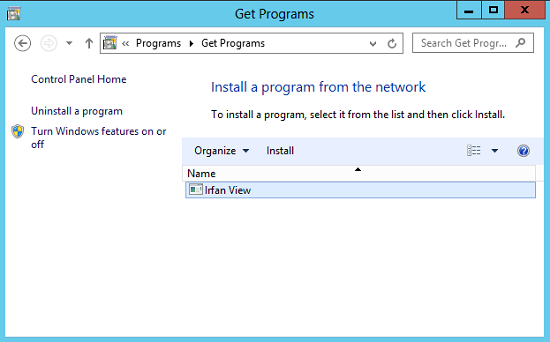
Fig. 5. Application available for installation
Conclusion
Actually, no matter how sad it may be, on this note the process of software deployment by means of Group Policy functionality together with ZAP-files comes to an end. From this article, you learned about what ZAP files are, in which scenarios they should be used, and when it will be necessary to dwell on other solutions. You learned about the very syntax of such files, as well as, naturally, how you can create such a file, and then how to distribute the software using such a file. Write in the comments, did you have to deploy software products in this way in your practice and, if it's not a secret, what applications did you deploy that way, and did you encounter any pitfalls when using this method?
Source: https://habr.com/ru/post/174743/
All Articles