Automated integration testing of an ASP.NET application
In this article I want to share the experience of creating an infrastructure for integration testing of a web application. The application is built on the .Net platform and consists of an ASP.NET MVC application and a database in MSSQL
The task of integration testing was formulated as follows: automate the deployment of the application and the execution of user interface tests so that you can quickly verify that the installed version of the application successfully processes all the necessary test scenarios.
In other words, we need to quickly check what will happen when we install the new version to the customer and start working with it. Since the result of these tests is an indicator of the quality of the application being created, we will always know the quality of our application, and therefore the situation in which we are.
')
Since integration testing will allow simulating user actions, it can be said that it will allow verification of the fact that such TK item was successfully completed. If we create tests for each item of the technical assignment (we get the program and testing methodology - PMI :) and automate them, then the number of successfully completed tests will mean real information about the percentage of technical tests performed. Otherwise, the assessment of the state of the system will be as follows:
- Well, how is our system today, if in one word?
- If in one word, then ... it works.
- And if in two words?
- And if in a nutshell, it does not work.
What should be checked with this testing:
- Compiling and building the application
- The procedure for installing or updating the application:
- Install new or update existing database
- Installing a new ASP.NET application
- Execution of test scenarios in each of which:
- The system is prepared to run the script. Since each scenario has preconditions, it is necessary to adjust the system to these conditions. For example, if for a script it is necessary that the user in the system creates three orders, you must somehow get the user data in the database and three of his orders.
- Runs a test script by emulating user actions in the browser.
- The system returns to the state it was in before the script was executed, actually to the state immediately after installing the application
- Reporting the quality of the application
- Build an installation package containing applications of known quality.
This process is shown in the diagram below.

I want to note that this scheme allows you to play on the developer’s machine and on Continues Integration Server the same actions that will be performed on an industrial environment during and after installing the updated application there.
Below you can see how the configurations should be deployed in different environments for integration testing and industrial use. I want to immediately note that the interaction with the application in all environments is the same. The interaction with the application occurs through the browser, the database is updated in the form of execution of the database update script, and the ASP.NET application is updated via the standard Deployment.
In the developer's configuration, Visual Studio is used as the main tool.
In this configuration, it is supposed to use the DBMS on the developer's machine. I think this option is better than the option when all developers use one common database. On the one hand, the common database is cheaper to maintain and each developer always has the latest version of the database. But on the other hand, in such databases, you can easily get a violation of data integrity, for example, you can enter several incorrect orders, because the developer forgot to do some kind of checking. He will, of course, check later, and more incorrect orders will not be created in the system. But another developer can continue to debug his functionality on the wrong orders and make a lot of hidden errors.
In the case of a personal database, the task of creating complete data becomes clear and easier to solve. This is written below in the "Little Tricks" section.
Before the integration test, the developer must restore the working database from the industrial server to the integration testing database. Of course, it is impossible to get a working base from an industrial stand, but still there must be some kind of database as close as possible to it in order to correctly check the process of updating the database. As an option, the working database can be depersonalized, that is, a copy of the working database is made, and then the names of customers and contract amounts change in it, so that the commercial information does not reach the developers and testers.
The first stage of the test will be to check the deployment of the database, that is, the developer will perform the publication of the database. To do this, the developer publishes the Database Project to the target database. During the project build, Visual Studio will climb into the target database, compare it with the scripts of the current project, and make a difference script, which will be executed. Already errors can occur here, for example, you forgot to create a field referenced by the secondary key, or when you insert the initial data, a conflict of primary keys occurred. It turns out that the developer finds and corrects all these errors at the testing stage and not at the implementation stage, I think everyone knows how much it saves nerves.
The next step, the developer runs the tests through the Visual Studio Test Runner. The integration tests fill the database with the data required for the test, and thus meet the preliminary requirements of the tests, then the test, via the Selenium RC Server, calls the browser and simulates the user's actions. The result of the test is checked again through the browser, you can also get data from the database for comparison with the reference.
After the test, the database returns to its original state.
As a result, after running the tests, you can see the general state of the system.

Here, instead of Visual Studio, the Continues integration server is used, but all actions are similar to those on the developer’s machine.

On an industrial environment, an update is installed through an installer that works with an industrial environment in the same way as it was in integration tests. Users also work with the system as it was tested in tests. There should be no unpleasant surprises.
To create the necessary infrastructure, the following tools are needed:
Visual Studio Solution, which contains several projects:
- Project "SQL Server Database Project". As you know, such a project allows you to store all DDL and SQL scripts that are needed to develop the structure and initial filling of the database. The main advantage of this project is that it can generate a differential script to update an existing database to the latest version. This allows you to install updates without deleting existing data. Moreover, this operation can be automated through MSBuild and performed on the Continues Integration server.
- Project with ASP.NET application. Contains the application itself. The same project is used to check the deployment of a web application to the server, again automatically using MSBuild.
- A project containing integration tests. This is an MSTest or NUnit project. This project will be used to run tests and create a test report.
This is the minimum set of projects that is necessary for the organization of automated integration testing.
Of course, Solution is stored in a version control system, such as SVN.
In addition, the solution contains the nuGet package "Selenuim Remote Contol". Unfortunately, the Selenim IDE does not fully support the new “Selenium WebDriver”, so you can export test scripts from Selenim IDE to C # code only for Remote Contol. Otherwise, part of the steps will not be exported to C # and you will have to write them with your hands, which is much slower than through export from Selenim IDE.
For "Selenuim Remote Contol" you need java application "selenium-server-standalone-xxxjar"
For quick and easy test recording, you will need FireFox with the Selenim IDE add-on installed.
You also need a Continues Integration server to continuously get the latest version from SVN and run tests.
I will show how to install and configure the products described above on various stands.
Let's start with the database project. Database project can have several publish.xml files in each of which it is described where and how the database will be published. Since each developer’s database is located at his own address, these files must be removed from the version control system and configured by each developer separately.
To publish the database, right-click on this file in Visual Studio and select "Publish". The publication is similar to the deployment (Deploy), except that the deployment settings are stored in the project properties, and the publication settings in publish.xml.
To publish the database from the command line, you need to call the following command:
> MSBuild / t: Publish /p:SqlPublishProfilePath= mymypublishfile.publish.xml »DBProject.sqlproj
An ASP.NET application in Visual Studio can be launched using the “Run” command or deployed using standard Visual Studio tools. On Continues Integration Server, this can also be done in various ways, for example, through xCopy. I will not dwell on this in more detail, because it is, on the one hand, a large enough material, and on the other hand, it is easy to find on the Internet.
You also need a Selenium RC server, which can be downloaded here: docs.seleniumhq.org/download
Starts the server with the command
> java -jar c: \ selenium \ selenium-server.jar -multiwindow
When the server is running, you can run tests.
This can be an MSTest project or a NUnit project.
First you need to install the nuGet Selenium.RC package into it.
As mentioned at the beginning of each test, you need to run a SQL script that fills the database with data for the test. Since I often work with scripts created in SQL Server Management Studio, the “GO” command is always found in them. To execute such scripts, the smo library is used, these are several assemblies that can be installed as part of the MSSQL Server SDK and found for example in "C: \ Program Files (x86) \ Microsoft SQL Server \ 110 \ SDK \ Assemblies", but you should take into account that they are compiled for .Net 2.0 and just make them work in .Net 4.0 and later fail. Therefore, a test application, I usually configure for .Net 3.5
After this, you can make such an auxiliary class in the test project:
I have all the SQL scripts in the same test project in the “SQL” folder, and for each script the “Copy to Output directory” property is set to “Copy if newer”
What is in the scripts "BackupBeforeTest.sql" and "RestoreAfterTest.sql" is written below.
As a result, the test looks something like this:
This simple test verifies user login.
Before executing the test, the Backup database is done and the “CreateTestUser.sql” script is executed, which creates the user with the necessary parameters.
After the test is completed, the database is restored from the backup in order to clear the database of the data remaining after the test.
Unfortunately, integration tests cannot be completely isolated from each other, in particular, using the Seleniun tool, you cannot remove the “ASP.NET_Session” cookie from the browser, because it is marked as HTTPOnly. Because of this, you have to check whether the user is logged in from the past test or not, and if you’re left, you have to simulate the user's logout, and thus reset the session state.
The rest of the test course is fairly obvious. A login and password is entered and it is checked that there is no error message, and a link to logout appears. How to write such a test using Selenium IDE, see below.
Selenium allows you to run tests on many browsers, but for quick creation you need to use FireFox with the “Selenium IDE” add-on installed.
Why is this “Selenium IDE” so good?
Firstly, it is very convenient for quick writing tests. You can turn on the recording mode and start working with the web application, and selenium will record all your actions. But I’ll say right away that in the case of an AJAX application, this does not work out because you have to constantly wait for the server's response, and this “Selenium IDE” does not automatically do. Nevertheless, even in this case, it is possible to add such expectation to the test process.
The illustration shows a test that will check the change records in the directory. This page is implemented using the DevExpress MVC Extension and contains a lot of AJAX code, so steps like “WaitFor ...” have been added, which are just waiting for the necessary updates to appear in the browser.
It is also a great advantage that the test can be quickly debugged through the “Selenium IDE”. Just click the "Run Test" button and check that everything works.
After the test has been debugged, it can be saved into the c # file, using the “Export Test Sute As” / “C # / NUnit / Remote Control” command, and copying the contents of the test methods into the test project. All this significantly increases the speed of creating tests compared to the option when you immediately write a test in C #, and debug it by running it through MSTest or NUnit.
And the most remarkable feature of “Selenium IDE” is the fact that testers can write these tests for their own purposes, and if a test is very important, it can be transferred to developers and they will add it to the list of integration tests. The result is that testers help write tests, although of course you should not forget that testers cannot write SQL scripts that will prepare the database for the test, and this is an essential part of the test.
The data for the test is needed to bring the system to the state described in the precondition to the test. For example, there must be a buyer who placed three orders. The easiest way to create a buyer and orders through the user interface. Next, you need to unload data from the required tables into SQL scripts in the form of SQL Dump. And then use this script when running the test.
An example of such a script:
This script can be obtained through programs like “SQL Dumper” or through SQL Server Management Studio, which has a good wizard for generating scripts on database objects, including table data.
- [Manage ID records in the database] -
I think you have already noticed that identifiers, in data creation scripts, start with 1,000,000, not 1.
This is due to the fact that when you have a combat database, identifiers with small values are probably already used, and if you try to insert these values into the script, you will get a violation of the uniqueness of identifiers.
To avoid this, it is necessary to immediately set the initial value for the generator of identifiers in a million or even a billion in the development and test databases.
The simplest and most effective way would be to use transactions, but in our configuration, the test and the application are executed in different processes and it is not possible to easily use one transaction in both processes.
However, you can use a simple and fast mechanism for DataBase backups. But we must remember that creating and restoring a normal backup is a relatively long process, but there is a Snapshot backup, it is designed to quickly create and restore a database.
so before each test I create a backup script from the file “BackupBeforeTest.sql”
and after the test I restore it with the following script from “RestoreAfterTest.sql”:
As you can see, before restoring, you need to disable all users who remain connected after the test. Otherwise, it is impossible to restore the database.
I mentioned several times that before executing the script, it is necessary to prepare a database for it. But if you dig deeper, it will be seen that these scripts have dependencies on each other.
Let's start from the zero level: reference data is created as part of the initial database deployment, many entities in the system refer to this reference data. Further there are users, on them too many who refers. As further examples, you can take a catalog of products, and orders that refer to products, users, and reference books.
Obviously, when preparing test data for an order, it is reasonable to use already existing data to create users and a product catalog, this will at least save time.
But in fact, there are even more advantages. Let us recall an example that I mentioned above when one developer, for example, working on a product catalog, forgot to implement a rule and created several incorrect data, including test ones. Another developer who deals with orders, made his code using incorrect data about the goods.
In the case of dependent test data, as soon as the first developer corrects his code and his test data, the second developer will drop his tests if this rule is important for them. Thus, the first developer, while debugging the test data for the catalog with a product, in fact also debugs the test data for orders, thereby errors in orders are detected faster.
This principle works the other way. If the order developer needs new test data for products that are not yet available, he should prepare such data for himself and drive his test order for this new product. But it also means that this new product must successfully pass all tests related to the product catalog. If a test in the product catalog does not pass with a new product, it means that the order developer found an error in the code of the product catalog developer. Again, it turns out that errors in the product catalog are detected earlier, compared to the case when each developer prepares all the test data for himself.
The described method of organizing automated integration testing allows you to automatically assess the quality of the created Web application at all stages of development, and not only at the stage of stabilization. The sooner mistakes are found, the cheaper it is to correct them, and most importantly, immediately, and not only on stabilization, the amount of work remaining is visible, which allows project managers to plan their work more precisely.
Of course, maintaining the described infrastructure requires certain costs, but I think that these costs pay off due to lower costs for manual testing.
The task of integration testing was formulated as follows: automate the deployment of the application and the execution of user interface tests so that you can quickly verify that the installed version of the application successfully processes all the necessary test scenarios.
In other words, we need to quickly check what will happen when we install the new version to the customer and start working with it. Since the result of these tests is an indicator of the quality of the application being created, we will always know the quality of our application, and therefore the situation in which we are.
')
Since integration testing will allow simulating user actions, it can be said that it will allow verification of the fact that such TK item was successfully completed. If we create tests for each item of the technical assignment (we get the program and testing methodology - PMI :) and automate them, then the number of successfully completed tests will mean real information about the percentage of technical tests performed. Otherwise, the assessment of the state of the system will be as follows:
- Well, how is our system today, if in one word?
- If in one word, then ... it works.
- And if in two words?
- And if in a nutshell, it does not work.
What should be checked with this testing:
- Compiling and building the application
- The procedure for installing or updating the application:
- Install new or update existing database
- Installing a new ASP.NET application
- Execution of test scenarios in each of which:
- The system is prepared to run the script. Since each scenario has preconditions, it is necessary to adjust the system to these conditions. For example, if for a script it is necessary that the user in the system creates three orders, you must somehow get the user data in the database and three of his orders.
- Runs a test script by emulating user actions in the browser.
- The system returns to the state it was in before the script was executed, actually to the state immediately after installing the application
- Reporting the quality of the application
- Build an installation package containing applications of known quality.
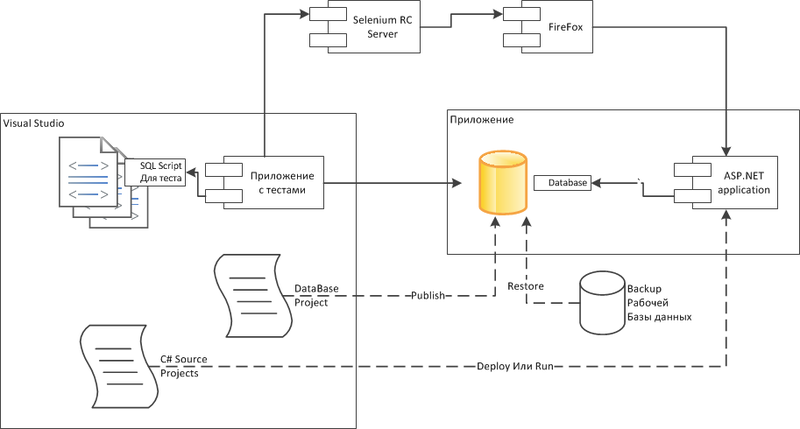
This process is shown in the diagram below.
I want to note that this scheme allows you to play on the developer’s machine and on Continues Integration Server the same actions that will be performed on an industrial environment during and after installing the updated application there.
Basic configurations
Below you can see how the configurations should be deployed in different environments for integration testing and industrial use. I want to immediately note that the interaction with the application in all environments is the same. The interaction with the application occurs through the browser, the database is updated in the form of execution of the database update script, and the ASP.NET application is updated via the standard Deployment.
Configuration on the developer machine
In the developer's configuration, Visual Studio is used as the main tool.
In this configuration, it is supposed to use the DBMS on the developer's machine. I think this option is better than the option when all developers use one common database. On the one hand, the common database is cheaper to maintain and each developer always has the latest version of the database. But on the other hand, in such databases, you can easily get a violation of data integrity, for example, you can enter several incorrect orders, because the developer forgot to do some kind of checking. He will, of course, check later, and more incorrect orders will not be created in the system. But another developer can continue to debug his functionality on the wrong orders and make a lot of hidden errors.
In the case of a personal database, the task of creating complete data becomes clear and easier to solve. This is written below in the "Little Tricks" section.
Before the integration test, the developer must restore the working database from the industrial server to the integration testing database. Of course, it is impossible to get a working base from an industrial stand, but still there must be some kind of database as close as possible to it in order to correctly check the process of updating the database. As an option, the working database can be depersonalized, that is, a copy of the working database is made, and then the names of customers and contract amounts change in it, so that the commercial information does not reach the developers and testers.
The first stage of the test will be to check the deployment of the database, that is, the developer will perform the publication of the database. To do this, the developer publishes the Database Project to the target database. During the project build, Visual Studio will climb into the target database, compare it with the scripts of the current project, and make a difference script, which will be executed. Already errors can occur here, for example, you forgot to create a field referenced by the secondary key, or when you insert the initial data, a conflict of primary keys occurred. It turns out that the developer finds and corrects all these errors at the testing stage and not at the implementation stage, I think everyone knows how much it saves nerves.
The next step, the developer runs the tests through the Visual Studio Test Runner. The integration tests fill the database with the data required for the test, and thus meet the preliminary requirements of the tests, then the test, via the Selenium RC Server, calls the browser and simulates the user's actions. The result of the test is checked again through the browser, you can also get data from the database for comparison with the reference.
After the test, the database returns to its original state.
As a result, after running the tests, you can see the general state of the system.
Configuration on Continues integration server
Here, instead of Visual Studio, the Continues integration server is used, but all actions are similar to those on the developer’s machine.
Configuration on industrial environment
On an industrial environment, an update is installed through an installer that works with an industrial environment in the same way as it was in integration tests. Users also work with the system as it was tested in tests. There should be no unpleasant surprises.
Required Tools
To create the necessary infrastructure, the following tools are needed:
Visual Studio Solution, which contains several projects:
- Project "SQL Server Database Project". As you know, such a project allows you to store all DDL and SQL scripts that are needed to develop the structure and initial filling of the database. The main advantage of this project is that it can generate a differential script to update an existing database to the latest version. This allows you to install updates without deleting existing data. Moreover, this operation can be automated through MSBuild and performed on the Continues Integration server.
- Project with ASP.NET application. Contains the application itself. The same project is used to check the deployment of a web application to the server, again automatically using MSBuild.
- A project containing integration tests. This is an MSTest or NUnit project. This project will be used to run tests and create a test report.
This is the minimum set of projects that is necessary for the organization of automated integration testing.
Of course, Solution is stored in a version control system, such as SVN.
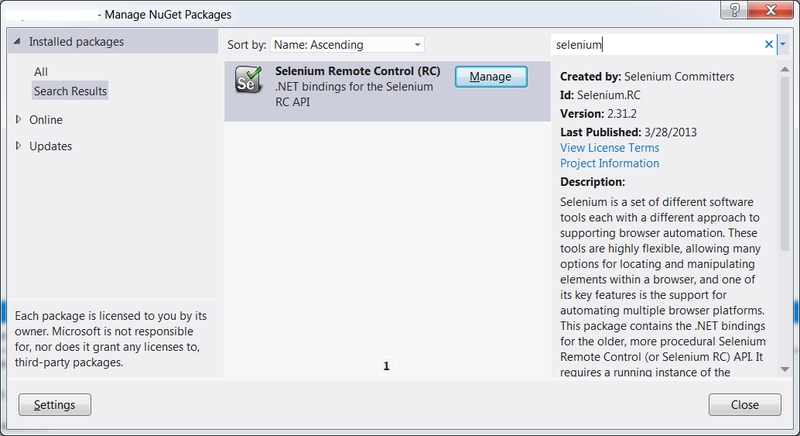
In addition, the solution contains the nuGet package "Selenuim Remote Contol". Unfortunately, the Selenim IDE does not fully support the new “Selenium WebDriver”, so you can export test scripts from Selenim IDE to C # code only for Remote Contol. Otherwise, part of the steps will not be exported to C # and you will have to write them with your hands, which is much slower than through export from Selenim IDE.
For "Selenuim Remote Contol" you need java application "selenium-server-standalone-xxxjar"
For quick and easy test recording, you will need FireFox with the Selenim IDE add-on installed.
You also need a Continues Integration server to continuously get the latest version from SVN and run tests.
Environment setup
I will show how to install and configure the products described above on various stands.
database project
Let's start with the database project. Database project can have several publish.xml files in each of which it is described where and how the database will be published. Since each developer’s database is located at his own address, these files must be removed from the version control system and configured by each developer separately.
To publish the database, right-click on this file in Visual Studio and select "Publish". The publication is similar to the deployment (Deploy), except that the deployment settings are stored in the project properties, and the publication settings in publish.xml.
To publish the database from the command line, you need to call the following command:
> MSBuild / t: Publish /p:SqlPublishProfilePath= mymypublishfile.publish.xml »DBProject.sqlproj
Web application
An ASP.NET application in Visual Studio can be launched using the “Run” command or deployed using standard Visual Studio tools. On Continues Integration Server, this can also be done in various ways, for example, through xCopy. I will not dwell on this in more detail, because it is, on the one hand, a large enough material, and on the other hand, it is easy to find on the Internet.
Selenium Server
You also need a Selenium RC server, which can be downloaded here: docs.seleniumhq.org/download
Starts the server with the command
> java -jar c: \ selenium \ selenium-server.jar -multiwindow
When the server is running, you can run tests.
Test project with integration tests
This can be an MSTest project or a NUnit project.
First you need to install the nuGet Selenium.RC package into it.
As mentioned at the beginning of each test, you need to run a SQL script that fills the database with data for the test. Since I often work with scripts created in SQL Server Management Studio, the “GO” command is always found in them. To execute such scripts, the smo library is used, these are several assemblies that can be installed as part of the MSSQL Server SDK and found for example in "C: \ Program Files (x86) \ Microsoft SQL Server \ 110 \ SDK \ Assemblies", but you should take into account that they are compiled for .Net 2.0 and just make them work in .Net 4.0 and later fail. Therefore, a test application, I usually configure for .Net 3.5
After this, you can make such an auxiliary class in the test project:
public class TestDBHelper { public static void ExecScript(String scriptName) { string sqlConnectionString = System.Configuration.ConfigurationManager.ConnectionStrings["TestDBConnection"].ConnectionString; FileInfo file = new FileInfo(Path.Combine("SQL", scriptName)); string script = file.OpenText().ReadToEnd(); SqlConnection conn = new SqlConnection(sqlConnectionString); Server server = new Server(new ServerConnection(conn)); server.ConnectionContext.ExecuteNonQuery(script); } public static void BackupBeforeTest() { TestDBHelper.ExecScript("BackupBeforeTest.sql"); } public static void RestoreAfterTest() { TestDBHelper.ExecScript("RestoreAfterTest.sql"); } } I have all the SQL scripts in the same test project in the “SQL” folder, and for each script the “Copy to Output directory” property is set to “Copy if newer”
What is in the scripts "BackupBeforeTest.sql" and "RestoreAfterTest.sql" is written below.
As a result, the test looks something like this:
[TestClass] public class SimpleTest { private ISelenium selenium; private StringBuilder verificationErrors; [TestInitialize] public void Init() { TestDBHelper.BackupBeforeTest(); TestDBHelper.ExecScript("CreateTestUser.sql"); selenium = new DefaultSelenium("localhost", 4444, "*chrome", "http://localhost:12945/"); selenium.Start(); verificationErrors = new StringBuilder(); } [TestCleanup] public void CleanUp() { selenium.Stop(); TestDBHelper.RestoreAfterTest(); } [TestMethod] public void TestLogin() { if (selenium.IsElementPresent("link= []")) { selenium.Click("link= []"); selenium.WaitForPageToLoad("30000"); } selenium.Open("/"); selenium.Click("link="); selenium.WaitForPageToLoad("30000"); selenium.Type("id=UserName", "TestUser"); selenium.Type("id=Password", "123456"); selenium.Click("css=input.btn"); selenium.WaitForPageToLoad("30000"); Assert.IsFalse(selenium.IsElementPresent("css=div.validation-summary-errors > ul > li"), " "); Assert.IsTrue(selenium.IsElementPresent("link= []"), " "); } } This simple test verifies user login.
Before executing the test, the Backup database is done and the “CreateTestUser.sql” script is executed, which creates the user with the necessary parameters.
After the test is completed, the database is restored from the backup in order to clear the database of the data remaining after the test.
Unfortunately, integration tests cannot be completely isolated from each other, in particular, using the Seleniun tool, you cannot remove the “ASP.NET_Session” cookie from the browser, because it is marked as HTTPOnly. Because of this, you have to check whether the user is logged in from the past test or not, and if you’re left, you have to simulate the user's logout, and thus reset the session state.
The rest of the test course is fairly obvious. A login and password is entered and it is checked that there is no error message, and a link to logout appears. How to write such a test using Selenium IDE, see below.
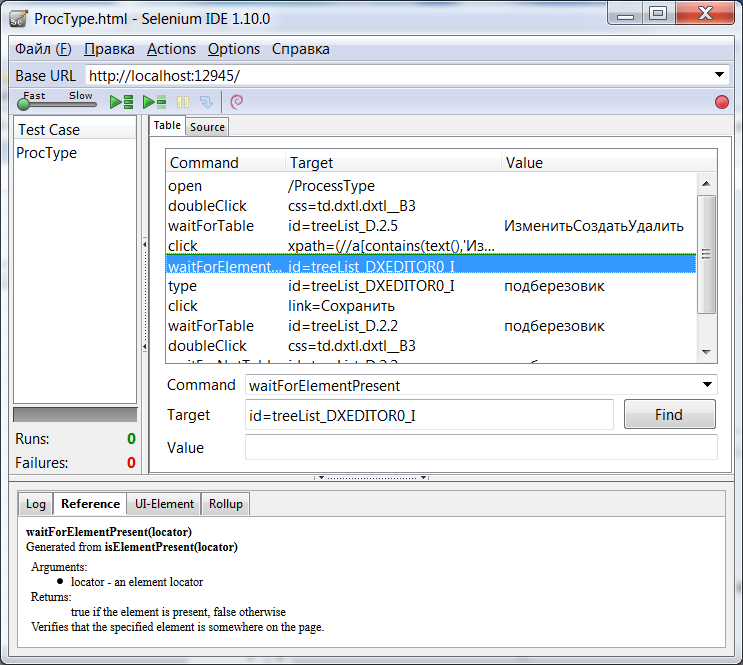
Firefox and Selenium IDE. Creating tests
Selenium allows you to run tests on many browsers, but for quick creation you need to use FireFox with the “Selenium IDE” add-on installed.
Why is this “Selenium IDE” so good?
Firstly, it is very convenient for quick writing tests. You can turn on the recording mode and start working with the web application, and selenium will record all your actions. But I’ll say right away that in the case of an AJAX application, this does not work out because you have to constantly wait for the server's response, and this “Selenium IDE” does not automatically do. Nevertheless, even in this case, it is possible to add such expectation to the test process.
The illustration shows a test that will check the change records in the directory. This page is implemented using the DevExpress MVC Extension and contains a lot of AJAX code, so steps like “WaitFor ...” have been added, which are just waiting for the necessary updates to appear in the browser.
It is also a great advantage that the test can be quickly debugged through the “Selenium IDE”. Just click the "Run Test" button and check that everything works.
After the test has been debugged, it can be saved into the c # file, using the “Export Test Sute As” / “C # / NUnit / Remote Control” command, and copying the contents of the test methods into the test project. All this significantly increases the speed of creating tests compared to the option when you immediately write a test in C #, and debug it by running it through MSTest or NUnit.
And the most remarkable feature of “Selenium IDE” is the fact that testers can write these tests for their own purposes, and if a test is very important, it can be transferred to developers and they will add it to the list of integration tests. The result is that testers help write tests, although of course you should not forget that testers cannot write SQL scripts that will prepare the database for the test, and this is an essential part of the test.
Little tricks
Creating and loading test data in the database
The data for the test is needed to bring the system to the state described in the precondition to the test. For example, there must be a buyer who placed three orders. The easiest way to create a buyer and orders through the user interface. Next, you need to unload data from the required tables into SQL scripts in the form of SQL Dump. And then use this script when running the test.
An example of such a script:
SET IDENTITY_INSERT [dbo].[User] ON INSERT [dbo].[User] ([UserId], [Login], [Password], [DisplayName]) VALUES (1000001, N'TestUser', N'7dHZDOYgwADlGdinx9u/c4Cmhtc=', N' ') SET IDENTITY_INSERT [dbo].[User] OFF SET IDENTITY_INSERT [dbo].[Order] ON INSERT [dbo].[Order] ([OrderId], [UserId], [Description], [Price]) VALUES (1000001, 1000001, N' №1', 100.0) INSERT [dbo].[Order] ([OrderId], [UserId], [Description], [Price]) VALUES (1000002, 1000001, N' №2', 200.0) INSERT [dbo].[Order] ([OrderId], [UserId], [Description], [Price]) VALUES (1000003, 1000001, N' №3', 300.0) SET IDENTITY_INSERT [dbo].[Order] OFF This script can be obtained through programs like “SQL Dumper” or through SQL Server Management Studio, which has a good wizard for generating scripts on database objects, including table data.
- [Manage ID records in the database] -
I think you have already noticed that identifiers, in data creation scripts, start with 1,000,000, not 1.
This is due to the fact that when you have a combat database, identifiers with small values are probably already used, and if you try to insert these values into the script, you will get a violation of the uniqueness of identifiers.
To avoid this, it is necessary to immediately set the initial value for the generator of identifiers in a million or even a billion in the development and test databases.
Clearing the database after the test
The simplest and most effective way would be to use transactions, but in our configuration, the test and the application are executed in different processes and it is not possible to easily use one transaction in both processes.
However, you can use a simple and fast mechanism for DataBase backups. But we must remember that creating and restoring a normal backup is a relatively long process, but there is a Snapshot backup, it is designed to quickly create and restore a database.
so before each test I create a backup script from the file “BackupBeforeTest.sql”
USE [master] GO IF EXISTS (SELECT name FROM sys.databases WHERE name = N'MyDataBase_Spanpshot') DROP DATABASE MyDataBase_Spanpshot GO CREATE DATABASE MyDataBase_Spanpshot ON (NAME = 'DataBase_data_File', FILENAME = 'C:\MyDataBase_TestBU.SNP') AS SNAPSHOT OF MyDataBase; and after the test I restore it with the following script from “RestoreAfterTest.sql”:
USE master; DECLARE @DatabaseName nvarchar(50) SET @DatabaseName = N'MyDataBase' DECLARE @SQL varchar(max) SELECT @SQL = COALESCE(@SQL,'') + ' BEGIN TRY Kill ' + Convert(varchar, SPId) + '; END TRY BEGIN CATCH END CATCH;' FROM MASTER..SysProcesses WHERE DBId = DB_ID(@DatabaseName) AND SPId <> @@SPId EXEC(@SQL) RESTORE DATABASE MyDataBase_Spanpshot from DATABASE_SNAPSHOT = 'MyDataBase_Spanpshot'; GO IF EXISTS (SELECT name FROM sys.databases WHERE name = N'MyDataBase_Spanpshot') DROP DATABASE MyDataBase_Spanpshot GO As you can see, before restoring, you need to disable all users who remain connected after the test. Otherwise, it is impossible to restore the database.
Organization of SQL scripts for incremental database filling before a test
I mentioned several times that before executing the script, it is necessary to prepare a database for it. But if you dig deeper, it will be seen that these scripts have dependencies on each other.
Let's start from the zero level: reference data is created as part of the initial database deployment, many entities in the system refer to this reference data. Further there are users, on them too many who refers. As further examples, you can take a catalog of products, and orders that refer to products, users, and reference books.
Obviously, when preparing test data for an order, it is reasonable to use already existing data to create users and a product catalog, this will at least save time.
But in fact, there are even more advantages. Let us recall an example that I mentioned above when one developer, for example, working on a product catalog, forgot to implement a rule and created several incorrect data, including test ones. Another developer who deals with orders, made his code using incorrect data about the goods.
In the case of dependent test data, as soon as the first developer corrects his code and his test data, the second developer will drop his tests if this rule is important for them. Thus, the first developer, while debugging the test data for the catalog with a product, in fact also debugs the test data for orders, thereby errors in orders are detected faster.
This principle works the other way. If the order developer needs new test data for products that are not yet available, he should prepare such data for himself and drive his test order for this new product. But it also means that this new product must successfully pass all tests related to the product catalog. If a test in the product catalog does not pass with a new product, it means that the order developer found an error in the code of the product catalog developer. Again, it turns out that errors in the product catalog are detected earlier, compared to the case when each developer prepares all the test data for himself.
Conclusion
The described method of organizing automated integration testing allows you to automatically assess the quality of the created Web application at all stages of development, and not only at the stage of stabilization. The sooner mistakes are found, the cheaper it is to correct them, and most importantly, immediately, and not only on stabilization, the amount of work remaining is visible, which allows project managers to plan their work more precisely.
Of course, maintaining the described infrastructure requires certain costs, but I think that these costs pay off due to lower costs for manual testing.
Source: https://habr.com/ru/post/174735/
All Articles