Delegating Administrative Tasks to Active Directory
In view of the fact that during Habravstrechi I talked about 11 different scenarios, naturally, I would like to dwell on each of these moments. In other words, starting with this article, I will consider most of the points that were discussed during the previous report. So…
Relatively recently, I was asked several questions in Windows Live Messenger related to the delegation of administrative authority in Active Directory. However, before proceeding to the questions themselves on this topic, I will literally tell you in a few words what the delegation is and why it is needed.
 It’s more than obvious that in virtually every organization, the IT department includes several administrators, and the various administrative tasks should be distributed among the administrators, or, say, among the support service members. For example, as in this example, let's say employees of the support department have to add computers to the domain. However, such a group of users should not be able to perform operations other than those that you want to allow them.
But those permissions that can be assigned to users, groups, or computers, in other words, to security principals, are called access control entries (ACE). Therefore, the access permissions for the object are modified using the ACL. You can view ACLs directly using such snap-ins as Active Directory Users and Computers , Active Directory Administrative Center , as well as in such snap-ins as Active Directory Sites and Services , ADSI Editor , and also "LDP" (some funds will be discussed in more detail later in this article). If we talk about permissions to control access to objects AD, then immediately it should be noted that they are divided into standard permissions and special permissions . Special permissions are granular options that apply to a particular object, and standard access permissions are already composed of a set of special permissions that allow, or, conversely, prohibit a particular function. Solely, as an example, we can single out such a standard resolution as reading , because in fact it includes recording such special permissions as reading permissions , a list of contents , as well as reading all the properties . But that's another topic.
Actually, all ACE records are located in a discretionary access control list , in other words, in the original it sounds like the Discretionary Access Control List , or, more simply, in the DACL. This is a list of access control entries that defines the access permissions for each security principal to an object. In turn, each security principal that is added to an object receives a list of permissions, which indicates that a particular user or group of users can perform specific operations with the object itself. It should always be remembered here that ACEs that have been explicitly assigned will always be evaluated before inherited ACEs. And also it is always necessary to take into account the fact that prohibiting records will always prevail over allowing ones.
The DACL itself is part of the ACL of the object itself, which still contains the system access control list , in other words, the System Access Control List, SACL. This list defines the audit parameters for an object, including all security principals and operations for which an audit is to be performed.
Thus, returning to the very topic of this section, the delegation of administrative tasks is the inheritance of permissions of the parent object for the security principal created in Active Directory.
One of the tasks that had to be performed was the following: it was necessary to provide an opportunity to a certain group of users, say, to some technical staff, to add computers to the domain and distribute these computers to different departments. In principle, this task can be called trivial, but we slightly change the conditions to make it more interesting. What will be done: since, by default, each user can join a computer to the domain, we will correct this situation so that only those users who are members of the “Support” security group can join the computers to the domain. Therefore, you need to perform the following steps:
Now, after all these actions have been completed, only those users who are members of the global support group “Support” created earlier will be able to join computers to the domain.
Immediately after the possibility of joining computers to the domain to a specific security group, a question of this nature arose: “Can I somehow view the tasks delegated earlier”? Here the answer is simple: you can view, and not the only method. All possible options for viewing tasks for which delegation was delegated are simply meaningless to be considered in one article, so later in this article several basic options will be presented:
By and large, there are still at least 6 ways to view the delegation of administrative authority, but they are simply meaningless to describe in one article, and if this topic interests you, I can show most of these methods in a separate webcast.
However, in addition to allowing computers to join the domain and viewing the configured permissions, we still have another small task, which will be discussed in the next small section.
The latter task, which will be discussed in this article, is the implementation of allowing the movement of computer objects between departments for the Support group . Since last time we implemented permissions for joining computers to a domain by means of delegating control, this time we should try to look for means of solving this problem in this wizard. To solve this problem, it will be necessary to edit some permissions for the Computers container, since it is known that GPOs cannot be associated with this container, and the support division employees need to distribute computers among different departments.
After opening the delegate management wizard and adding the target group, you will find that it is impossible to perform such actions among normal tasks. In this case, you should try to use the list of special tasks for delegation . In the displayed dialog box, you have the opportunity to delegate all objects in the container you selected (in this case, you should set the switch to the option “this folder, existing objects in it and creation of new objects in this folder” ), as well as the ability to transfer control only to selected objects which can be found in the corresponding list (the option “only to the following objects in this folder” ).
Among the available objects, check the box “Computer objects” and then select the check box “Delete selected objects from this folder” under this list.
The dialog box for this page of the Delegation Wizard is shown in the following illustration:
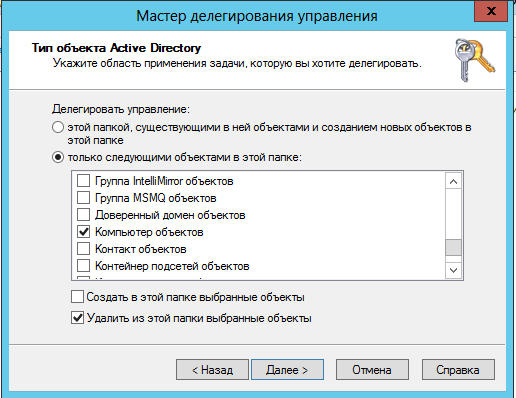
Fig. 15. The page for creating a special task for delegation
After that, on the next page of the wizard, the “Permissions” page - you should indicate that the “Record” permission is delegated, and that will be enough.
Since the task of moving can be divided into two parts — removing an object from the Computers container and then creating an object in another department — as an example only, creating objects in a specially created department for computer accounts will be demonstrated by changing additional security settings for the required units (similar actions were discussed in the previous section).
Now, if you closed the Active Directory Users and Computers snap -in, you need to enable the display of additional components for it, and then go to the subdivisions properties dialog box to which computer accounts should be moved. In my case, this is the Clients division.
In the properties dialog of this unit, go to the Security tab, and then open the advanced security settings dialog box. In the dialog box that appears, localize the previously added group and make sure that support group employees are allowed to join computers to the domain, but the permissions associated with deleting objects are missing here, and then go to the permission editing dialog by clicking the Add button.
In the “Permission element for Computers” dialog box that appears , you need to add a group that will apply permissions. In other words, click on the link “Select a Subject” and localize the Support group using the appropriate dialog box. Since within the previously created subdivisions there may be sub-divisions with different breakdowns (for example, computers by departments), from the "Applies to" drop-down list, select the "This object and all child objects" option, which is set by default.
It remains only to choose the desired resolution. Since we need to allow computers to be moved, which means that objects will be created inside this and all nested containers, check the box next to the “Create Objects: Computer” permission, and then save all the changes made. The " Permissions for Clients" dialog box is shown below:
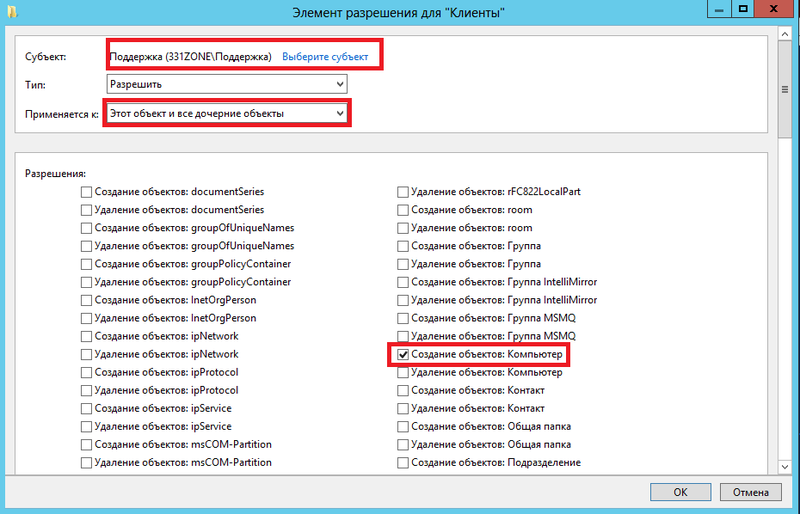
Fig. 16. Adding Permissions to Create Computer Objects
By and large, you can come up with many more examples related to the delegation of authority and the assignment of non-standard permissions to different security groups, and almost every example can be called unique and interesting in its own way. Remember that instead of assigning all administrators, it will be much more beneficial if you simply assign permissions to specific tasks to specific groups of users. Please write in the comments to this article whether you used delegation in yourselves and what examples you encountered and experienced difficulties.
Relatively recently, I was asked several questions in Windows Live Messenger related to the delegation of administrative authority in Active Directory. However, before proceeding to the questions themselves on this topic, I will literally tell you in a few words what the delegation is and why it is needed.
Delegation of Active Directory Objects
It’s more than obvious that in virtually every organization, the IT department includes several administrators, and the various administrative tasks should be distributed among the administrators, or, say, among the support service members. For example, as in this example, let's say employees of the support department have to add computers to the domain. However, such a group of users should not be able to perform operations other than those that you want to allow them.But those permissions that can be assigned to users, groups, or computers, in other words, to security principals, are called access control entries (ACE). Therefore, the access permissions for the object are modified using the ACL. You can view ACLs directly using such snap-ins as Active Directory Users and Computers , Active Directory Administrative Center , as well as in such snap-ins as Active Directory Sites and Services , ADSI Editor , and also "LDP" (some funds will be discussed in more detail later in this article). If we talk about permissions to control access to objects AD, then immediately it should be noted that they are divided into standard permissions and special permissions . Special permissions are granular options that apply to a particular object, and standard access permissions are already composed of a set of special permissions that allow, or, conversely, prohibit a particular function. Solely, as an example, we can single out such a standard resolution as reading , because in fact it includes recording such special permissions as reading permissions , a list of contents , as well as reading all the properties . But that's another topic.
Actually, all ACE records are located in a discretionary access control list , in other words, in the original it sounds like the Discretionary Access Control List , or, more simply, in the DACL. This is a list of access control entries that defines the access permissions for each security principal to an object. In turn, each security principal that is added to an object receives a list of permissions, which indicates that a particular user or group of users can perform specific operations with the object itself. It should always be remembered here that ACEs that have been explicitly assigned will always be evaluated before inherited ACEs. And also it is always necessary to take into account the fact that prohibiting records will always prevail over allowing ones.
The DACL itself is part of the ACL of the object itself, which still contains the system access control list , in other words, the System Access Control List, SACL. This list defines the audit parameters for an object, including all security principals and operations for which an audit is to be performed.
Thus, returning to the very topic of this section, the delegation of administrative tasks is the inheritance of permissions of the parent object for the security principal created in Active Directory.
Example delegation of administrative authority
One of the tasks that had to be performed was the following: it was necessary to provide an opportunity to a certain group of users, say, to some technical staff, to add computers to the domain and distribute these computers to different departments. In principle, this task can be called trivial, but we slightly change the conditions to make it more interesting. What will be done: since, by default, each user can join a computer to the domain, we will correct this situation so that only those users who are members of the “Support” security group can join the computers to the domain. Therefore, you need to perform the following steps:
- First, open the Active Directory Users and Computers snap-in on the domain controller. Here you need to create a global security group whose members will be able to join users' computers to the domain. In other words, this group will look like this:

Fig. 1. Properties of the group responsible for joining computers to the domain - The next step is to indicate that computers can only be joined to the domain by users who are members of the global security group created in the previous step. To do this, open the Group Policy Management snap- in and go to the GPME editor for the Default Domain Controllers Policy GPO created by default, which is located in the Domain Controllers division.
In the displayed snap-in, go to the "Computer Configuration \ Policies \ Windows Configuration \ Security Settings \ Local Policies \ User Rights Assignment" node and localize the policy setting called "Adding workstations to the domain" . When you open the dialog box for this policy setting, you will immediately be able to find that, by default, the "Authenticated" group is listed there, thanks to which every user can join computers to the domain. Now, in order to allow computers to be joined to the domain only by users from the “Support” security group, you should remove the group specified in this default policy setting, and then use the Add User or Group button and the Active Directory object search dialog, should add the previously created global security group. The process of adding such a group is depicted in the following illustration:
Fig. 2. Change the group responsible for joining computers to the domain - Now, although it was described a little bit earlier, in which scenarios delegation is performed, and that in most cases delegation is performed at the department level, in this case, to allow computers to join the domain, we should be in the Active Directory Users and Computers snap-in. » Call the Delegation Wizard directly for the entire domain. Therefore, in the Active Directory Users and Computers snap-in, in the snap-in tree area, call the context menu for the domain and select the Delegate control option, as shown below:
')
Fig. 3. Calling the Delegation Management Wizard - On the first page of the wizard, you can simply familiarize yourself with the main task of this tool and, since you cannot perform any actions on the first page, you should simply click on the “Next” button. On the second page of the wizard, the Users and Groups page, you need to localize the group for which you want to delegate control. In this example, click on the “Add” button and select the “Support” group using the appropriate dialog, as shown in the following illustration:

Fig. 4. Adding a group for which management is delegated
After the group is added, to go to the next page of the wizard, click on the "Next" button. - The "Delegated Tasks" page allows you to define specific operations that should be performed in Active Directory Domain Services by users or groups of users that were added on the previous page of the wizard. Since in this example the task of joining computers to a domain is delegated and such a task can be found in the provided list of common tasks, check the box next to the task “Join a computer to the domain” and click on the “Next” button. It is worth paying attention to the fact that this wizard allows you to delegate not only those tasks that appear on this list, and if you were unable to immediately find a specific task, you will need to create a special task for delegation. The creation of a special task will be shown later in this article, and the delegation of the task of joining a computer to a domain is shown in the following illustration:

Fig. 5. Delegation of the task of joining computers to the domain for members of the Support group - On the last page, the wizard will re-inform that the work of the wizard was successfully completed and control was transferred to a specific group of users to join the computers to the domain, which, in fact, was the task assigned to us:

Fig. 6. Completion of the delegation of management
Now, after all these actions have been completed, only those users who are members of the global support group “Support” created earlier will be able to join computers to the domain.
Defining the tasks for which delegation was granted
Immediately after the possibility of joining computers to the domain to a specific security group, a question of this nature arose: “Can I somehow view the tasks delegated earlier”? Here the answer is simple: you can view, and not the only method. All possible options for viewing tasks for which delegation was delegated are simply meaningless to be considered in one article, so later in this article several basic options will be presented:
- The first method is to use the Active Directory Users and Computers snap -in . First of all, in order to view the tasks that have been delegated, for the snap-in itself, the display of additional components should be enabled in the View menu. After that, go to the properties dialog of the department for which the delegation was performed. Since the previous section delegated for the entire domain level, in this example, the domain properties dialog box appears.
In the dialog box that appears, go to the "Security" tab, and then from there call the dialog box for advanced security settings. Here, in the dialog box that appears, you can find all the ACE entries that were set, both by default and with the help of the Delegation Wizard. For example, in the following illustration, you can see that a permission has been added to the Support group that allows you to create Computer objects:
Fig. 7. View delegated tasks for the Support group
If you wish, you can either change the permissions for the current group, and, if necessary, delete it completely. - Now consider a more sophisticated method, namely the use of LDP.exe . This time you should do the following:
Open the LDP tool and connect to the domain controller on port 389 using the Connection menu, as shown in the following illustration:
Fig. 8. Connection to a domain controller
After that you should bind using the command of the same name from the "Connection" menu. Since at the moment I am logged in as an administrator, I can not enter credentials, and in the displayed “Binding” dialog box immediately press the “OK” button , as shown below:
Fig. 9. Perform bind
Now you can connect to the required department or immediately to the entire domain by selecting the "Tree" command from the "View" menu. In case you need to view the entire domain, you can leave the field blank, but if you plan to view a specific department, you must specify the distinguished name in the following format: "OU = OU name, DN = domain ...".
Then, in order to see who was granted the delegation, you should look at the entire structure in a tree view. In other words, from the “View” menu , select the “Tree” command and in the displayed “Tree” dialog box specify the base expandable name (or, since in the example above you need to view the entire domain, you can leave this text field empty).
Already in the familiar area of the tree, you need to select a department, the rights to which should be checked, and then select the "Advanced" command and the "Security Descriptor" from the context menu. In the dialog box that appears, be sure to ensure that you have the correct DN selected, and that the checkbox is on the “ACL List” option, as shown in the following illustration:
Fig. 10. Opening Security Descriptor Dialog
Now in the dialog box that appears, you can view all groups and users who have been granted certain permissions. If necessary, you can also edit or delete delegated permissions using the appropriate buttons. The security descriptors dialog box, as well as the window for editing delegated permissions, is displayed in the following illustration: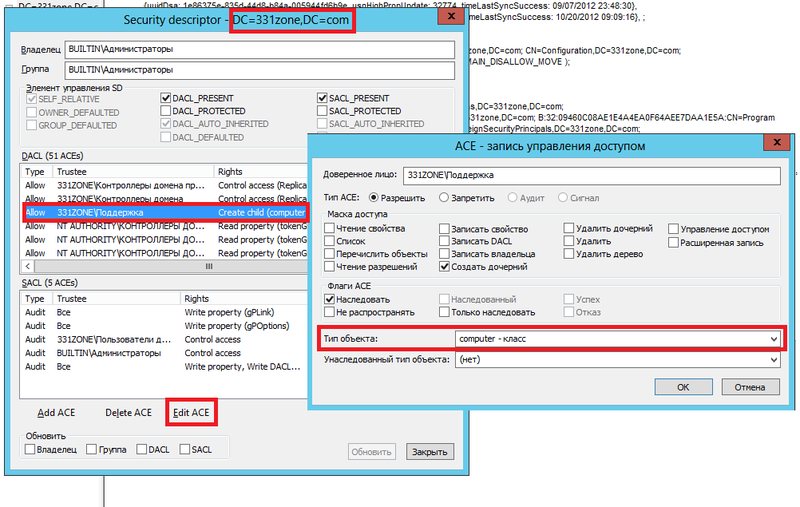
Fig. 11. View and change delegated permissions for a support group. - The third option to some extent can be called more modernistic, since now we will determine which permissions were assigned to the same support group, but already using the Active Directory Administrative Center snap-in. To do this, open this tool, select a subdivision in the snap-in tree for which you should see who was granted the delegation, and then go to the properties of the selected object, for example, as shown in the following illustration, directly from the context menu:

Fig. 12. Go to the properties of the selected object
After working with the Active Directory Users and Computers snap-in, you can immediately decide what needs to be done. In the dialog box that appears, go to the Permissions group , and all that remains is to select the required group and go to the Advanced Security Settings dialog. The permission group is displayed below: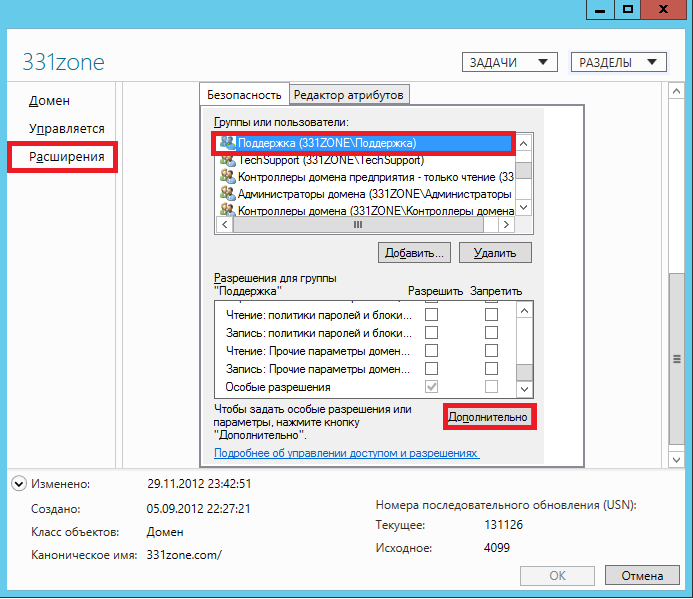
Fig. 13. Permissions of the security support team - If you are a fan of the command line, then no one limits you. To view permissions to control user actions in Active Directory, a command line utility such as DSACLS is provided . Often this command is executed with the distinguished name of the object. For example, in order to find out who has permissions to the entire domain, run the command:
DSACLS DC = 331zone, DC = com
The result of the command is shown in the following illustration:
Fig. 14. Check permissions for the support team using command line
By and large, there are still at least 6 ways to view the delegation of administrative authority, but they are simply meaningless to describe in one article, and if this topic interests you, I can show most of these methods in a separate webcast.
However, in addition to allowing computers to join the domain and viewing the configured permissions, we still have another small task, which will be discussed in the next small section.
Permissions for moving objects between departments
The latter task, which will be discussed in this article, is the implementation of allowing the movement of computer objects between departments for the Support group . Since last time we implemented permissions for joining computers to a domain by means of delegating control, this time we should try to look for means of solving this problem in this wizard. To solve this problem, it will be necessary to edit some permissions for the Computers container, since it is known that GPOs cannot be associated with this container, and the support division employees need to distribute computers among different departments.
After opening the delegate management wizard and adding the target group, you will find that it is impossible to perform such actions among normal tasks. In this case, you should try to use the list of special tasks for delegation . In the displayed dialog box, you have the opportunity to delegate all objects in the container you selected (in this case, you should set the switch to the option “this folder, existing objects in it and creation of new objects in this folder” ), as well as the ability to transfer control only to selected objects which can be found in the corresponding list (the option “only to the following objects in this folder” ).
Among the available objects, check the box “Computer objects” and then select the check box “Delete selected objects from this folder” under this list.
The dialog box for this page of the Delegation Wizard is shown in the following illustration:
Fig. 15. The page for creating a special task for delegation
After that, on the next page of the wizard, the “Permissions” page - you should indicate that the “Record” permission is delegated, and that will be enough.
Since the task of moving can be divided into two parts — removing an object from the Computers container and then creating an object in another department — as an example only, creating objects in a specially created department for computer accounts will be demonstrated by changing additional security settings for the required units (similar actions were discussed in the previous section).
Now, if you closed the Active Directory Users and Computers snap -in, you need to enable the display of additional components for it, and then go to the subdivisions properties dialog box to which computer accounts should be moved. In my case, this is the Clients division.
In the properties dialog of this unit, go to the Security tab, and then open the advanced security settings dialog box. In the dialog box that appears, localize the previously added group and make sure that support group employees are allowed to join computers to the domain, but the permissions associated with deleting objects are missing here, and then go to the permission editing dialog by clicking the Add button.
In the “Permission element for Computers” dialog box that appears , you need to add a group that will apply permissions. In other words, click on the link “Select a Subject” and localize the Support group using the appropriate dialog box. Since within the previously created subdivisions there may be sub-divisions with different breakdowns (for example, computers by departments), from the "Applies to" drop-down list, select the "This object and all child objects" option, which is set by default.
It remains only to choose the desired resolution. Since we need to allow computers to be moved, which means that objects will be created inside this and all nested containers, check the box next to the “Create Objects: Computer” permission, and then save all the changes made. The " Permissions for Clients" dialog box is shown below:
Fig. 16. Adding Permissions to Create Computer Objects
Instead of conclusion
By and large, you can come up with many more examples related to the delegation of authority and the assignment of non-standard permissions to different security groups, and almost every example can be called unique and interesting in its own way. Remember that instead of assigning all administrators, it will be much more beneficial if you simply assign permissions to specific tasks to specific groups of users. Please write in the comments to this article whether you used delegation in yourselves and what examples you encountered and experienced difficulties.
Source: https://habr.com/ru/post/174437/
All Articles