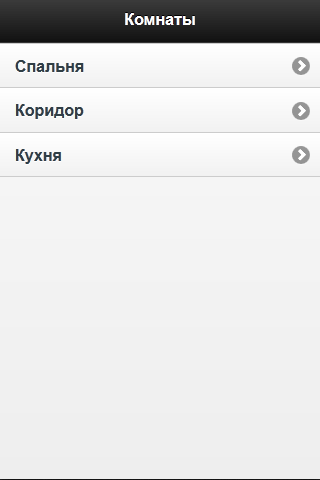
Light control via browser
 We wrote a web-based lighting control application using the NooLite system.
In the application settings, you can define a list of its pages. On each of them, you can add controls (sliders and buttons) that perform the desired set of actions (turning the light on / off, adjusting the brightness in several channels).
Demo (instead of turning on / off the light in demo mode, a text message about performing actions is displayed).
')
We used ASP.NET MVC on the server side, jQuery Mobile on the client (actually, it was first of all interesting to control the lighting from the phone). DBMS is not required (settings are stored in the configuration file). To send commands from a computer to control units, use a PC118 USB adapter.
Download the app here . There you can also download a separate .NET library that implements the API for managing the NooLite system. The source code of all this is on Google Code .
Under the cat there is an instruction for installation and configuration from scratch.
Install the necessary components
- Download and install the .NET Framework 4.0: www.microsoft.com/en-us/download/details.aspx?id=17718
- Install ASP.NET MVC3: www.asp.net/mvc/mvc3
- Install IIS Express: www.microsoft.com/en-us/download/details.aspx?id=34679
Configuring a web server (IIS Express)
1. Download the archive with the web application from here and unpack it, for example, in the folder “C: \ noolite”.
2. Run IIS Express (file C: \ Program Files \ IIS Express \ iisexpress.exe) so that it creates default configs.
3. Create a record on the new site in the IIS settings. To do this, on the command line, type
cd C:\Program Files\IIS Express appcmd add site /name:noolite.web /bindings:"http://%COMPUTERNAME%:19777,http://localhost:19777" /physicalPath:C:\noolite 4. Install ApplicationPool for the site
appcmd set app "noolite.web/" /applicationPool:Clr4IntegratedAppPool 5. Run IIS Express
iisexpress /site:noolite.web Now, if you type " localhost : 19777" in the browser, something like this should open:

Configure light control
Application settings related to the management of electrical appliances are located in the NooLite.config file in the root folder of the site. By default, this file contains test data:
<?xml version="1.0" encoding="utf-8"?> <nooLiteConfiguration debug="false"> <page id="bedroom" title="" description=" "> <control id="main" displayText=" " type="Switcher" level="155"> <channel id="0" /> </control> <control id="night-light" displayText="" type="Slider"> <channel id="0" level="0" /> <channel id="1" /> </control> <control id="all-off" displayText=" " level="0"> <channel id="0" /> <channel id="1" /> </control> </page> <page id="hallway" title=""> <control id="main" displayText=" " type="Switcher"> <channel id="2" /> </control> <control id="small" displayText=" " type="Switcher"> <channel id="3" /> </control> <control id="all-off" displayText=" " type="Switcher"> <channel id="2" /> <channel id="3" /> </control> </page> </nooLiteConfiguration> The PC118 USB Adapter has 8 channels, each of which can be associated with a group of fixtures (or other electrical devices).
Inside the root
nooLiteConfiguration element contains a collection of page elements. Each of them describes a separate page of the application. The page element has the parameters id (page identifier, used when forming its address), title (page title) and description (description, displayed on the page above).Within each
page element are several control elements. They define a set of controls on the page. The control element has the parameters id (control identifier), displayText (text label), type (control type) and level (brightness level that will be set for luminaires when using this control, for example, when a button is pressed).The
type parameter can be one of the following values:- Button - a button that sets the brightness level to the luminaires set in the
levelparameter; - Switcher - a group of two buttons: "ON" and "OFF". The ON button works the same as the Button element, the OFF button turns off the light in all connected channels;
- Slider - the slider and the “SET” button, which sets the brightness level selected with the slider in the specified channel group.
Inside each
control you can specify a set of channels ( channel element) to which you want to send commands when using this control. The channel has the parameters id (the channel number is a number from 0 to 7) and level (the brightness level for the channel takes precedence over the value of the level parameter for the control).Below is an example of the display of controls for the “bedroom” page from the test data set.

Instead of conclusion
I have long dreamed of automating the management of electrical appliances. Do not control the light through the console, namely to be able to write programs that control the light on the desired algorithms without human intervention. For a long time there was no available "hardware" with the necessary capabilities. I even assembled my own device (on the Arduino + XBee) but the resulting bundle of chips and wires was difficult to adapt for use in real life.
When I first found out about a “Belarusian company that develops radio-controlled switches,” I remembered the story about INTEGRAL monitors , laughed and forgot about it. But after reviewing the NooLite system in Habré, I ordered myself a couple of such switches and it turned out to be very cool. I think these things and the people who create them make our world a better place. They show us that the future, which we could only dream of as a child, is already very close - much closer than we think.
I would very much like the NooLite system and other similar projects to develop and enter our lives. That is why I spent the weekend managing the light through the browser. And I am ready to spend my time on the implementation of such tasks.
Thanks for attention!
Source: https://habr.com/ru/post/174329/
All Articles