How to run a program without an operating system: part 2
In the first part of our article, we talked about how you can get a simple “Hello World” program that runs without an operating system and prints a message on the screen.
In this part of the article, I want to develop the resulting code in the first part so that it can be debugged through GDB, compiled through the Visual Studio shell and printed on the screen a list of PCI devices.
')
! IMPORTANT! : All further actions can be successfully carried out only after successful completion of all 6 steps described in the first part of the article).
We learn to debug the program
Main article : Using the GDB debugger to the maximum
How to debug kernel.bin code? To do this, add debugging symbols to kernel.bin and start the debugger:
1. Add the compiler option in the makefile so that it generates debugging symbols:
CFLAGS = -Wall -fno-builtin -nostdinc -nostdlib -ggdb3 2. Add a couple of lines at the build stage so that the kernel.bin is written to disk without characters (such a file can be made using the strip utility). To do this, fix the kernel.bin target in the makefile:
kernel.bin: $(OBJFILES) $(LD) -T linker.ld -o $@ $^ cp $@ $@.dbg strip $@ then:
kernel.bin - does not contain characters - it can be run;
kernel.bin.dbg - contains both symbols and code - you can feed it to the debugger.
3. Install the debugger:
sudo apt-get install cgdb 4. Recompile the program:
make clean make all sudo make image 5. Run qemu with the debugger wait option:
sudo qemu-system-i386 -s -S -hda hdd.img & 6. Run the debugger with a file with symbols:
cgdb kernel.bin.dbg 7. In the debugger, connect to qemu and set the breakpoint directly to the main function:
(gdb) target remote localhost:1234 (gdb) break main 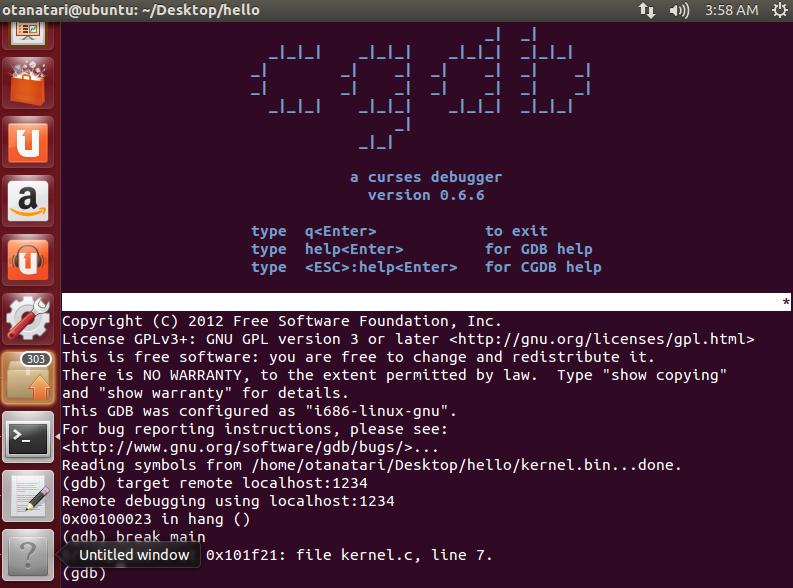
8. Get into main and debug it:
(gdb) c (gdb) n (gdb) n 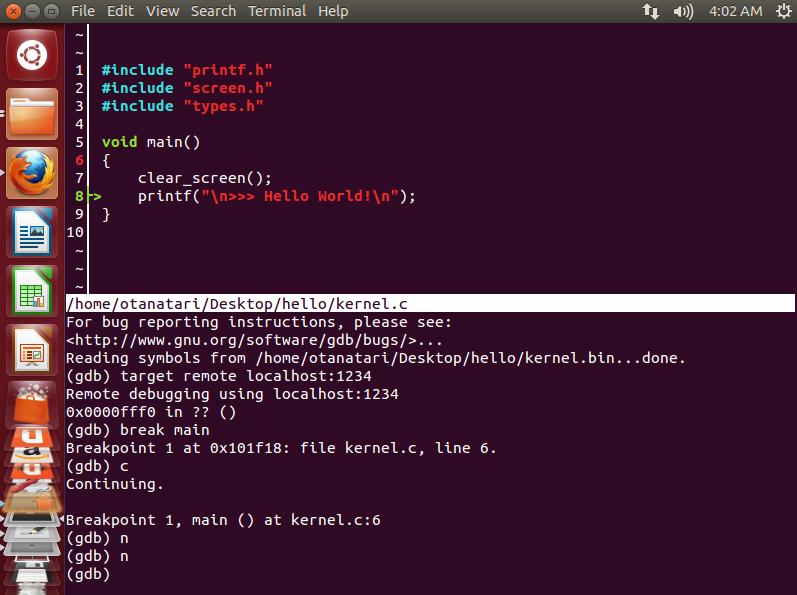
Thus, a powerful debugging tool is obtained. This method will work for QEMU, and in order to debug the program directly on the hardware, you need to connect the debugger module to our program - we will look at it in one of the following articles.
Compiling from Visual Studio
Main article : Using Visual Studio 2010 shell to compile projects using gcc on Linux
How to work with the received code from Visual Studio? Following the instructions in the article, we assemble the Visual Studio project without creating a project on Linux - it already exists.
1. Install on the ssh system:
sudo apt-get install ssh 2. We have the source of the project from kernel.bin on the shared directory for the virtual machine.
3. Install the plink utility in the tools folder and check its operation.
4. Create a Visual Studio project following the instructions and get the following tree:
\ proj \ kernel.c
\ proj \ loader.s
\ proj \ common \ printf.c
\ proj \ common \ screen.c
\ proj \ include \ printf.h
\ proj \ include \ stdarg.h
\ proj \ include \ screen.h
\ proj \ include \ types.h
\ proj \ makefile
\ proj \ linker.ld
\ proj \ tools \ plink.exe
\ proj \ kernel \ kernel.sln
\ proj \ kernel \ kernel.suo
\ proj \ kernel \ kernel.sdf
\ proj \ kernel \ vs \ kernel.vcxproj
\ proj \ kernel \ vs \ kernel.vcxproj.filters
\ proj \ kernel \ vs \ make_vs.props
5. Build the file ”\ proj \ kernel \ vs \ make_vs.props” as per the instructions:
<?xml version="1.0" encoding="utf-8"?> <Project xmlns="http://schemas.microsoft.com/developer/msbuild/2003"> <PropertyGroup Label="RemoteBuildLocals"> <RblFolder>proj</RblFolder> <RblIncludePath>$(SolutionDir)\include\</RblIncludePath> <RblExecute>sudo make image; sudo qemu-system-i386 -hda hdd.img</RblExecute> </PropertyGroup> <PropertyGroup Label="RemoteBuildSettings"> <RbHost>192.168.1.8</RbHost> <RbUser>user</RbUser> <RbPassword>123456</RbPassword> <RbRoot> ~/Desktop/_habr</RbRoot> </PropertyGroup> <PropertyGroup Label="RemoteBuild"> <RbToolArgs> -pw $(RbPassword) $(RbUser)%40$(RbHost) cd $(RbRoot); cd $(RblFolder);</RbToolArgs> <RbToolExe>$(SolutionDir)tools\plink -batch $(RbToolArgs)</RbToolExe> <RbBuildCmd>$(RbToolExe) make all</RbBuildCmd> <RbRebuildAllCmd>$(RbToolExe) make rebuild</RbRebuildAllCmd> <RbCleanCmd>$(RbToolExe) make cleanall</RbCleanCmd> <RbExecuteCmd>$(RbToolArgs) $(RblExecute)</RbExecuteCmd> <RbIncludePath>$(RblIncludePath)</RbIncludePath> </PropertyGroup> <PropertyGroup Condition="'$(Configuration)|$(Platform)'=='Debug|Win32'"> <NMakeBuildCommandLine>$(RbBuildCmd)</NMakeBuildCommandLine> <NMakeReBuildCommandLine>$(RbRebuildAllCmd)</NMakeReBuildCommandLine> <NMakeCleanCommandLine>$(RbCleanCmd)</NMakeCleanCommandLine> <IncludePath>$(RbIncludePath)</IncludePath> <LocalDebuggerCommand>$(SolutionDir) tools\plink</LocalDebuggerCommand> <LocalDebuggerCommandArguments>$(RbExecuteCmd)</LocalDebuggerCommandArguments> </PropertyGroup> <PropertyGroup Condition="'$(Configuration)|$(Platform)'=='Release|Win32'"> <NMakeBuildCommandLine>$(RbBuildCmd)</NMakeBuildCommandLine> <NMakeReBuildCommandLine>$(RbRebuildAllCmd)</NMakeReBuildCommandLine> <NMakeCleanCommandLine>$(RbCleanCmd)</NMakeCleanCommandLine> <IncludePath>$(RbIncludePath)</IncludePath> <LocalDebuggerCommand>$(SolutionDir)tools\plink</LocalDebuggerCommand> <LocalDebuggerCommandArguments>$(RbExecuteCmd)</LocalDebuggerCommandArguments> </PropertyGroup> </Project> 6. Change the file ”\ proj \ kernel \ vs \ kernel.vcxproj” as per the instructions:
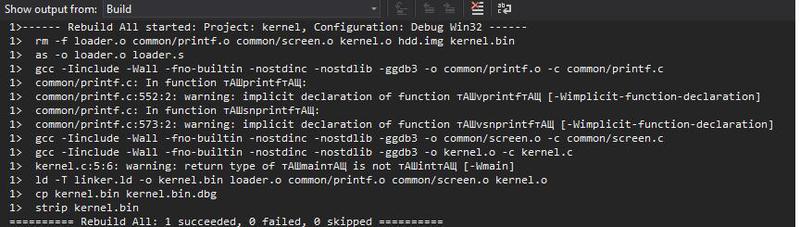
<Import Project="$(VCTargetsPath)\Microsoft.Cpp.props" /> <Import Project="$(SolutionDir)\vs\make_vs.props" /> <ImportGroup Label="ExtensionSettings"> 7. In the end, you should get something like the following:

8. Check that everything works:
Thus, for the further development of our program, you can use the Visual Studio shell, albeit a GCC compiler on Linux.
Scanning PCI devices
Main article : How to find PCI devices without an operating system
How can I scan the PCI system bus for devices now? Following the instructions in the article, we perform the following actions (the boot image is already ready, so just add the PCI scan code):
1. Add the following type definition to the include \ types.h file:
typedef unsigned long u32; typedef unsigned short u16; typedef unsigned char u8; 2. Add the file include \ io.h , which without any changes can be taken from the bitvisor project from the directory (include \ io.h).
3. Add the include \ pci.h file, which contains the basic definitions for functions for working with PCI. It has the following contents:
#ifndef _PCI_H #define _PCI_H #include "types.h" #define PCI_CONFIG_PORT 0x0CF8 #define PCI_DATA_PORT 0x0CFC #define PCI_MAX_BUSES 255 #define PCI_MAX_DEVICES 32 #define PCI_MAX_FUNCTIONS 8 #define PCI_HEADERTYPE_NORMAL 0 #define PCI_HEADERTYPE_BRIDGE 1 #define PCI_HEADERTYPE_CARDBUS 2 #define PCI_HEADERTYPE_MULTIFUNC 0x80 typedef union { struct { u16 vendorID; u16 deviceID; u16 commandReg; u16 statusReg; u8 revisionID; u8 progIF; u8 subClassCode; u8 classCode; u8 cachelineSize; u8 latency; u8 headerType; u8 BIST; } __attribute__((packed)) option; u32 header[4]; } __attribute__((packed)) PCIDevHeader; void ReadConfig32(u32 bus, u32 dev, u32 func, u32 reg, u32 *data); char *GetPCIDevClassName(u32 class_code); void PCIScan(); #endif 4. Add the pci.c file to the root of the project, with the following contents (we have slightly improved this code compared to the main article):
#include "types.h" #include "printf.h" #include "io.h" #include "pci.h" typedef struct { u32 class_code; char name[32]; } PCIClassName; static PCIClassName g_PCIClassNames[] = { { 0x00, "before PCI 2.0"}, { 0x01, "disk controller"}, { 0x02, "network interface"}, { 0x03, "graphics adapter"}, { 0x04, "multimedia controller"}, { 0x05, "memory controller"}, { 0x06, "bridge device"}, { 0x07, "communication controller"}, { 0x08, "system device"}, { 0x09, "input device"}, { 0x0a, "docking station"}, { 0x0b, "CPU"}, { 0x0c, "serial bus"}, { 0x0d, "wireless controller"}, { 0x0e, "intelligent I/O controller"}, { 0x0f, "satellite controller"}, { 0x10, "encryption controller"}, { 0x11, "signal processing controller"}, { 0xFF, "proprietary device"} }; typedef union { struct { u32 zero : 2; u32 reg_num : 6; u32 func_num : 3; u32 dev_num : 5; u32 bus_num : 8; u32 reserved : 7; u32 enable_bit : 1; }; u32 val; } PCIConfigAddres; void ReadConfig32(u32 bus, u32 dev, u32 func, u32 reg, u32 *data) { PCIConfigAddres addr; addr.val = 0; addr.enable_bit = 1; addr.reg_num = reg; addr.func_num = func; addr.dev_num = dev; addr.bus_num = bus; out32(PCI_CONFIG_PORT, addr.val); in32(PCI_DATA_PORT, data); return; } char *GetPCIDevClassName(u32 class_code) { int i; for (i = 0; i < sizeof(g_PCIClassNames)/sizeof(g_PCIClassNames[0]); i++) { if (g_PCIClassNames[i].class_code == class_code) return g_PCIClassNames[i].name; } return NULL; } int ReadPCIDevHeader(u32 bus, u32 dev, u32 func, PCIDevHeader *p_pciDevice) { int i; if (p_pciDevice == 0) return 1; for (i = 0; i < sizeof(p_pciDevice->header)/sizeof(p_pciDevice->header[0]); i++) ReadConfig32(bus, dev, func, i, &p_pciDevice->header[i]); if (p_pciDevice->option.vendorID == 0x0000 || p_pciDevice->option.vendorID == 0xffff || p_pciDevice->option.deviceID == 0xffff) return 1; return 0; } void PrintPCIDevHeader(u32 bus, u32 dev, u32 func, PCIDevHeader *p_pciDevice) { char *class_name; printf("bus=0x%x dev=0x%x func=0x%x venID=0x%x devID=0x%x", bus, dev, func, p_pciDevice->option.vendorID, p_pciDevice->option.deviceID); class_name = GetPCIDevClassName(p_pciDevice->option.classCode); if (class_name) printf(" class_name=%s", class_name); printf("\n"); } void PCIScan(void) { int bus; int dev; for (bus = 0; bus < PCI_MAX_BUSES; bus++) for (dev = 0; dev < PCI_MAX_DEVICES; dev++) { u32 func = 0; PCIDevHeader pci_device; if (ReadPCIDevHeader(bus, dev, func, &pci_device)) continue; PrintPCIDevHeader(bus, dev, func, &pci_device); if (pci_device.option.headerType & PCI_HEADERTYPE_MULTIFUNC) { for (func = 1; func < PCI_MAX_FUNCTIONS; func++) { if (ReadPCIDevHeader(bus, dev, func, &pci_device)) continue; PrintPCIDevHeader(bus, dev, func, &pci_device); } } } } 5. Add the launch of scanning PCI devices in kernel.c:
#include "printf.h" #include "screen.h" #include "types.h" #include "pci.h" void main() { clear_screen(); printf("\n>>> Hello World!\n"); PCIScan(); } 6. Make the necessary changes to the makefile:
OBJFILES = \ loader.o \ common/printf.o \ common/screen.o \ pci.o \ kernel.o 7. Now you can rebuild the project:
make rebuild sudo make image 8. Run the project to make sure everything works:
sudo qemu-system-i386 -hda hdd.img 
So we got a list of PCI devices on the computer. It will also work on a regular computer by booting from a flash drive.
After going through all the steps in this article, you can personally understand everything and see a working program that can be fully debugged.
Links to the following articles of the cycle:
" How to run a program without an operating system: part 3: Graphics "
" How to run a program without an operating system: part 4. Parallel computing "
" How to run a program without an operating system: part 5. Accessing the BIOS from the OS "
" How to run a program without an operating system: part 6. Support for working with disks with the FAT file system "
Source: https://habr.com/ru/post/174157/
All Articles