Developing Blueprints plugins in Atlassian Confluence
It would seem that quite recently Confluence 5 came out, which brought a lot of new features to users: a new visual presentation, the ability to switch between applications directly from the wiki, a notification that a comment has been added or the content of someone's page has been changed. However, Atlassian Confluence version 5.1 is already being felt, which is aimed at simplifying the process of creating pages using Blueprints technology. Blueprints helps users understand what content they want to create and shows how to do this, literally guiding users by hand before getting ready to view the wiki page.
This article covers the process of developing Blueprints plug-ins from the initial idea to the final result. For this, a small plugin for Atlassian Confluence will be developed, which allows you to create pages from good old wiki markup right in the page view mode using the Blueprints technology.
To create a project structure, you can use the
Now you can open the project in your favorite IDE and edit the metadata in the POM file (note that the development of plug-ins for Confluence takes place with the participation of Maven ). In the example, we will use the first milestone Confluence 5.1 (now 5.1-rc3 is already available).
In this step, add the modules for working with
The
Next, we define the
The
The
The soy-template we use is defined further in the
In this case, the user will see the following:
The
The
It should be noted that the page template from the
Variables that can be used in the template can be taken both from the form that the user fills in, or “lay down” directly by the
And finally,
With the used parameter values in the
Note that you should add a dependence on the resources
You won’t believe it, but the process of creating a
In addition, you can view the source code of the plug-in or try to repeat all the steps to create it yourself.
This article covers the process of developing Blueprints plug-ins from the initial idea to the final result. For this, a small plugin for Atlassian Confluence will be developed, which allows you to create pages from good old wiki markup right in the page view mode using the Blueprints technology.
Step 1 - Creating the project structure
To create a project structure, you can use the
atlas-create-confluence-plugin command from the Atlassian SDK and enter the necessary data:group-id:com.stiltsoft.confluence.pluginsartifact-id:wiki-markup-blueprint-pluginversion:1.0.0-SNAPSHOTpackage:com.stiltsoft.confluence.plugins.blueprint.markup
Step 2 - Add Metadata to the POM File
Now you can open the project in your favorite IDE and edit the metadata in the POM file (note that the development of plug-ins for Confluence takes place with the participation of Maven ). In the example, we will use the first milestone Confluence 5.1 (now 5.1-rc3 is already available).
<dependencies> <dependency> <groupId>com.atlassian.confluence</groupId> <artifactId>confluence</artifactId> <version>${confluence.version}</version> <scope>provided</scope> </dependency> <dependency> <groupId>com.atlassian.confluence.plugins</groupId> <artifactId>confluence-create-content-plugin</artifactId> <version>${create-content.version}</version> <scope>provided</scope> </dependency> </dependencies> <properties> <confluence.version>5.1-m1</confluence.version> <create-content.version>1.3.8</create-content.version> <confluence.data.version>5.1-m1</confluence.data.version> <amps.version>4.1.5</amps.version> </properties> Step 3 - Adding Modules to the Plugin Descriptor
In this step, add the modules for working with
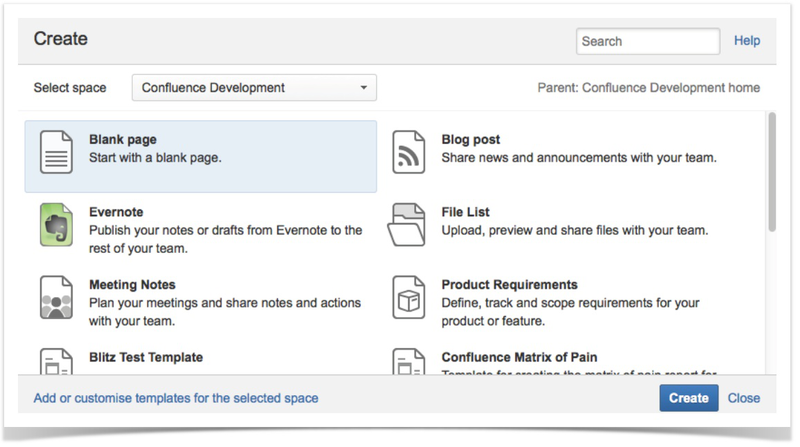
Blueprints into the plugin descriptor atlassian-plugin.xml . <web-item key="wiki-markup-blueprint-item" i18n-name-key="wiki.markup.blueprint.name" section="system.create.dialog/content"> <description key="wiki.markup.blueprint.description"/> <resource name="icon" type="download" location="images/stiltsoft.png"/> <param name="blueprintKey" value="wiki-markup-blueprint"/> </web-item> The
web-item module adds the Wiki Markup menu item to the Create Dialog window and has the following options:- the
i18n-name-keyattribute is the key by which the name of the displayed menu item is found in the resource file sectionattribute - defines where the menu item appears (in order for it to appear in theCreate Dialogwindow, specify the valuesystem.create.dialog/content)resourcetag - used to indicate the path to the displayed icon- tag
param- defines a parameter with the nameblueprintKeyand a value equal to the key of theblueprintmodule, announced later inatlassian-plugin.xml
Next, we define the
blueprint module: <blueprint key="wiki-markup-blueprint" create-result="view" content-template-key="wiki-markup-blueprint-page" index-key="wiki-markup-blueprint-index"> <dialog-wizard key="blueprint-wizard"> <dialog-page id="insertMarkupForm" template-key="WikiMarkup.Blueprint.form" title-key="wiki.markup.blueprint.dialog.title" last="true"/> </dialog-wizard> </blueprint> The
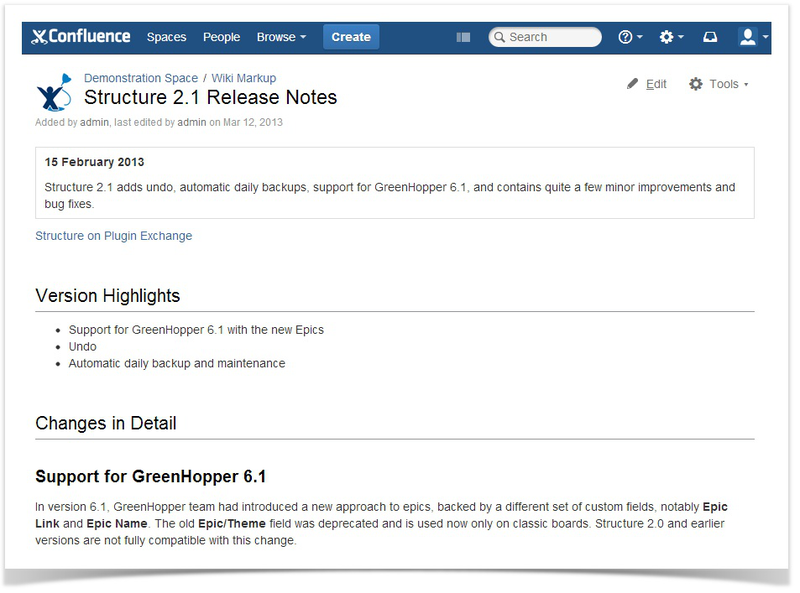
blueprint module is a core value for developers. It includes the following parameters:keyattribute - the key of the module in the descriptorcreate-resultattribute - defines the behavior that is expected after the completion of all steps to create a new page usingBlueprints. It can takeeditvalues (after all steps are completed, we enter the page editing mode) andview(after all steps are completed, we enter the page view mode, the page is created automatically).content-template-keyattribute - refers to the key of thecontent-templatemodule, announced later inatlassian-plugin.xmlindex-keyattribute - defines the name of the label, which will be put in the created page (It is worth noting that theindex'amechanismindex'aquite multifaceted, but in this example is not considered by us)
The
blueprint module's dialog-wizard blueprint defines the dynamic behavior of what the user sees when creating content using your Blueprint plugin. The parameter has the following attributes:idattribute - participates in the formation ofhtmlcontent and is used as part of thecssclass in the current content creation window that the user sees- attribute
template-key- defines the name of thesoytemplate for dynamically generating the contents of the window title-keyattribute - the key that contains the window title in the resource file
The soy-template we use is defined further in the
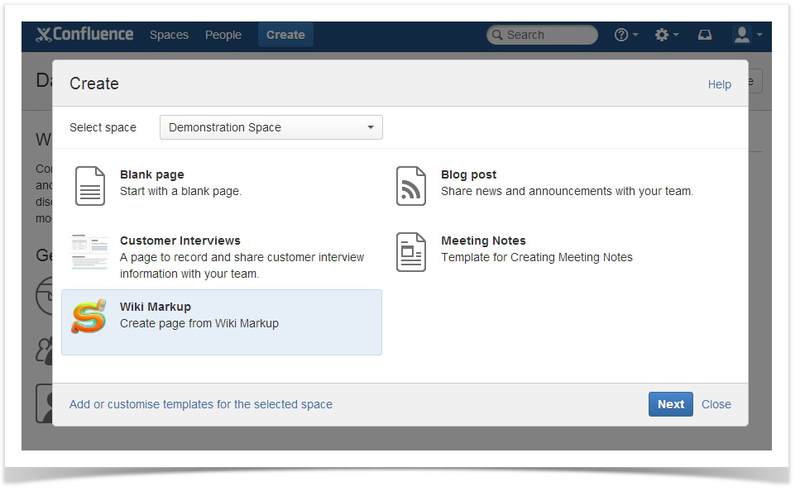
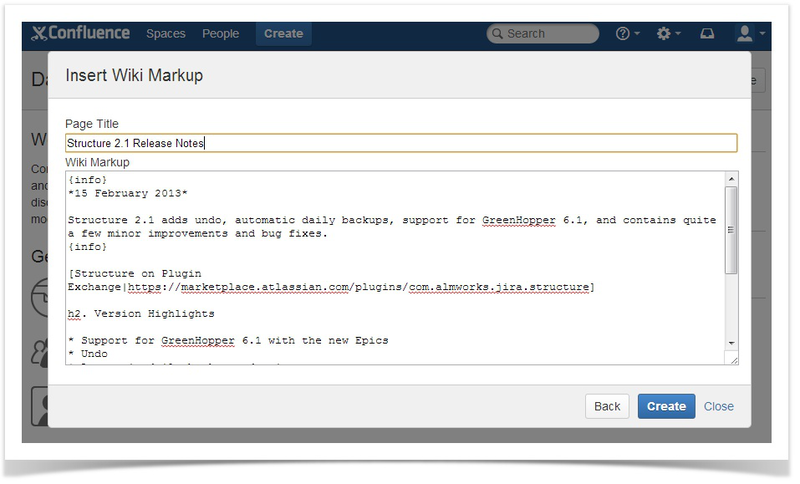
web-resource module. The following is the contents of the templates.soy file: {namespace WikiMarkup.Blueprint} /** * Wiki Markup form */ {template .form} <form id="wiki-markup-form" action="#" method="post" class="aui"> <div> {getText('wiki.markup.blueprint.dialog.form.label.page.title')} </div> <input id="page-title" type="text" name="title"> <div> {getText('wiki.markup.blueprint.dialog.form.label.markup')} </div> <textarea id="wiki-markup" name="wikiMarkup"></textarea> </form> {/template} In this case, the user will see the following:
The
content-template module defines the page template that is used to create the page: <content-template key="wiki-markup-blueprint-page" i18n-name-key="wiki.markup.blueprint.page.name"> <resource name="template" type="download" location="xml/content-template.xml"/> <context-provider class="com.stiltsoft.confluence.plugins.blueprint.markup.WikiMarkupProvider"/> </content-template> The
content-template module has the following parameters:keyattribute - the key of the module in the descriptor (used in theblueprintmodule)resourcetag - define a template that participates in the creation of a new page- The
context-providertag is an optional parameter that can participate in the creation of a page by generating additional variables.
It should be noted that the page template from the
xml file may contain dynamic variables that are taken from the context. In the plugin we are developing, the template looks like this: <at:var at:name="wikiInXhtml" at:rawXhtml='true'/> Variables that can be used in the template can be taken both from the form that the user fills in, or “lay down” directly by the
context-provider . In our example, the context-provider , which converts the wiki markup entered by the user on the input form into xhtml markup used in Confluence. The context-provider 'a code is presented below: package com.stiltsoft.confluence.plugins.blueprint.markup; import com.atlassian.confluence.content.render.xhtml.DefaultConversionContext; import com.atlassian.confluence.content.render.xhtml.XhtmlException; import com.atlassian.confluence.renderer.PageContext; import com.atlassian.confluence.xhtml.api.EditorFormatService; import com.atlassian.plugin.PluginParseException; import com.atlassian.plugin.web.ContextProvider; import java.util.Map; public class WikiMarkupProvider implements ContextProvider { private EditorFormatService editorFormatService; public WikiMarkupProvider(EditorFormatService editorFormatService) { this.editorFormatService = editorFormatService; } @Override public void init(Map<String, String> params) throws PluginParseException { } @Override public Map<String, Object> getContextMap(Map<String, Object> ctx) { try { String wikiMarkup = (String) ctx.get("wikiMarkup"); String xhtml = editorFormatService.convertWikiToEdit(wikiMarkup, new DefaultConversionContext(new PageContext())); ctx.put("wikiInXhtml", xhtml); } catch (XhtmlException ignored) { } return ctx; } } And finally,
atlassian-plugin.xml define a web-resource module in atlassian-plugin.xml : <web-resource key="blueprint-resources" name="Blueprint Resources"> <transformation extension="js"> <transformer key="jsI18n"/> </transformation> <transformation extension="soy"> <transformer key="soyTransformer"> <functions>com.atlassian.confluence.plugins.soy:soy-core-functions</functions> </transformer> </transformation> <resource type="download" name="wiki-markup.css" location="css/wiki-markup.css"/> <resource type="download" name="templates-soy.js" location="soy/templates.soy"/> <resource type="download" name="wiki-markup.js" location="js/wiki-markup.js"/> <dependency>com.atlassian.confluence.plugins.confluence-create-content-plugin:resources</dependency> <context>atl.general</context> <context>atl.admin</context> </web-resource> With the used parameter values in the
web-resource module, you can familiarize yourself with the documentation on the site .Note that you should add a dependence on the resources
com.atlassian.confluence.plugins.confluence-create-content-plugin:resources . In addition, wiki-markup.js should register your Blueprint plugin as follows: (function ($) { Confluence.Blueprint.setWizard('com.stiltsoft.confluence.plugins.wiki-markup-blueprint-plugin:wiki-markup-blueprint-item', function() { }); })(AJS.$); Step 4 - Use the plugin to create wiki markup pages.
You won’t believe it, but the process of creating a
Blueprint plug-in for creating a page from wiki markup comes to an end. If you did everything correctly, you can now install the plugin and try it in action.In addition, you can view the source code of the plug-in or try to repeat all the steps to create it yourself.
')
Source: https://habr.com/ru/post/173797/
All Articles