How to make a simple multiplayer game through Game Center. Part 1: connecting Game Center to the application
Translation of a wonderful tutorial on integrating multiplayer using Game Center in an iOS game. On the author's website there are many lessons designed to help novice game developers.
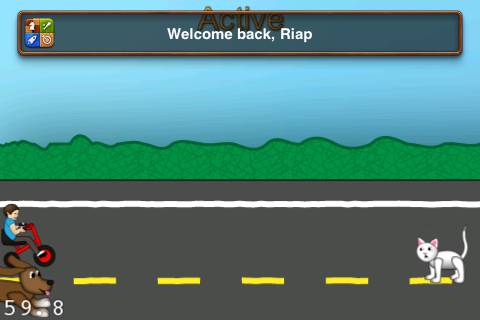
The game you will be working on is very simple. This is a race whose participants are a dog and a child. Tap as fast as possible to win!
')
This tutorial assumes that you are familiar with the basics of Cocos2D. Otherwise, I advise you to familiarize yourself with other Cocos2D lessons that you can find here .
Note: in order to test Game Center in the application, you must be a registered iOS developer. You also need at least one physical iOS device (in order for one copy of the application to work in the simulator, and another on the device). In the end, you need at least two different Game Center accounts for testing (do not worry, you can create them for free, only you need another e-mail address).
Ready? Then let's go!
So, let's begin
This lesson demonstrates the addition of a multiplayer component to a simple game. Since the creation of the logic of the gameplay is not part of the goal of this lesson, I prepared a piece that contains the game code without working with the network.
Download the code and run the project. You should see something like this:
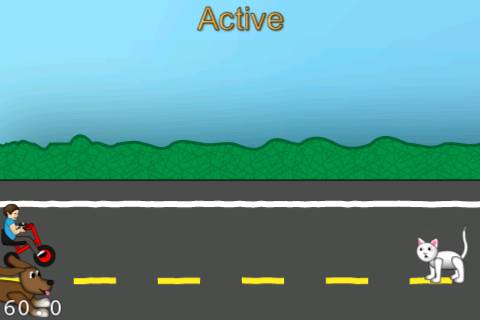
The game is very simple, and the code is well commented. Review it and make sure you understand everything.
Turn on Game Center
At the moment you have a simple game that you can play, except that it is very boring to play it alone! It would be much more fun to use Game Center to invite friends to play with you or use match search to play with random people. But before you start using Game Center, you need to do two things:
- Create and configure App ID;
- Register the application in iTunes Connect.
Let's get started.
Create and configure App ID
The first step is to create and configure the App ID. To do this, log in to iOS Dev Center , and from there to iOS Provisioning Portal. Open the App IDs tab and create a new App ID for the application, just like in the screenshot:
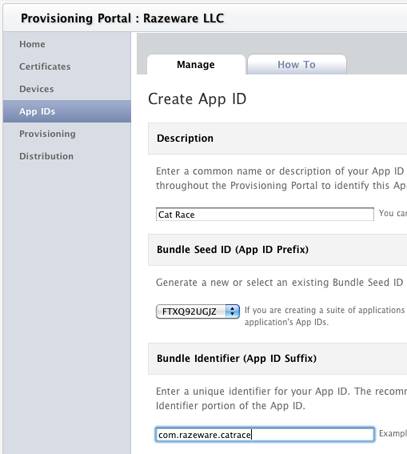
The most important part is the Bundle Identifier. It must be a unique string (that is, it cannot match the one that I use!) A good way is to use your domain name followed by a unique string to avoid matching the names.
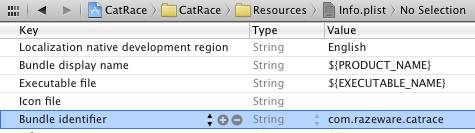
When you are done, click Submit. Then open the Cat Race project, select Resources \ Info.plist ( note lane: in later versions of Xcode, this file is located in the Supporting Files folder and is named% Project_name% -Info.plist) and change the Bundle Identifier to the one you entered in iOS Provisioning Portal as shown below (of course, you will enter a different value):
And the last thing. To prevent Xcode from trouble, follow these steps:
- Delete all copies of the application from your device or simulator;
- Exit the simulator if it is running;
- Run Project \ Clean.
Congratulations, you now have an App ID for the app, and it is configured to use! Now you can register the application in iTunes Connect and enable Game Center.
Register the application in iTunes Connect
The next step is to enter iTunes Connect and register a new application.
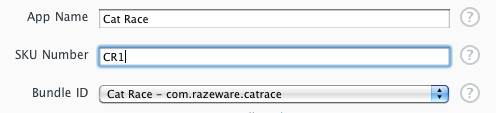
Once you are logged into iTunes Connect, select Manage Your Applications, then click on the blue Add New App button in the upper left. Enter the name of the application, the SKU Number and select the Bundle ID, in the likeness of an early pattern, as well as in the screenshot:
Click Continue and complete the basic information about the application. Do not worry about correctness, as long as it is not so important, because you can change it later. And now you just need to add something (including an icon and a screenshot) to make iTunes Connect happy.
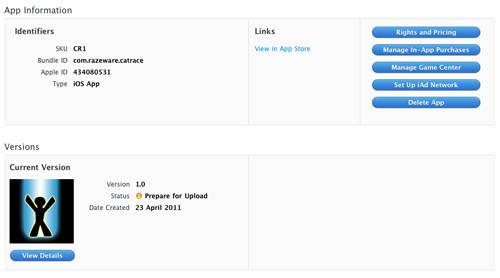
When you're done, click Save, and if everything is done as it should, the application status will be “Prepare for Upload”, as in the screenshot:
Click the blue “Manage Game Center” button on the top right, then click “Enable”. After that click “Done”. That's it, Game Center is enabled for your application, and you can start writing code!
By the way, in the “Manage Game Center” section, you can also manage leaderboards and, of course, achievements. In this lesson, work with them will not be dismantled.
Local Player Authorization: Theory
When the game starts, the first thing is to authorize the local player. It is very simple. You only need to call authenticateWithCompletionHandler. Optionally, you can make sure that a certain block of code is executed immediately after the user is authorized.
But there is one trick. There is another authentication method. To do this, switch to the Game Center application, log in from there and go back to your application.
Your application needs to know when the authorization status changes. You can find out about this by registering for “authentication changed” notifications. So, to authorize a player you need:
- Create a singleton object ( note: Singleton is a design pattern that ensures that a class has only one instance and provides global access to that instance) to keep the Game Center code in one place;
- When a single object is created, it will register to receive the “authentication changed” notification;
- The game will call the singleton object method to authorize the player;
- When a player logs in or out, the “authentication changed” function will be called back;
- The callback function will track whether a player is currently authorized.
Local player authorization: implementation
In the Cat Race project, create a new file, select the iOS \ Cocoa Touch \ Objective-C class and click Next. Enter NSObject in the Subclass field, click Next and name the new class as GCHelper, click Finish. Next, replace the contents of GCHelper.h with the following:
#import <Foundation/Foundation.h> #import <GameKit/GameKit.h> @interface GCHelper : NSObject { BOOL gameCenterAvailable; BOOL userAuthenticated; } @property (assign, readonly) BOOL gameCenterAvailable; + (GCHelper *)sharedInstance; - (void)authenticateLocalUser; @end This code imports the GameKit header file and creates an object with two boolean variables. One of them is necessary to monitor the availability of Game Center'a, and the second to determine when a player is authorized.
Also created: a property so that the game can report that the Game Center is available; a static method to maintain the uniqueness of an object instance and another method for authorizing a local user (which will be called when the application starts).
Next, go to GCHelper.m and add the following code inside @implementation:
@synthesize gameCenterAvailable; #pragma mark Initialization static GCHelper *sharedHelper = nil; + (GCHelper *) sharedInstance { if (!sharedHelper) { sharedHelper = [[GCHelper alloc] init]; } return sharedHelper; } Here the gameCenterAvailable property is synthesized, which sets the method for creating a single instance of the class. I note that there are many options for writing singleton methods, but this is the easiest way when you don’t need to worry about multiple threads trying to initialize a singlelton at the same time.
Next, add the following method immediately after the sharedInstance method:
- (BOOL)isGameCenterAvailable { // check for presence of GKLocalPlayer API Class gcClass = (NSClassFromString(@"GKLocalPlayer")); // check if the device is running iOS 4.1 or later NSString *reqSysVer = @"4.1"; NSString *currSysVer = [[UIDevice currentDevice] systemVersion]; BOOL osVersionSupported = ([currSysVer compare:reqSysVer options:NSNumericSearch] != NSOrderedAscending); return (gcClass && osVersionSupported); } This method was taken directly from the Apple Guide on using the Game Kit . This method checks the availability of the Game Kit on a specific device. Due to this, the application will be able to run on iOS 4.0 or earlier (only without multiplayer).
Next, add the following code immediately after the previous method:
- (id)init { if ((self = [super init])) { gameCenterAvailable = [self isGameCenterAvailable]; if (gameCenterAvailable) { NSNotificationCenter *nc = [NSNotificationCenter defaultCenter]; [nc addObserver:self selector:@selector(authenticationChanged) name:GKPlayerAuthenticationDidChangeNotificationName object:nil]; } } return self; } - (void)authenticationChanged { if ([GKLocalPlayer localPlayer].isAuthenticated && !userAuthenticated) { NSLog(@"Authentication changed: player authenticated."); userAuthenticated = TRUE; } else if (![GKLocalPlayer localPlayer].isAuthenticated && userAuthenticated) { NSLog(@"Authentication changed: player not authenticated"); userAuthenticated = FALSE; } } The init method checks the availability of the Game Center, and in the case of a positive result is registered for the “authentication changed” notification. It is important that the application is registered for this notification before attempting to authorize the user, so it works after the authorization is completed.
The authenticationChanged callback function is very simple: it checks to see if the user is authorized during the state transition, and changes the flag accordingly.
I note that for training purposes, a function can be called several times in a row for authorization or exit, to make sure that the userAuthenticated flag is different from the current status, and only shows if there have been any changes after some time.
Finally, add a method to authorize the local player immediately after the authenticationChanged method:
#pragma mark User functions - (void)authenticateLocalUser { if (!gameCenterAvailable) return; NSLog(@"Authenticating local user..."); if ([GKLocalPlayer localPlayer].authenticated == NO) { [[GKLocalPlayer localPlayer] authenticateWithCompletionHandler:nil]; } else { NSLog(@"Already authenticated!"); } } Here you call the authenticateWithCompletionHandler method, which will be mentioned later. It serves to inform the Game Kit of the need to authorize a player. Note that it does not pass the completion handler. Since you signed up for the “authentication changed” notification, this is optional.
Ok, now GCHelper contains all the code needed to authorize a player, so now it only remains to use it! Switch to AppDelegate.m and make the following changes:
// #import "GCHelper.h" // applicationDidFinishLaunching, // , runWithScene: [[GCHelper sharedInstance] authenticateLocalUser]; This will create a single instance (which will register for the “authentication changed” callback during the initialization process), then call the authenticateLocalUser method.
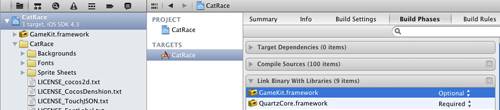
Almost done! The final step is to add the Game Kit framework to the project. To do this, select the Cat Race project at the top left of the Groups & Files tab, go to the Build Phases tab, expand “Link Binary with Libraries” and click on the “+” button. Select GameKit.framework and click Add. Change the type from Required to Optional, and your screen should look like the following:
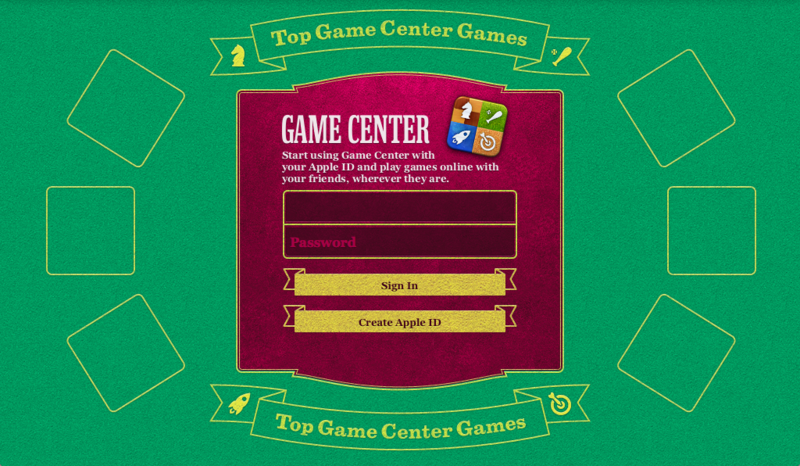
You did it! Build and run the project, and if you are logged in to the Game Center, then you should see something like this:
Now that you have authorized a player, you can start having fun, for example, find someone to play with!
Game Center, Game Center, make me a match
There are two ways to find someone to play with through the Game Center. This is a program match search or use the built-in match creation interface.
In this lesson you will learn the built-in interface for creating matches. The idea is that when you want to find a match, you pass some parameters to the GKMatchRequest object, then create and display an instance of GKMatchmakerViewController.
Let's see how it works. First, let's make some edits to CGHelper.h:
// @protocol GCHelperDelegate - (void)matchStarted; - (void)matchEnded; - (void)match:(GKMatch *)match didReceiveData:(NSData *)data fromPlayer:(NSString *)playerID; @end // @interface @interface GCHelper : NSObject <GKMatchmakerViewControllerDelegate, GKMatchDelegate> { // @interface UIViewController *presentingViewController; GKMatch *match; BOOL matchStarted; id <GCHelperDelegate> delegate; // @interface @property (retain) UIViewController *presentingViewController; @property (retain) GKMatch *match; @property (assign) id <GCHelperDelegate> delegate; - (void)findMatchWithMinPlayers:(int)minPlayers maxPlayers:(int)maxPlayers viewController:(UIViewController *)viewController delegate:(id<GCHelperDelegate>)theDelegate; Let's quickly go through this code.
- You define the GCHelperDelegate protocol, which is used to notify another object about important events, such as: the beginning of a match, the end or the receipt of data. In this game, your Cocos2D layer will implement this protocol;
- The GCHelper object implements two protocols. The first is to allow the match creation interface to notify this object when a match is found or not. And the second is for the Game Center to notify this object when data is received or the connection status has changed;
- New variables and instance properties are created to monitor the view controller, which will display the match creation interface. As well as a link to the match, a variable that lets you know whether the match started or not, and the delegate;
- A new method is being created so that Cocos2D layer can find someone to play with.
Now switch to GCHelper.m and make the following changes:
// @synthesize presentingViewController; @synthesize match; @synthesize delegate; // , authenticateLocalUser - (void)findMatchWithMinPlayers:(int)minPlayers maxPlayers:(int)maxPlayers viewController:(UIViewController *)viewController delegate:(id<GCHelperDelegate>)theDelegate { if (!gameCenterAvailable) return; matchStarted = NO; self.match = nil; self.presentingViewController = viewController; delegate = theDelegate; [presentingViewController dismissModalViewControllerAnimated:NO]; GKMatchRequest *request = [[[GKMatchRequest alloc] init] autorelease]; request.minPlayers = minPlayers; request.maxPlayers = maxPlayers; GKMatchmakerViewController *mmvc = [[[GKMatchmakerViewController alloc] initWithMatchRequest:request] autorelease]; mmvc.matchmakerDelegate = self; [presentingViewController presentModalViewController:mmvc animated:YES]; } This method will be called by the Cocos2D layer to search for a match. If the Game Center is not available, then this method does nothing.
It initializes the match as not yet started and the match object as nil. It saves the outside view controller and delegate for future use and cancels any view controller that existed before it (in case the GKMatchmakerViewController is currently displayed).
Then comes the important part. The GKMatchRequest object allows you to specify the type of match you are looking for, such as the minimum and maximum number of players. This method establishes them as they were transferred to it (for this game at least - 2 players, maximum - also 2 players).
Next, it creates a new instance of GKMatchmakerViewController with the received request ( note: the instance of GKMatchRequest), sets the GCHelper object as a delegate and displays the transmitted view controller to the screen.
From this point on, control is transferred to GKMatchmakerViewController, which allows the user to find a random player and start the game. After that, some callback functions will be called, so let's add them:
#pragma mark GKMatchmakerViewControllerDelegate // - (void)matchmakerViewControllerWasCancelled:(GKMatchmakerViewController *)viewController { [presentingViewController dismissModalViewControllerAnimated:YES]; } // - (void)matchmakerViewController:(GKMatchmakerViewController *)viewController didFailWithError:(NSError *)error { [presentingViewController dismissModalViewControllerAnimated:YES]; NSLog(@"Error finding match: %@", error.localizedDescription); } // , - (void)matchmakerViewController:(GKMatchmakerViewController *)viewController didFindMatch:(GKMatch *)theMatch { [presentingViewController dismissModalViewControllerAnimated:YES]; self.match = theMatch; match.delegate = self; if (!matchStarted && match.expectedPlayerCount == 0) { NSLog(@"Ready to start match!"); } } If the player cancels the match search, or an error occurs, the match creation view will simply close.
And if a match is found, it will save the match object and set the delegate of the match to the GCHelper delegate so that it can be notified of incoming data and a change in the connection status.
He also checks if it's time to start the match. The match object stores the number of players that need to be found in the variable expectedPlayerCount. If it is 0, then everyone is ready to start. Now we just put it in the log, later we will do something interesting here.
Next, add the implementation of the GKMatchDelegate callback functions:
#pragma mark GKMatchDelegate // - (void)match:(GKMatch *)theMatch didReceiveData:(NSData *)data fromPlayer:(NSString *)playerID { if (match != theMatch) return; [delegate match:theMatch didReceiveData:data fromPlayer:playerID]; } // (, , ) - (void)match:(GKMatch *)theMatch player:(NSString *)playerID didChangeState:(GKPlayerConnectionState)state { if (match != theMatch) return; switch (state) { case GKPlayerStateConnected: // handle a new player connection. NSLog(@"Player connected!"); if (!matchStarted && theMatch.expectedPlayerCount == 0) { NSLog(@"Ready to start match!"); } break; case GKPlayerStateDisconnected: // a player just disconnected. NSLog(@"Player disconnected!"); matchStarted = NO; [delegate matchEnded]; break; } } // - - (void)match:(GKMatch *)theMatch connectionWithPlayerFailed:(NSString *)playerID withError:(NSError *)error { if (match != theMatch) return; NSLog(@"Failed to connect to player with error: %@", error.localizedDescription); matchStarted = NO; [delegate matchEnded]; } // - - (void)match:(GKMatch *)theMatch didFailWithError:(NSError *)error { if (match != theMatch) return; NSLog(@"Match failed with error: %@", error.localizedDescription); matchStarted = NO; [delegate matchEnded]; } match: didReceiveData: fromPlayer is called when another player sends you data. This method simply forwards the data to the delegate (in this game it will be the Cocos2D layer), so the game engine can use it.
match: player: didChangState is used when connecting a player to check if all players are connected so that you can start the match. Otherwise, if a player disconnects, the match ends and a notification is sent to the delegate.
OK, now we have the code to create a match, let's use it in our HelloWorldLayer. Switch to HelloWorldLayer.h and make the following changes:
// #import "GCHelper.h" // @interface GCHelperDelegate @interface HelloWorldLayer : CCLayer <GCHelperDelegate> Now switch to HelloWorldLayer.m and make the following corrections:
// #import "AppDelegate.h" #import "RootViewController.h" // init, setGameState AppDelegate * delegate = (AppDelegate *) [UIApplication sharedApplication].delegate; [[GCHelper sharedInstance] findMatchWithMinPlayers:2 maxPlayers:2 viewController:delegate.viewController delegate:self]; // #pragma mark GCHelperDelegate - (void)matchStarted { CCLOG(@"Match started"); } - (void)matchEnded { CCLOG(@"Match ended"); } - (void)match:(GKMatch *)match didReceiveData:(NSData *)data fromPlayer:(NSString *)playerID { CCLOG(@"Received data"); } The most important part here is the init method. It gets the RootViewController from the App Delegate, because this view controller will display the match creation view controller. Further, the method for match search is called by displaying the view controller of the match creation. This is the method you just wrote in GCHelper.
Next come the preparations for the functions of the beginning or end of the matches, which you implement later.
Last thing. By default, the Cocos2D template does not contain a property for the RootViewController in the App Delegate, so you must add it. Switch to AppDelegate.h and add the following:
@property (nonatomic, retain) RootViewController *viewController; Synthesize it in AppDelegate.m:
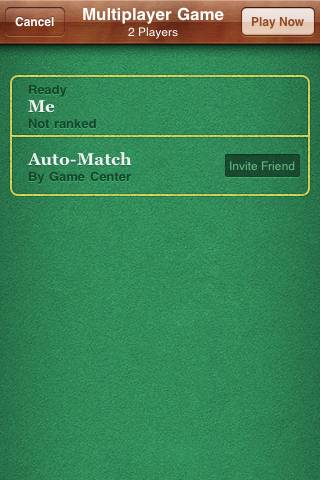
@synthesize viewController; Done! Build and run the application, and you should see the match creation view controller appear:
Now run the application on another device so that you have two running copies at the same time (for example, it can be a simulator and your iPhone).
Important: make sure you use different Game Center accounts on each device, otherwise it will not work.
Click "Play Now" on both devices and, after some time, the match creation view controller will disappear, and you should see something like this in the log:
CatRace[16440:207] Authentication changed: player authenticated. CatRace[16440:207] Player connected! CatRace[16440:207] Ready to start match! Congratulations! You created a match between two devices! Now you are on the way to creating a network game!
Landscape orientation and GKMatchmakerViewController
You should have noticed that by default the GKMatchmakerViewController appears in a portnet orientation. Obviously, this is very annoying, because this Cocos2D game in landscape!
Fortunately, you can fix this by forcing GKMatchmakerViewController to accept only landscape orientations. To do this, create a new file, select the iOS \ Cocoa Touch \ Objective-C class and create a subclass of NSObject under the name GKMatchmakerViewController-LandscapeOnly.
Replace the contents of GKMatchmakerViewController-LandscapeOnly.h with the following:
#import <Foundation/Foundation.h> #import <GameKit/GameKit.h> @interface GKMatchmakerViewController(LandscapeOnly) - (BOOL)shouldAutorotateToInterfaceOrientation:(UIInterfaceOrientation)interfaceOrientation; @end And then the contents of GKMatchmakerViewController-LandscapeOnly.m:
#import "GKMatchmakerViewController-LandscapeOnly.h" @implementation GKMatchmakerViewController (LandscapeOnly) - (BOOL)shouldAutorotateToInterfaceOrientation:(UIInterfaceOrientation)interfaceOrientation { return ( UIInterfaceOrientationIsLandscape( interfaceOrientation ) ); } @end And that's it! Build the application and run it. Now the view controller should appear in the landscape view:

What next?
Here is an example of a project with all the code that was discussed in this lesson.
In the second part, we will learn how to transfer data between devices, and turn the game into a wonderful cat-child race!
Source: https://habr.com/ru/post/173449/
All Articles