Simple solution for vertical shooting of devices and other tricks when creating reviews
In my first two reviews of the readers ( PocketBook Basic New and PocketBook Touch ) I photographed the described devices with hands, and I made a slideshow for these reviews, combining screenshots taken by software and real photos of devices. In these reviews, the picture that I took as the base for the frames of the slideshow had to be done while holding the camera in the position as close as possible to the vertical one (the lens is pointing down from the table). Even then, I imagined that the next step was the use of a tripod or some kind of tripod analogue, which would give me the opportunity to use real photos in the slideshow.
While working on the next review , I already had a more serious tool for creating high-quality images - the Nikon Coolpix P300 camera, which was kindly provided by Nikon Ukraine. This time I decided to approach the creation of a slideshow more thoroughly. At first I was looking for a tripod suitable for vertical shooting, but in the end I got a little idea how to do without it.
')
The essence of the idea is extremely simple: put something like a cover from some small box on two wooden planks on top, cut out a hole for the lens and take photographs in this “stand for the camera”. In the room in which I photographed the devices for review, there is a bookcase next to the table, on one of the shelves of which I put wooden slats, on which I put a stand under the camera with the camera itself. I put boxes from other large devices and several books under the opposite side of the slats.
Below, I will talk in more detail about creating snapshots for a slideshow, show some chips related to creating slideshows in the form of a gif-animation, and also talk about possible ways of using this lowtech analogue tripod in some other areas. Be careful, traffic!
Creating a stand for the camera
While working on the Assistant AE-601 reading room review , I began to look for a suitable support for a camera. The material for the stand should be durable (thick cardboard or a combination of cardboard with plastic), for the Nikon Coolpix P300 camera, digging debris, I found a box from under the quiet Noctua NF-P12 fan. He put a camera on the stand, marked out the area of the lens and, using scissors, a knife and electrical tape, built what was needed. Doing reviews of the Amazon Kindle and Nook Simple Touch readers , I already had a more serious camera on my hands - the Nikon Coolpix P7100 , the stand for which I did separately (larger lens, larger camera itself).
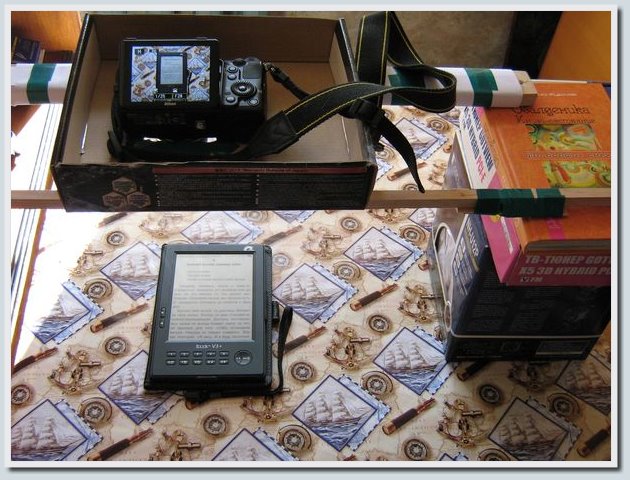
Stand for Nikon Coolpix P300 and Nikon Coolpix P7100 look like this:


By placing the stand under the camera on the slats, you can adjust the height by placing additional books. Also, for reliable fixing of the slats, it is useful to put a couple of books on the slats on top. Below I give a couple more photos of what a device for vertical shooting with a Nikon Coolpix P7100 camera looks like.
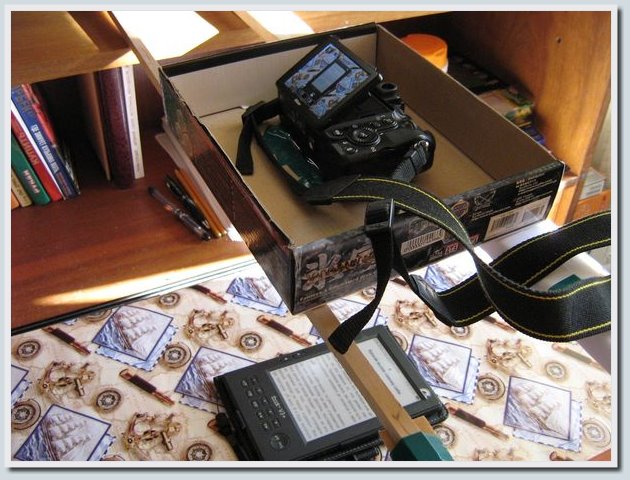

In the above photos, you might have noticed a turning screen in a Nikon Coolpix P7100 camera. This chip came in handy when I shot a video for Kindle and Nook Simple Touch reviews (if you shoot without an assistant, the swivel screen is simply indispensable!).
Creating snapshots for slideshows
Taking photos for review of the Assistant's reading room, I have not thought of using the timer yet. But in the next two reviews, this camera chip was already actively used. It is convenient to set the timer for 10 seconds, perhaps it is possible to fix this option for each shot, I did not find such a setting, so I turned on the timer for each shot individually.
The procedure for taking pictures for a slideshow with a Nikon Coolpix P7100 camera using a timer, see below:

Dropbox folder
Training for slideshows
When photographing a reader for a slideshow using the device described above (the reader is in one position, the information displayed on the device’s screen is different), the device’s screen was a real distinguishable difference in the pictures. However, when creating a gif-slideshow from such frames, the size of the file being created was heavy.
At first, I thought that this was due to the overestimation of the duration of the display of each frame of the slideshow, but experimenting, I realized that at least for the eyes the pictures seem to be the same (except for the screen area of the device), but the computer perceives the information in these graphic files as different. Thus, to save space, I went to the option of working with the frame (we use the base photo, in which for frames the slideshow we replace only the screen area).
The process of training for the slideshow in Ulead Photoimpact 12 , as well as the procedure for creating a slideshow from these frames, is shown below as a video.
Also, I have already shown video instructions and illustrated instructions for working with Ulead GIF Animator 5.
Video recording
The device described in this habratopic is also well suited for self-creating video reviews. Putting the camera on the stand and turning on the recording, you can show the capabilities of the described device and the chips available in it (the camera is fixed, hands are free). I shot videos for reviews from Amazon and Barnes & Noble readers that way. Separately, I want to note that an important bonus for vertical shooting of devices with the help of this device is the presence of a rotating monitor in the camera. If there is no such monitor, it will be problematic to remove the tested device while sitting at the table.
In the case of my reviews, I used a Nikon COOLPIX P7100 camera with a swiveling monitor for shooting videos, you can appreciate the quality of the video in this and this video. An additional feature of this camera is a high-aperture lens, which makes it possible to adequately shoot without a flash in conditions of limited lighting (this feature is useful if you plan to take photographs of devices like tablets and monitors and want to avoid glare on photos).
Use of a device for vertical shooting in other areas
In addition to demonstrating the capabilities of various useful devices, the proposed device (in conjunction with a camera) you can also use in other areas. You can show the assembly and disassembly of devices, give lessons in electronics, train calligraphy and drawing, make training videos on needlework (embroidery, weaving beads, origami), and much more.

For me personally, the solution proposed above was useful, I hope, and the information from this topic will be useful to you in some way.
Thank you all for your attention, I wish you good luck and success in your creative endeavors!
UPD: Also, you may be interested in an article related to setting up lighting when photographing devices - “A quality photo of a gadget at home” . Thanks for the tip, tbicr !
Source: https://habr.com/ru/post/173427/
All Articles