Re-flashing network storage NS-2502 from Edimax through the console cable
Once I decided to upgrade NAS with non-native firmware. Well, the firmware was under the same hardware, only released by another manufacturer.
I found a discussion of this repository on the IXBT forum, I switched from it to the Polish site, where I took the firmware, which by all reviews works with iron several times better than the native one.
I took the firmware from here , there this piece of hardware is called MZK-NAS02SG.
There was a bummer when flashing. The server was precipitated and the firmware download hung. After waiting some time and rebooting the server with magic keys (RELEASE + COPY - 5 sec), I got hemorrhoids - the server died.
It turned out such a good brick with two half-terabyte disks and absolutely useless.
I got on the Internet and did not find absolutely any information about how to still flash this device. Fortunately, I came across a post on the comteh.com forum in which the user Virus_58 got into the same situation. From him, I received a Chinese document that said how to sew a device. Half of the document was in Chinese, the second in English, which in general helped.
')
So, the first thing we need to do is disassemble our brick. It’s not easy, you can’t do without broken locks, so we can make out who can.
Somewhere on the English site, a credit card was mentioned, but something didn’t work out for me.
The pictures are not entirely relevant, because cut from the same Chinese document, but in principle are no different from what I saw when connected to the console. In my case, the difference lies only in the version of the bootloader and the name of the firmware.
To connect to the console using the cable from the phone LG-1100, something like this:
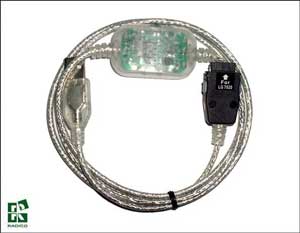
The distinguishing feature of these cables is that they have a “box” in which the controller is located. The cable is not mine, took from a friend. Therefore, it has already been prepared: the phone connector is cut off and the wires are marked (black - GND, white - Tx, blue - Rx), the rest are not needed.
You can use any USB-COM controller that provides power supply voltage transfer to 3.3V.
!!! IMPORTANT!!!
Do not stick directly into the computer's COM port - burn. In the COM port of the PC spruga 5 V.
!!! IMPORTANT!!!
After disassembling at the top of the motherboard of our server we see 4 pins. If you look from the front side, the pinout will be like this: o1 o2:
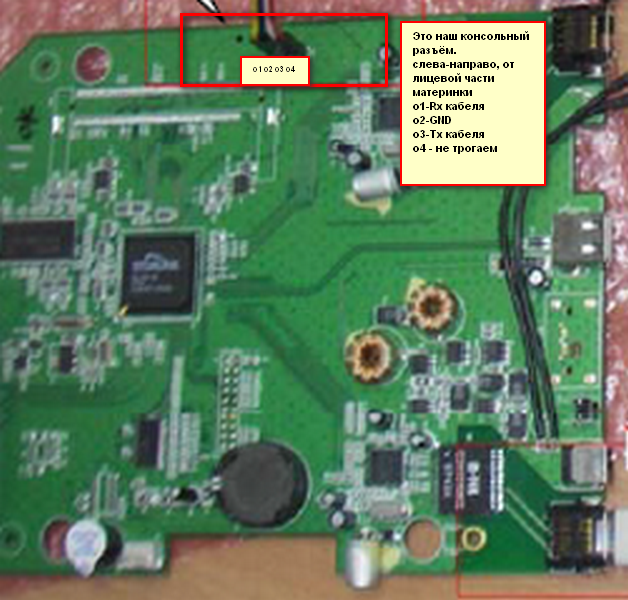
o3 o4
o1 - connect Rx cable
o2 - connect GND cable
o3 - connect Tx cable
o4 - do not touch.
Open console (I did via PuTTY)
COM5 - your COM port number
Speed 19200
Data bits - 8
Stop bits - 1
Parity - None
Flow Control - Xon / Xoff
Connect. If everything is correct, then when you turn on the server in the console will begin to pour infa.
Note: I had several times when turning on the console that the server starts screaming wildly. It was solved by turning off the server, connecting first Rx + GND, and then carefully connecting Tx wires. I also pulled the cable out of the USB port. Under what circumstances this happened - I did not notice, but the problem was from the side of the cable and its controller.
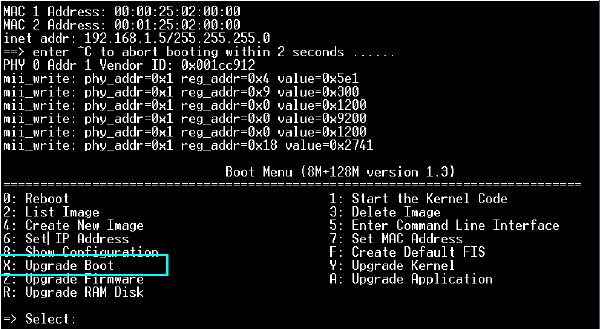
We press ctrl + c, the menu comes out:
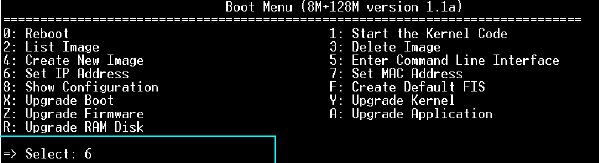
At this step we will configure the address - we will select 6.
We enter 192.168.1.5
We connect the gateway to the PC with an Ethernet cable. On the PC, we set the address 192.168.1.111.
We start the TFTP server (I used TFTPD, since it is the simplest and easiest available at the moment).
In the root folder of the server we throw our image with the firmware. I will omit the TFTPD setting, since find in the internet can be no problem.
After these preparatory activities, we return to the console.
Update the bootloader (if not required, go to the next step):
Choose: X
Choose the 2nd item, because we have a raised TFTP server and the necessary files are on it:
Enter the address of our TFTP server, in this case, we have 192.168.1.111:

Specify the name of the boot loader image, then press Enter and wait while watching the process.
I did not need to change the bootloader, because I have it version 1.4, so I only needed to restore the firmware.
So in any case, do not press Z: or A:
Choose item Y: Upgrade Kernel
Choose a download via TFTP:
Specify the address of the TFTP server. In our case, 192.168.1.111. After that pop up a request to specify the file name with the image. Specify. You can copy, prescribe with your hands - whatever you like.
It is necessary to make sure that the name of the file with the firmware was entered correctly and then press Enter and watch the process.
You can track the download on the TFTP server or not.
After the firmware is completed, the server will reboot. If not, restart it.
When the download is complete, we will see in the message a message that the http server is waiting for connections. If this does not happen, then you need to reset the firmware to the factory settings - hold the Release and Copy buttons for at least 5 seconds. If you watch the console, the server will inform you about erasing the settings and go to reboot.
After that, I got everything, and what you want.
I hope someone will help.
I found a discussion of this repository on the IXBT forum, I switched from it to the Polish site, where I took the firmware, which by all reviews works with iron several times better than the native one.
I took the firmware from here , there this piece of hardware is called MZK-NAS02SG.
There was a bummer when flashing. The server was precipitated and the firmware download hung. After waiting some time and rebooting the server with magic keys (RELEASE + COPY - 5 sec), I got hemorrhoids - the server died.
It turned out such a good brick with two half-terabyte disks and absolutely useless.
I got on the Internet and did not find absolutely any information about how to still flash this device. Fortunately, I came across a post on the comteh.com forum in which the user Virus_58 got into the same situation. From him, I received a Chinese document that said how to sew a device. Half of the document was in Chinese, the second in English, which in general helped.
')
So, the first thing we need to do is disassemble our brick. It’s not easy, you can’t do without broken locks, so we can make out who can.
Somewhere on the English site, a credit card was mentioned, but something didn’t work out for me.
The pictures are not entirely relevant, because cut from the same Chinese document, but in principle are no different from what I saw when connected to the console. In my case, the difference lies only in the version of the bootloader and the name of the firmware.
Step 1
To connect to the console using the cable from the phone LG-1100, something like this:
The distinguishing feature of these cables is that they have a “box” in which the controller is located. The cable is not mine, took from a friend. Therefore, it has already been prepared: the phone connector is cut off and the wires are marked (black - GND, white - Tx, blue - Rx), the rest are not needed.
You can use any USB-COM controller that provides power supply voltage transfer to 3.3V.
!!! IMPORTANT!!!
Do not stick directly into the computer's COM port - burn. In the COM port of the PC spruga 5 V.
!!! IMPORTANT!!!
Step 2
After disassembling at the top of the motherboard of our server we see 4 pins. If you look from the front side, the pinout will be like this: o1 o2:
o3 o4
o1 - connect Rx cable
o2 - connect GND cable
o3 - connect Tx cable
o4 - do not touch.
Step 3
Open console (I did via PuTTY)
COM5 - your COM port number
Speed 19200
Data bits - 8
Stop bits - 1
Parity - None
Flow Control - Xon / Xoff
Connect. If everything is correct, then when you turn on the server in the console will begin to pour infa.
Note: I had several times when turning on the console that the server starts screaming wildly. It was solved by turning off the server, connecting first Rx + GND, and then carefully connecting Tx wires. I also pulled the cable out of the USB port. Under what circumstances this happened - I did not notice, but the problem was from the side of the cable and its controller.
Flash Block Size = 65536
Storlink SL351x Boot Loader [Linux], version 1.0.9
Built by linux, 10:50:46, Aug 6 2008
Processor: SL3516c2
CPU Rate: 300000000
AHB Bus Clock: 150MHz Ratio: 2/1
MAC 1 Address: 00: 00: 25: 02: 00: 00
MAC 2 Address: 00: 01: 25: 02: 00: 00
inet addr: 192.168.1.5/255.255.255.0
==> enter ^ C to abort booting within 2 seconds ...
We press ctrl + c, the menu comes out:
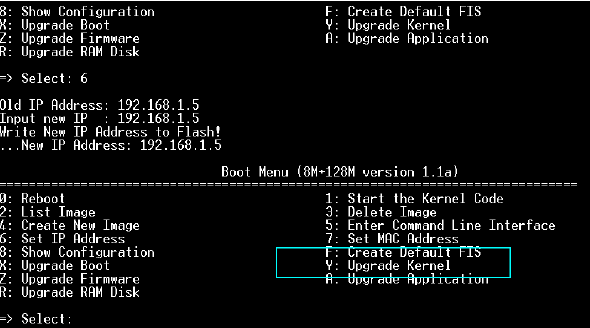
At this step we will configure the address - we will select 6.
We enter 192.168.1.5
Step 4
We connect the gateway to the PC with an Ethernet cable. On the PC, we set the address 192.168.1.111.
We start the TFTP server (I used TFTPD, since it is the simplest and easiest available at the moment).
In the root folder of the server we throw our image with the firmware. I will omit the TFTPD setting, since find in the internet can be no problem.
After these preparatory activities, we return to the console.
Step 5
Update the bootloader (if not required, go to the next step):
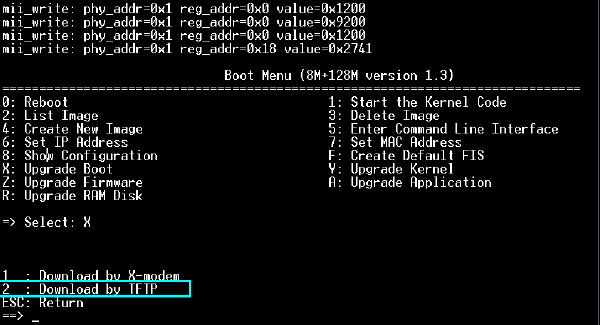
Choose: X
Choose the 2nd item, because we have a raised TFTP server and the necessary files are on it:
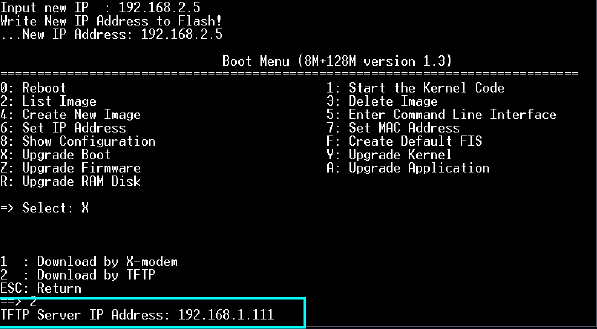
Enter the address of our TFTP server, in this case, we have 192.168.1.111:
Specify the name of the boot loader image, then press Enter and wait while watching the process.
Step 6
I did not need to change the bootloader, because I have it version 1.4, so I only needed to restore the firmware.
!!!
The Chinese instruction highlights:
Don't select “Z: Upgrade Firmware” or “A: Upgrade Application” to upgrade
firmware.
!!!
So in any case, do not press Z: or A:
Choose item Y: Upgrade Kernel
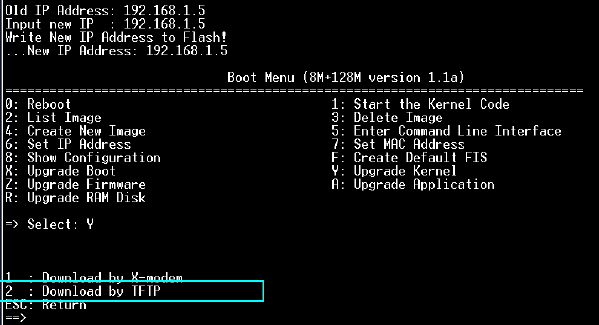
Choose a download via TFTP:
Specify the address of the TFTP server. In our case, 192.168.1.111. After that pop up a request to specify the file name with the image. Specify. You can copy, prescribe with your hands - whatever you like.
It is necessary to make sure that the name of the file with the firmware was entered correctly and then press Enter and watch the process.
You can track the download on the TFTP server or not.
After the firmware is completed, the server will reboot. If not, restart it.
When the download is complete, we will see in the message a message that the http server is waiting for connections. If this does not happen, then you need to reset the firmware to the factory settings - hold the Release and Copy buttons for at least 5 seconds. If you watch the console, the server will inform you about erasing the settings and go to reboot.
After that, I got everything, and what you want.
I hope someone will help.
Source: https://habr.com/ru/post/173291/
All Articles