Oracle ADF. Business Components
Good time of day habravchane. My previous article was a small intro in ADF. And as I see from the survey results that the topic was interesting, I continue to write about ADF.
Now, after a short story about this framework, you can “rush into battle” and consider the features of ADF more specifically. This article will be about the ADF Business Components. How to work with them declaratively and programmatically.
ADF Business Components (hereinafter referred to as BC) is a part of the database framework that provides visual and declarative development. The BC configuration is stored in XML files, but if you wish, you can generate Java classes and add and / or redefine logic.
BC are divided into 5 main parts:
EO is a table from the database, and, accordingly, an instance of EO is a row from the table.
This component encapsulates the data, validation rules and persistence logic.
')
EO associations define the connections between two entities (tables)
VO is the component responsible for reading data from the data source, and also includes operations for updating it.
View Links - define links between VOs (similar to associations)
The Application Module is a service level that provides work with business components (namely, VO and View Links). You can also add additional methods to it and nest other Application Modules. Ultimately, the Application Module is used as a Data Control.
For test databases, I will use the employees table from the oracle HR schema .
After passing through the "Business Components from tables" wizard, the result will be the following set of files.
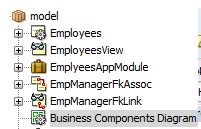
Here Employees - EO, EmployeesView - VO, EmployeesAppModule - Application Module, EmpManagerFkAssoc - an association between employees and their managers, EmpManagerFkLink - View link for a similar link, but for VO, Business Components Diagram is a diagram of components.
And on the Data Controls panel, an appropriate data control will be created.
Take a look at the chart.
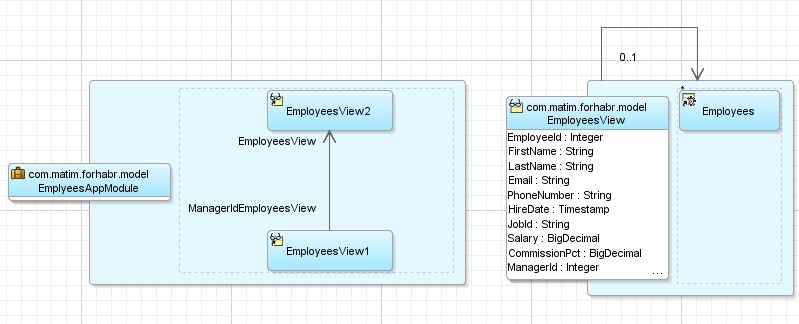
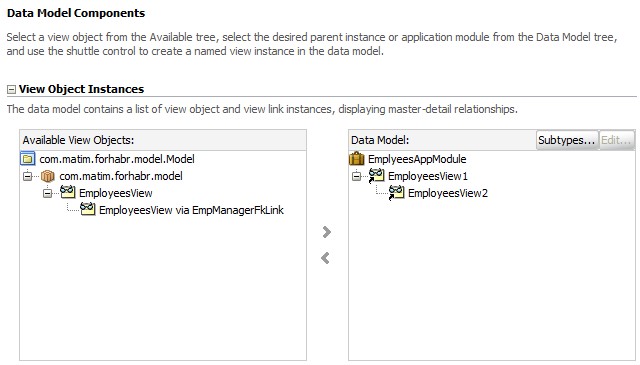
You can see that EmployeesView is created based on Employees EO. And in ApplicationModule there are two instances of EmployeesView. One is responsible for the manager, and the second for his employees.
Overview of the generated files.
Employees
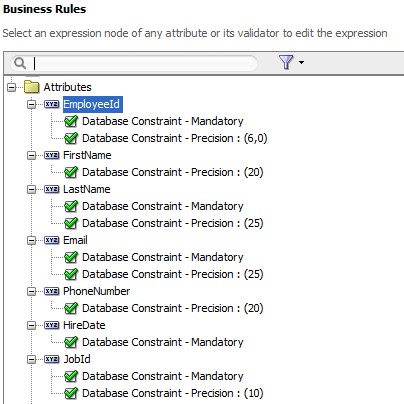
In the generated EO, you can see which attributes it includes, edit, add your own or delete.
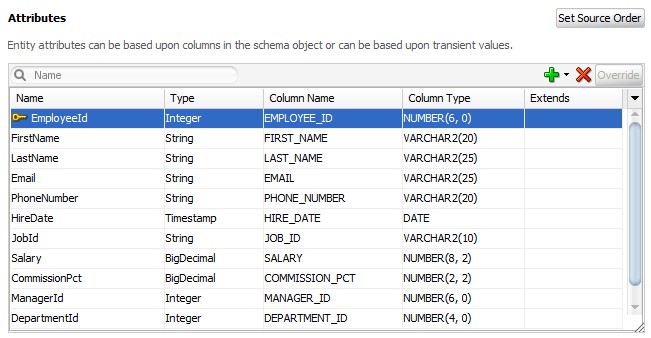
You can also manage data validation rules.
EmployeesView
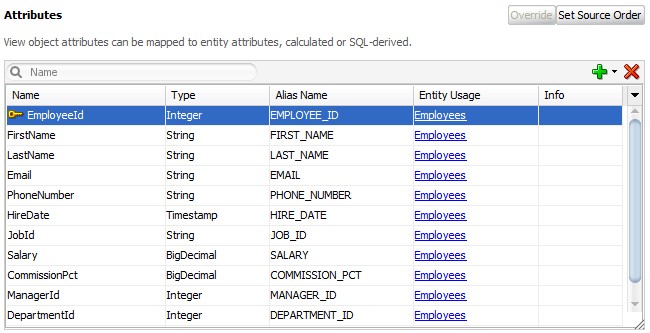
From the VO attributes, it is clear that they are taken from Employees EO.
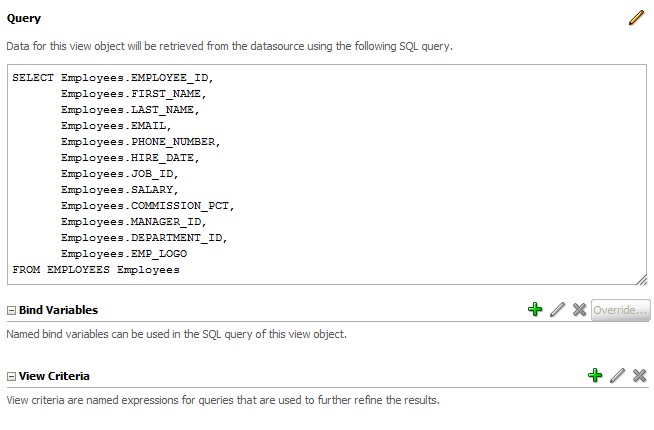
You can see the VO request, its variables and criteria (named where clauses)
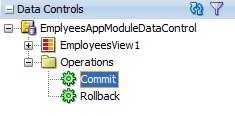
EmployeesAppModule
The Application Module, as we saw earlier, contains two EmployeesView instances.
EmpManagerFkAssoc
The relationship between entities.
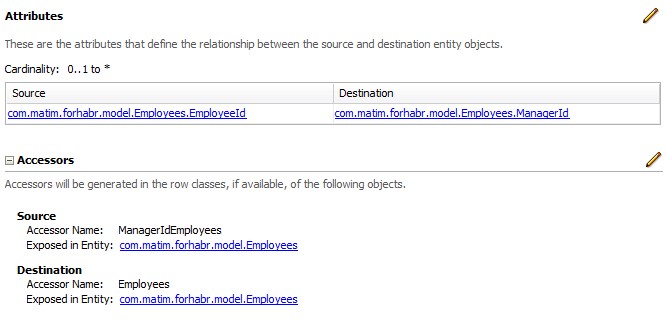
EmpManagerFkLink
Identical Source and Destination, say that View Link is based on Associations.


Yes Yes. CRUD will be implemented in a completely declarative way, I will not write a single line of code.
Let's see what the result will be.
At first, a table with employees will be shown.
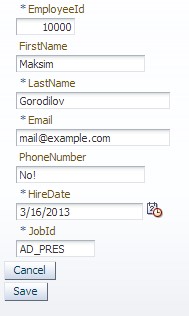
When you click on Create employee, there will be a transition to the creation of a new employee.
When you click on Save, a new employee will be added to the database, and we will return to the table.

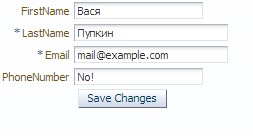
When you click on the Update employee, there will be a transition to editing the employee's information.
After saving the changes, return to the table again.

Well, finally, when you click on Delete employee, the employee will evaporate.

The flow of operations is controlled by the bounded task flow. How to work with task flows will be a separate article. For now, just look at the diagram.
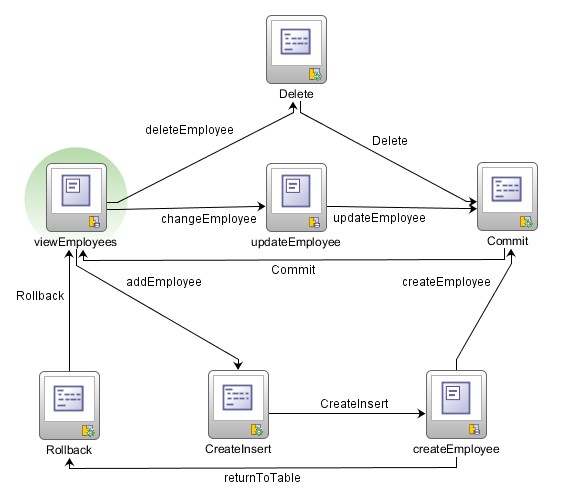
ViewEmployees, createEmployee and updateEmployee are JSFF view activities, which are responsible for displaying the table and forms.
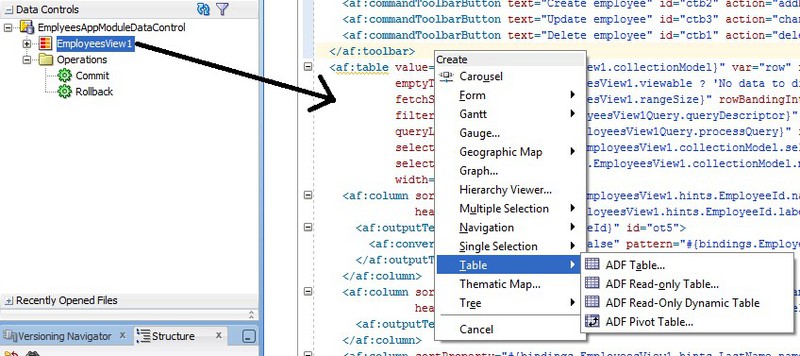
To display employees in the table, you need to move EmployeeView from Data Control to the page and select in the creation options - the desired type of table (in my case - this is read only)
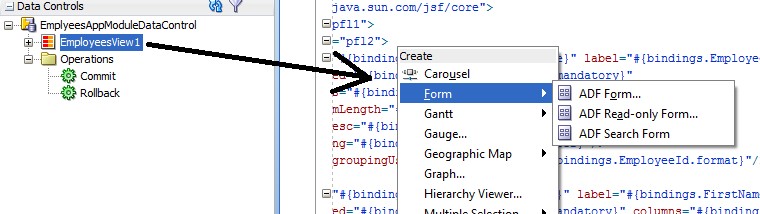
To output forms on the createEmployee and updateEmployee pages, you need to do a similar operation, but choose from the category Form (in my case - this is an ADF Form)
All other activities are operations on DataControl. Moved these operations also to the Data Controls panel.

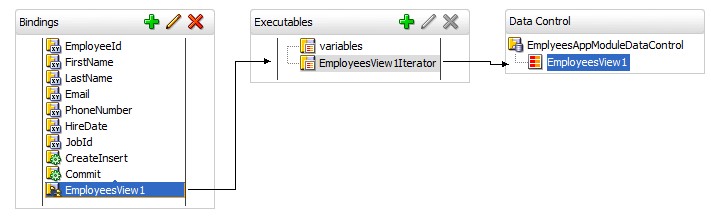
CreateInsert creates a new line in the iterator and moves the iterator cursor to it.
Delete deletes the row in the iterator where the cursor is currently located.
For the CreateInsert and Delete actions to take effect, you need to call the Commit operation, and in order to roll back the changes, Rollback.
This completes the CRUD implementation.
Now consider the case when we do not completely abandon the declarative path, but we want to call operations in any managed bean.
For simplicity, we consider only the implementation of the insert, since the others are done similarly.
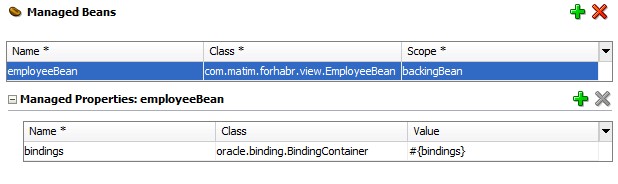
The first step is to create a managed bean.
Bean'a code will be considered at the very end.
I will create a new page and transfer the table to it so that you can see the new data and the form for adding a new employee.
In the input components put the value of the connection on the managed bean. And at the end I will add a button using the managed bean method as an action listener.
As a result, the jspx markup looks like this:
A page description will look like this.
Code managed bean'a (get'ry and set'ry omitted).
Fields:
Insert method used by the button on the page:
Check the operation of the managed bean, making sure that a new entry is in the table.
And the last example in which there will be only use of the code.
First you need to prepare classes for Business Components.
To do this, open the EmployeeView, go to the Java tab and generate the following classes.
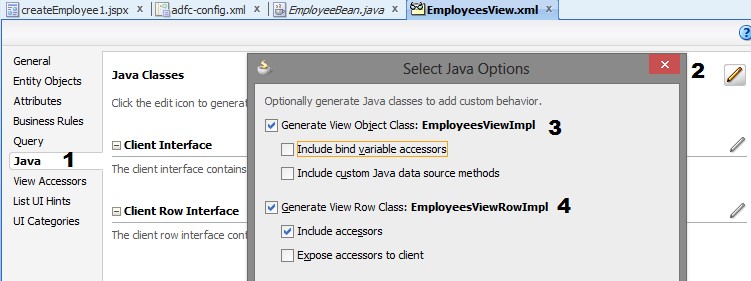
EmployeesViewImpl is required for working with queries, and EmployeesViewRowImpl will be a string with attributes.
In the same way, generate a class for the Application Module.

It remains to write a new method to add a string to the database in the EmployeesAppModuleImpl, create a TO class to transfer data to this method, and call this method in a managed bean.
Method in the Application Module:
New bean method:
We check the work:
That's all for today. A lot of things are still left behind on this topic, so I will leave a link to additional information here .
PS The next article will be about task flows.
Now, after a short story about this framework, you can “rush into battle” and consider the features of ADF more specifically. This article will be about the ADF Business Components. How to work with them declaratively and programmatically.
General concepts
ADF Business Components (hereinafter referred to as BC) is a part of the database framework that provides visual and declarative development. The BC configuration is stored in XML files, but if you wish, you can generate Java classes and add and / or redefine logic.
BC are divided into 5 main parts:
- Entity Objects (EO)
- View Objects (VO)
- Associations
- View Links
- Application module
EO is a table from the database, and, accordingly, an instance of EO is a row from the table.
This component encapsulates the data, validation rules and persistence logic.
')
EO associations define the connections between two entities (tables)
VO is the component responsible for reading data from the data source, and also includes operations for updating it.
View Links - define links between VOs (similar to associations)
The Application Module is a service level that provides work with business components (namely, VO and View Links). You can also add additional methods to it and nest other Application Modules. Ultimately, the Application Module is used as a Data Control.
IDE time
For test databases, I will use the employees table from the oracle HR schema .
After passing through the "Business Components from tables" wizard, the result will be the following set of files.
Here Employees - EO, EmployeesView - VO, EmployeesAppModule - Application Module, EmpManagerFkAssoc - an association between employees and their managers, EmpManagerFkLink - View link for a similar link, but for VO, Business Components Diagram is a diagram of components.
And on the Data Controls panel, an appropriate data control will be created.
Take a look at the chart.
You can see that EmployeesView is created based on Employees EO. And in ApplicationModule there are two instances of EmployeesView. One is responsible for the manager, and the second for his employees.
Overview of the generated files.
Employees
In the generated EO, you can see which attributes it includes, edit, add your own or delete.
You can also manage data validation rules.
EmployeesView
From the VO attributes, it is clear that they are taken from Employees EO.
You can see the VO request, its variables and criteria (named where clauses)
EmployeesAppModule
The Application Module, as we saw earlier, contains two EmployeesView instances.
EmpManagerFkAssoc
The relationship between entities.
EmpManagerFkLink
Identical Source and Destination, say that View Link is based on Associations.
CRUD
Yes Yes. CRUD will be implemented in a completely declarative way, I will not write a single line of code.
Let's see what the result will be.
At first, a table with employees will be shown.
When you click on Create employee, there will be a transition to the creation of a new employee.
When you click on Save, a new employee will be added to the database, and we will return to the table.
When you click on the Update employee, there will be a transition to editing the employee's information.
After saving the changes, return to the table again.
Well, finally, when you click on Delete employee, the employee will evaporate.
The flow of operations is controlled by the bounded task flow. How to work with task flows will be a separate article. For now, just look at the diagram.
ViewEmployees, createEmployee and updateEmployee are JSFF view activities, which are responsible for displaying the table and forms.
To display employees in the table, you need to move EmployeeView from Data Control to the page and select in the creation options - the desired type of table (in my case - this is read only)
To output forms on the createEmployee and updateEmployee pages, you need to do a similar operation, but choose from the category Form (in my case - this is an ADF Form)
All other activities are operations on DataControl. Moved these operations also to the Data Controls panel.
CreateInsert creates a new line in the iterator and moves the iterator cursor to it.
Delete deletes the row in the iterator where the cursor is currently located.
For the CreateInsert and Delete actions to take effect, you need to call the Commit operation, and in order to roll back the changes, Rollback.
This completes the CRUD implementation.
CRUD v2
Now consider the case when we do not completely abandon the declarative path, but we want to call operations in any managed bean.
For simplicity, we consider only the implementation of the insert, since the others are done similarly.
The first step is to create a managed bean.
Bean'a code will be considered at the very end.
I will create a new page and transfer the table to it so that you can see the new data and the form for adding a new employee.
In the input components put the value of the connection on the managed bean. And at the end I will add a button using the managed bean method as an action listener.
As a result, the jspx markup looks like this:
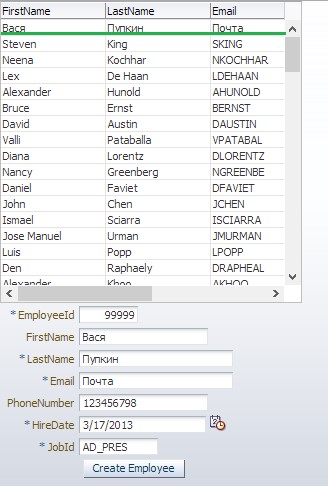
<af:form id="f1"> <af:table value="#{bindings.EmployeesView1.collectionModel}" var="row" rows="#{bindings.EmployeesView1.rangeSize}" emptyText="#{bindings.EmployeesView1.viewable ? 'No data to display.' : 'Access Denied.'}" fetchSize="#{bindings.EmployeesView1.rangeSize}" rowBandingInterval="0" id="t1"> <af:column sortProperty="#{bindings.EmployeesView1.hints.FirstName.name}" sortable="false" headerText="#{bindings.EmployeesView1.hints.FirstName.label}" id="c1"> <af:outputText value="#{row.FirstName}" id="ot1"/> </af:column> <af:column sortProperty="#{bindings.EmployeesView1.hints.LastName.name}" sortable="false" headerText="#{bindings.EmployeesView1.hints.LastName.label}" id="c2"> <af:outputText value="#{row.LastName}" id="ot2"/> </af:column> <af:column sortProperty="#{bindings.EmployeesView1.hints.Email.name}" sortable="false" headerText="#{bindings.EmployeesView1.hints.Email.label}" id="c3"> <af:outputText value="#{row.Email}" id="ot3"/> </af:column> <af:column sortProperty="#{bindings.EmployeesView1.hints.PhoneNumber.name}" sortable="false" headerText="#{bindings.EmployeesView1.hints.PhoneNumber.label}" id="c4"> <af:outputText value="#{row.PhoneNumber}" id="ot4"/> </af:column> <af:column sortProperty="#{bindings.EmployeesView1.hints.JobId.name}" sortable="false" headerText="#{bindings.EmployeesView1.hints.JobId.label}" id="c5"> <af:outputText value="#{row.JobId}" id="ot5"/> </af:column> </af:table> <af:panelFormLayout id="pfl1"> <af:inputText value="#{backingBeanScope.employeeBean.employeeId}" label="#{bindings.EmployeeId.hints.label}" required="#{bindings.EmployeeId.hints.mandatory}" columns="#{bindings.EmployeeId.hints.displayWidth}" maximumLength="#{bindings.EmployeeId.hints.precision}" shortDesc="#{bindings.EmployeeId.hints.tooltip}" id="it1"> <f:validator binding="#{bindings.EmployeeId.validator}"/> <af:convertNumber groupingUsed="false" pattern="#{bindings.EmployeeId.format}"/> </af:inputText> <af:inputText value="#{backingBeanScope.employeeBean.firstName}" label="#{bindings.FirstName.hints.label}" required="#{bindings.FirstName.hints.mandatory}" columns="#{bindings.FirstName.hints.displayWidth}" maximumLength="#{bindings.FirstName.hints.precision}" shortDesc="#{bindings.FirstName.hints.tooltip}" id="it2"> <f:validator binding="#{bindings.FirstName.validator}"/> </af:inputText> <af:inputText value="#{backingBeanScope.employeeBean.lastName}" label="#{bindings.LastName.hints.label}" required="#{bindings.LastName.hints.mandatory}" columns="#{bindings.LastName.hints.displayWidth}" maximumLength="#{bindings.LastName.hints.precision}" shortDesc="#{bindings.LastName.hints.tooltip}" id="it3"> <f:validator binding="#{bindings.LastName.validator}"/> </af:inputText> <af:inputText value="#{backingBeanScope.employeeBean.email}" label="#{bindings.Email.hints.label}" required="#{bindings.Email.hints.mandatory}" columns="#{bindings.Email.hints.displayWidth}" maximumLength="#{bindings.Email.hints.precision}" shortDesc="#{bindings.Email.hints.tooltip}" id="it4"> <f:validator binding="#{bindings.Email.validator}"/> </af:inputText> <af:inputText value="#{backingBeanScope.employeeBean.phoneNumber}" label="#{bindings.PhoneNumber.hints.label}" required="#{bindings.PhoneNumber.hints.mandatory}" columns="#{bindings.PhoneNumber.hints.displayWidth}" maximumLength="#{bindings.PhoneNumber.hints.precision}" shortDesc="#{bindings.PhoneNumber.hints.tooltip}" id="it5"> <f:validator binding="#{bindings.PhoneNumber.validator}"/> </af:inputText> <af:inputDate value="#{backingBeanScope.employeeBean.hireDate}" label="#{bindings.HireDate.hints.label}" required="#{bindings.HireDate.hints.mandatory}" columns="#{bindings.HireDate.hints.displayWidth}" shortDesc="#{bindings.HireDate.hints.tooltip}" id="id1"> <f:validator binding="#{bindings.HireDate.validator}"/> <af:convertDateTime pattern="#{bindings.HireDate.format}"/> </af:inputDate> <af:inputText value="#{backingBeanScope.employeeBean.jobId}" label="#{bindings.JobId.hints.label}" required="#{bindings.JobId.hints.mandatory}" columns="#{bindings.JobId.hints.displayWidth}" maximumLength="#{bindings.JobId.hints.precision}" shortDesc="#{bindings.JobId.hints.tooltip}" id="it6"> <f:validator binding="#{bindings.JobId.validator}"/> </af:inputText> <af:commandButton text="Create Employee" id="cb1" actionListener="#{backingBeanScope.employeeBean.createEmployee}"/> </af:panelFormLayout> </af:form> A page description will look like this.
Code managed bean'a (get'ry and set'ry omitted).
Fields:
private int employeeId; private String firstName; private String lastName; private String email; private String phoneNumber; private Timestamp hireDate; private String jobId; private BindingContainer bindings; Insert method used by the button on the page:
public void createEmployee(ActionEvent actionEvent) { // binding BindingContainer bindings = getBindings(); // OperationBinding createOperation = bindings.getOperationBinding("CreateInsert"); createOperation.execute(); // AttributeBinding employeeId = (AttributeBinding)bindings.getControlBinding("EmployeeId"); employeeId.setInputValue(this.employeeId); AttributeBinding firstName = (AttributeBinding)bindings.getControlBinding("FirstName"); firstName.setInputValue(this.firstName); AttributeBinding lastName = (AttributeBinding)bindings.getControlBinding("LastName"); lastName.setInputValue(this.lastName); AttributeBinding phoneNumber = (AttributeBinding)bindings.getControlBinding("PhoneNumber"); phoneNumber.setInputValue(this.phoneNumber); AttributeBinding email = (AttributeBinding)bindings.getControlBinding("Email"); email.setInputValue(this.email); AttributeBinding hireDate = (AttributeBinding)bindings.getControlBinding("HireDate"); hireDate.setInputValue(this.hireDate); AttributeBinding jobId = (AttributeBinding)bindings.getControlBinding("JobId"); jobId.setInputValue(this.jobId); // OperationBinding commitOperation = bindings.getOperationBinding("Commit"); commitOperation.execute(); } Check the operation of the managed bean, making sure that a new entry is in the table.
CRUD v3
And the last example in which there will be only use of the code.
First you need to prepare classes for Business Components.
To do this, open the EmployeeView, go to the Java tab and generate the following classes.
EmployeesViewImpl is required for working with queries, and EmployeesViewRowImpl will be a string with attributes.
In the same way, generate a class for the Application Module.
It remains to write a new method to add a string to the database in the EmployeesAppModuleImpl, create a TO class to transfer data to this method, and call this method in a managed bean.
Method in the Application Module:
public void createEmployee(EmployeeInfo employeeInfo) { // ViewObject EmployeesViewImpl employeeView = getEmployeesView1(); // . EmployeesViewRowImpl employee = (EmployeesViewRowImpl)employeeView.createRow(); employee.setEmployeeId(employeeInfo.getEmployeeId()); employee.setEmail(employeeInfo.getEmail()); employee.setPhoneNumber(employeeInfo.getPhoneNumber()); employee.setFirstName(employeeInfo.getFirstName()); employee.setLastName(employeeInfo.getLastName()); employee.setHireDate(new Timestamp(employeeInfo.getHireDate())); employee.setJobId(employeeInfo.getJobId()); // . employeeView.insertRow(employee); // getDBTransaction().commit(); } New bean method:
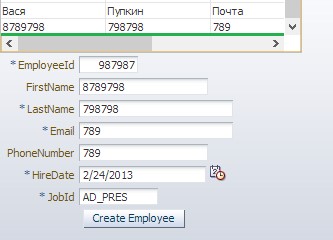
public void createEmployee2(ActionEvent actionEvent) { // application module String applicationModuleClass = "com.matim.forhabr.model.EmplyeesAppModuleImpl"; String config = "EmplyeesAppModuleLocal"; EmplyeesAppModuleImpl appModule = (EmplyeesAppModuleImpl) Configuration.createRootApplicationModule(applicationModuleClass, config); // TO EmployeeInfo employeeInfo = new EmployeeInfo(); employeeInfo.setEmail(this.email); employeeInfo.setEmployeeId(this.employeeId); employeeInfo.setFirstName(this.firstName); employeeInfo.setHireDate(this.hireDate); employeeInfo.setJobId(this.jobId); employeeInfo.setLastName(this.lastName); employeeInfo.setPhoneNumber(this.phoneNumber); // appModule.createEmployee(employeeInfo); // Configuration.releaseRootApplicationModule(appModule, false); // AppModule, // , // Execute BindingContainer bindings = getBindings(); OperationBinding executeIterator = bindings.getOperationBinding("Execute"); executeIterator.execute(); } We check the work:
That's all for today. A lot of things are still left behind on this topic, so I will leave a link to additional information here .
PS The next article will be about task flows.
Source: https://habr.com/ru/post/173059/
All Articles