Enhance SSH Access Security on Juniper SRX Routers
In this article I will explain how to set up a truly secure SSH access to Juniper SRX series devices, i.e. make hacking of our router a rotten a priori occupation. I will describe two things:
At one time, I honestly killed the whole day in order to get a handle on how to implement such simple things in Juniper. I hope my article will save you time.
Let's implement the first item. And immediately a couple of fly in the ointment:
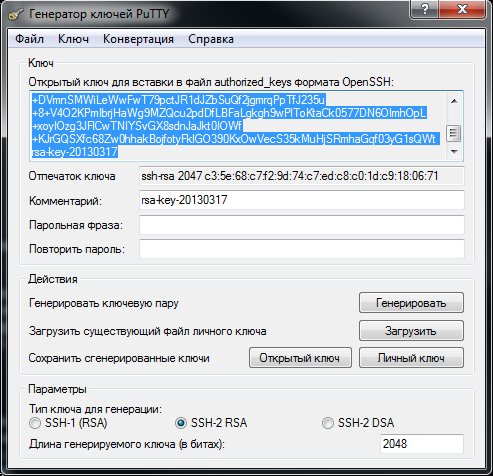
So let's get started. First you need to generate a pair of SSH-keys. The PuTTygen utility from the standard PuTTy utility is perfect for this. Run it and see this window:
')
We choose SSH2-RSA, the key length is 1024 bits (above, Junipers do not support). Click "Generate", move the mouse while it is being generated. When finished, be sure to enter twice a strong password in the appropriate fields and press the "Private Key" button to save the private key. I think it is not necessary to remind you that the private key is called a closed key, that it should be stored in a very safe place? I, for example, do not store it in clear text, but use the KeePass2 utility. Well, this is already someone more comfortable!
It is also advisable not to lose this key, because we will further configure Juniper so that he simply won't let him go to the console without him. We'll have to go into the web-muzzle and delete the part of the config that is responsible for this setting. Well, or carry out the dreary procedure of resetting the root password to the device.
Then, copy the contents of the "Public Key ..." window into a notebook. We will need to fix something before inserting the public key into the Juniper config. First, delete the phrase “rsa-key- ...” from the end, then bring the key to the form:
Now that the private key is password-protected and stored in a safe place, and the open key is ready for insertion into the config, you can close the PuTTygen utility and go to the console. We write:
Now we make an entry only by key:
Here we enter the password that was set when generating the private key. After that, we generously let! It is interesting that if someone now tries to enter without a key, Juniper will obediently ask him for a login-password, but the authentication will fail every time.
Now let's talk about how to restrict SSH access at the network access level. There are two complementary methods for this. First: the
Good. But if we have ssh open on the interface for lokalki, then all users of the lokalki can potentially contact Juniper via ssh. This is in most cases not gud, so you need to use firewall filters to give access only to certain IPs.
Suppose we need to allow access only for ip 192.168.10.10, and all the rest - to deny. We write this design:
We apply this filter to the loopback interface of the router (since it is this one that leads to the routing-engine, that is, to the core of the system where the sshd daemon lives).
It is clear that it is not necessary, for example, to write all zeroes in the
By the way, we can restrict access to the Juniper web interface by the same procedure!
That's all! In this simple way, we have significantly increased the security of our ssh sessions!
- How to make SSH login possible only by ssh key.
- How to restrict the list of IP addresses that can use ssh-access to Juniper.
At one time, I honestly killed the whole day in order to get a handle on how to implement such simple things in Juniper. I hope my article will save you time.
Let's implement the first item. And immediately a couple of fly in the ointment:
- On Juniper, DO NOT change the SSH port! All our life we will connect on the 22nd! Okay. This is another reason to enter by key. I hope in the future firmware somehow fix it ...
- This procedure does not affect access to the web interface. On the one hand, this is bad, because Anyone who breaks the password to the web, can change the configuration as he wants, but on the other hand it’s good, because makes us think, and who can even go to our web-muzzle and can he do it? Restrict access to the web interface can be both on the interface and on the ip. But more about that later.
So let's get started. First you need to generate a pair of SSH-keys. The PuTTygen utility from the standard PuTTy utility is perfect for this. Run it and see this window:
')
We choose SSH2-RSA, the key length is 1024 bits (above, Junipers do not support). Click "Generate", move the mouse while it is being generated. When finished, be sure to enter twice a strong password in the appropriate fields and press the "Private Key" button to save the private key. I think it is not necessary to remind you that the private key is called a closed key, that it should be stored in a very safe place? I, for example, do not store it in clear text, but use the KeePass2 utility. Well, this is already someone more comfortable!
It is also advisable not to lose this key, because we will further configure Juniper so that he simply won't let him go to the console without him. We'll have to go into the web-muzzle and delete the part of the config that is responsible for this setting. Well, or carry out the dreary procedure of resetting the root password to the device.
Then, copy the contents of the "Public Key ..." window into a notebook. We will need to fix something before inserting the public key into the Juniper config. First, delete the phrase “rsa-key- ...” from the end, then bring the key to the form:
"Ssh-rsa AAAAB3NzaC1yc2EAAAABJQAAAQBfkD3juKaLXqNKJfhUMIwt4Ro / aF38WDi7XlALiSYDYY8GZuhcAMJHL0FKJRTI07QcrAttention! It is important not to make a mistake, otherwise Juniper will not accept the key! The key must be completely enclosed in quotes. At the end there should be a “=” sign, followed by a space, and then - root @ your_name_Juniper. I mean, exactly like the command line prompt of your device! Juniper's name, I remind you, is
Kfev4nFm2HbeSFkaI96l4TSKlqS90goemrbTkNTes / 2F9VBzRjogYcEfr57bgUQ + DVmnSMWiLeWwFwT79pctJR1dJZbSuQf2jgmrqPpTfJ235u + 8 + V4O2KPmIbrjHaWg9MZQcu2pdDfLBFaLgkgh9wPlToKtaCk0577DN6OImhOpL + xoyIOzg3JFlCwTNIYSvGX8sdnJaJkt0IOWf + KJrGQSXfc68Zw0hhakBojfotyFklGO390KxO
wVecS35kMuHjSRmhaGqf03yG1sQWt = root @ juniper "
set system host-name by the command set system host-name in configuration mode. If you later change this name, you will have to correct the key itself.Now that the private key is password-protected and stored in a safe place, and the open key is ready for insertion into the config, you can close the PuTTygen utility and go to the console. We write:
root@juniper# set system root-authentication ssh-rsa _ ( -)Now we make an entry only by key:
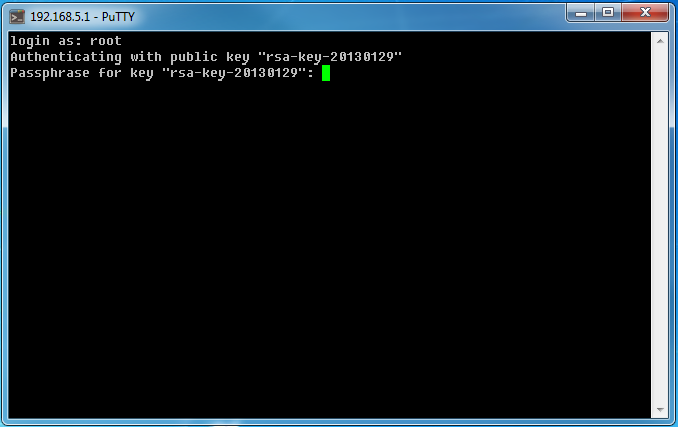
root@juniper# set system services ssh root-login deny-passwordNow, to log in via SSH, we need to pre-specify our private key file in Putti in the section “Connection - SSH - Authentication”. At the entrance we will see something like this:root@juniper# commit checkroot@juniper# commit
Here we enter the password that was set when generating the private key. After that, we generously let! It is interesting that if someone now tries to enter without a key, Juniper will obediently ask him for a login-password, but the authentication will fail every time.
Now let's talk about how to restrict SSH access at the network access level. There are two complementary methods for this. First: the
host-inbound-traffic directive in the edit security zones section. Example: root @ juniper # show security zones security-zone untrust
screen untrust-screen;
interfaces {
fe-0/0 / 0.0 {
host-inbound-traffic {
system-services {
ping;
ssh;
}
}
} host-inbound-traffic system-services section, Juniper will listen for ssh requests on this zone / interface.Good. But if we have ssh open on the interface for lokalki, then all users of the lokalki can potentially contact Juniper via ssh. This is in most cases not gud, so you need to use firewall filters to give access only to certain IPs.
Suppose we need to allow access only for ip 192.168.10.10, and all the rest - to deny. We write this design:
root@juniper# edit firewall filter deny-sshroot@juniper# set term 1 from source-address 0/0root@juniper# set term 1 from source-address 192.168.10.10 except(we prohibit access via ssh. Discard - means silently killing the package. You can write reject - this is also a ban, but with icmp port unreachable sent. Log - means logging unsuccessful attempts to bang on ssh. In principle, you can not write).root@juniper# set term 1 from destination-port sshroot@juniper# set term 1 then log discard
root@juniper# set term 2 then acceptWe apply this filter to the loopback interface of the router (since it is this one that leads to the routing-engine, that is, to the core of the system where the sshd daemon lives).
root@juniper# set interfaces lo0 unit 0 family inet filter input deny-sshdestination-address filter to the rules, otherwise the ssh protocol on the network will not work as a whole in a magical way. For a loopback interface, you do not need to specify destination-address , since it is not transit.It is clear that it is not necessary, for example, to write all zeroes in the
source-address . You can specify some specific subnets and even interfaces. In other words, you can configure access very flexibly.By the way, we can restrict access to the Juniper web interface by the same procedure!
That's all! In this simple way, we have significantly increased the security of our ssh sessions!
Source: https://habr.com/ru/post/173031/
All Articles