What we should build a PBX!
A lot of articles have been written on the topic of installing and configuring IP PBX based on Asterisk software. But, for the most part, these articles are reduced to a computer, Linux, and treading the keyboard in the command line of this Linux itself. I want to tell you about one wonderful device, on which, with the installation and configuration of Asterisk, absolutely any user can handle. This is a D-Link DNS-345 network drive with Add-On (add-on) MicroPBX.
Why do I need IP PBX? Of course, to save money on telephone conversations, flexibility of the system in setting up and operation, huge functionality, etc. To date, all major operators connect phones as a classic way (via phone cable), and means of IP-telephony (via SIP). Examples of connection and operation of such systems:
http://dlink.ua/voip_solutions_5
http://dlink.ua/voip_solutions_3
http://dlink.ua/voip_solutions_2
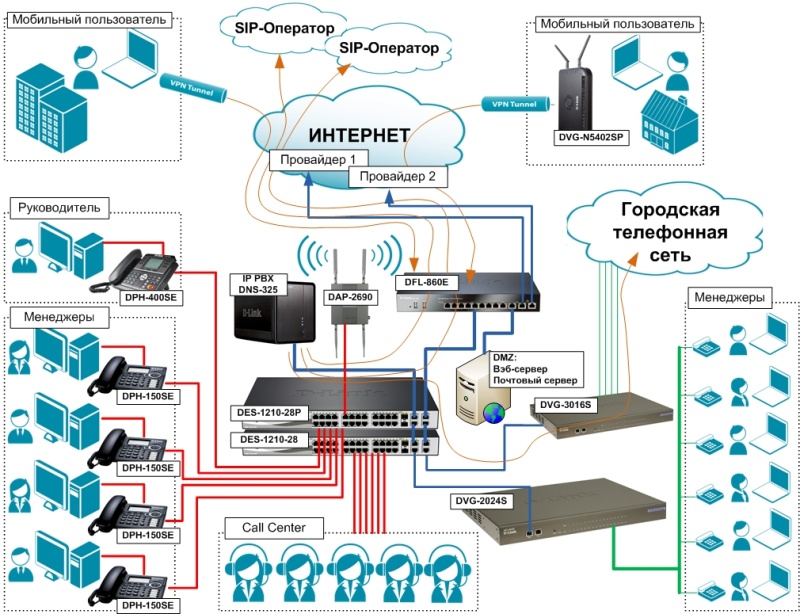
As shown in the figure above, it is better to use a hybrid scheme - part of the phones via SIP, part of the classic - over copper. This option will require additional costs, at least, for the purchase of a VoIP FXO gateway (in the D-Link DVG-3016S picture). But the hybrid system provides much greater reliability - in the case of the “fall” of the Internet, analog lines will work, and if the phone is broken. cable - SIP line. As they say, reliability requires sacrifice.
But back to the main character of this article - the network drive D-Link DNS-345. What is its beauty? Well, compared with the closest competitors - this is of course the price. In terms of functionality and performance, they are not worse than their more expensive colleagues, and most of the competitors do not have some functional things. For example, support for GSM modems with voice functions as GSM gateways. For example, Sprut Universal GSM gateway costs ~ $ 250, and a 3G modem with voice features Huawei E1550 ~ $ 40.
Anticipating the statements “yes, I am an asterisk with the support of Huawei E1550, I can raise it on a $ 40 router” I want to say that it’s just impossible to realize all the capabilities of a full- featured NAS (Network Attached Storage) router. More precisely possible, but what is his performance? Given that the HDD connects only USB'shny, with the appropriate read / write speed, and the RAM on the router, as a rule, no more than 32M. Those. A router with the same NAS software will always be in perpetual swap with all that it implies. DNS-345 has 512M of RAM. The processor on the router is 600 MHz at best, the DNS-345 has 1.6 GHz. I myself somehow raised Asterisk + Huawei1550 on a router and am well acquainted with the capabilities of such a system, suitable only for a home, but in any way, even for a small office.
And so, proceed to configure. To get started, download Add-On MicroPBX Asterisk 1.8.15-cert. Take here:
http://dlink.vtverdohleb.org.ua/Add-On/
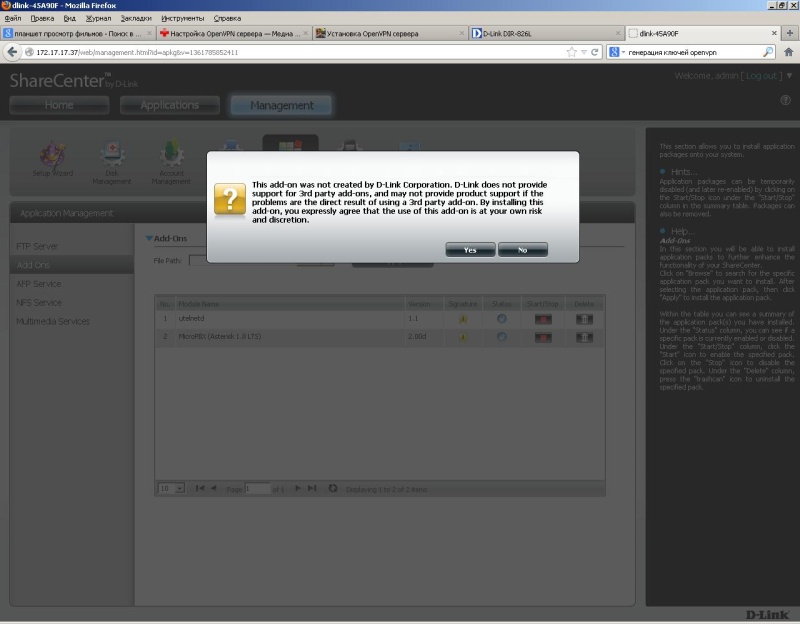
Go to the “Management / Application Management / Add Ons” section and install the Add-On “DNS-345 Asterisk18 Package ...”.

')
Messages "Third-party Add-On ..." do not worry, click Yes.
After the installation is complete, launch the Add-On button with the Start button. The package includes USB voice modems drivers, so it is recommended, before installing Add-On, to insert the modem into the NAS NAS port. The DNS-345 USB port is rather weak, so you need to connect the modem via USB-HUB with external power.
But before you connect the modem to the NAS, you need to go through, probably the most complicated PBX setup, the procedure is to switch the modem to the Modem Only mode. To do this, connect the modem to the computer and, using any terminal program, enter AT commands to change the operating mode. As a terminal, you can use, for example, PuTTY ( http://www.putty.org/ ). How to "get" on the modem in the pictures below.

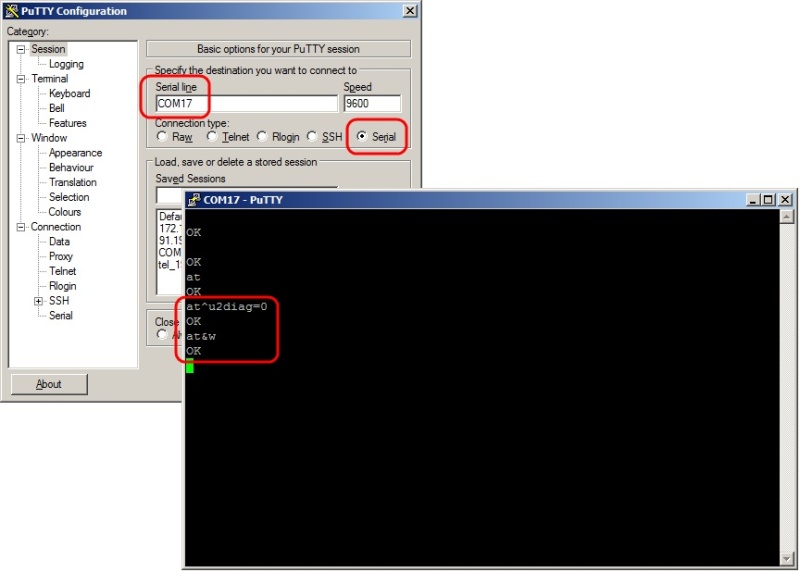
In the terminal, type "ATE1" in the blind, "and press Enter. Subsequent input will be displayed on the screen. Next enter:
AT ^ U2DIAG = 0
AT & W
Everything, the modem is ready to work, you can switch it to DNS-345.
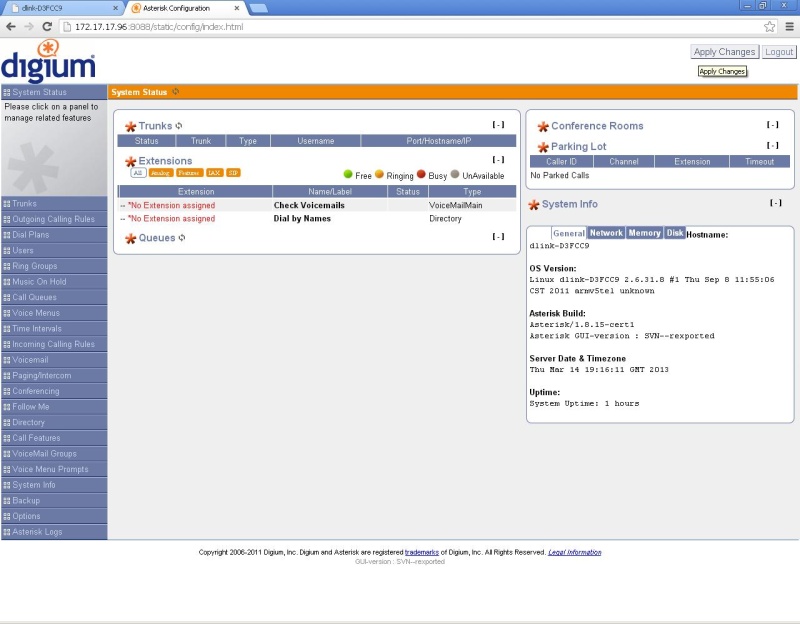
Run the Asterisk 1.8 cert1 Add-On, go to the Applications section and open the Asterisk web interface.

The default login / password is admin / admin.

Do not forget to click the "Apply Changes" button in the upper right corner of the interface!
I will not write about Asterisk settings, the possibilities of the web interface are described in some detail here:
http://service.d-link.ua/node/50
I'll tell you only about the basic setting of the GSM gateway. To begin with, create a basic “Dial Plan”, get users linked to this Dial Plan, and combine the users into one Ring Group.

Check if the modem is correctly defined. To do this, go to the "Options / Advanced Options" section and turn on the "Advanced Settings". After that, go to the "Asterisk CLI" section and give the "datacard show devices" command. If you see something like the image below, it means that the modem has not picked up the system.

There can be many reasons, for example, a modem, for some reason, did not switch to Modem Only mode and the system sees it not as a voice modem, but as a USB-HDD. In this case, unfortunately, without picking in the insides of the Linux system, it is unlikely that you will understand the reason.
But we will proceed from the best - the modem was determined and you saw such a picture

Set up incoming GSM calls. Go to the File Editor section and open the "extensions.conf" file. If the Ring Group is created, the last line will be the “[ringroups-custom-1]” section.

Open the “default” context and enter the following 2 lines into it:
exten = s, 1, NoOp (all_ring)
include = ringroups-custom-1
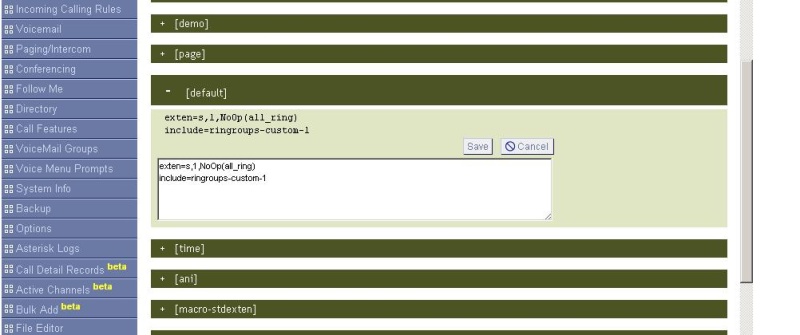
Click the Apply Changes button. All incoming calls work.
Now let's move on to setting up outgoing calls. Create a trunk for outgoing. Hostname, you can enter any non-existing IP address, for example 192.168.255.255
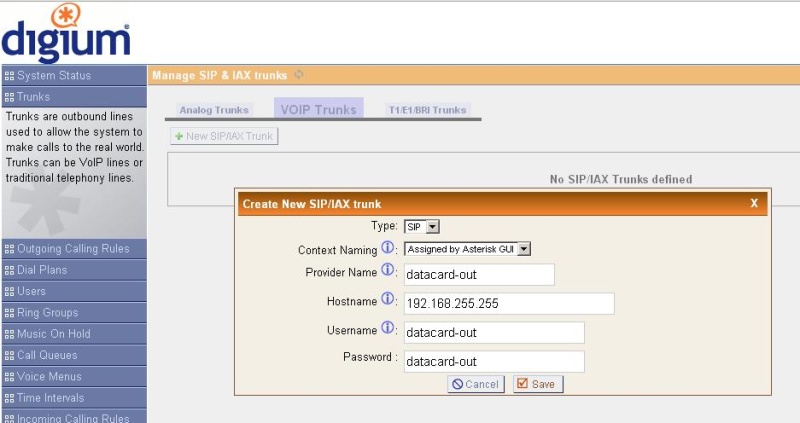
The line will appear in the logs
[Mar 14 20:39:06] NOTICE [1869]: chan_sip.c: 13390 sip_reg_timeout: - Registration for 'datacard-out@192.168.255.255' timed out, trying again (Attempt # 2)
You can not pay attention to this. The second option is to open the users.conf file through the File Editor and comment out or delete the line "host = 192.168.255.255".
Create a rule for outgoing calls in the section “Outgoing Calling Rules”.
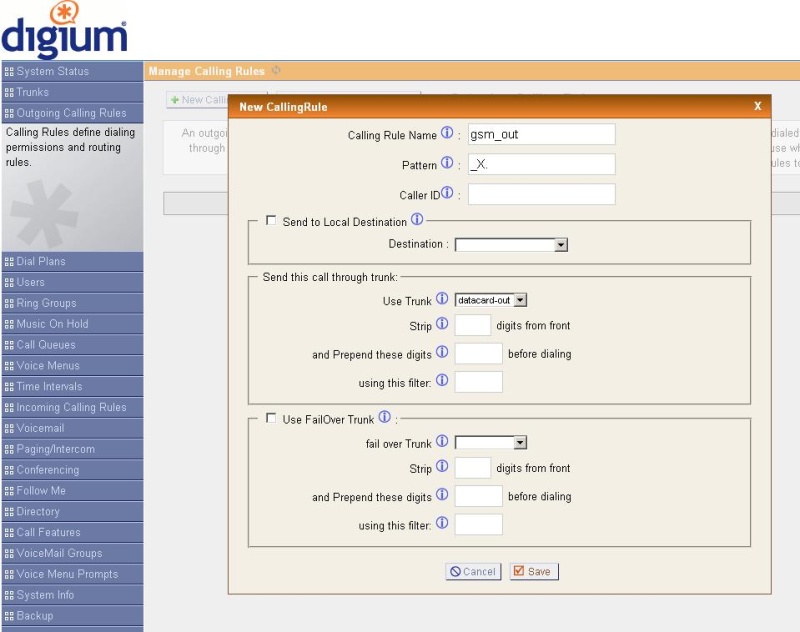
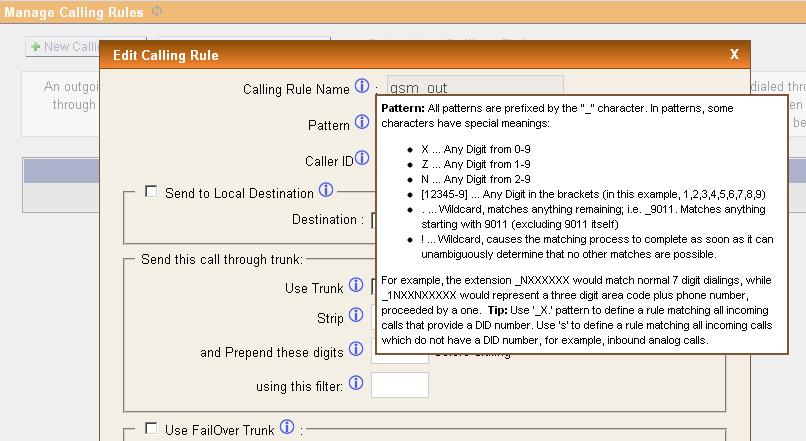
Pattern for any called number - "_X.". If you need to wrap only certain numbers in GSM, you can register your mask
In Dial Plan, allow the use of the outgoing direction "gsm_out".

Go to the File Editor section and open the "extensions.conf" file. If “Outgoing Calling Rules” is created, the next-to-last line will be “[CallingRule_gsm_out]”. Instead of the contents of CallingRule_gsm_out, enter the following:
exten = _X., 1, Dial (Datacard / datacard0 / $ {EXTEN}, 300, trR)
exten = s, n, hangup

Click the “Apply Changes” button in the upper right corner of the interface.
That's all, the basic setup is complete. As mentioned at the beginning, with detailed instructions on how to configure the remaining Asterisk functions through the Web-GUI can be found at service.d-link.ua/node/50
Why do I need IP PBX? Of course, to save money on telephone conversations, flexibility of the system in setting up and operation, huge functionality, etc. To date, all major operators connect phones as a classic way (via phone cable), and means of IP-telephony (via SIP). Examples of connection and operation of such systems:
http://dlink.ua/voip_solutions_5
http://dlink.ua/voip_solutions_3
http://dlink.ua/voip_solutions_2
As shown in the figure above, it is better to use a hybrid scheme - part of the phones via SIP, part of the classic - over copper. This option will require additional costs, at least, for the purchase of a VoIP FXO gateway (in the D-Link DVG-3016S picture). But the hybrid system provides much greater reliability - in the case of the “fall” of the Internet, analog lines will work, and if the phone is broken. cable - SIP line. As they say, reliability requires sacrifice.
But back to the main character of this article - the network drive D-Link DNS-345. What is its beauty? Well, compared with the closest competitors - this is of course the price. In terms of functionality and performance, they are not worse than their more expensive colleagues, and most of the competitors do not have some functional things. For example, support for GSM modems with voice functions as GSM gateways. For example, Sprut Universal GSM gateway costs ~ $ 250, and a 3G modem with voice features Huawei E1550 ~ $ 40.
Anticipating the statements “yes, I am an asterisk with the support of Huawei E1550, I can raise it on a $ 40 router” I want to say that it’s just impossible to realize all the capabilities of a full- featured NAS (Network Attached Storage) router. More precisely possible, but what is his performance? Given that the HDD connects only USB'shny, with the appropriate read / write speed, and the RAM on the router, as a rule, no more than 32M. Those. A router with the same NAS software will always be in perpetual swap with all that it implies. DNS-345 has 512M of RAM. The processor on the router is 600 MHz at best, the DNS-345 has 1.6 GHz. I myself somehow raised Asterisk + Huawei1550 on a router and am well acquainted with the capabilities of such a system, suitable only for a home, but in any way, even for a small office.
And so, proceed to configure. To get started, download Add-On MicroPBX Asterisk 1.8.15-cert. Take here:
http://dlink.vtverdohleb.org.ua/Add-On/
Go to the “Management / Application Management / Add Ons” section and install the Add-On “DNS-345 Asterisk18 Package ...”.
')
Messages "Third-party Add-On ..." do not worry, click Yes.
After the installation is complete, launch the Add-On button with the Start button. The package includes USB voice modems drivers, so it is recommended, before installing Add-On, to insert the modem into the NAS NAS port. The DNS-345 USB port is rather weak, so you need to connect the modem via USB-HUB with external power.
But before you connect the modem to the NAS, you need to go through, probably the most complicated PBX setup, the procedure is to switch the modem to the Modem Only mode. To do this, connect the modem to the computer and, using any terminal program, enter AT commands to change the operating mode. As a terminal, you can use, for example, PuTTY ( http://www.putty.org/ ). How to "get" on the modem in the pictures below.
In the terminal, type "ATE1" in the blind, "and press Enter. Subsequent input will be displayed on the screen. Next enter:
AT ^ U2DIAG = 0
AT & W
Everything, the modem is ready to work, you can switch it to DNS-345.
Run the Asterisk 1.8 cert1 Add-On, go to the Applications section and open the Asterisk web interface.
The default login / password is admin / admin.
Do not forget to click the "Apply Changes" button in the upper right corner of the interface!
I will not write about Asterisk settings, the possibilities of the web interface are described in some detail here:
http://service.d-link.ua/node/50
I'll tell you only about the basic setting of the GSM gateway. To begin with, create a basic “Dial Plan”, get users linked to this Dial Plan, and combine the users into one Ring Group.
Check if the modem is correctly defined. To do this, go to the "Options / Advanced Options" section and turn on the "Advanced Settings". After that, go to the "Asterisk CLI" section and give the "datacard show devices" command. If you see something like the image below, it means that the modem has not picked up the system.
There can be many reasons, for example, a modem, for some reason, did not switch to Modem Only mode and the system sees it not as a voice modem, but as a USB-HDD. In this case, unfortunately, without picking in the insides of the Linux system, it is unlikely that you will understand the reason.
But we will proceed from the best - the modem was determined and you saw such a picture
Set up incoming GSM calls. Go to the File Editor section and open the "extensions.conf" file. If the Ring Group is created, the last line will be the “[ringroups-custom-1]” section.
Open the “default” context and enter the following 2 lines into it:
exten = s, 1, NoOp (all_ring)
include = ringroups-custom-1
Click the Apply Changes button. All incoming calls work.
Now let's move on to setting up outgoing calls. Create a trunk for outgoing. Hostname, you can enter any non-existing IP address, for example 192.168.255.255
The line will appear in the logs
[Mar 14 20:39:06] NOTICE [1869]: chan_sip.c: 13390 sip_reg_timeout: - Registration for 'datacard-out@192.168.255.255' timed out, trying again (Attempt # 2)
You can not pay attention to this. The second option is to open the users.conf file through the File Editor and comment out or delete the line "host = 192.168.255.255".
Create a rule for outgoing calls in the section “Outgoing Calling Rules”.
Pattern for any called number - "_X.". If you need to wrap only certain numbers in GSM, you can register your mask
In Dial Plan, allow the use of the outgoing direction "gsm_out".
Go to the File Editor section and open the "extensions.conf" file. If “Outgoing Calling Rules” is created, the next-to-last line will be “[CallingRule_gsm_out]”. Instead of the contents of CallingRule_gsm_out, enter the following:
exten = _X., 1, Dial (Datacard / datacard0 / $ {EXTEN}, 300, trR)
exten = s, n, hangup
Click the “Apply Changes” button in the upper right corner of the interface.
That's all, the basic setup is complete. As mentioned at the beginning, with detailed instructions on how to configure the remaining Asterisk functions through the Web-GUI can be found at service.d-link.ua/node/50
Source: https://habr.com/ru/post/172927/
All Articles