Learn a better bundler
 The bandler turned out to be a great tool for setting and tracking jams, which every Ruby project needs so much that almost every project uses it. However, despite its ubiquity, most users are not aware of the built-in tools and helpers of the bandler. In an attempt to raise awareness (and the performance of Ruby developers), I'm going to tell you about them.
Install, update, and outdated
You probably already know this, but I will summarize it for beginners. Run bundle install to install the packages required for your project. What if you just started git pull and there are new jams? bundle install . If you have just added new jams or changed versions of jams in the Gemfile? bundle install . It would seem more logical to run the bundle update , but this will not only install jams - it will also try to update each jam in your package. This usually means catastrophe, unless, of course, you actually planned it.
The update command should be used when your used jams are updated, and you want your package to have the latest version, which your Gemfile will allow to run. Run bundle outdated to print a list of jams that can be updated. If you want to update a specific jam, run a GEM bundle update or bundle update to update everything. After the update, make sure to pass all the tests before committing your new Gemfile.lock!
')
Show and open
Most people know about the bundle show, which prints the full path to the location of the installation of the jam (probably because this command is run if the installation is successful). However, the bundle open command is much more useful, which will immediately open the jam in your editor. Here is a minimalistic demo:
$ bundle install Fetching gem metadata from https://rubygems.org/.......... Resolving dependencies... Installing rack (1.5.2) Using bundler (1.3.1) Your bundle is complete! Use `bundle show [gemname]` to see where a bundled gem is installed. $ echo $EDITOR mate -w $ bundle open rack That's all you need to open the rack in your editor. The ability to open jams without having to search for them can be a great way to debug. It allows you to insert statements for printing or debugging in seconds. If you change your jams, do not forget to reset them after that! In the future, a pristine command will be created for this, but for now run the bundle exec gem pristine to restore the jams that you edited.
Search
The show command has another trick in its bosom: bundle show --paths . Printing a list of all the paths may not look terribly useful, but it makes it much easier to search the source code for all the jams in your package. Want to know where ActionDispatch :: RemoteIp is described? Just one line:
$ grep ActionDispatch::RemoteIp `bundle show --paths` Regardless of whether you are using grep, ack, or ag, it has become very easy to configure the shell function, which allows you to search the package with just a couple of characters. Here are mine:
function back () { ack "$@" `bundle show --paths` } With this function, search has become even easier and faster:
$ back ActionDispatch::RemoteIp Binstubs
One of the most annoying things when using a bandler is that you (probably) have to run bundle exec whatever every time you want to run any command. The easiest way to get around this is to install the Bundler binstubs . By running the GEM bundle binstubs , you can generate stubs in the bin / folder. These stubs will load your package and the correct version of the jam before you run the command. Here is an example binstub configuration for rspec.
$ bundle binstubs rspec-core $ bin/rspec spec No examples found. Finished in 0.00006 seconds 0 examples, 0 failures Use binstubs for frequently launched commands or for commands that you may be running through cronjob. Considering that binstubs should not load a lot of code, they will work very quickly. Rails 4 has adapted binstubs and will exit with bin / rails and bin / rake. They will be configured to always run for a specific application.
Creating a gemfile
I have seen many complaints that it’s very inconvenient to type in the source 'https://rubygems.org/' every time creating a new Gemfile. Fortunately, the bandler will do it for you! When you start a new project, you can create a new Gemfile using Rubygems.org as the source, running just one command:
$ bundle init Now you are ready to add jams and set at your pleasure!
Local Git Jams
Many people asked how you can use a bandler to change and commit to jam in your Gemfile. Thanks to the efforts of José Valim, the 1.2 bundler allows you to do this extremely elegantly. With one setting, you can upload your own git clone to the development, but when deployed to production, it will be checked which last commit you used.
Here's how to set up a local git copy of the rack:
$ echo "gem 'rack', :github => 'rack/rack', :branch => 'master'" >> Gemfile $ bundle config local.rack ~/sw/gems/rack $ bundle show rack /Users/andre/sw/gems/rack Once everything is set up, you can either change the code that your application will use, or commit to that repository as often as you like.
Ruby Versions
Another feature of the 1.2 bandler is the Ruby version requests. If you know that your application only works with one version of Ruby, you can request this version. Just add one line to your Gemfile, specifying the version number as string.
ruby '1.9.3' Now the bandler will throw an exception every time you try to run your application on a different version of Ruby. You no longer need to worry that you will accidentally use the wrong version when developing!
Dependency scheme
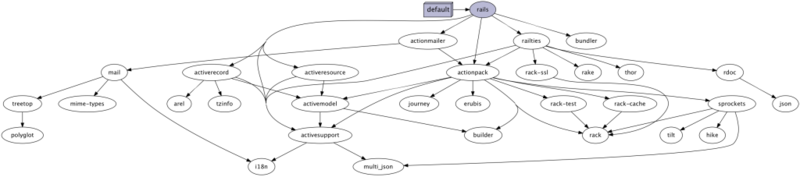
The bandler uses a gemfile to create a so-called dependency scheme, which shows a lot of jams and their dependencies on each other. Sometimes it is very interesting and convenient to see a graphical dependency diagram, and this is what the bundle viz command does. You will need to set the GraphViz and ruby-graphviz jams.
$ brew install graphviz $ gem install ruby-graphviz $ bundle viz After that, you will get a beautiful overview of your dependencies. Here is a gemfile scheme that contains only one Rails jam.
IRB in your package
Before the big finale, I have one last tip for you: the console of commands. Having launched the bundle console , you will not just open the IRB prompt, but also load the entire package and all the jams. If you want to experiment with the jams used, but you don’t have Rails jam to call the Rails console, this is a great alternative.
$ bundle console >> Rack::Server.new => #<Rack::Server:0x007fb439037970 @options=nil> Creating a new jam
And, finally, what is most useful in the bander after all installations. Given that the bandler was created to manage jams, the bandler's team is very motivated to make managing and creating jams extremely simple. You can create a folder with the base of your jam by simply running bundle gem NAME . You will get a folder with gemspec, readme and lib files where you can put your code. When you added the code, you can install this jam into your system for verification by running rake install. When you are happy with your jam and want to share with the others, you can put a new version of the jam in rubygems.org by running rake release . As a side effect, jams created in this way can be used as git jams. This means that you (and everyone else using this jam) can copy, edit and collect any commit.
Let's sum up
Now that you know so many useful things about a bundler, I suggest you test it. Use search, create jams!
As far as I can tell, the bandler is most useful because it simplifies the process of collaborating and using code, which makes Ruby better for everyone.
Note: a friend of Engine Yard , André Arko, a member of the bandler’s core team, wrote this wonderful article for us. Do not forget to look at his site .
Source: https://habr.com/ru/post/172807/
All Articles