Text output in iOS: CoreText, NSAttributedString
I would like to tell you about the text output on the screen in iOS. Initially, it was intended as a tutorial, then as a collection of unobvious facts, but it turned out what happened.
Methods of text output can be divided into several categories:
First of all, you need to talk about the basic thing called NSAttributedString or CFAttributedStringRef if we work with toll-free-bridge objects. This is a string with which to set display attributes.
')
This code creates a string with a single display attribute: the font that you want to use when drawing the string. It looks like this:

Here we need to highlight one important point that DemoniacDeath kindly reminded me of in the comments: CoreText for drawing uses CTFont, which is actually a toll-free-bridge to UIFont starting only from iOS6. Therefore, the type conversion, which is used in the examples for brevity, will work only on iOS6, and on everything below it you need to create a CTFont based on a UIFont:
So, there are quite a few standard attributes available:
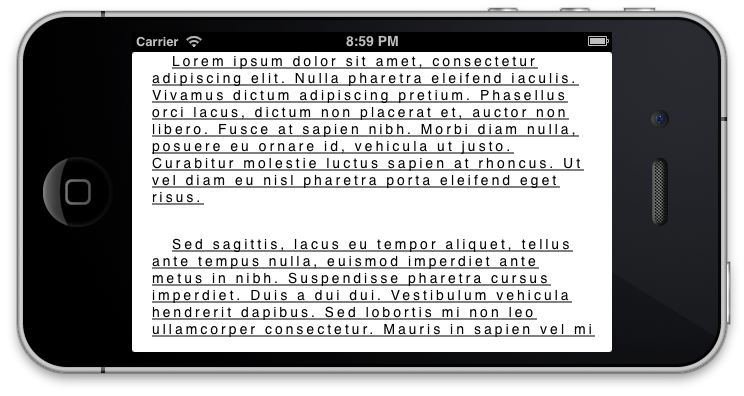
For example, text with kerning 3.0, font size 14 and underline, indent all text to the right by 20.0 points, a red line by 40.0 points and a distance between paragraphs of 30.0 points:
Now how it all can be drawn. Starting from iOS6 in UIKit , the NSAttributedString category now has the NSStringDrawing category and you can simply do this:
There is another method:
which pretends to be supposedly customizable with the help of passed parameters and special context. Frankly, I have never used these methods, because the minimum version of iOS that we support in our product is 4.3.
You can also pass the generated NSAttributedString to a UILabel , UITextField, or UITextView via the setAttributedString method :. This method is also supported only with iOS6.0. By the way, for these elements, starting with iOS6.0, attributes for display can be set directly in InterfaceBuilder in xib or storyboard.
CoreText is such a cool thing that allows you to draw text on several levels of abstractions. It also allows you to access elementary parts of the text display on several levels.
Before I begin to talk further, I want to say that by this moment it is implied that you know what a graphic context is and are familiar with affine transformations.
I’m also stealing a picture from an Apple site:
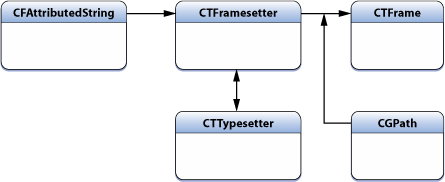
At this level, we still can not draw. The only role of this abstraction: to create objects for drawing, which will be inscribed in geometric primitives, using text with specified styles. Also, using the CTFramesetter, you can fix the width or height, find the height or width for the current text with the current display settings.
Here is fixed the width in which you want to enter the text. suggestedSize will contain the desired text height. The same can be done with the width.
This object creates the above described CTFramesetter and it is already fully ready for drawing.
I want to elaborate on the parameters of the following method:
A couple of examples.
The last example also uses the kCTFramePathFillWindingNumber parameter for the CTFrame , so the intersected areas are also filled with text.
Two more important points:
This is what will happen to a non-unit transformation matrix:

Before further raskaz I would like to steal another image from the site of the Apple:
It is this entity that is involved in the creation of a CTFrame . Her role is to create the very textual graphic primitives that are already ready for drawing at this stage. He carries out the transfer of lines according to a given algorithm (according to words, symbols, etc), cuts off all that did not fit.
This is what CTFrame consists of. CTLine can be drawn by specifying the positions for which they will be located: by taking the calculated from the CTFrame using the CTFrameGetLineOrigins method or by asking for some Very Tricky Algorithm.
What else is definitely worth knowing. The line has several typographical parameters: baseline , ascent , descent , leading . About each can be read here . CTFrameGetLineOrigins returns exactly the baseline . The remaining parameters can be found through the method:

Red color - descent, black - baseline, blue - ascent.
We will return to these parameters. In the meantime, I want to note that descent and ascent will be taken for the entire line as the minimum and maximum for all fonts that are used in the line. For example, for the text above, it is clearly seen that in the line where Hebrew is present, the descent is greater.
Some more useful methods:
Returns the string line for the current line. It is very often used in algorithms when only certain lines are needed that fall into a selected string interval.
Returns the string index for the specified position in the string. For example, it can be used to define clicks on certain areas of text. Note that the context is inverted, and (0,0) will be at the very bottom line.
To draw a line, it is not necessary to create the whole chain from CTFramesetter-> CTFrame-> CTLine. You can create a line immediately. Quite often, the problem also arises to cut it if the text does not fit into a given area:
Probably the most useful abstraction for someone who writes his element to enter text. CTRun is what groups characters with the same styles for grouped drawing. Or rather, they are grouped starting from iOS6.0, and in everything that is younger - each character will be a separate CTRun . From the very beginning, you need to understand one easy and obvious point: there are symbols, but there are glyphs . Two more points follow from this fact, which are also light, but already unobvious: one character can consist of one glyph, and maybe of several; one glyph can represent several characters at once. For example, most emoticons are one glyph, but consist of several UTF characters.
To all those who are going to work with CTRun, I strongly recommend that you familiarize yourself with CTRun.h - all the methods that are there are extremely useful.
Returns the number of glyphs in CTRun .
Returns the range from the whole line in which CTRun is located. The length of this range is not always equal to the result of the previous method!
This method is related to the previous one. It returns the position of the glyphs in the string. For example, there is a text from several emoticons:

Starting with iOS6.0 CTrun will be as follows:
As you can see, each glyph actually consists of two characters. The result of calling the CTRunGetStringIndices method is: [0,2,4].
Please note that this method is available in two variants: copy the required number of indexes into the buffer selected in advance, or get a pointer to the beginning of the array inside CTRun . Choose what is more convenient for you. There are quite a few such methods, it can be seen from the signatures, and I will not focus on this.
The current attributes for CTRun that were specified in CFAttributedString .
Returns the display-specific parameters as a bitmask. Pay special attention to kCTRunStatusRightToLeft - shows that the glyphs in CTRun are written from right to left.
Positions for the glyphs inside CTRun relative to the CTFrame . I pay special attention to the fact that if you use the second variant of the method and want to take positions of, say, the second glyph, then in the range you need to transfer not 1 (the numbering starts from 0), but the position of this glyph in the line. For the emoticon version, which was higher, this would be position 2. This applies to all similar methods.
Returns the size of glyphs.
Returns typographical parameters for a single CTRun . Remember I said that the descent and ascent lines will be taken as extreme for the fonts that were used in this line? So, now for each part of the line you can find them separately:

Also, when it became clear what descent and ascent are, I’ll tell you about the kCTRunDelegateAttributeName attribute. At the input it takes CTRunDelegate , which is created based on a number of methods:
We are interested in the last three. Methods are free functions that return the descent , ascent, and width of the glyph that has been marked with this attribute. A set of methods will be invoked each time the parameters of the current glyph should participate in the calculation of common geometric parameters. This can be applied to create your own glyphs.
Draw CTRun in a graphic context.
Frankly, this level is no longer CoreText , but CoreGraphics - it was available before. It's just easier now to get the glyphs.
It should be understood that in this case things like underscore styles will not be available, since they are implemented via CoreText . But when drawing, we are free to arrange the glyphs as desired.
Apple, as always, is true to its traditions in designing APIs: for simple things, you can’t go far and just call the “do-it-good” method, and for more complex things, you can twist the strings and pull the wheels.
Methods of text output can be divided into several categories:
- UIKit - familiar UI controls. Only basic display capabilities, very little formatting capabilities.
- UIKit + NSAttributedString - familiar UI controls with the ability to set a string with display attributes. A bunch of formatting options
- CoreText - a framework for working with text and text views. In conjunction with NSAttributedString, there are plenty of possibilities for formatting text and, thanks to several levels of abstractions over text elements, advanced methods for displaying them.
- CoreGraphics - with it, you can also draw text
NSAttributedString
First of all, you need to talk about the basic thing called NSAttributedString or CFAttributedStringRef if we work with toll-free-bridge objects. This is a string with which to set display attributes.
')
NSDictionary *textAttributes = @{(NSString *)kCTFontAttributeName : [UIFont systemFontOfSize:16]}; NSAttributedString *attributedString = [[NSAttributedString alloc] initWithString:LoremIpsum attributes:textAttributes]; This code creates a string with a single display attribute: the font that you want to use when drawing the string. It looks like this:
Here we need to highlight one important point that DemoniacDeath kindly reminded me of in the comments: CoreText for drawing uses CTFont, which is actually a toll-free-bridge to UIFont starting only from iOS6. Therefore, the type conversion, which is used in the examples for brevity, will work only on iOS6, and on everything below it you need to create a CTFont based on a UIFont:
CTFont ctFont = (__bridge_transfer id)CTFontCreateWithName(uiFont.fontName, uiFont.pointSize, NULL); So, there are quite a few standard attributes available:
- kCTForegroundColorAttributeName - font color
- kCTUnderlineStyleAttributeName - text underline style: CTUnderlineStyle imposes on underline type: single line, thick single, double; CTUnderlineStyleModifiers affects the type of line: dashed, dots, etc
- kCTUnderlineColorAttributeName - underline color
- kCTForegroundColorFromContextAttributeName - whether to take the color from the graphic context. If YES, then the kCTUnderlineColorAttributeName and kCTUnderlineStyleAttributeName parameters will not affect the color, but the context color CGContextSetFillColorWithColor will be used
- kCTLigatureAttributeName - mode of using ligatures . Modes:
- 0 specifies that only those ligatures that are necessary for the normal display of characters will be used.
- 1 specifies that only standard ligatures will be used. Which ligatures will be standard depends on the font and language. For example, for English it is fl and fi. Hebrew, Arabic, Thai - its own interesting characters.
- 2 specifies that, if possible, the maximum characters should be grouped into ligatures.
- kCTParagraphStyleAttributeName - there may be paragraphs in the text. This parameter defines the paragraph style. All parameters can be found in the definition of CTParagraphStyleSpecifier . I would like to separately pay attention to kCTParagraphStyleSpecifierBaseWritingDirection - determines the text display direction (from left to right / from right to left) for the current paragraph. The default is kCTWritingDirectionNatural - the display direction will be chosen according to this document . But you can set the input direction manually by setting kCTWritingDirectionLeftToRight / kCTWritingDirectionRightToLeft
- kCTRunDelegateAttributeName is a very important and interesting parameter. At the input, it takes a set of functions that return the width and a few more parameters, based on which the row height is calculated. Then I will talk about this parameter in more detail and its application.
For example, text with kerning 3.0, font size 14 and underline, indent all text to the right by 20.0 points, a red line by 40.0 points and a distance between paragraphs of 30.0 points:
CTParagraphStyleSetting paragraphSettings[] = (CTParagraphStyleSetting[]){ (CTParagraphStyleSetting){ kCTParagraphStyleSpecifierFirstLineHeadIndent, sizeof(float_t), (float_t[]){ 40.0f } }, (CTParagraphStyleSetting){ kCTParagraphStyleSpecifierHeadIndent, sizeof(float_t), (float_t[]){ 20.0f } }, (CTParagraphStyleSetting){ kCTParagraphStyleSpecifierParagraphSpacing, sizeof(float_t), (float_t[]){ 30.0f } } }; id paragraphStyle = (__bridge_transfer id)CTParagraphStyleCreate(paragraphSettings, sizeof(paragraphSettings) / sizeof(paragraphSettings[0])); NSDictionary *textAttributes = @{ (NSString *)kCTFontAttributeName : [UIFont systemFontOfSize:14], (NSString *)kCTKernAttributeName : @(3.0), (NSString *)kCTUnderlineStyleAttributeName : @(kCTUnderlineStyleSingle), (NSString *)kCTParagraphStyleAttributeName : paragraphStyle }; Drawing
Uikit
Now how it all can be drawn. Starting from iOS6 in UIKit , the NSAttributedString category now has the NSStringDrawing category and you can simply do this:
NSDictionary *textAttributes = @{(NSString *)kCTFontAttributeName : [UIFont systemFontOfSize:16]}; NSAttributedString *attributedString = [[NSAttributedString alloc] initWithString:LoremIpsum attributes:textAttributes]; [attributedString drawInRect:rect]; There is another method:
- (void)drawWithRect:(CGRect)rect options:(NSStringDrawingOptions)options context:(NSStringDrawingContext *)context; which pretends to be supposedly customizable with the help of passed parameters and special context. Frankly, I have never used these methods, because the minimum version of iOS that we support in our product is 4.3.
You can also pass the generated NSAttributedString to a UILabel , UITextField, or UITextView via the setAttributedString method :. This method is also supported only with iOS6.0. By the way, for these elements, starting with iOS6.0, attributes for display can be set directly in InterfaceBuilder in xib or storyboard.
Coretext
CoreText is such a cool thing that allows you to draw text on several levels of abstractions. It also allows you to access elementary parts of the text display on several levels.
Before I begin to talk further, I want to say that by this moment it is implied that you know what a graphic context is and are familiar with affine transformations.
I’m also stealing a picture from an Apple site:
First level. CTFramesetter
At this level, we still can not draw. The only role of this abstraction: to create objects for drawing, which will be inscribed in geometric primitives, using text with specified styles. Also, using the CTFramesetter, you can fix the width or height, find the height or width for the current text with the current display settings.
NSDictionary *textAttributes = @{(NSString *)kCTFontAttributeName : [UIFont systemFontOfSize:16]}; NSAttributedString *attributedString = [[NSAttributedString alloc] initWithString:LoremIpsum attributes:textAttributes]; CTFramesetterRef framesetter = CTFramesetterCreateWithAttributedString((__bridge CFAttributedStringRef)(attributedString)); CGSize suggestedSize = CTFramesetterSuggestFrameSizeWithConstraints(framesetter, CFRangeMake(0, 0), NULL, CGSizeMake(CGRectGetWidth(rect), CGFLOAT_MAX), NULL); Here is fixed the width in which you want to enter the text. suggestedSize will contain the desired text height. The same can be done with the width.
Second level. CTFrame
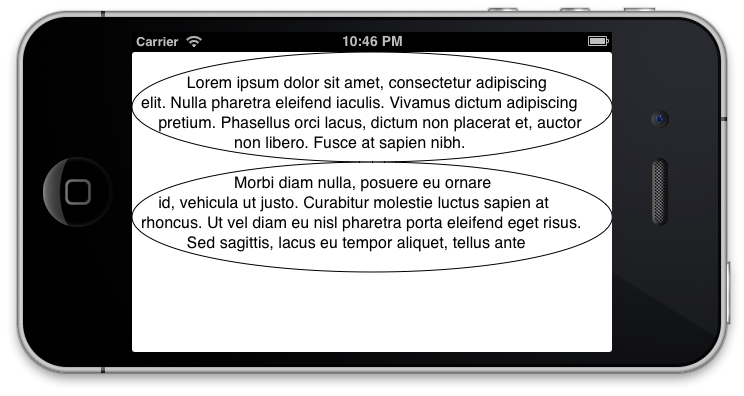
This object creates the above described CTFramesetter and it is already fully ready for drawing.
CGPathRef path = CGPathCreateWithRect((CGRect){CGPointZero, suggestedSize}, NULL); CTFrameRef textFrame = CTFramesetterCreateFrame(framesetter, CFRangeMake(0, 0), path, NULL); CTFrameDraw(textFrame, context); I want to elaborate on the parameters of the following method:
CTFrameRef CTFramesetterCreateFrame( CTFramesetterRef framesetter, CFRange stringRange, CGPathRef path, CFDictionaryRef frameAttributes ) - framesetter - the object itself, containing a string with attributes, for which you need to build a graphic display
- stringRange - the section of the line for which the mapping will be built. A length of 0 means that the line must be taken to the end, starting from the current position. That is, CFRange (0,0) denotes a string from beginning to end
- path - sets a set of geometric primitives, into which the text should be entered
- frameAttributes - additional parameters for fitting. For example, kCTFramePathFillRuleAttributeName sets the rule for how the text will be kept in the intersected areas ; kCTFrameProgressionAttributeName determines the order in which lines are created: from bottom to top (horizontal text) or from right to left (vertical text)
A couple of examples.
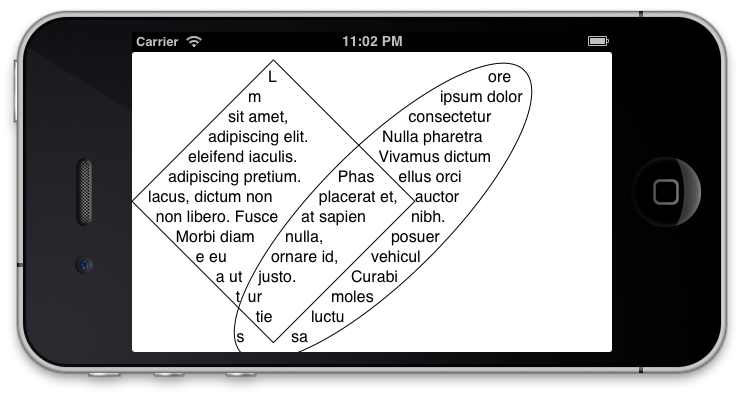
CGMutablePathRef path = CGPathCreateMutable(); CGPathAddEllipseInRect(path, NULL, (CGRect){CGPointZero, CGSizeMake(suggestedSize.width, suggestedSize.height / 2)}); CGPathAddEllipseInRect(path, NULL, (CGRect){0, suggestedSize.height / 2, CGSizeMake(suggestedSize.width, suggestedSize.height / 2)}); CGAffineTransform transformation = CGAffineTransformMakeRotation(M_PI_4); CGPathAddEllipseInRect(path, &transformation, CGRectMake(20, -200, 400, 130)); CGPathAddRect(path, &transformation, CGRectMake(50, -150, 200, 200)); The last example also uses the kCTFramePathFillWindingNumber parameter for the CTFrame , so the intersected areas are also filled with text.
Two more important points:
- If you try one of the above examples, the result will be very different from the one I gave, namely: the image will be inverted, since CoreText forms an image starting from the bottom left corner, as in any CGContext created, for example, CGBitmapContext . Therefore, for correct output, you need to convert the current graphics context.
- It is possible and necessary to set the transformation only for the text, and not for the whole graphic context. This is done via CGContextSetTextMatrix . The peculiarity of this thing is that CGSave / RestoreContext does not save or restore the transformation matrix for text. Therefore, it must always be set before drawing, otherwise it may contain values that were set in any other call to this method in the depths of the system libraries or simply in other parts of your program.
CGContextSetTextMatrix(context, CGAffineTransformIdentity); CGContextScaleCTM(context, 1.0f, -1.0f); CGContextTranslateCTM(context, 0.0f, -suggestedSize.height); This is what will happen to a non-unit transformation matrix:
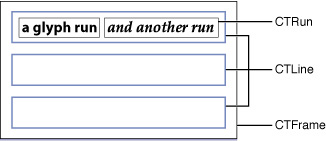
CGContextSetTextMatrix(context, CGAffineTransformMakeRotation(M_PI_4)); CGContextScaleCTM(context, 1.0f, -1.0f); CGContextTranslateCTM(context, 0.0f, -suggestedSize.height); Before further raskaz I would like to steal another image from the site of the Apple:
Lyrical digression. CTTypesetter
It is this entity that is involved in the creation of a CTFrame . Her role is to create the very textual graphic primitives that are already ready for drawing at this stage. He carries out the transfer of lines according to a given algorithm (according to words, symbols, etc), cuts off all that did not fit.
Level three. CTLine
This is what CTFrame consists of. CTLine can be drawn by specifying the positions for which they will be located: by taking the calculated from the CTFrame using the CTFrameGetLineOrigins method or by asking for some Very Tricky Algorithm.
CFArrayRef lines = CTFrameGetLines(textFrame); for (CFIndex i = 0, linesCount = CFArrayGetCount(lines); i < linesCount; ++i) { CGPoint lineOrigin = CGPointZero; CTFrameGetLineOrigins(textFrame, CFRangeMake(i, 1), &lineOrigin); CGContextSetTextPosition(context, lineOrigin.x, lineOrigin.y); CTLineDraw(CFArrayGetValueAtIndex(lines, i), context); } What else is definitely worth knowing. The line has several typographical parameters: baseline , ascent , descent , leading . About each can be read here . CTFrameGetLineOrigins returns exactly the baseline . The remaining parameters can be found through the method:
doubCTLineGetTypographicBounds(CTLineRef line, CGFloat* ascent, CGFloat* descent, CGFloat* leading); Red color - descent, black - baseline, blue - ascent.
We will return to these parameters. In the meantime, I want to note that descent and ascent will be taken for the entire line as the minimum and maximum for all fonts that are used in the line. For example, for the text above, it is clearly seen that in the line where Hebrew is present, the descent is greater.
Some more useful methods:
CFRange CTLineGetStringRange(CTLineRef line) Returns the string line for the current line. It is very often used in algorithms when only certain lines are needed that fall into a selected string interval.
CFIndex CTLineGetStringIndexForPosition(CTLineRef line, CGPoint position) Returns the string index for the specified position in the string. For example, it can be used to define clicks on certain areas of text. Note that the context is inverted, and (0,0) will be at the very bottom line.
CTLineRef CTLineCreateWithAttributedString(CFAttributedStringRef string) To draw a line, it is not necessary to create the whole chain from CTFramesetter-> CTFrame-> CTLine. You can create a line immediately. Quite often, the problem also arises to cut it if the text does not fit into a given area:
CTLineRef CTLineCreateTruncatedLine(CTLineRef line, double width, CTLineTruncationType truncationType, CTLineRef truncationToken) Fourth level CTrun
Probably the most useful abstraction for someone who writes his element to enter text. CTRun is what groups characters with the same styles for grouped drawing. Or rather, they are grouped starting from iOS6.0, and in everything that is younger - each character will be a separate CTRun . From the very beginning, you need to understand one easy and obvious point: there are symbols, but there are glyphs . Two more points follow from this fact, which are also light, but already unobvious: one character can consist of one glyph, and maybe of several; one glyph can represent several characters at once. For example, most emoticons are one glyph, but consist of several UTF characters.
To all those who are going to work with CTRun, I strongly recommend that you familiarize yourself with CTRun.h - all the methods that are there are extremely useful.
CFIndex CTRunGetGlyphCount(CTRunRef run) Returns the number of glyphs in CTRun .
CFRange CTRunGetStringRange(CTRunRef run) Returns the range from the whole line in which CTRun is located. The length of this range is not always equal to the result of the previous method!
const CFIndex* CTRunGetStringIndicesPtr(CTRunRef run) void CTRunGetStringIndices(CTRunRef run, CFRange range, CFIndex buffer[]) This method is related to the previous one. It returns the position of the glyphs in the string. For example, there is a text from several emoticons:
Starting with iOS6.0 CTrun will be as follows:
CTRun: string range = (0, 6), string = "\U0001f437\U0001f434\U0001f428"As you can see, each glyph actually consists of two characters. The result of calling the CTRunGetStringIndices method is: [0,2,4].
Please note that this method is available in two variants: copy the required number of indexes into the buffer selected in advance, or get a pointer to the beginning of the array inside CTRun . Choose what is more convenient for you. There are quite a few such methods, it can be seen from the signatures, and I will not focus on this.
CFDictionaryRef CTRunGetAttributes(CTRunRef run) The current attributes for CTRun that were specified in CFAttributedString .
CTRunStatus CTRunGetStatus(CTRunRef run) Returns the display-specific parameters as a bitmask. Pay special attention to kCTRunStatusRightToLeft - shows that the glyphs in CTRun are written from right to left.
const CGPoint* CTRunGetPositionsPtr(CTRunRef run) void CTRunGetPositions(CTRunRef run, CFRange range, CGPoint buffer[]) Positions for the glyphs inside CTRun relative to the CTFrame . I pay special attention to the fact that if you use the second variant of the method and want to take positions of, say, the second glyph, then in the range you need to transfer not 1 (the numbering starts from 0), but the position of this glyph in the line. For the emoticon version, which was higher, this would be position 2. This applies to all similar methods.
const CGSize* CTRunGetAdvancesPtr(CTRunRef run) void CTRunGetAdvances(CTRunRef run, CFRange range, CGSize buffer[]) Returns the size of glyphs.
double CTRunGetTypographicBounds(CTRunRef run, CFRange range, CGFloat* ascent, CGFloat* descent, CGFloat* leading) Returns typographical parameters for a single CTRun . Remember I said that the descent and ascent lines will be taken as extreme for the fonts that were used in this line? So, now for each part of the line you can find them separately:
Also, when it became clear what descent and ascent are, I’ll tell you about the kCTRunDelegateAttributeName attribute. At the input it takes CTRunDelegate , which is created based on a number of methods:
typedef struct { CFIndex version; CTRunDelegateDeallocateCallback dealloc; CTRunDelegateGetAscentCallback getAscent; CTRunDelegateGetDescentCallback getDescent; CTRunDelegateGetWidthCallback getWidth; } CTRunDelegateCallbacks; We are interested in the last three. Methods are free functions that return the descent , ascent, and width of the glyph that has been marked with this attribute. A set of methods will be invoked each time the parameters of the current glyph should participate in the calculation of common geometric parameters. This can be applied to create your own glyphs.
void CTRunDraw(CTRunRef run, CGContextRef context, CFRange range) Draw CTRun in a graphic context.
CoreGraphics
Level five. Glyphs
Frankly, this level is no longer CoreText , but CoreGraphics - it was available before. It's just easier now to get the glyphs.
CFIndex glyphCount = CTRunGetGlyphCount(run); CGPoint positions[glyphCount]; CGGlyph glyphs[glyphCount]; CTRunGetPositions(run, CFRangeMake(0, 0), positions); CTRunGetGlyphs(run, CFRangeMake(0, 0), glyphs); CGContextSetFont(context, cgFont); CGContextSetFontSize(context, CTFontGetSize(runFont)); CGContextSetFillColorWithColor(context, runColor); CGContextShowGlyphsAtPositions(context, glyphs, positions, glyphCount); It should be understood that in this case things like underscore styles will not be available, since they are implemented via CoreText . But when drawing, we are free to arrange the glyphs as desired.
Apple, as always, is true to its traditions in designing APIs: for simple things, you can’t go far and just call the “do-it-good” method, and for more complex things, you can twist the strings and pull the wheels.
Source: https://habr.com/ru/post/172661/
All Articles