Configuring CCBoot v.3 to work in Active Directory
Hello!
This article will cover the CCBoot technology from Youngzsoft, which allows diskless booting of the operating system from a remotely located machine and working in Active Directory.
Hello, I am a system administrator, and I am lazy. I am tired of suffering, adjusting the work of the operating system every time when a user accidentally deletes any system file or crashes program settings. Therefore, I wondered if it was possible to load the operating system every time from the reference image, and so that the user's profile and documents were stored on the network, and all changes in the operating system itself were respectively lost after each reboot. This would be the perfect solution for an internet cafe or gaming club.
A little googling, I found a solution that would suit me one hundred percent.
')
Youngzsoft has developed a CCBoot product that allows diskless booting of operating systems with iSCSI. The diskless computer is connected to the hard disk through a network and loads the operating system from a remotely located machine. CCBoot uses the fast-paced iSCSI protocol with gPXE diskless boot technology.
Not trivial is the task of setting up a CCBoot solution for diskless clients and their work in Active Directory.
To work, we need a raised and configured domain controller, as well as a server with CCBoot, a client reference machine and diskless machines with PXE support that will perform diskless booting over the network.
If you install the CCBoot server on a domain controller, then in the CCBoot server, click “Options” -> "DHCP Settings" and make sure that the address of the CCBoot server matches the address of the DNS server.
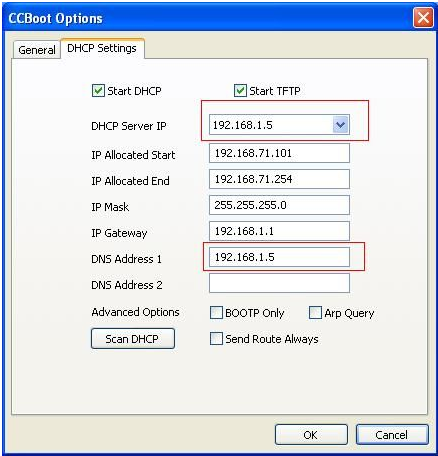
In my test environment, the CCBoot server was raised on a virtual machine running Windows Server 2008 Ent R2 SP1 (IP: 10.7.1.19) on a Hyper-V server. A domain controller is a physical server running Windows Server 2003 Ent R2 SP2 (IP: 10.0.0.11), where DHCP and DNS services were taken up. Accordingly, my DHCP Settings settings are as follows:

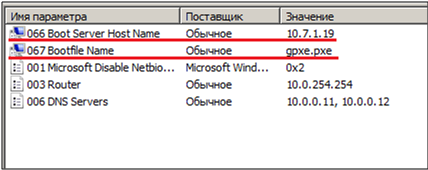
Next you need to add our client CCBoot to the reservation on our DHCP server. We open the DHCP snap-in, create a reservation to the address 10.7.1.51, and in the right-hand part of the snap-in window we indicate points 066 and 067 according to the figure below, where 10.7.1.19 is the address of our CCBoot server.
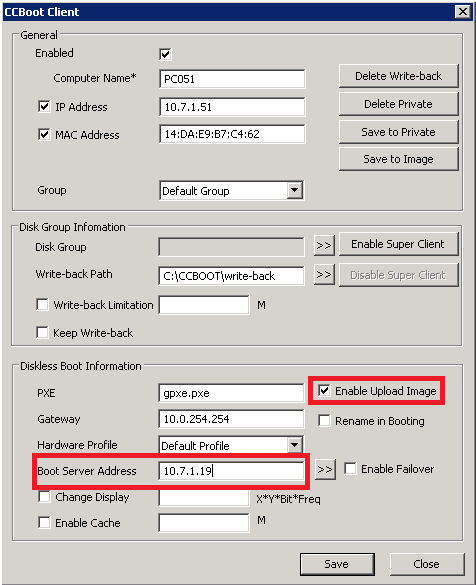
On the CCBoot server, we select the desired client (IP: 10.7.1.51), from which we want to log in to our domain, go to its properties, tick the “Enable Upload Image” box. Make sure that the address of the CCBoot server is correct: 10.7.1.19.
We set up our reference machine, install drivers and necessary software.
Do not forget to optimize both the client and the server for the purpose of faster operation of this solution, using the recommendations offered by Youngzsoft.
Install the latest version of the CCBoot client with support for Active Directory, click "Install Client".

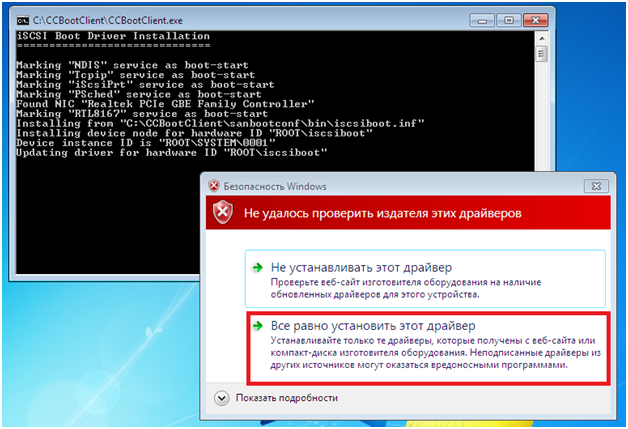
We agree to the installation of drivers for an unverified publisher.
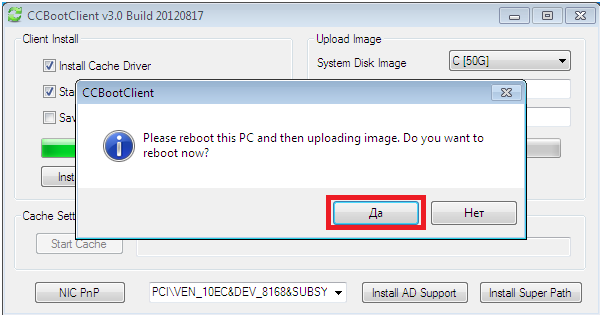
After installing the client restart the computer.
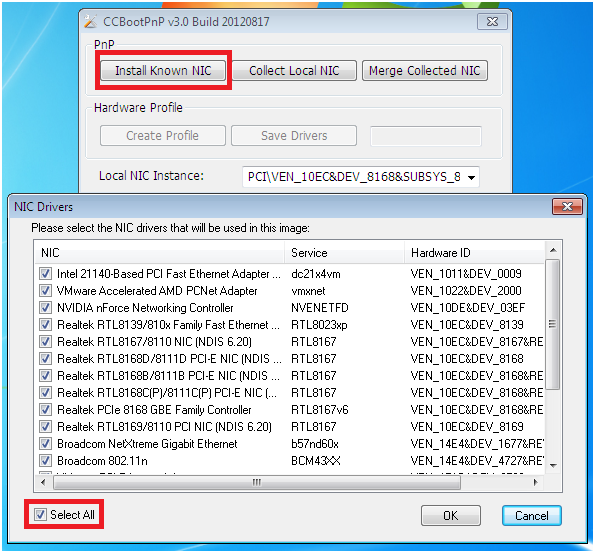
After loading the operating system, run CCBootPNP.exe, which is located in the folder with the installed client. Click "Install Known NIC", set the checkbox "Select All", then restart the computer.
We launch CCBootClient, set the name of our image in the field “Image File Name”, in the field “Server IP Address” we indicate the address of our CCBoot server: 10.7.1.19. Click the “Upload Image” button and wait for the image upload to our server.
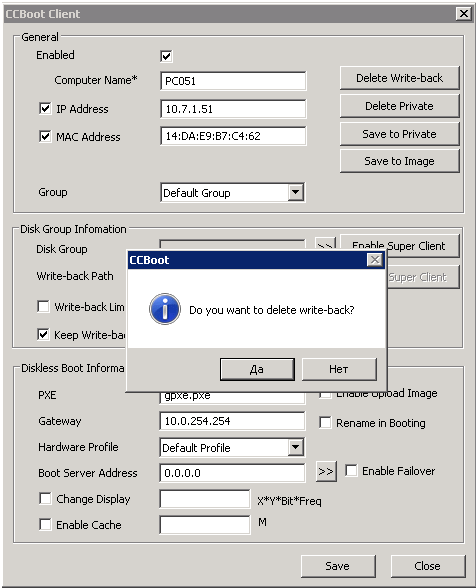
Next, go to the properties of the client machine on the CCBoot server and set a tick in front of “Keep Write-back”. In the pop-up window to the question “Do you want to write-back? »We answer in the affirmative.
Launch CCBootClient, click “Install AD” and wait for confirmation. Next, enter this machine in the domain. After confirming that the machine has been entered into the domain, turn it off.
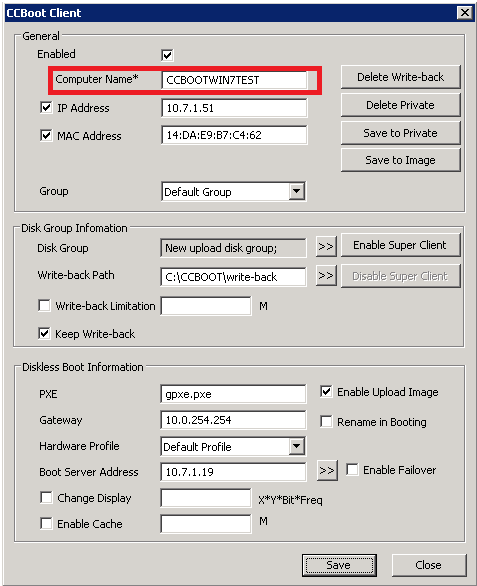
Go to the CCBoot server, in the installation folder, find the file "CCBootAD.exe" and run it. Click “Add” and add our computer. My test machine name is CCBOOTWIN7TEST.
After the manipulations with the CCBootAD.exe utility in the ADUC snap-in, we will see the CCBoot Domain User in the machine description.

In the properties of the machine on the CCBoot server, we change the name of the machine from PC051 to CCBOOTWIN7TEST.
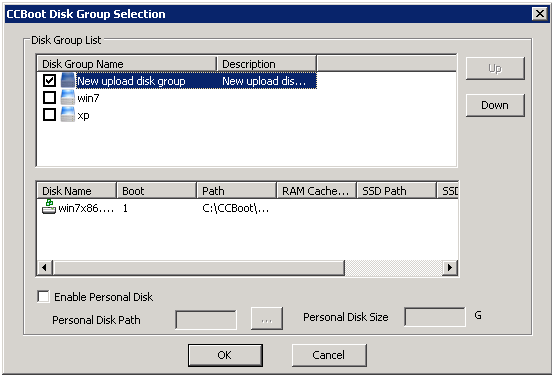
After downloading the image from the reference test machine to the CCBoot server, open Disk Manager on the server. It is seen that the new image appeared in the group New upload disk group.

Next, we need to specify that our machine will have to boot from the newly created image. Open the Client Manager and in the properties of the client machine, in the Disk Group field, specify the group we need - New upload disk group.

If we have several groups, when loading, the server will ask us which image to load from which group. Click the button “>>” and make sure that in our group one image is win7x86.vhd.
Next you need to specify the machine that it can join the domain.
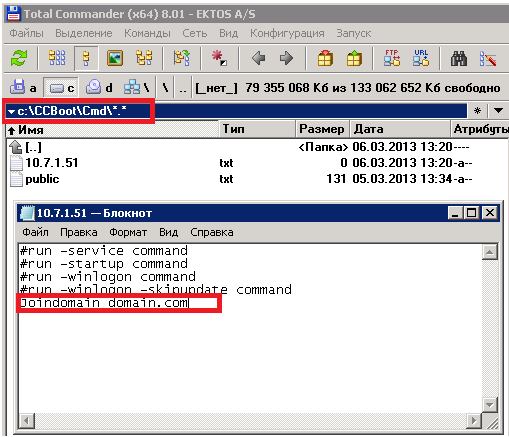
Starting from version 3, CCBoot allows us to run commands from batch files automatically when the client loads.
Go to the folder on the server where CCBoot is installed, then to the “Cmd” folder. Here we can create a batch file that clients will use when they download. If the file name is “public.txt”, all clients will use it. If the file name matches the client's IP address, this client will use the commands from this batch file. If both files are in the “Cmd” folder, the client will use the file with the name corresponding to its IP address.
Create a file 10.7.1.51.txt and add the line “Join domain.com”, where domain.com is our domain name.
Go to the properties of the server and make sure that a check is checked against “Run batch Command at Client”.

Now we disconnect the hard drive from the test computer, in the BIOS we set the network boot. The CCBoot server sees our machine, Windows 7 starts booting. You will be prompted to either load the recovery console or select the normal Windows boot. We select the normal download, wait for the login window to appear, log in as a domain user and make sure that the domain is visible and the available network resources. Shut down the system.
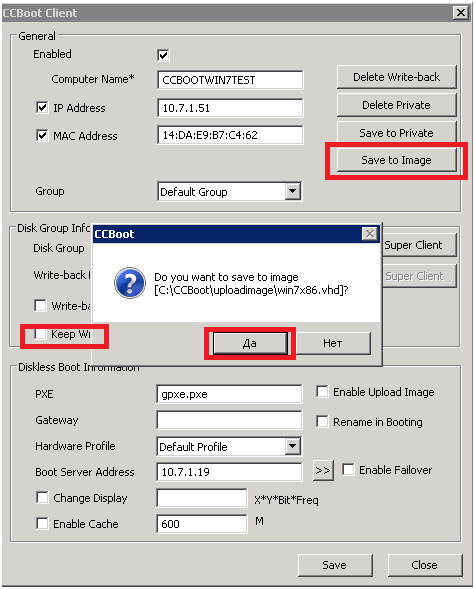
Go to the client properties on the CCBoot server, click the “Save to Image” button, confirm, uncheck “Keep Write-back”, save the changes.
Now every time the operating system boots, the client gets a reference image with customized software, which we can change at any time. Personal data can be stored through roaming profiles by configuring group policies accordingly. The loading speed of the operating system over the network is comparable to the speed of loading the system from the hard disk. However, you can significantly increase the speed of network boot, if you store images on SSD-hard drives using a gigabit network, etc.
This article will cover the CCBoot technology from Youngzsoft, which allows diskless booting of the operating system from a remotely located machine and working in Active Directory.
Prehistory
Hello, I am a system administrator, and I am lazy. I am tired of suffering, adjusting the work of the operating system every time when a user accidentally deletes any system file or crashes program settings. Therefore, I wondered if it was possible to load the operating system every time from the reference image, and so that the user's profile and documents were stored on the network, and all changes in the operating system itself were respectively lost after each reboot. This would be the perfect solution for an internet cafe or gaming club.
A little googling, I found a solution that would suit me one hundred percent.
')
Youngzsoft has developed a CCBoot product that allows diskless booting of operating systems with iSCSI. The diskless computer is connected to the hard disk through a network and loads the operating system from a remotely located machine. CCBoot uses the fast-paced iSCSI protocol with gPXE diskless boot technology.
Not trivial is the task of setting up a CCBoot solution for diskless clients and their work in Active Directory.
What is necessary?
To work, we need a raised and configured domain controller, as well as a server with CCBoot, a client reference machine and diskless machines with PXE support that will perform diskless booting over the network.
If you install the CCBoot server on a domain controller, then in the CCBoot server, click “Options” -> "DHCP Settings" and make sure that the address of the CCBoot server matches the address of the DNS server.
In my test environment, the CCBoot server was raised on a virtual machine running Windows Server 2008 Ent R2 SP1 (IP: 10.7.1.19) on a Hyper-V server. A domain controller is a physical server running Windows Server 2003 Ent R2 SP2 (IP: 10.0.0.11), where DHCP and DNS services were taken up. Accordingly, my DHCP Settings settings are as follows:
Next you need to add our client CCBoot to the reservation on our DHCP server. We open the DHCP snap-in, create a reservation to the address 10.7.1.51, and in the right-hand part of the snap-in window we indicate points 066 and 067 according to the figure below, where 10.7.1.19 is the address of our CCBoot server.
On the CCBoot server, we select the desired client (IP: 10.7.1.51), from which we want to log in to our domain, go to its properties, tick the “Enable Upload Image” box. Make sure that the address of the CCBoot server is correct: 10.7.1.19.
We set up our reference machine, install drivers and necessary software.
Do not forget to optimize both the client and the server for the purpose of faster operation of this solution, using the recommendations offered by Youngzsoft.
Install the latest version of the CCBoot client with support for Active Directory, click "Install Client".
We agree to the installation of drivers for an unverified publisher.
After installing the client restart the computer.
After loading the operating system, run CCBootPNP.exe, which is located in the folder with the installed client. Click "Install Known NIC", set the checkbox "Select All", then restart the computer.
We launch CCBootClient, set the name of our image in the field “Image File Name”, in the field “Server IP Address” we indicate the address of our CCBoot server: 10.7.1.19. Click the “Upload Image” button and wait for the image upload to our server.
Next, go to the properties of the client machine on the CCBoot server and set a tick in front of “Keep Write-back”. In the pop-up window to the question “Do you want to write-back? »We answer in the affirmative.
Launch CCBootClient, click “Install AD” and wait for confirmation. Next, enter this machine in the domain. After confirming that the machine has been entered into the domain, turn it off.
Go to the CCBoot server, in the installation folder, find the file "CCBootAD.exe" and run it. Click “Add” and add our computer. My test machine name is CCBOOTWIN7TEST.
After the manipulations with the CCBootAD.exe utility in the ADUC snap-in, we will see the CCBoot Domain User in the machine description.
In the properties of the machine on the CCBoot server, we change the name of the machine from PC051 to CCBOOTWIN7TEST.
After downloading the image from the reference test machine to the CCBoot server, open Disk Manager on the server. It is seen that the new image appeared in the group New upload disk group.
Next, we need to specify that our machine will have to boot from the newly created image. Open the Client Manager and in the properties of the client machine, in the Disk Group field, specify the group we need - New upload disk group.
If we have several groups, when loading, the server will ask us which image to load from which group. Click the button “>>” and make sure that in our group one image is win7x86.vhd.
Next you need to specify the machine that it can join the domain.
Starting from version 3, CCBoot allows us to run commands from batch files automatically when the client loads.
Go to the folder on the server where CCBoot is installed, then to the “Cmd” folder. Here we can create a batch file that clients will use when they download. If the file name is “public.txt”, all clients will use it. If the file name matches the client's IP address, this client will use the commands from this batch file. If both files are in the “Cmd” folder, the client will use the file with the name corresponding to its IP address.
Create a file 10.7.1.51.txt and add the line “Join domain.com”, where domain.com is our domain name.
Go to the properties of the server and make sure that a check is checked against “Run batch Command at Client”.
Now we disconnect the hard drive from the test computer, in the BIOS we set the network boot. The CCBoot server sees our machine, Windows 7 starts booting. You will be prompted to either load the recovery console or select the normal Windows boot. We select the normal download, wait for the login window to appear, log in as a domain user and make sure that the domain is visible and the available network resources. Shut down the system.
Go to the client properties on the CCBoot server, click the “Save to Image” button, confirm, uncheck “Keep Write-back”, save the changes.
Result
Now every time the operating system boots, the client gets a reference image with customized software, which we can change at any time. Personal data can be stored through roaming profiles by configuring group policies accordingly. The loading speed of the operating system over the network is comparable to the speed of loading the system from the hard disk. However, you can significantly increase the speed of network boot, if you store images on SSD-hard drives using a gigabit network, etc.
Source: https://habr.com/ru/post/172481/
All Articles