Bar of Desires by March 8 in Python and Pyramid
How to congratulate the girls at work with a wonderful holiday of spring? This year I wanted to do something unusual, something to surprise them in addition to traditional gifts and flowers. This is how the Desire Bar web application, created in one day using Python and Pyramid, appeared .
Maybe after reading the article, someone decides to re-use the “Wish Bar” for congratulations. Maybe someone will discover Pyramid - a web framework, perfect for quickly creating small web projects. Finally, you can simply pick up the source code of the application from GitHub for your own use.
')
The article shows the process of developing a small web application, starting with the formulation of the problem and design and ending with the deployment of the application on the server. In the course of the article, comments are given on the implementation, which explain with examples some principles of web applications in general and Pyramid in particular. Thus, the article can also be viewed as a guide for Pyramid for beginners on the example of a real problem.
On March 1, a week before International Women's Day, the male part of our team gathered in a meeting room to solve a difficult problem - how to congratulate our girls on the wonderful holiday of spring. During the discussion, a simple and at the same time extremely difficult idea to realize was born - to fulfill all their wishes on this holiday. And if not all (and we sensibly assessed our strength), then at least some, the simplest. This is how the concept of the “bar of desires” appeared.
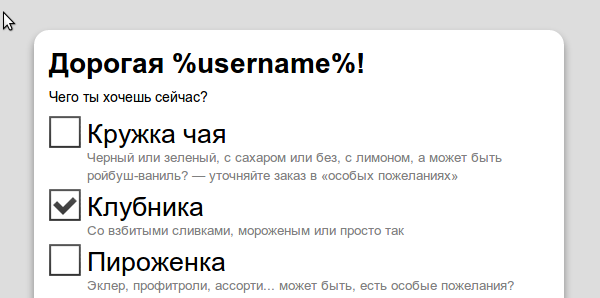
“Bar of Desires” is a virtual bar in which a girl can choose everything she likes, specify special wishes and place an order. This order must be processed by the responsible officer and arrange for the delivery of the chosen “wishes” to the girl. The menu of the bar includes such "desires" as "A slice of cake" or "Strawberry with ice cream" - desserts, fruits, drinks. The menu should be made with humor. Orders must be processed promptly - you can not make the girl wait.
First of all - specification and design. Define usage scenarios.
In order for the waiter to know who to carry the completed order, it is necessary to distinguish the users of the web application. Enough to know the name of the girl. So ask her to specify the name before placing the order. We do not need authorization: a) we are in the local network, there are no villains; b) hardly girls want to fill in authorization forms on such a day. Knowing the name, you can refer to it in the application by name, it adds a sense of individual approach. For greater certainty when placing an order, you can remember the IP-address.
Notify the waiters by means of Google Talk - the jabber server on the local network did not catch on, many have google accounts, IM is faster than email. Finally, we have experience with Google Talk in Python via xmpppy - a script works on the server in the office, which periodically selects the person responsible for watering the flowers and sends him a reminder message.
Start by creating a project directory. We name the project wishbar (hereinafter, all the paths to the files are given relative to the project directory). Create a web application module (
Check the availability of the application through the browser at http: // localhost: 8080 / . The server is available, but returns only 404 Not found.
In the web application, we need styles, scripts and images. Create directories js, css, img and add view-functions (views, views; eng. Views) to handle statics.
Now requests to URLs like
Let's do HTML. Let's start with "hello world". Add a route to the web application configuration.
Create the
and the primitive
We register this handler in the web application. You can use the imperative approach, but it's easier to ask the web application in
We need three pages — a name entry page, a menu page, and an order confirmation page. All three pages should have a single design. Therefore, it is desirable to use templates. In particular, to have one basic HTML page template, into the body of which the corresponding content will be inserted already for each specific screen. In the delivery of Pyramid is the Chameleon template engine, we will choose it. Create a base template
It remains to register all event handlers from
In
Now in the
The web application framework is ready, you can do the applied logic. In the view-function of the main page, you need to check whether we know the user name, or is this a new client. Suppose that when a girl specifies a name, the web application sends her a cookie with the entered name. Accordingly, in the handler of the main page we can check whether there is a cookie in the request. If there is - we know the name and we can display a list of desires. If not, we display the girl a page with a name entry form.
A little work on the layout and styles. To help take awesome-buttons .

Since awesome buttons are not buttons, but links, we add some jQuery to submit the form when a button is clicked. These forms will be sent to the URL
Now we already have a cookie with the girl’s name. When processing a request for the
In the template, we will generate a table with rows for each of the desires in the list.
We look what happened.

At the bottom of the page we will add a field for entering “special wishes” and a button for sending the form to the server to the root URL in the form of a POST request. In the corresponding view-function, we add a check of the request type. In the case of POST, we will receive the form data, create an order object and redirect the user to
Add the appropriate route and the
On the confirmation page, we show the user the contents of the order and offer to “wish” something else.

The
Now you can do order processing.
It was assumed that there will be several "managers" who need to be notified of incoming orders. Managers must agree on who will accept the order and organize its execution. For the notification, it was decided to use Google Talk. It is convenient to work with xmpppy with XMPP from Python.
That's all. As soon as an order arrives,
It was originally planned to notify several "managers." Moreover, the "manager" could respond to the address of the "bar of desires" - then all the rest would receive a confirmation of their taking the order for processing. To do this, even the corresponding gtalk bot was written, the code of which can be found further in the file
But during the run it turned out that from a certain moment the messages cease to reach the managers. As a result of a series of experiments, it was found out that Google Talk has built-in protection against a large flow of events - when sending more than 10 events in approximately 100 seconds, Google Talk blocks sending events from the client for a couple of minutes. What I have found only a brief mention on StackOverflow without specific numbers.
Therefore, it was decided to abandon the idea of using the bot. Since there was little time left, we created a room at partych.at , added all the waiters and a wish bar account to it. In the
After the web application was ready, the question arose of how it could be deployed to a server on a local network running Ubuntu. I entered the search query “Pyramid setup.py” into the search and found a document that I should have read at the very beginning. The document describes the standard way to create Pyramid projects.
The
The key difference of the Pyramid project is the placement of the web application files in a separate
After the final result was posted on GitHub , it was easy to deploy the project to a server on the local network:
The girls were very pleased. In some cases, even a wow effect has been achieved.
The Wish Fulfillment Bar was successfully launched on March 7th and tested under the strictest secrecy. On the morning of the holiday, the managers and waiters were at their combat posts and chatted in their minds at ease. The first order arrived at about 9 am with the words "I am in shock" in the "special requests" section. The application worked successfully until the end of the holiday. The only thing that we did not take into account in our “ideal” scheme is that the gateway will lie in the building and all the offices will remain without the Internet. Accordingly, notifications about orders ceased to be transmitted to the chat, and the chat itself became inaccessible to the waiters. Fortunately, the Internet was disconnected ten minutes before the holiday banquet, and no one was hurt.
The application is developed and tested under Python 2.7. But I think that under Python 3 everything will work without significant changes. Many important tasks for this web application were not solved due to the lack of necessity and time constraints - no logging, localization, error handling, etc. The following were used for development: Python 2.7.2 , Pyramid 1.4 , xmpppy 0.5.0rc1 , LESS 1.3. 0 , jQuery 1.9.1 . I am not a professional Python developer. Therefore, I would appreciate any constructive criticism and advice that will allow me to improve the article and my skills in this area.
The source code for the project is available on GitHub .
Maybe after reading the article, someone decides to re-use the “Wish Bar” for congratulations. Maybe someone will discover Pyramid - a web framework, perfect for quickly creating small web projects. Finally, you can simply pick up the source code of the application from GitHub for your own use.
')
The article shows the process of developing a small web application, starting with the formulation of the problem and design and ending with the deployment of the application on the server. In the course of the article, comments are given on the implementation, which explain with examples some principles of web applications in general and Pyramid in particular. Thus, the article can also be viewed as a guide for Pyramid for beginners on the example of a real problem.
Formulation of the problem
On March 1, a week before International Women's Day, the male part of our team gathered in a meeting room to solve a difficult problem - how to congratulate our girls on the wonderful holiday of spring. During the discussion, a simple and at the same time extremely difficult idea to realize was born - to fulfill all their wishes on this holiday. And if not all (and we sensibly assessed our strength), then at least some, the simplest. This is how the concept of the “bar of desires” appeared.
“Bar of Desires” is a virtual bar in which a girl can choose everything she likes, specify special wishes and place an order. This order must be processed by the responsible officer and arrange for the delivery of the chosen “wishes” to the girl. The menu of the bar includes such "desires" as "A slice of cake" or "Strawberry with ice cream" - desserts, fruits, drinks. The menu should be made with humor. Orders must be processed promptly - you can not make the girl wait.
First of all - specification and design. Define usage scenarios.
- Girl: open a web application, select “wishes” from the list, specify if necessary special requests in the form of text, place an order, admire which guys are great. If desired, repeat the procedure.
- The waiter (male employee): promptly receive an alert about the order made, prepare a set of “wishes” chosen by the girl, bring the “wishes” to the girl at the workplace.
In order for the waiter to know who to carry the completed order, it is necessary to distinguish the users of the web application. Enough to know the name of the girl. So ask her to specify the name before placing the order. We do not need authorization: a) we are in the local network, there are no villains; b) hardly girls want to fill in authorization forms on such a day. Knowing the name, you can refer to it in the application by name, it adds a sense of individual approach. For greater certainty when placing an order, you can remember the IP-address.
Notify the waiters by means of Google Talk - the jabber server on the local network did not catch on, many have google accounts, IM is faster than email. Finally, we have experience with Google Talk in Python via xmpppy - a script works on the server in the office, which periodically selects the person responsible for watering the flowers and sends him a reminder message.
Web application
The following description assumes that you are familiar with Python and understand the basic principles of building web applications.
Start by creating a project directory. We name the project wishbar (hereinafter, all the paths to the files are given relative to the project directory). Create a web application module (
server.py file): from wsgiref.simple_server import make_server from pyramid.config import Configurator def create_app(): config = Configurator() app = config.make_wsgi_app() return app if __name__ == '__main__': app = create_app() server = make_server('0.0.0.0', 8080, app) server.serve_forever() For launching web applications, a simple minimalistic HTTP server with WSGI support is used - the wsgiref.simple_server module from the standard Python library. It is quite enough for our web application, both for development and use in a local network. At least for now. At the end of the article it will be shown how to prepare the Pyramid application for deployment on the server - in combat we will use another server.
Check the availability of the application through the browser at http: // localhost: 8080 / . The server is available, but returns only 404 Not found.
In the web application, we need styles, scripts and images. Create directories js, css, img and add view-functions (views, views; eng. Views) to handle statics.
def create_app(): config = Configurator() path = os.path.abspath(__file__) root = path[:path.rindex("/")] config.add_static_view("css", "{0}/css".format(root)) config.add_static_view("js", "{0}/js".format(root)) config.add_static_view("img", "{0}/img".format(root)) app = config.make_wsgi_app() return app Now requests to URLs like
/css/* , /js/* , /img/* will return files from the corresponding directories.To each request coming to the server, Pyramid must associate a view-function that will process it. If the function cannot be found, the client will return a response with an error status. Pyramid has several ways to register view functions. To register static handlers, we use the imperative approach - when we call add_static_view , an object of the pyramid.static.static_view class is created and registered, which will process requests to URLs starting with the prefix passed in the first parameter.
Let's do HTML. Let's start with "hello world". Add a route to the web application configuration.
config = Configurator() config.add_route("index_route","/") The route is determined by the URL pattern (second parameter). The first parameter is the name of the route. If the requested URL falls under the route pattern, the view request processing function associated with the route is called.
Mapping by route is one way to bind view functions to queries. There is also a traversal - a search engine for view functions based on a resource tree. In this web application, only the first approach is used. You can read more about traversal in the documentation .
Create the
views.py view functions views.py , add the index_route route handler code to it: @view_config(route_name="index_route") def index(request): return render_to_response('pt/index.pt', { 'name' : 'world' }, request) and the primitive
pt/index.html template in the pt folder: <!doctype html> <html xmlns="http://www.w3.org/1999/xhtml" xmlns:tal="http://xml.zope.org/namespaces/tal" xmlns:metal="http://xml.zope.org/namespaces/metal"> <head> <meta http-equiv="Content-Type" content="text/html; charset=utf-8" /> <title>wishbar</title> </head> <body> Hello, ${name}! </body> </html> render_to_responsegenerates an HTML page for the requestrequestfor thept/index.pttemplate specified in the first parameter, substituting data from the dictionary in the second parameter.
We register this handler in the web application. You can use the imperative approach, but it's easier to ask the web application in
create_app “scan” views.py and register all the handlers described in it. config = Configurator() config.add_route("index_route","/") config.scan("views") We need three pages — a name entry page, a menu page, and an order confirmation page. All three pages should have a single design. Therefore, it is desirable to use templates. In particular, to have one basic HTML page template, into the body of which the corresponding content will be inserted already for each specific screen. In the delivery of Pyramid is the Chameleon template engine, we will choose it. Create a base template
pt/base.pt and a template for each of their three pages - pt/login.pt , pt/index.pt (change the “hello world”), pt/confirm.pt . To use the base.pt template as a base template, create a file subscribers.py next to the server.py file with the following contents: from pyramid.renderers import get_renderer from pyramid.events import BeforeRender, subscriber @subscriber(BeforeRender) def add_base_template(event): base = get_renderer('pt/base.pt').implementation() event.update({'base': base}) It remains to register all event handlers from
subscribers.py in the web application in the create_app function. config = Configurator() config.add_route("index_route","/") config.scan("subscribers") @subscriber defines theadd_base_templatefunction as a handler for internal Pyramid events of typeBeforeRender. The BeforeRender event handler is called immediately before the template is rendered. In the handler, we can change the set of renderer globals — the named values available in the templates. In particular, we add the renderer of the base templatebase.ptto this set under the namebase.
In
pt/base.pt declare the necessary expansion slots: <div id="content"> <tal:block metal:define-slot="content"> </tal:block> </div> Now in the
login.pt , index.pt and confirm.pt you can “inherit” from the base template: <html xmlns="http://www.w3.org/1999/xhtml" xmlns:tal="http://xml.zope.org/namespaces/tal" xmlns:metal="http://xml.zope.org/namespaces/metal" metal:use-macro="base"> <tal:block metal:fill-slot="content"> Hello, ${name}! </tal:block> </html> The web application framework is ready, you can do the applied logic. In the view-function of the main page, you need to check whether we know the user name, or is this a new client. Suppose that when a girl specifies a name, the web application sends her a cookie with the entered name. Accordingly, in the handler of the main page we can check whether there is a cookie in the request. If there is - we know the name and we can display a list of desires. If not, we display the girl a page with a name entry form.
if 'username' in request.cookies: pass else: return render_to_response('pt/login.pt', {}, request) A little work on the layout and styles. To help take awesome-buttons .
Since awesome buttons are not buttons, but links, we add some jQuery to submit the form when a button is clicked. These forms will be sent to the URL
/login/ in the form of a POST request. Add a route and a handler. In the handler, save the girl's name in the form of a cookie with the username key and send 302 Found to the root of the web application. config.add_route("index_route","/") @view_config(route_name="login_route") def login(request): username = request.params['username'] response = Response() response.set_cookie('username', value=username, max_age=86400) return HTTPFound(location = "/", headers=response.headers) As in any web application, redirection is necessary so that when the page is refreshed, the browser does not offer to re-send a POST request with the form data. This happens if you return the HTML page in response to a POST request.
Now we already have a cookie with the girl’s name. When processing a request for the
index_route route, index_route can display a list of "desires". Encode the wish list in the form of a list in Python and transfer it to the template along with the girl's name. if 'username' in request.cookies: username = request.cookies['username'] response = render_to_response("pt/index.pt", { "username" : username, "wishbar" : WISHBAR }, request) return response In the template, we will generate a table with rows for each of the desires in the list.
<div class="table"> <tal:block repeat="wish wishbar"> <label for="${wish.name}"> <div><input id="${wish.name}" name="wish-${wish.name}" type="checkbox"></input><div class="checkbox"></div></div> <div> <div class="title">${wish.title}</div> <div class="description">${wish.description}</div> </div> </label> </tal:block> </div> We look what happened.
For styling flags, a method was used with input substitution to div and their binding through JavaScript. It would be correct to add preloading images when loading the page in accordance with the recommendations of the author of the article, but I did not. Since the application was deployed on the local network, the girls did not even notice a delay in downloading images.
At the bottom of the page we will add a field for entering “special wishes” and a button for sending the form to the server to the root URL in the form of a POST request. In the corresponding view-function, we add a check of the request type. In the case of POST, we will receive the form data, create an order object and redirect the user to
/confirm/id- . if request.method == "POST": username = request.cookies['username'] wishlist = [] for key,value in request.POST.items(): if key.startswith("wish-"): wishlist.append(NAME2WISH[key[5:]]) special = request.params["special"] bequick = request.params["bequick"] order = Order(username,request.remote_addr,wishlist,special,bequick) ORDERS[order.id] = order return HTTPFound(location = "/confirm/{}".format(order.id)) Add the appropriate route and the
/confirm/* handler. config.add_route("confirm_route","/confirm/{order}") @view_config(route_name="confirm_route") def confirm(request): order_id = request.matchdict['order'] if order_id in ORDERS.iterkeys(): order = ORDERS.pop(order_id) notify(order) return render_to_response('pt/confirm.pt', { "order" : order }, request) else: return HTTPFound(location = "/") On the confirmation page, we show the user the contents of the order and offer to “wish” something else.
The
notify function notify intended to notify the waiters about the order. About her a little later. For now, let's finish with the web application. It remains a bit: it is necessary to allow the user to "log out" and "log in" under a different name. To do this, on the wish selection page there is a link to the URL /logout/ . Register the corresponding view logout function. It is enough to clear the cookie with the username and redirect it to the main one. config.add_route("logout_route","/logout/") @view_config(route_name="logout_route") def logout(request): response = Response() response.set_cookie('username', value=None) return HTTPFound(location = "/", headers=response.headers) Now you can do order processing.
Order processing
It was assumed that there will be several "managers" who need to be notified of incoming orders. Managers must agree on who will accept the order and organize its execution. For the notification, it was decided to use Google Talk. It is convenient to work with xmpppy with XMPP from Python.
notify the notify.py implementation in notify.py . USERNAME = 'username' # @gmail.com PASSWORD = 'password' class User(): def __init__(self,uri,name): self.uri = uri self.name= name USERS = { "user@gmail.com" : User("user@gmail.com",u" ") } def notify(order): cnx = xmpp.Client('gmail.com') cnx.connect( server=('talk.google.com',5223) ) cnx.auth(USERNAME,PASSWORD,'botty') message = order.username + " (" + order.remote_addr + "): " if order.donothing: message += u" " else: message += order.wishstr if order.bequick: message += u", -" for user in USERS.itervalues(): cnx.send(xmpp.Message(user.uri, message, typ='chat')) That's all. As soon as an order arrives,
notify sends a message with order information to all users in the USERS list.It was originally planned to notify several "managers." Moreover, the "manager" could respond to the address of the "bar of desires" - then all the rest would receive a confirmation of their taking the order for processing. To do this, even the corresponding gtalk bot was written, the code of which can be found further in the file
notify.py . The bot was launched when the application started in a separate thread, processed incoming messages and sent them to the USERS list.But during the run it turned out that from a certain moment the messages cease to reach the managers. As a result of a series of experiments, it was found out that Google Talk has built-in protection against a large flow of events - when sending more than 10 events in approximately 100 seconds, Google Talk blocks sending events from the client for a couple of minutes. What I have found only a brief mention on StackOverflow without specific numbers.
Therefore, it was decided to abandon the idea of using the bot. Since there was little time left, we created a room at partych.at , added all the waiters and a wish bar account to it. In the
USERS list there is only a room account. Now, when someone left the order, the message was sent to the room where everyone saw it and could immediately agree on processing.Deployment
After the web application was ready, the question arose of how it could be deployed to a server on a local network running Ubuntu. I entered the search query “Pyramid setup.py” into the search and found a document that I should have read at the very beginning. The document describes the standard way to create Pyramid projects.
I intend to bring this information to the end of the article. Firstly, in order to start directly with the task and the code and not to confuse the reader. Second, bring your project to standard Pyramid easily and quickly. What I did.
The
pcreate utility automatically generates a typical project structure and creates a setup.py for a new web application, in which all dependencies are already written. You must go to the level above our project and run in the console pcreate -s starter wishbar .pcreate offers other scaffolds for web applications. For example, alchemy - creates a web application using sqlalchemy .The key difference of the Pyramid project is the placement of the web application files in a separate
wishbar package. Which is correct, the modules should be in packages. In my case, the files were in the root of the project. The transfer was not difficult - the extra generated code was removed, the missing import directives were added for dependencies between modules, the create_app call from server.py to __init__.py .After the final result was posted on GitHub , it was easy to deploy the project to a server on the local network:
cd ~ mkdir wishbar cd wishbar git init git remote add origin "https://github.com/rgmih/wishbar.git" git pull origin master sudo python ./setup.py develop pserve production.ini With this deployment method, the web application runs under the Waitress WSGI server on port 7777.
Conclusion
The girls were very pleased. In some cases, even a wow effect has been achieved.
The Wish Fulfillment Bar was successfully launched on March 7th and tested under the strictest secrecy. On the morning of the holiday, the managers and waiters were at their combat posts and chatted in their minds at ease. The first order arrived at about 9 am with the words "I am in shock" in the "special requests" section. The application worked successfully until the end of the holiday. The only thing that we did not take into account in our “ideal” scheme is that the gateway will lie in the building and all the offices will remain without the Internet. Accordingly, notifications about orders ceased to be transmitted to the chat, and the chat itself became inaccessible to the waiters. Fortunately, the Internet was disconnected ten minutes before the holiday banquet, and no one was hurt.
The application is developed and tested under Python 2.7. But I think that under Python 3 everything will work without significant changes. Many important tasks for this web application were not solved due to the lack of necessity and time constraints - no logging, localization, error handling, etc. The following were used for development: Python 2.7.2 , Pyramid 1.4 , xmpppy 0.5.0rc1 , LESS 1.3. 0 , jQuery 1.9.1 . I am not a professional Python developer. Therefore, I would appreciate any constructive criticism and advice that will allow me to improve the article and my skills in this area.
The source code for the project is available on GitHub .
Source: https://habr.com/ru/post/172243/
All Articles