Samba authentication in a Windows domain
We continue a series of articles about the interaction of Linux and Windows.
Now we will consider the task of introducing a server running CentOS Linux (version 6.3) into the Windows 2008R2 domain. As in the last articles, we will use the standard tools supplied as part of the distribution kit of the operating system. But, unlike our previous articles, we will expand the task. It is required to organize not only file storage on a server running CentOS Linux, but also to provide access for domain users to the command and graphical shell.
On the CentOS project site, you can find information on configuring Samba , but this information mainly concerns older versions (CentOS 5) and covers a small number of configuration examples.
There are other materials on configuring Samba for the CentOS distribution. In the process of writing an article and testing a very handy selection of articles published on the site . The following articles turned out to be especially useful (despite the fact that they were published in March – April 2007):
To organize the test network, we will use the VMware VSphere 5 virtual environment, which is based on the ESXi hypervisor architecture. This environment is actively used in the information network of MEI for hosting servers and research. However, one could use the well-proven Microsoft Hyper-V, as well as any other similar solution, including on the basis of free software, such as the Xen hypervisor or KVM .
The test environment is an Active Directory-based domain network (Active Directory Domain Services - AD DS), which consists of two infrastructure servers running MS Windows Server2008 R2 EE and one client machine — MS Windows 7 Professional. IP addresses from subnet 192.168.7.0/24 are used.
On the domain controller LAB-DC1 roles are installed:
Test network and interaction protocol descriptions are described in the article .
We install the minimum required set of packages: the Gnome desktop (or another window manager of choice), the base server, and Samba . We will need:
First you need to configure the DNS service. This is very important because the reliable operation of our network and Samba services depends on the correct resolution of names on the network. Our domain controller is also a DNS server. Therefore, in the Administrative Tools section, select the DNS management program and manually enter the name and address of the new server. In fig. 1 already presented the result.
')

Fig. 1. Set the name and address in DNS.
Our DNS server is integrated with Active Directory. You can verify the correctness of the forward and reverse name resolution using the nslookup or host utility. Let's clarify: this must be done, even though the necessary record has already appeared on the DNS server. It is necessary to do this because such a test is an extra test of the network operability and correctness of settings. Verification using the host utility looks like this:
host 192.168.7.10 - determining the name of the address, and
host test-centos.lab.local - address definition by name.
As a result, we must get the correct name resolution in both cases.
Now this IP address (192.168.7.10) needs to be assigned to the network adapter of the newly installed CentOS Linux server. Use the System menu item on the desktop and select the Network Connections item (Fig. 2).
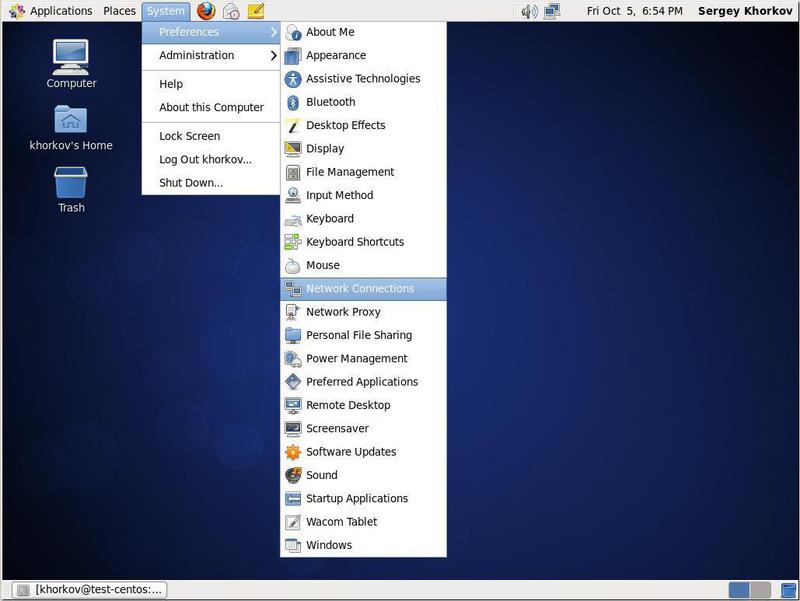
Fig. 2. Set up a network connection.
In the settings window that appears, set the desired IP address. As a result, we should get the following - see fig. 3
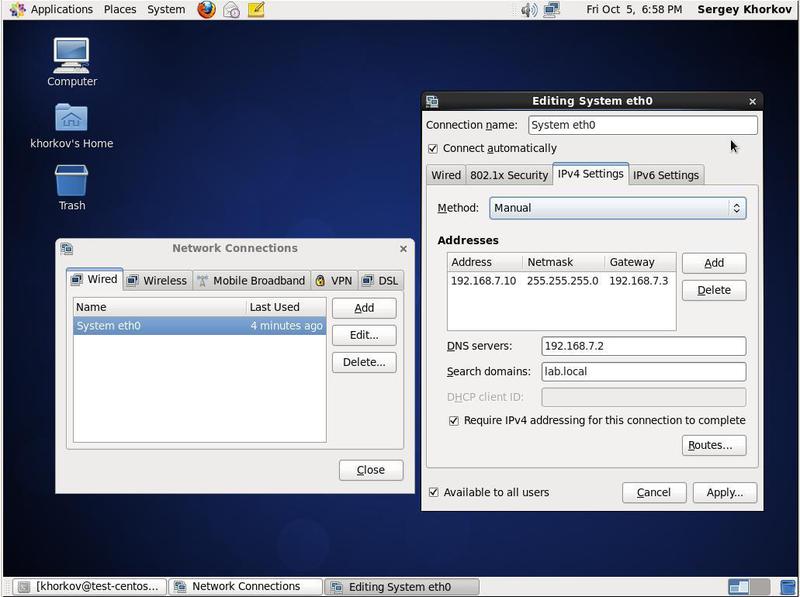
Fig. 3. Setting up a network connection. Set the IP address.
Our server is configured using the Network Manager. Therefore, it is necessary to note several options:
You can configure the network connection manually by editing the

Fig. 4. Configure the network connection. Settings file.
The NM_CONTROLLED keyword enables or disables managing a connection using Network Manager.
With any configuration method, you should set the DNS server IP address. This is our domain controller with an IP address of 192.168.7.2.
To apply the network adapter settings, run the restart command:
As mentioned in previous articles, the correct time setting is very important for the operation of Active Directory. You can adjust the time using the standard means of the system (see Fig. 5).

Fig. 5. Setting the time.
But in order to completely avoid problems with desynchronization of clocks, you should configure the time service ( ntpd daemon) to synchronize time with the domain controller (see Figure 6).

Fig. 6. Setting up a time service.
To do this, edit the file
Having made the specified settings, you should check their correctness. It is necessary to test the connection to the domain controller, the time setting, the correctness of the direct and reverse name resolution (see Figure 7).
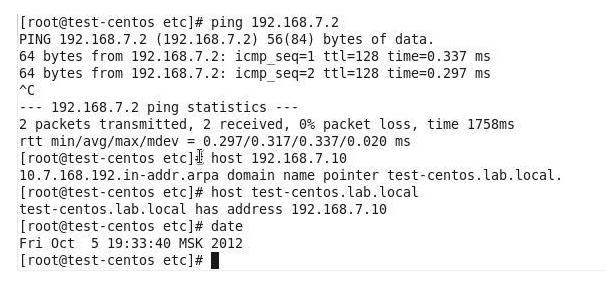
Fig. 7. Check settings.
Now it is time to configure the membership of our server in the Windows domain. Unlike the previous examples, we will not configure LDAP and Kerberos separately. We will try to configure everything at once using the authconfig command line utility supplied as part of the CentOS distribution.
Authconfig allows you to configure all required services at once. In this case, you can configure not only the authorization in the Windows 2008 domain, but also the use of LDAP, NIS and other authentication methods.
More information about the authconfig utility can be obtained from the built-in manual ( man authconfig , online version ), or from the built-in manual by typing authconfig -help in the command line. It will be enough to say that authconfig has about 50 customization options - can you imagine its capabilities and, at the same time, the complexity of customization? It is easier to use the graphical interface to authconfig - the system-config-authentication utility (Fig. 8). This utility can be called from the system administration interface, or from the command line. Moreover, the second option seems to be preferable, since the display of diagnostic messages will occur in the terminal window, which will simplify troubleshooting.

Fig. 8. Call system-config-authentication .
In the User Account Database menu, you can select the location for storing user lists and passwords. The options are:
IPAv2 allows you to authorize users, workstations, groups and enforce network access control policies. IPAv2 is positioned as a solution replacing NSSWITCH and PAM. More information is available at http://www.freeipa.org/page/Main_Page .
Since our task is to authorize in the Windows domain, we select Winbind as the User Account Database (Fig. 9).

Fig. 9. Select User Account Database.
You must specify the basic parameters for authconfig . The Windows Domain is the short name of the Windows 2008R2 domain, which is used in the workgroup parameter of the Samba configuration file (/etc/samba/smb.conf). We have already described the Samba configuration file in previous articles .
The security model is set to ads, which corresponds to the value of the security parameter in the Samba configuration file (
The Winbind ADS Realm parameter is similar to the REALM parameter in the Samba configuration file and is related to the Kerberos security settings. The similar REALM parameter is specified in the
The Winbind Domain Controllers field can be left blank - the domain controller name will be determined from DNS. This field should be populated if, for some reason, DNS cannot determine the name and IP address of the domain controller.
Very interesting is the Template Shell parameter, which indicates which command shell will be used when registering a domain user on our CentOS Linux server. Possible shell values are listed in the
The Allow Offline Login option allows our CentOS Linux server to cache passwords and, accordingly, to authorize users if a domain controller is unavailable.
Let's go to the Advanced Options tab, since there are some parameters that we are interested in (see Figure 10).

Fig. 10. Advanced Options system-config-authentication tab.
On this tab, we are interested in two parameters: Create home directories on the first login and Enable local access control.
Enable local access control allows us to specify the rules for registering users on our server. You can allow or deny certain users to register using terminals or remote desktops. This is very convenient if we want, for example, to prevent users from connecting via the console terminal. Registration rules and a brief description are contained in the
The parameter Create home directories on the first login allows you to remove from the administrator the obligation to create home directories for users. If you specify this parameter, the home directory is created automatically when the user first logs into the system. But you need to check the correctness of the presence of this option. On CentOS Linux, the pam_oddjob_mkhomedir.so module is responsible for this, which should be mentioned in the
Now we will consider the task of introducing a server running CentOS Linux (version 6.3) into the Windows 2008R2 domain. As in the last articles, we will use the standard tools supplied as part of the distribution kit of the operating system. But, unlike our previous articles, we will expand the task. It is required to organize not only file storage on a server running CentOS Linux, but also to provide access for domain users to the command and graphical shell.
On the CentOS project site, you can find information on configuring Samba , but this information mainly concerns older versions (CentOS 5) and covers a small number of configuration examples.
There are other materials on configuring Samba for the CentOS distribution. In the process of writing an article and testing a very handy selection of articles published on the site . The following articles turned out to be especially useful (despite the fact that they were published in March – April 2007):
- Active Directory Integration with Samba for RHEL / CentOS 5
- Troubleshooting Active Directory and Winbind
- Active Directory Single Sign On
To organize the test network, we will use the VMware VSphere 5 virtual environment, which is based on the ESXi hypervisor architecture. This environment is actively used in the information network of MEI for hosting servers and research. However, one could use the well-proven Microsoft Hyper-V, as well as any other similar solution, including on the basis of free software, such as the Xen hypervisor or KVM .
The test environment is an Active Directory-based domain network (Active Directory Domain Services - AD DS), which consists of two infrastructure servers running MS Windows Server2008 R2 EE and one client machine — MS Windows 7 Professional. IP addresses from subnet 192.168.7.0/24 are used.
- Domain Name - LAB.LOCAL
- ForefrontThreat Management Gateway (TMG) 2010 Server - LAB-TMG.lab.local
- Client - LAB-CL1.lab.local
On the domain controller LAB-DC1 roles are installed:
- Active Directory Certificate Services (AD CS);
- Active Directory Domain Services (Active Directory Domain Services - AD DS);
- DHCP server (Scope name: LAB.LOCAL; Address pool: 192.168.7.20–192.168.7.70);
- DNS server (Type: AD-Integrated; Dynamic updates: Secure only);
- Web Services (IIS).
Test network and interaction protocol descriptions are described in the article .
1. Required packages
We install the minimum required set of packages: the Gnome desktop (or another window manager of choice), the base server, and Samba . We will need:
- the krb5-workstation package (version 1.9 or later) containing the necessary client applications for authentication based on Kerberos;
- the oddjobmkhomedir package (version no less than 0.30-5), designed to automatically create user directories when you first log into the system;
- The Samba package itself (version not lower than 3.5-10), containing the main programs and the samba-winbind package , which is responsible for connecting our server to the domain controller.
2. DNS Setup
First you need to configure the DNS service. This is very important because the reliable operation of our network and Samba services depends on the correct resolution of names on the network. Our domain controller is also a DNS server. Therefore, in the Administrative Tools section, select the DNS management program and manually enter the name and address of the new server. In fig. 1 already presented the result.
')
Fig. 1. Set the name and address in DNS.
Our DNS server is integrated with Active Directory. You can verify the correctness of the forward and reverse name resolution using the nslookup or host utility. Let's clarify: this must be done, even though the necessary record has already appeared on the DNS server. It is necessary to do this because such a test is an extra test of the network operability and correctness of settings. Verification using the host utility looks like this:
host 192.168.7.10 - determining the name of the address, and
host test-centos.lab.local - address definition by name.
As a result, we must get the correct name resolution in both cases.
3. Setting up the network adapter
Now this IP address (192.168.7.10) needs to be assigned to the network adapter of the newly installed CentOS Linux server. Use the System menu item on the desktop and select the Network Connections item (Fig. 2).
Fig. 2. Set up a network connection.
In the settings window that appears, set the desired IP address. As a result, we should get the following - see fig. 3
Fig. 3. Setting up a network connection. Set the IP address.
Our server is configured using the Network Manager. Therefore, it is necessary to note several options:
- Connect automatically, which allows you to automatically connect a network adapter.
- Available to all users, which allows all users to use this adapter.
You can configure the network connection manually by editing the
/etc/sysconfig/networking/devices/ifcfg-eth0, bringing it to the form shown in Figure. four.Fig. 4. Configure the network connection. Settings file.
The NM_CONTROLLED keyword enables or disables managing a connection using Network Manager.
With any configuration method, you should set the DNS server IP address. This is our domain controller with an IP address of 192.168.7.2.
To apply the network adapter settings, run the restart command:
/etc/init.d/network restart 4. Setting time
As mentioned in previous articles, the correct time setting is very important for the operation of Active Directory. You can adjust the time using the standard means of the system (see Fig. 5).
Fig. 5. Setting the time.
But in order to completely avoid problems with desynchronization of clocks, you should configure the time service ( ntpd daemon) to synchronize time with the domain controller (see Figure 6).
Fig. 6. Setting up a time service.
To do this, edit the file
/etc/ntp.conf , specifying a domain controller as a time server. Do not forget to start the ntpd daemon using the chkconfig ntpd on and restart it using the /etc/init.d/ntpd restart command.5. Check settings
Having made the specified settings, you should check their correctness. It is necessary to test the connection to the domain controller, the time setting, the correctness of the direct and reverse name resolution (see Figure 7).
Fig. 7. Check settings.
6. Setting up domain authorization
Now it is time to configure the membership of our server in the Windows domain. Unlike the previous examples, we will not configure LDAP and Kerberos separately. We will try to configure everything at once using the authconfig command line utility supplied as part of the CentOS distribution.
Authconfig allows you to configure all required services at once. In this case, you can configure not only the authorization in the Windows 2008 domain, but also the use of LDAP, NIS and other authentication methods.
More information about the authconfig utility can be obtained from the built-in manual ( man authconfig , online version ), or from the built-in manual by typing authconfig -help in the command line. It will be enough to say that authconfig has about 50 customization options - can you imagine its capabilities and, at the same time, the complexity of customization? It is easier to use the graphical interface to authconfig - the system-config-authentication utility (Fig. 8). This utility can be called from the system administration interface, or from the command line. Moreover, the second option seems to be preferable, since the display of diagnostic messages will occur in the terminal window, which will simplify troubleshooting.
Fig. 8. Call system-config-authentication .
In the User Account Database menu, you can select the location for storing user lists and passwords. The options are:
- local password database (/ etc / passwd and / etc / shadow files);
- connecting to an LDAP server;
- connecting to a NIS server;
- using Winbind - connecting to a Windows domain controller;
- Using IPAv2 is an integrated solution that combines LDAP, Kerberos, NTP, DNS, and certificate services.
IPAv2 allows you to authorize users, workstations, groups and enforce network access control policies. IPAv2 is positioned as a solution replacing NSSWITCH and PAM. More information is available at http://www.freeipa.org/page/Main_Page .
Since our task is to authorize in the Windows domain, we select Winbind as the User Account Database (Fig. 9).
Fig. 9. Select User Account Database.
You must specify the basic parameters for authconfig . The Windows Domain is the short name of the Windows 2008R2 domain, which is used in the workgroup parameter of the Samba configuration file (/etc/samba/smb.conf). We have already described the Samba configuration file in previous articles .
The security model is set to ads, which corresponds to the value of the security parameter in the Samba configuration file (
/etc/samba/smb.conf ). Selecting security model = ads means that protocols compatible with ADS Windows 2008R2 are used. Other possible security model values:- Domain - centralized authorization using the Windows 2000/2003 domain;
- Server - used when Samba is not a member of a domain, but uses centralized storage of user accounts and passwords on the server;
- User - a local database of user accounts and passwords is used. This requires not only a user account, but also a workstation account.
The Winbind ADS Realm parameter is similar to the REALM parameter in the Samba configuration file and is related to the Kerberos security settings. The similar REALM parameter is specified in the
/etc/krb5.conf settings /etc/krb5.conf .The Winbind Domain Controllers field can be left blank - the domain controller name will be determined from DNS. This field should be populated if, for some reason, DNS cannot determine the name and IP address of the domain controller.
Very interesting is the Template Shell parameter, which indicates which command shell will be used when registering a domain user on our CentOS Linux server. Possible shell values are listed in the
/etc/shells file. The system-config-authentication utility adds / bin / false to these values, which is used as the default value. If you specify /bin/false as a command shell, then domain users will be denied logging on. The Template Shell parameter is similar to the /etc/passwd field of the Linux /etc/passwd . To allow users to work interactively on the system using the command line, this parameter must be set to /bin/sh or /bin/bash .The Allow Offline Login option allows our CentOS Linux server to cache passwords and, accordingly, to authorize users if a domain controller is unavailable.
Let's go to the Advanced Options tab, since there are some parameters that we are interested in (see Figure 10).
Fig. 10. Advanced Options system-config-authentication tab.
On this tab, we are interested in two parameters: Create home directories on the first login and Enable local access control.
Enable local access control allows us to specify the rules for registering users on our server. You can allow or deny certain users to register using terminals or remote desktops. This is very convenient if we want, for example, to prevent users from connecting via the console terminal. Registration rules and a brief description are contained in the
/etc/security/access.conf file.The parameter Create home directories on the first login allows you to remove from the administrator the obligation to create home directories for users. If you specify this parameter, the home directory is created automatically when the user first logs into the system. But you need to check the correctness of the presence of this option. On CentOS Linux, the pam_oddjob_mkhomedir.so module is responsible for this, which should be mentioned in the
/etc/pam.d/system-auth in the required session pam_oddjob_mkhomedir.so session line skel=/etc/skel/ umask=0022 . In addition, the default home directory for registering domain users on the Samba server is /home/%D/%U This is indicated by the template homedir in the Samba settings file. If you use the default value, the administrator must create the directory /home/, . /home/LAB , .
Identity & Authentication system-config-authentication Windows 2008 R2.
Join Domain (. 11). OK, LAB.

. 11. .
, Samba (. 12). . , system-config-authentication . System, .

. 12. LAB.
Authentication Configuration Apply, Winbind oddjobd .
(. . 13).

. 13. .
, test-centos.
. (. 14).

. 14. .
, . «\». winbind separator Samba . Log In, . usertest (. 15).

. 15. CentOS Linux.
, CentOS Linux Windows 2008 R2 Linux. .
7.
- .
. ./home/, . /home/LAB , .
Identity & Authentication system-config-authentication Windows 2008 R2.
Join Domain (. 11). OK, LAB.
. 11. .
, Samba (. 12). . , system-config-authentication . System, .
. 12. LAB.
Authentication Configuration Apply, Winbind oddjobd .
(. . 13).
. 13. .
, test-centos.
. (. 14).
. 14. .
, . «\». winbind separator Samba . Log In, . usertest (. 15).
. 15. CentOS Linux.
, CentOS Linux Windows 2008 R2 Linux. .
7.
- .
. .
/home/, . /home/LAB , .Identity & Authentication system-config-authentication Windows 2008 R2.
Join Domain (. 11). OK, LAB.
. 11. .
, Samba (. 12). . , system-config-authentication . System, .
. 12. LAB.
Authentication Configuration Apply, Winbind oddjobd .
(. . 13).
. 13. .
, test-centos.
. (. 14).
. 14. .
, . «\». winbind separator Samba . Log In, . usertest (. 15).
. 15. CentOS Linux.
, CentOS Linux Windows 2008 R2 Linux. .
7.
- .
. .
/home/, . /home/LAB , .
Identity & Authentication system-config-authentication Windows 2008 R2.
Join Domain (. 11). OK, LAB.


. 11. .

, Samba (. 12). . , system-config-authentication . System, .


. 12. LAB.

Authentication Configuration Apply, Winbind oddjobd .
(. . 13).


. 13. .

, test-centos.
. (. 14).


. 14. .

, . «\». winbind separator Samba . Log In, . usertest (. 15).


. 15. CentOS Linux.

, CentOS Linux Windows 2008 R2 Linux. .

7.
- .
. .Source: https://habr.com/ru/post/171249/
All Articles