Installing Windows 7 over the network using Microsoft Windows AIK

Not so long ago I ran into a situation that, in principle, does not cause any special problems for system administrators. There was a need to update the OS on numerous computers of the organization, which in turn still caused a number of some problems, solutions of which had to be assembled in parts, and also finished most of the whole process about what I actually want to tell you myself.
These problems were limitations in having one DVD-ROM drive, one day of free time, as well as about twenty computers on which it was necessary to install Windows 7 with the entire set of necessary drivers, programs, etc.
When searching for information in Google on this issue, there was nothing that would work without jambs or work at all. But let's start in order.
Preparing an operating system image
For ease of preparation of the combat OS, the latest version of Oracle VirtualBox , as well as Windows 7 x64 Professional, was taken as the basis. The first thing you need to do is install and configure Windows 7 on a virtual machine. To do this, in the process of adding a VM, we create two virtual hard disks. One to install and configure Windows 7 on it, the second to save the image of the configured system on it. You also need to install the Virtualbox Guest Additions guest OS add-on and create a shared folder to further copy the created image to the physical machine.After installing all the stuffing on the VM, go to the system preparation stage using the sysprep utility located in the root of our VM system:
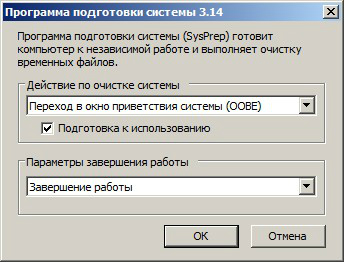
%windir%\system32\sysprep\sysprep.exe To prepare the system for creating a customized image, you need to set the utility parameters:
- Go to the system's welcome window (OOBE) - this mode will be activated the next time you start the system. Runs the computer in welcome screen mode.
- Tick the box “Preparing for use” - prepares the installation of Windows before creating the image. Security ID (SID) is reset, system restore points are reset, event logs are deleted.
- Shutdown Options “Shutdown” - upon completion of the utility operation, the system will complete its operation.
Do not start the OS before saving the system image, because during the next start of the computer, the specialized configuration step starts to work. A new security identifier (SID) is created and the Windows activation clock is reset.
')
The utility also removes installed drivers. To save them, you need to run sysprep from the command line with the parameter:
/unattend: In the answer file, you must specify the parameter PersistAllDeviceInstalls (starting with Windows 8 there is also the DoNotCleanUpNonPresentDevices parameter): <PersistAllDeviceInstalls>true</PersistAllDeviceInstalls> <!-- Windows 8 <DoNotCleanUpNonPresentDevices>true</DoNotCleanUpNonPresentDevices> --> After cleaning, the system will automatically shut down. We proceed to the next stage.Install and configure Windows AIK + PE
Download and install the Windows Automated Installation Kit (AIK) for Windows 7 . After running setup.exe, select "Install Windows AIK". There should be no particular problems during installation.Creating and Configuring a Windows PE Image
Windows PE is the pre-installation environment used to prepare for OC installation. Using Windows PE, we will capture the system volume into a wim image using the imagex utility and save it to another hard disk partition.In this case, creating a disk with a 64-bit version of Windows PE is considered. If you are creating a disk with a 32-bit version of Windows PE, you will need to replace the architecture (amd64 with x86) in all commands.
From the Start menu, go to All Programs> Microsoft Windows AIK> Deployment Tools Command Prompt — all subsequent commands will be entered into this command line window. Requires running as administrator.
Copy Windows PE image files
copype.cmd amd64 d:\winpe_image To modify a copied Windows PE image, you must connect it with the command
dism /Mount-Wim /WimFile:d:\winpe_image\winpe.wim /index:1 /MountDir:d:\winpe_image\mount Now, having connected the image, we can install packages into it and add our own files.
Add the imagex utility to our image.
xcopy "%ProgramFiles%\Windows AIK\Tools\amd64\imagex.exe" d:\winpe_image\iso\ Also, if desired, you can immediately prepare a list of exceptions - files and folders that will not be included in the saved image. Create a Wimscript.ini file in any text editor and specify in it the files and folders that you want to exclude from the image. The Wimscript.ini file is located in the same folder as the imegex.
By default, imagex uses the following exceptions:
[ExclusionList] \$ntfs.log \hiberfil.sys \pagefile.sys "\System Volume Information" \RECYCLER \Windows\CSC [CompressionExclusionList] *.mp3 *.zip *.cab \WINDOWS\inf\*.pnf Now you need to save the image with the command:
dism /unmount-Wim /MountDir:d:\winpe_image\mount /Commit All the preparatory work was done with the winpe.wim file, and for the Windows PE boot disk, the boot.wim file located in the winpe_x86 \ ISO \ sources folder is used. Therefore, it is necessary to replace the boot.wim file with the winpe.wim file, while renaming it.
xcopy /yd:\winpe_image\winpe.wim d:\winpe_image\ISO\sources\boot.wim To create an image, execute the command:
oscdimg -n -bd:\winpe_image\etfsboot.com d:\winpe_image\ISO d:\winpe_image\winpe_image.iso Creating a Windows 7 Image
It is necessary to save the image of our OS using the imagex utility. We are loading into the VM from the image winpe_image.iso that we created earlier. After a successful download, a command line window opens before us, and we’ll just work in it.Capture and save the image produced by one team.
F:\imagex.exe /capture E: D:\install.wim "Windows 7 x64" /compress maximum / capture E: - capture section E:
D: \ install.wim is the location and name of the saved WIM file.
"Windows 7 x64" - the name of the image. The name must be enclosed in quotes.
/ compress maximum - type of compression of files in the image (optional). For the / compress option, the maximum (maximum compression), fast (fast compression) and none (without compression) values are allowed. If not specified, fast compression is used. Maximum compression can reduce the size of the image, but the capture takes longer than with fast compression. The speed of unpacking an image is almost independent of the type of compression. It remains to wait 20-30 minutes and the image will be ready.
After saving the image on the second disk of the virtual machine, for further work it needs to be transferred to the physical OS. We start the virtual machine again and complete the installation of Windows, which was interrupted at the OOBE stage. If you have already installed Virtual Machine Additions, you now need to copy the file from the virtual machine to the physical one using the shared folder, which can be specified in the virtual machine settings.
Configuring a boot image of Windows 7
At this stage, run the “Deployment Tools Command Prompt” again and copy the Windows PE image files: copype.cmd amd64 d:\winpe Mount image
imagex /mountrw winpe.wim 1 mount Windows PE is mounted and in the d: \ winpe folder you can find the file winpe.wim.Setup autorun installation Windows.
In order not to manually create a virtual disk and not to start the installation manually, you can edit the startnet.cmd and startnet2.cmd files. They are located d: \ winpe \ mount \ windows \ system32.startnet.cmd
wpeinit %windir%\system32\startnet2.cmd startnet2.cmd
chcp 1251 netsh interface ip set address name=" " source=dhcp chcp 866 pause net use z: \\192.168.0.1\win7 /user:install install cd /d Z:\sources setup.exe The net use command connects to the computer with the IP address 192.168.0.1 (our server computer) to the shared directory with the name win7 as the install user with the same password.
We can create the user we need with such a command in cmd
net user install install /add /passwordchg:no Follow the instructions below:
- On the server computer, create the root directory for the boot (I have d: \ win7 \), and in it the folder boot.
- We share the win7 folder, that is, we share it with all users.
- Copy the entire sources folder from the Windows 7 installation disk to d: \ win7.
- Replace the install.wim file in the d: \ win7 \ sources directory with the file that was previously copied from the virtual machine (ready Windows 7 image)
Now you need to copy additional files to install Windows 7.
Mount the WinPE image:
imagex /mountrw winpe.wim 1 mount We copy:
xcopy d:\winpe\mount\windows\boot\pxe\pxeboot.n12 d:\win7 xcopy d:\winpe\mount\windows\boot\pxe\bootmgr.exe d:\win7 xcopy d:\winpe\winpe.wim d:\win7\boot xcopy d:\winpe\iso\boot\boot.sdi d:\win7\boot Unmount the image with the command:
imagex.exe /unmount d:\winpe\mount Next, you need to create a BCD file (boot configuration data) in the d: \ win7 \ boot directory. To simplify this process, use the createbcd.cmd file. Create the file d: \ winpe \ createbcd.cmd and enter into it:
bcdedit -createstore %1\BCD bcdedit -store %1\BCD -create {ramdiskoptions} /d "Ramdisk options" bcdedit -store %1\BCD -set {ramdiskoptions} ramdisksdidevice boot bcdedit -store %1\BCD -set {ramdiskoptions} ramdisksdipath \boot\boot.sdi for /F "tokens=2 delims={}" %%i in ('bcdedit -store %1\BCD -create /d "MyWinPE Boot Image" /application osloader') do set guid={%%i} bcdedit -store %1\BCD -set %guid% systemroot \Windows bcdedit -store %1\BCD -set %guid% detecthal Yes bcdedit -store %1\BCD -set %guid% winpe Yes bcdedit -store %1\BCD -set %guid% osdevice ramdisk=[boot]\Boot\winpe.wim,{ramdiskoptions} bcdedit -store %1\BCD -set %guid% device ramdisk=[boot]\Boot\winpe.wim,{ramdiskoptions} bcdedit -store %1\BCD -create {bootmgr} /d "Windows BootManager" bcdedit -store %1\BCD -set {bootmgr} timeout 30 bcdedit -store %1\BCD -set {bootmgr} displayorder %guid% Run the command as an administrator:
createbcd.cmd d:\win7\boot If you have any problems with the drivers, you can add them as well in the “Command Line Deployment Tools”:
Mounting the image to add drivers
dism /mount-wim /wimfile:winpe.wim /index:1 /mountdir:mount To integrate drivers into an already mounted image, use the command
dism /image:mount /add-driver /driver:< inf> After all the work with the image is finished, it must be unmounted.
dism /unmount-wim /mountdir:mount /commit Configure TFTP server and DHCP
To create these servers you need to download the program TFTPD32 .The task of the DHCP server is to provide information to the remote computer about the free IP address, network mask, as well as the name of the download file and the TFTP server address where this file is located. The task of a TFTP server is to ensure the transfer required for downloading files to a remote computer.
Run the program and first select the folder d: \ win7, and a little lower - the IP of the network card. In my case, the computer has an IP of 192.168.0.1.
Go to the settings (the Settings button in the middle below) and gradually fill in the tabs:
- GLOBAL tab - tick only opposite TFTP Server, DHCP Server and Enable IPv6.
- TFTP tab - select the folder d: \ win7.
- TFTP Security - Standart.
- TFTP configuration - leave as is.
- Advanced TFTP Options - there should be ticks opposite: Option negotiation, Show Process bar and Translate Unix file names.
- DHCP tab
- IP pool starting address indicates which IP address to start issuing addresses from. In my example, the issuance of IP addresses will start from 192.168.0.2.
- Size of pool indicates the number of IP addresses that will be dynamically allocated. I set the value to 30.
- Boot File tells the remote computer the name of the file to be used as a bootloader. Set the value in pxeboot.n12.
- Mask, indicates the netmask. In our case, this is 255.255.255.0. The remaining values of the parameters are left as default.
- Ping address before assignation - uncheck (if you have a computer-to-computer connection without switches and routers).
Now you need to enable the BIOS from the network card and boot from it. After that, the IP address will be obtained via DHCP and execute pxeboot.n12 - which will launch Windows PE from the winpe.wim file. Immediately after booting up Windows PE, the win7 directory will be automatically mounted and the installation will start. Next, the installation is the same as with the disk.
Source: https://habr.com/ru/post/171017/
All Articles