Opening the keyboard Logitech Illuminated K800
About the tactile sensations, ease of use, stylish appearance Logitech Illuminated K800 is already enough written in different types of reviews. Let's talk about sad things. It so happened that beer was spilled on the keyboard. Quick brushing and shaking out the liquid did not help - a decent amount of the drink got inside, but it continued to work. The next morning, the keyboard spontaneously began to give out meaningless combinations of characters, and after that silence reigned, only a couple of keys answered, and even they typed not what was depicted on them. The case is not a warranty, so I decided to disassemble the keyboard. Who cares what's inside and how it can be opened, please under the cat.
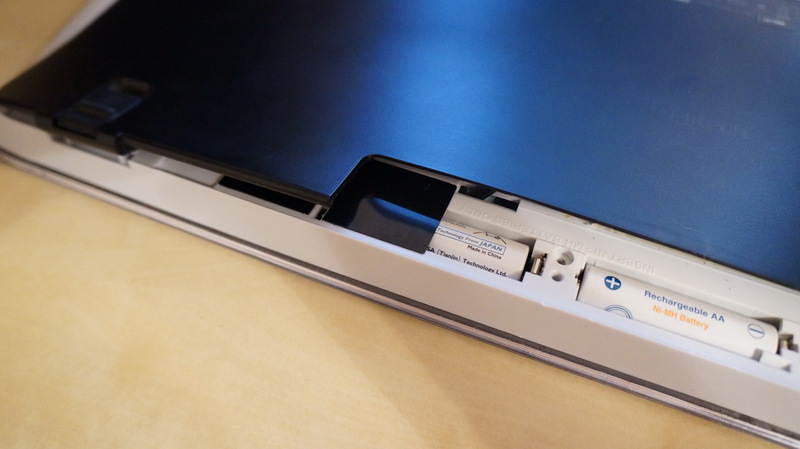
The keyboard is a fairly monolithic design with a single visible screw on the battery compartment, unscrew it. Inside you will see another screw, but for now you can leave it alone.
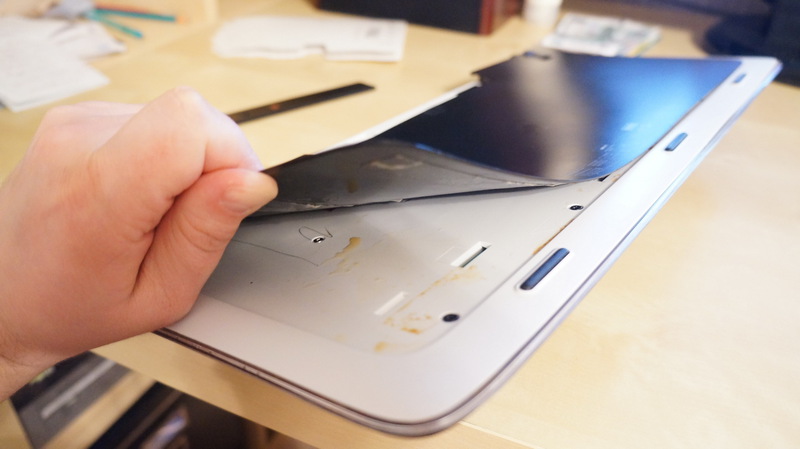
The next step is to separate the bottom cover. It was necessary to tear off at random this lower part of the body, it was not clear where the latches are and how well the case is glued. I started from the places where the legs are located - it is easier to catch on them, but still, one cannot do without a screwdriver or other flat tool. It can be seen that one of the batteries is covered with a half black film.
He acted at random and broke off several latches, later refused, that this is not critical, because This cover is covered with layers with a sticky backing and they perfectly fix the cover with an incomplete set of latches. The photo shows the stains and puddles of beer.
')
From the inside, the torn off bottom cover looks like this:

Circled places where there were latches, suddenly someone come in handy:

Next, unscrew the 16 screws, which, among other entrails, hold the upper part of the keyboard (the one with the logo). Pay attention to the black rectangle of dense film, which covers half of one of the batteries. Its purpose is not entirely clear - it turns out that replacing the batteries must be accompanied by tearing off the bottom cover of the keyboard, or else you can cut it off with something sharp. But if you bend it back, then it turns out that there is another screw under the glued film, do not forget to unscrew it.

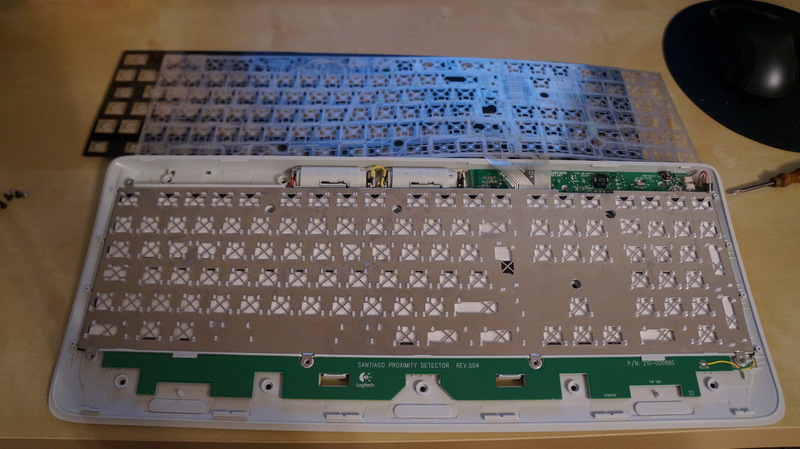
Next, remove the upper part, which with the logo, along the perimeter, we pass something sharp and durable and tear off the top cover. There are also latches here.
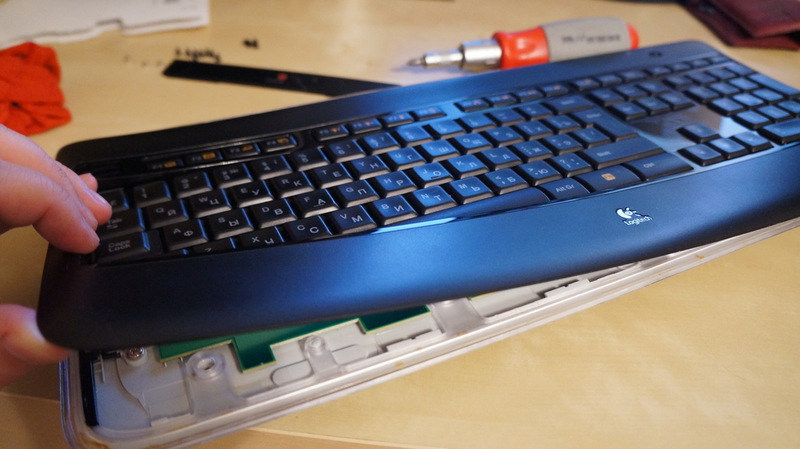
A thin transparent frame is fastened with screws on the right and left, and a smaller Phillips screwdriver is needed for opening than for the other screws.

Judging by the inscription, there is a proximity sensor at the bottom, which responds to the presentation of hands to the keyboard and turns on the backlight.
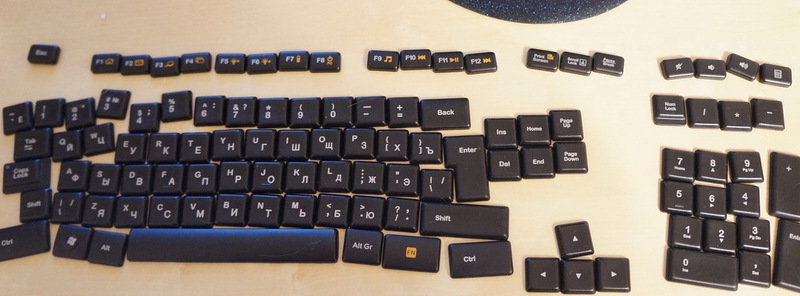
Proceed to the chore of picking up keys. The “scissors” mechanism holds the keys tightly, picks up the key from the top and bottom and pulls it up. I didn’t have enough experience and some of the keys still got the retainer off, which they attach to the mechanism itself, which means then they will pop up when pressed.

Do not forget where and which key is located.
For a complete analysis, you need to disconnect and fasten the mechanism of each key. Firstly for the purpose of flushing, and secondly, without this, do not remove the layer with the membranes and the layer with the conductive paths. Mechanisms disconnect no less carefully than the keys.
Here is a video showing how to remove the keys and the fastening mechanism (about K800 from 3:22)
If, nevertheless, keys or mechanisms were damaged in the process, then not eBay is sold separately, both of them (although I did not see the Russian layout).
After that, you can disassemble the "sandwich" consisting of a layer with membranes, a layer with conductive tracks, a layer with backlight and a metal plate, to which the key mechanism is attached.

Make sure the backlight works by simply turning on the keyboard. We will verify that the proximity sensor also reacts to the presentation of hands.
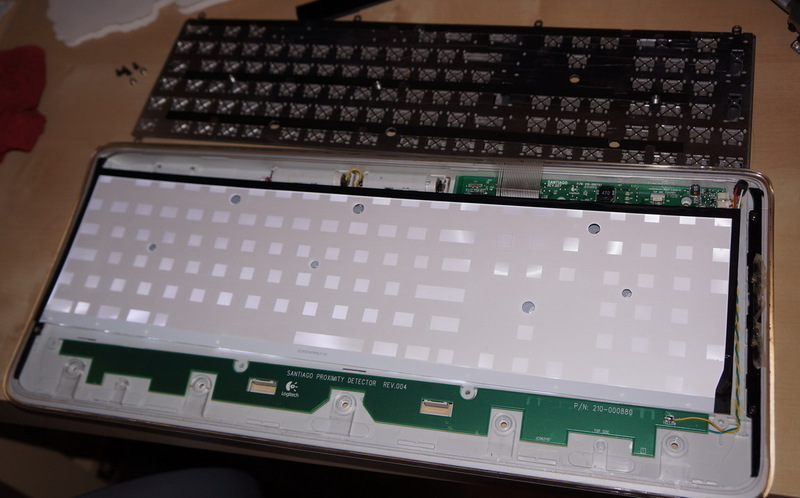
Under the backlit layer is a metal plate on which everything lies.

I disassemble all the layers separately, they are spilled with beer, so that each of them is sent under a stream of water. The keys and their mechanisms are also washed out so that nothing sticks together. Leave everything to dry until the next day.
The next day, I checked the keyboard for performance. Membranes are laid on the layer with contacts and all pressings are checked in turn. You can use a plain text editor or special programs. Everything is working! After checking, we collect everything in the reverse order, paying attention to the keys and mechanisms of the keys; they are rather fragile and it is easy to break off the latches.

After the work done and the two evenings spent on parsing, a working keyboard was obtained and an invaluable experience in parsing and repairing Logitech keyboards.

The keyboard is a fairly monolithic design with a single visible screw on the battery compartment, unscrew it. Inside you will see another screw, but for now you can leave it alone.
The next step is to separate the bottom cover. It was necessary to tear off at random this lower part of the body, it was not clear where the latches are and how well the case is glued. I started from the places where the legs are located - it is easier to catch on them, but still, one cannot do without a screwdriver or other flat tool. It can be seen that one of the batteries is covered with a half black film.
He acted at random and broke off several latches, later refused, that this is not critical, because This cover is covered with layers with a sticky backing and they perfectly fix the cover with an incomplete set of latches. The photo shows the stains and puddles of beer.
')
From the inside, the torn off bottom cover looks like this:
Circled places where there were latches, suddenly someone come in handy:
Next, unscrew the 16 screws, which, among other entrails, hold the upper part of the keyboard (the one with the logo). Pay attention to the black rectangle of dense film, which covers half of one of the batteries. Its purpose is not entirely clear - it turns out that replacing the batteries must be accompanied by tearing off the bottom cover of the keyboard, or else you can cut it off with something sharp. But if you bend it back, then it turns out that there is another screw under the glued film, do not forget to unscrew it.
Next, remove the upper part, which with the logo, along the perimeter, we pass something sharp and durable and tear off the top cover. There are also latches here.
A thin transparent frame is fastened with screws on the right and left, and a smaller Phillips screwdriver is needed for opening than for the other screws.
Judging by the inscription, there is a proximity sensor at the bottom, which responds to the presentation of hands to the keyboard and turns on the backlight.
Proceed to the chore of picking up keys. The “scissors” mechanism holds the keys tightly, picks up the key from the top and bottom and pulls it up. I didn’t have enough experience and some of the keys still got the retainer off, which they attach to the mechanism itself, which means then they will pop up when pressed.
Do not forget where and which key is located.
For a complete analysis, you need to disconnect and fasten the mechanism of each key. Firstly for the purpose of flushing, and secondly, without this, do not remove the layer with the membranes and the layer with the conductive paths. Mechanisms disconnect no less carefully than the keys.
Here is a video showing how to remove the keys and the fastening mechanism (about K800 from 3:22)
If, nevertheless, keys or mechanisms were damaged in the process, then not eBay is sold separately, both of them (although I did not see the Russian layout).
After that, you can disassemble the "sandwich" consisting of a layer with membranes, a layer with conductive tracks, a layer with backlight and a metal plate, to which the key mechanism is attached.
Make sure the backlight works by simply turning on the keyboard. We will verify that the proximity sensor also reacts to the presentation of hands.
Under the backlit layer is a metal plate on which everything lies.
I disassemble all the layers separately, they are spilled with beer, so that each of them is sent under a stream of water. The keys and their mechanisms are also washed out so that nothing sticks together. Leave everything to dry until the next day.
The next day, I checked the keyboard for performance. Membranes are laid on the layer with contacts and all pressings are checked in turn. You can use a plain text editor or special programs. Everything is working! After checking, we collect everything in the reverse order, paying attention to the keys and mechanisms of the keys; they are rather fragile and it is easy to break off the latches.
After the work done and the two evenings spent on parsing, a working keyboard was obtained and an invaluable experience in parsing and repairing Logitech keyboards.
Source: https://habr.com/ru/post/170723/
All Articles