Android: [DirectoryBind] A simple way to link an external sd card and internal memory to make room
At once I will make a reservation that it will not be about programs like link2sd. The principle is similar, but we will not link the program directories, but the data directories of these programs, for example
In addition, we need a root (where do without it). By the way, after I learned about this program, this is another argument for root for me.
Many owners of Android smartphones or tablets with a small built-in memory probably faced the following problem: a large sd card was inserted (for example, 16, 32 or even 64 GB), but after installing several heavy programs our device or another program with arrogance declares that it’s not Enough space. Sometimes the program itself is small, but after installation it climbs the Internet and pulls gigabytes of data onto a smartphone.
Once again, having received the message “No place” and looking at the card we see that it is practically empty, but the internal memory of the device is packed to capacity.
This is because internal memory is often used as the default directory for many programs. The fact is that it is mounted as
Many "unscrupulous" programs always want to read / write data from / to the
As a result, we have what we have, and several opportunities to correct the situation:
The last two methods are also not a panacea, because they require certain skills from the user, besides they are not sufficiently “clean”, for example, problems are known when connecting a smartphone to a computer via usb (not unmounted), etc.
')
The DirectoryBind program will help to correct the situation, which a good person slig from xda wrote for himself and posted on the forum for general use.
Although the audience here is technically savvy, but for inexperienced Habr readers, you need to make a couple of explanations. As he himself wrote (the program is not idiot-proof), i.e. hardly pass the test for a fool.
After installation, run the program (for the first time, naturally, we allow Root rights forever), press the menu then “Preferences” and set the default paths to the external memory “Default data path” for example
Click the menu, then "Add new entry"

Now create a new directory link, for example, transfer the

By checking the “Transfer files from target to data” checkbox, the files and folders will be transferred from the
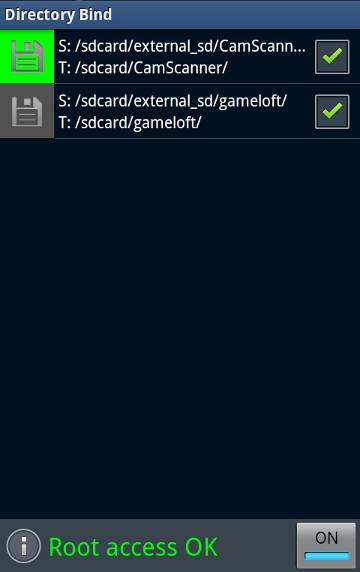
It should be noted that the links after creation are not activated automatically (gray diskette icon, as in the screenshot below for gameloft). To complete the binding of folders, select the necessary connections with the checkboxes and press the menu -> “Bind checked”. Icons for active (linked) folders should turn green.
By the way, if you want to attach the entire external card, I fully recommend that you do it wrong
Having suffered, I decided for myself to link only individual directories.
UPD. By the way, the external SD card is much slower than the internal memory, so the transfer of program data to an external SD naturally slows down the work of this program. This is especially necessary to remember those who decide to completely change the mount points of the internal and external memory, because Most likely your entire device will run slower than before.
I hope this program will complement your piggy bank of useful utilities for android devices.
If you do decide to swap the internal and external memory, i.e. To reassign the external sd card to
In the Root-Explorer we mount "/ etc" as R / W (if R / O), find the file "/etc/vold.fstab", save the copy and open it (with a long click) with it in the Text Editor.
In the following two lines we change the name of the mount points in places:
You can read more here . They also offer, as an alternative, to use another interesting program Root External 2 Internal SD .
I will add that in both cases, before switching, you need to copy the entire contents of the
Remember that after switching, your entire system may run slower than before.
Be careful - you need to understand that everything you do under the root, you do at your own peril and risk, and for example saving the wrong “vold.fstab” can make it impossible to load the device and for treatment you will need to be loaded into the recovery and edit “vold. fstab ”is already there.
This method can be used in conjunction with DirectoryBind, only now the other way around is the “Default target path” (/ sdcard) and all links created in DirectoryBind will point to an external map.
/sdcard2/Navigon -> /sdcard/Navigon or /mnt/extSdCard/Books -> /sdcard/Books , etc.In addition, we need a root (where do without it). By the way, after I learned about this program, this is another argument for root for me.
Many owners of Android smartphones or tablets with a small built-in memory probably faced the following problem: a large sd card was inserted (for example, 16, 32 or even 64 GB), but after installing several heavy programs our device or another program with arrogance declares that it’s not Enough space. Sometimes the program itself is small, but after installation it climbs the Internet and pulls gigabytes of data onto a smartphone.
Once again, having received the message “No place” and looking at the card we see that it is practically empty, but the internal memory of the device is packed to capacity.
This is because internal memory is often used as the default directory for many programs. The fact is that it is mounted as
/sdcard , which historically has always been an external sd card (it used to be on all smartphones before). The external sd card is mounted in this case as /sdcard2 , /mnt/sdcard2 , /mnt/extSdCard or even /sdcard/.externalSD . I understand that this is done by the manufacturers so that the device works out of the box, i.e. completely without sd card.Many "unscrupulous" programs always want to read / write data from / to the
/sdcard/ directory /sdcard/ . Rarely, this can be changed in the program settings.As a result, we have what we have, and several opportunities to correct the situation:
- remount directories: external sd card to
/sdcard, and internal to/sdcard2(you need/sdcard2, if not in the settings). In my opinion is not a flexible way, because now the internal memory is dead we have. Another disadvantage of this method is the speed of the system .
If you still decide to go this way, below I added how this can be done. - create a symbolic link to external directories as we need, for example
ln -sf /mnt/externalSD/Books /sdcard/Books.
It does not work if the file system does not support simlink (for example, fat). - when downloading android mount external directories to internal memory using something like
mount -o bind /mnt/externalSD/Books /sdcard/Books
and add it to autoload, for example using Autostart (root) , so that this happens automatically when you turn on or after rebooting the device.
The last two methods are also not a panacea, because they require certain skills from the user, besides they are not sufficiently “clean”, for example, problems are known when connecting a smartphone to a computer via usb (not unmounted), etc.
')
The DirectoryBind program will help to correct the situation, which a good person slig from xda wrote for himself and posted on the forum for general use.
QR code
Although the audience here is technically savvy, but for inexperienced Habr readers, you need to make a couple of explanations. As he himself wrote (the program is not idiot-proof), i.e. hardly pass the test for a fool.
After installation, run the program (for the first time, naturally, we allow Root rights forever), press the menu then “Preferences” and set the default paths to the external memory “Default data path” for example
/sdcard/external_sd/ and the internal memory “Default target path” /sdcard/ . Exit the menu.Click the menu, then "Add new entry"
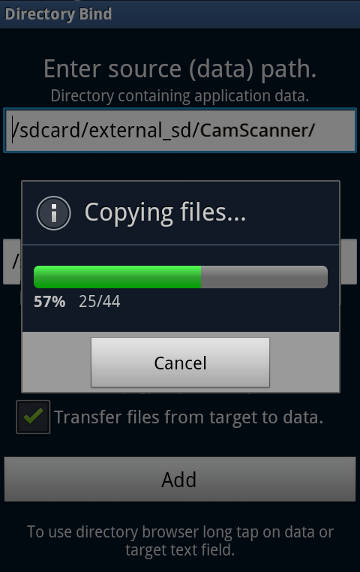
Now create a new directory link, for example, transfer the
CamScanner folder to an external map. A long press on the folder path opens a small built-in file manager in which you can create and / or select a folder. A folder on the external map must be created (and empty).By checking the “Transfer files from target to data” checkbox, the files and folders will be transferred from the
/sdcard/CamScanner/ directory to the /sdcard/external_sd/CamScanner .It should be noted that the links after creation are not activated automatically (gray diskette icon, as in the screenshot below for gameloft). To complete the binding of folders, select the necessary connections with the checkboxes and press the menu -> “Bind checked”. Icons for active (linked) folders should turn green.
By the way, if you want to attach the entire external card, I fully recommend that you do it wrong
/sdcard/externalSD/ , but with a dot in front of /sdcard/.externalSD/ . It will save you from such troubles as double thumbnails in galleries, etc. The truth will not help for all galleries and players, because some are looking for media and hidden directories.Having suffered, I decided for myself to link only individual directories.
UPD. By the way, the external SD card is much slower than the internal memory, so the transfer of program data to an external SD naturally slows down the work of this program. This is especially necessary to remember those who decide to completely change the mount points of the internal and external memory, because Most likely your entire device will run slower than before.
I hope this program will complement your piggy bank of useful utilities for android devices.
If you do decide to swap the internal and external memory, i.e. To reassign the external sd card to
/sdcard and in the device settings there is no such option - having a root, this can be easily done by performing the following operation:In the Root-Explorer we mount "/ etc" as R / W (if R / O), find the file "/etc/vold.fstab", save the copy and open it (with a long click) with it in the Text Editor.
In the following two lines we change the name of the mount points in places:
dev_mount sdcard /mnt/sdcard emmc@fat /devices/platform/goldfish_mmc.0 ... dev_mount sdcard /mnt/external_sd auto /devices/platform/goldfish_mmc.1 ... on dev_mount sdcard /mnt/external_sd emmc@fat /devices/platform/goldfish_mmc.0 ... dev_mount sdcard /mnt/sdcard auto /devices/platform/goldfish_mmc.1 ... You can read more here . They also offer, as an alternative, to use another interesting program Root External 2 Internal SD .
I will add that in both cases, before switching, you need to copy the entire contents of the
/sdcard folder to an external sd card.Remember that after switching, your entire system may run slower than before.
Be careful - you need to understand that everything you do under the root, you do at your own peril and risk, and for example saving the wrong “vold.fstab” can make it impossible to load the device and for treatment you will need to be loaded into the recovery and edit “vold. fstab ”is already there.
This method can be used in conjunction with DirectoryBind, only now the other way around is the “Default target path” (/ sdcard) and all links created in DirectoryBind will point to an external map.
Source: https://habr.com/ru/post/169965/
All Articles