Prevention notebook at home
Good day. I decided to share with you a way at home to maintain the health of our favorite laptops (netbooks) at the proper level.
There is one terrible and sometimes fatal threat, overheating! Many of you are confronted with the fact that your faithful assistant burns his knees, although the cooler howls continuously, or it pumps the temperature quite well into a cozy (maybe slightly dusty) blanket with which you wrapped yourself, and at the same time a laptop. Then it is worth thinking about - “And why would it?”. And it all leads to overheating, sudden disconnection and refusal to calls "to turn on now and finish playing the game." Not here it was, it will turn on only after a certain period of time, during which it cools down naturally. And it happens and does not turn on, then the direct road to the SC, because patient prevention will not save. After diagnosis, either a burned-up video chip or an overheated bridge will usually come to light. What is one thing that the other is not very nice for the price of repair. So let's keep track of your devices and not bring to extreme measures.
Today we are doing prevention, which is recommended by people “on experience” to do every 5-6 months. Our “patient” is called Asus F5R, which faithfully serves for 3 years. Let's start with a general plan of action:
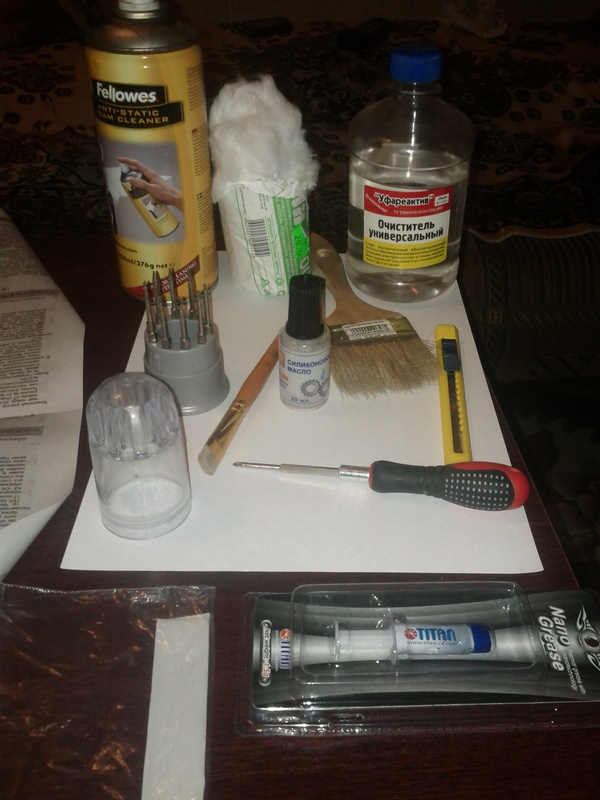
So. Step number one. The workplace is any flat surface, sufficient for analysis, it is advisable to cover it with an oilcloth so as not to spoil the table with accidentally spilled liquid. Good lighting, top light, combined with a bright desk lamp is ideal. A pair of clean cloths and tools.
Tool. Most often, nothing extraordinary is required. In most cases, a small cross-head screwdriver is enough, a spatula (this is all usually found in ready-made cheap sets of tools in radio components); , cotton, alcohol (I use isopropyl), you may need a solvent or acetone (you can use nail polish remover)
')
Material. Thermal grease, thermal pads, lubricant for the cooler, foam for cleaning.
I will say one thing about thermal grease: you can study, for the sake of interest, reviews on the net, of which there are a great many. But! Do not use KPT-8, AlSIL and the like in any way. They are good at radio electronics, but no more than that, since they do not provide that density of fit and heat transfer of the crystal to the radiator. Personally, I use Titan nano, an adequate price tag, a common, normal quality (not to consider an advertisement)
The problem with thermal pads arises for many, since they are difficult to find on sale. In our city, this is solved by buying in service workshops from employees not officially, although I don’t really understand why this is such a terrible shortage. If thermal pads are not got, then you should not despair. Firstly, they remain “alive” for quite a long time, that is, soft and slightly moist to the touch, secondly, there is a temporary replacement of the foil layer → thermal paste → layer of foil → thermal paste, etc. thickness. Since this is a very extreme measure (although it worked for me at one time), it is better to contact the SC about the replacement of gaskets.
Lubricant for the cooler: at a minimum, it is engine oil (oil for sewing machines, etc.), it is better to buy silicone oil in radio parts (quite cheap and not enough for once), or take a special lubricant from a computer store (there are sometimes something like vaseline)
Foam for cleaning. I strongly advise to be confused with its acquisition. I use foam to clean plastic surfaces (foreign, although it can be found in car cosmetics). Many advantages: cleans dirt on plastic well, gives an antistatic effect, therefore the dust does not stick any longer. This item is optional but recommended.
Actually with the tool and materials decided, therefore, into battle!
We begin to disassemble the laptop. I note that there are many models and everyone understands in different ways. In the old models, it is enough to remove the special compartment on the bottom and before the eyes of the entire cooling system, and in most of the new ones you have to disassemble everything completely. One way or another, we include logic and memory, unwind, if necessary, make sketches and inscriptions, where and what stood. Or we look mans on the Internet on analysis and in accuracy we repeat all movements. Next, proceed to the "preparation".
We got to the goal: cooler, radiator and a lot of dust.
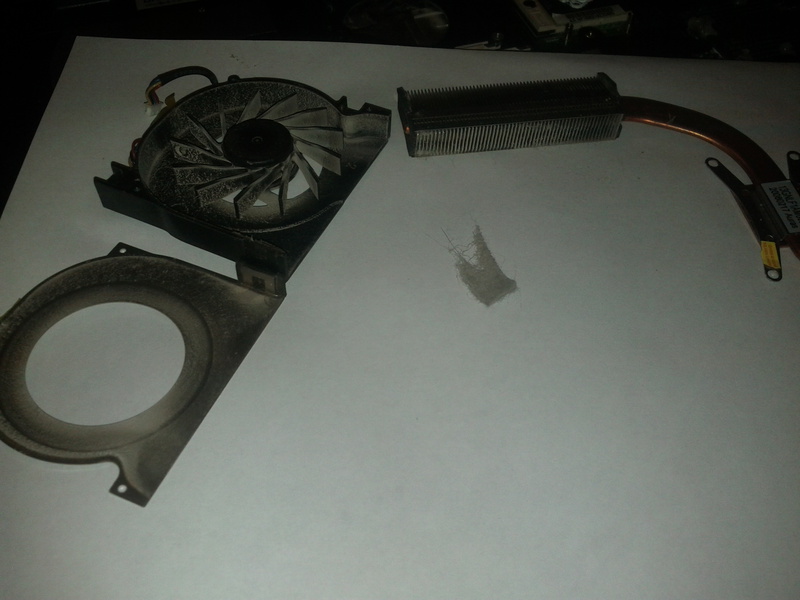
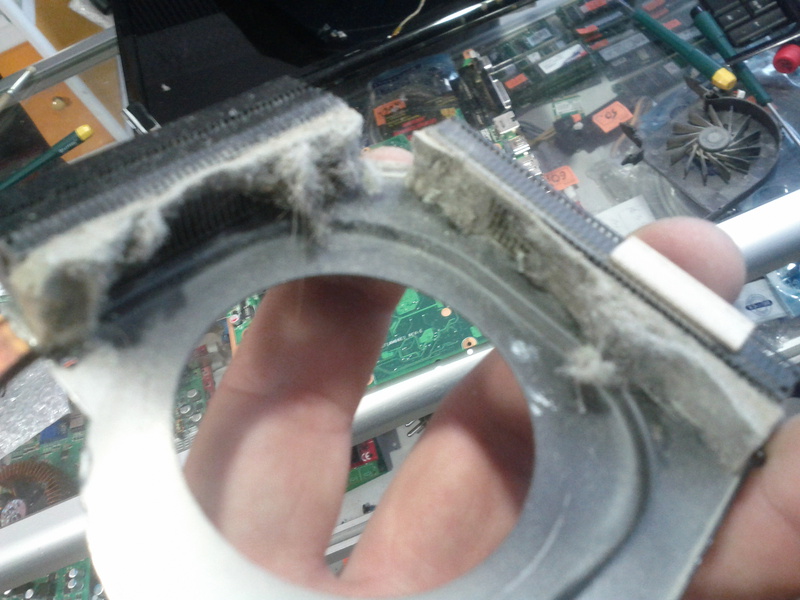
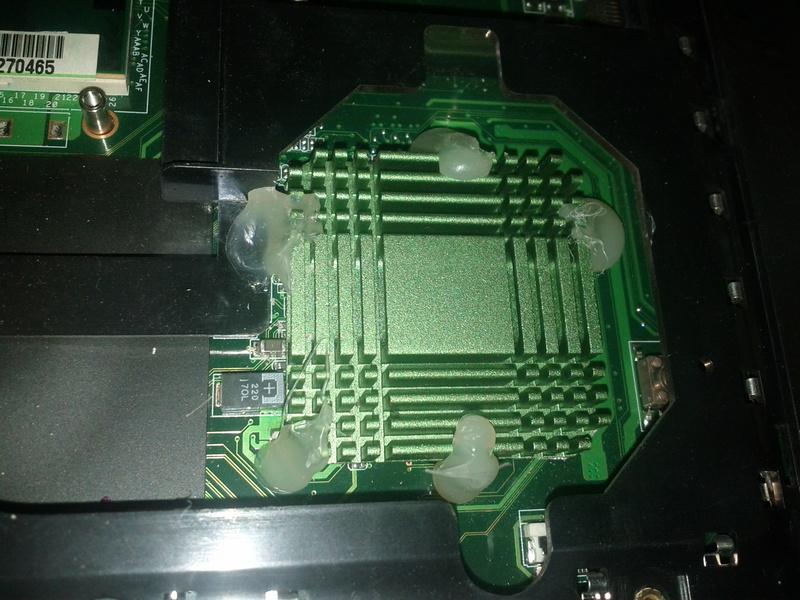
Carefully separate the cooler from the radiator, rejoice in the padding of dust (wool, hair), carefully blow out (preferably on the street) brush the dust from everything that catches your eye with a brush. The plastic parts of the body, especially the grille, should be treated with foam and cleaned with a soft, clean cloth.
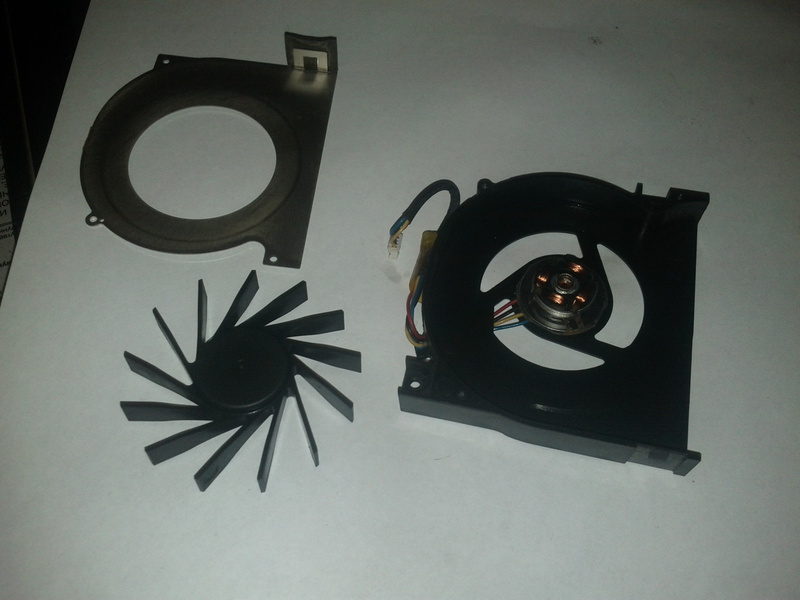
We disassemble the cooler, get to the blades. Now we try to lift the blades, if they are removed together with the spire, then you are very lucky, we remove and clean to shine. A couple of drops of lubricant in the spindle seat and collect everything back. We rejoice at the clean and easy-to-spin fan.
We take the cooling circuit in our hands, blow out the dust, remove with a cotton swab dipped in alcohol, the rest of the thermal paste (if the thermal paste dries out and turns into fossils, then use the cotton swab in the solvent). We perform the same operations to remove thermal paste with a processor, video chip and a bridge (Something may be missing depending on the model of the laptop :)).
Try not to overdo it with the amount of liquid on the cotton and do not fill the motherboard (nothing terrible, but still).
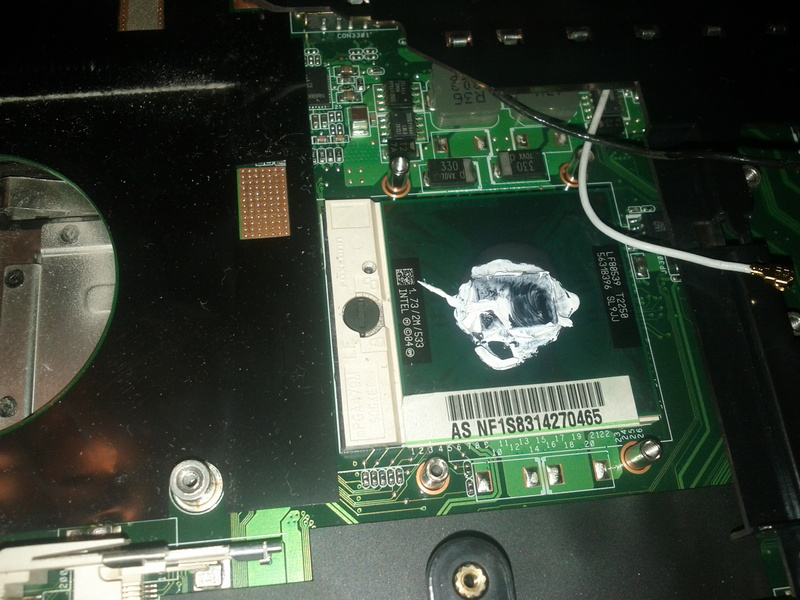
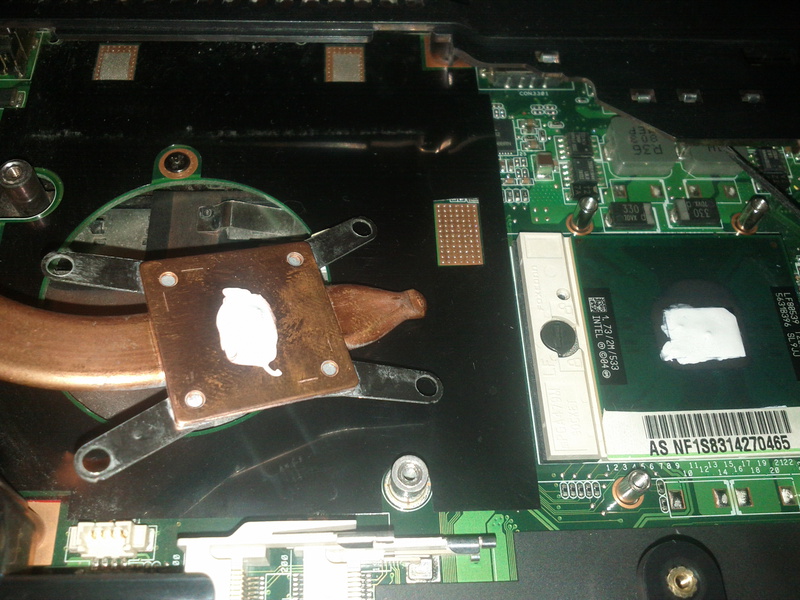
We decide whether or not to change the thermal pads, if not, then they can be slightly wiped with a cotton swab dipped in alcohol. Apply an even thin layer of thermal paste on the processor chip, video chip, bridge, apply a small amount of thermal paste on the radiator pad at the point of contact with the chip. We put the cooling circuit in place, rotate a millimeter from side to side and evenly distribute thermal grease and fasten everything in place. We assemble the laptop in a clear sequence, slowly, paying attention to the fasteners, latches and the length of the bolts (you can also punch the motherboard and the case).
Separate advice on the account of cleaning the keyboard, in any case should not go to her with a vacuum cleaner, especially with a powerful one. The surest option is to blow from a distance with compressed air or a compressor, and then foam, brush and carefully clean.
So collected, put the battery in place and ...
Do not turn on ... Do not despair, a very common mistake is not to short the RAM. We remove the battery, climb into the compartment and insert it well (but not until the crunch, of course).
We turn on and marvel at the quiet operation and grateful warm exhaust from the vent. To calm conscience, you can drive "Aida" or other similar programs, look at the temperature and enjoy the work done.
Pack the tool and material in a box and forget about it for the next six months, before the next preventive maintenance.
PS If anyone is interested in the self-made construction of cooling a bridge from a green radiator from an ancient video card, then in this laptop it doesn’t cool at all, and at a temperature of 79 degrees it drives off along with the hard drive. With such a modernization, the temperature came in the range of 45-50 and no longer does the brain.
All successful prevention, and care in this! I hope that my words will be interesting to someone, and whoever has learned nothing from this can always share experiences with others. Sincerely, thank you for your attention.
There is one terrible and sometimes fatal threat, overheating! Many of you are confronted with the fact that your faithful assistant burns his knees, although the cooler howls continuously, or it pumps the temperature quite well into a cozy (maybe slightly dusty) blanket with which you wrapped yourself, and at the same time a laptop. Then it is worth thinking about - “And why would it?”. And it all leads to overheating, sudden disconnection and refusal to calls "to turn on now and finish playing the game." Not here it was, it will turn on only after a certain period of time, during which it cools down naturally. And it happens and does not turn on, then the direct road to the SC, because patient prevention will not save. After diagnosis, either a burned-up video chip or an overheated bridge will usually come to light. What is one thing that the other is not very nice for the price of repair. So let's keep track of your devices and not bring to extreme measures.
Today we are doing prevention, which is recommended by people “on experience” to do every 5-6 months. Our “patient” is called Asus F5R, which faithfully serves for 3 years. Let's start with a general plan of action:
- workplace and tool preparation
- removal of unnecessary curious hands and paws (this is about pets and animals)
- analysis of the laptop (with sketching and recording of screws and fasteners, if there is no hope for memory)
- isolation, purification and processing of the required areas
- reassembly of the device (it is advisable not to leave the "extra" parts)
- testing and moral satisfaction from the work done.
So. Step number one. The workplace is any flat surface, sufficient for analysis, it is advisable to cover it with an oilcloth so as not to spoil the table with accidentally spilled liquid. Good lighting, top light, combined with a bright desk lamp is ideal. A pair of clean cloths and tools.
Tool. Most often, nothing extraordinary is required. In most cases, a small cross-head screwdriver is enough, a spatula (this is all usually found in ready-made cheap sets of tools in radio components); , cotton, alcohol (I use isopropyl), you may need a solvent or acetone (you can use nail polish remover)
')
Material. Thermal grease, thermal pads, lubricant for the cooler, foam for cleaning.
I will say one thing about thermal grease: you can study, for the sake of interest, reviews on the net, of which there are a great many. But! Do not use KPT-8, AlSIL and the like in any way. They are good at radio electronics, but no more than that, since they do not provide that density of fit and heat transfer of the crystal to the radiator. Personally, I use Titan nano, an adequate price tag, a common, normal quality (not to consider an advertisement)
The problem with thermal pads arises for many, since they are difficult to find on sale. In our city, this is solved by buying in service workshops from employees not officially, although I don’t really understand why this is such a terrible shortage. If thermal pads are not got, then you should not despair. Firstly, they remain “alive” for quite a long time, that is, soft and slightly moist to the touch, secondly, there is a temporary replacement of the foil layer → thermal paste → layer of foil → thermal paste, etc. thickness. Since this is a very extreme measure (although it worked for me at one time), it is better to contact the SC about the replacement of gaskets.
Lubricant for the cooler: at a minimum, it is engine oil (oil for sewing machines, etc.), it is better to buy silicone oil in radio parts (quite cheap and not enough for once), or take a special lubricant from a computer store (there are sometimes something like vaseline)
Foam for cleaning. I strongly advise to be confused with its acquisition. I use foam to clean plastic surfaces (foreign, although it can be found in car cosmetics). Many advantages: cleans dirt on plastic well, gives an antistatic effect, therefore the dust does not stick any longer. This item is optional but recommended.
Actually with the tool and materials decided, therefore, into battle!
We begin to disassemble the laptop. I note that there are many models and everyone understands in different ways. In the old models, it is enough to remove the special compartment on the bottom and before the eyes of the entire cooling system, and in most of the new ones you have to disassemble everything completely. One way or another, we include logic and memory, unwind, if necessary, make sketches and inscriptions, where and what stood. Or we look mans on the Internet on analysis and in accuracy we repeat all movements. Next, proceed to the "preparation".
We got to the goal: cooler, radiator and a lot of dust.
Carefully separate the cooler from the radiator, rejoice in the padding of dust (wool, hair), carefully blow out (preferably on the street) brush the dust from everything that catches your eye with a brush. The plastic parts of the body, especially the grille, should be treated with foam and cleaned with a soft, clean cloth.
We disassemble the cooler, get to the blades. Now we try to lift the blades, if they are removed together with the spire, then you are very lucky, we remove and clean to shine. A couple of drops of lubricant in the spindle seat and collect everything back. We rejoice at the clean and easy-to-spin fan.
We take the cooling circuit in our hands, blow out the dust, remove with a cotton swab dipped in alcohol, the rest of the thermal paste (if the thermal paste dries out and turns into fossils, then use the cotton swab in the solvent). We perform the same operations to remove thermal paste with a processor, video chip and a bridge (Something may be missing depending on the model of the laptop :)).
Try not to overdo it with the amount of liquid on the cotton and do not fill the motherboard (nothing terrible, but still).
We decide whether or not to change the thermal pads, if not, then they can be slightly wiped with a cotton swab dipped in alcohol. Apply an even thin layer of thermal paste on the processor chip, video chip, bridge, apply a small amount of thermal paste on the radiator pad at the point of contact with the chip. We put the cooling circuit in place, rotate a millimeter from side to side and evenly distribute thermal grease and fasten everything in place. We assemble the laptop in a clear sequence, slowly, paying attention to the fasteners, latches and the length of the bolts (you can also punch the motherboard and the case).
Separate advice on the account of cleaning the keyboard, in any case should not go to her with a vacuum cleaner, especially with a powerful one. The surest option is to blow from a distance with compressed air or a compressor, and then foam, brush and carefully clean.
So collected, put the battery in place and ...
Do not turn on ... Do not despair, a very common mistake is not to short the RAM. We remove the battery, climb into the compartment and insert it well (but not until the crunch, of course).
We turn on and marvel at the quiet operation and grateful warm exhaust from the vent. To calm conscience, you can drive "Aida" or other similar programs, look at the temperature and enjoy the work done.
Pack the tool and material in a box and forget about it for the next six months, before the next preventive maintenance.
PS If anyone is interested in the self-made construction of cooling a bridge from a green radiator from an ancient video card, then in this laptop it doesn’t cool at all, and at a temperature of 79 degrees it drives off along with the hard drive. With such a modernization, the temperature came in the range of 45-50 and no longer does the brain.
All successful prevention, and care in this! I hope that my words will be interesting to someone, and whoever has learned nothing from this can always share experiences with others. Sincerely, thank you for your attention.
Source: https://habr.com/ru/post/169731/
All Articles