Android Application Development with C #
Monodroid and Monotouch are xamarin frameworks, which make it possible to develop an application in C # for Android and iOS, respectively. Since this is a relatively new technology information on the Internet is not too much (except for off site and a large number of topics on stackoverflow.com), in Russian, I did not find any tutorials and information in general.
To eliminate this misunderstanding, I decided to write a small tutorial on how to start developing applications for mobile platforms using these frameworks. In this article I will consider only Monodroid.

')
What you need to start developing?
1) Visual studio C # professional version and higher (go and grunt)
2) The framework itself (and he, in turn, will install java, virtual machine and everything else for us)
If with the first everything is clear, then with the second it is more difficult, as it turned out in the process of using the frishnaya version of the monodroid does not know how to compile .apk files, so you should either buy it or use a crack from the Internet (which lies far from Google’s first page).
Let's start
After launching all the necessary studio after installation, we will notice new types of projects to create:
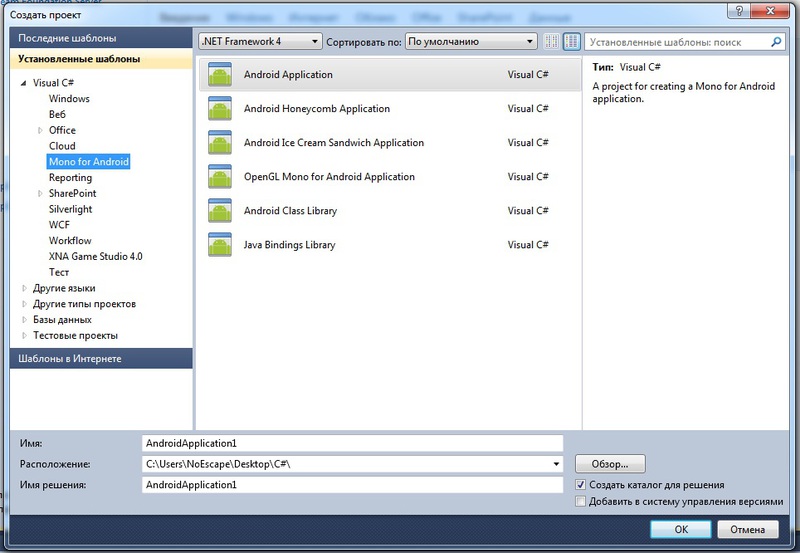
Choose Android Application. Several standard directories will be created:
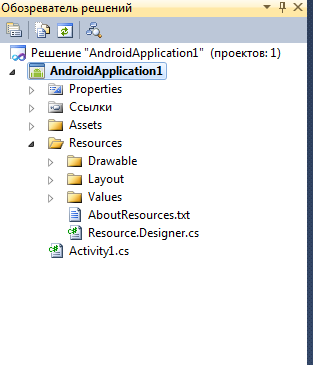
The Assets folder stores all the files used by the program for ala video, sounds, HTML files, etc. Initially, there is nothing in it except for a textbook with a description of the directory itself and why it is needed.
In the Drawable folder you need to place the image files used by the program.
The Layout folder contains graphical user interface files.
In the Values folder there are various parameters that can be created and loaded while the application is running (for example, you can remember the username and password there).
After creating an empty project, we can compile it by pressing F5 - the virtual machine settings will open with the choice of the device on which to run the test program. If you connect your device on an android with the debugging function turned on by USB (this is in the settings, the “for developer” tab), then you can launch it and test it directly on it. I strongly advise you to conduct tests on a real device. Many tach elements cannot be tested on a virtual machine; moreover, personally, on my virtual machine, the application has been deployed for quite some time. About a minute passes between the compilation and the launch on the virtual machine.
By default, we have a button, when clicked, it will be displayed how many times we clicked on it. Let's try to do something more interesting.
Open the interface file and try to change it.
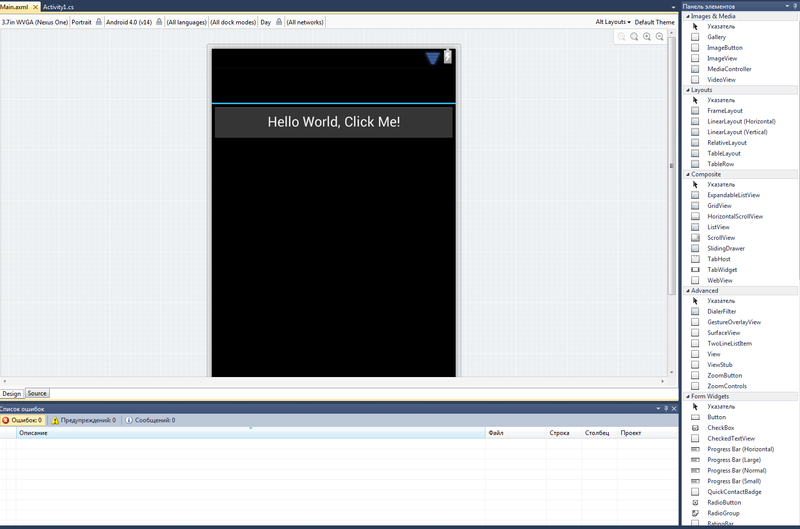
Below 2 tabs - view the interface code and the interface itself. On the right are various components.
I’ll say right away: it’s not for the faint of heart to use the built-in shaving unit. She is so lazy and doesn’t do what you expect, which is just awful. Instead, you can use the droiddraw.org website after creating the interface there and clicking on the Generate button can copy the code into the code tab and everything will be ok.
And in other matters, the best way is to create an interface from code, using formulas based on the screen resolution ratios. Without this, a normal interface that looks attractive on all screens is difficult to create.
However, for now let's go the easy way.
There are several types of objects on screen types of layers. However, many of them can contain each other and live together. Consider one of them:
1) LinearLayout - each element below the previous one.
2) RelativeLayout - each element is relative to the previous one (for example, you can set the parameter to the left of the button 1, below the text box, in the indent 40 pixels below the button 2, etc.
The settings of each component in the properties window are pretty familiar, and the properties themselves are similar to the Vinform elements.
Having created a more or less attractive interface, it should be run like that.
For this there is an Activity. By default, we have a file called Activity1, in which the class is derived from the Activity class.
Line above class declaration
[Activity (Label = "AndroidApplication1", MainLauncher = true, Icon = "@ drawable / icon")]
describes the title of the application window, the icon, and learns whether to launch this activity when the application starts.
From the main startup activation you can run any other. After autoloading this activation after starting the application, we load the interface with the line SetContentView (Resource.Layout.Main);
To access any item, we must use the FindViewById <> () function; when assigning an instance of the tag class an element that we need. Specifically, in our example, we see the line
FindViewById (Resource.Id.MyButton);
“MyButton” is the name of the button, you can see it when creating the interface in the code tab.
Through a simple construction Button Button = FindViewById (Resource.Id.MyButton);
we can work with the button and process all actions with it. In this case, the click handler looks like this:
button.Click + = delegate {button.Text = string.Format ("{0} clicks!", count ++); };
Having designed and written the app, we mine compile the apk file by going to the build tab and clicking the Package for android button. 2 files will appear in the project folder, one of which is signed by an automatic signature; we can use it to install the device.
On this, I think this short tutorial can be finished. In the future, I will most likely write a similar tutorial on porting and developing on iOS.
To eliminate this misunderstanding, I decided to write a small tutorial on how to start developing applications for mobile platforms using these frameworks. In this article I will consider only Monodroid.
')
What you need to start developing?
1) Visual studio C # professional version and higher (go and grunt)
2) The framework itself (and he, in turn, will install java, virtual machine and everything else for us)
If with the first everything is clear, then with the second it is more difficult, as it turned out in the process of using the frishnaya version of the monodroid does not know how to compile .apk files, so you should either buy it or use a crack from the Internet (which lies far from Google’s first page).
Let's start
After launching all the necessary studio after installation, we will notice new types of projects to create:
Choose Android Application. Several standard directories will be created:
The Assets folder stores all the files used by the program for ala video, sounds, HTML files, etc. Initially, there is nothing in it except for a textbook with a description of the directory itself and why it is needed.
In the Drawable folder you need to place the image files used by the program.
The Layout folder contains graphical user interface files.
In the Values folder there are various parameters that can be created and loaded while the application is running (for example, you can remember the username and password there).
After creating an empty project, we can compile it by pressing F5 - the virtual machine settings will open with the choice of the device on which to run the test program. If you connect your device on an android with the debugging function turned on by USB (this is in the settings, the “for developer” tab), then you can launch it and test it directly on it. I strongly advise you to conduct tests on a real device. Many tach elements cannot be tested on a virtual machine; moreover, personally, on my virtual machine, the application has been deployed for quite some time. About a minute passes between the compilation and the launch on the virtual machine.
By default, we have a button, when clicked, it will be displayed how many times we clicked on it. Let's try to do something more interesting.
Open the interface file and try to change it.
Below 2 tabs - view the interface code and the interface itself. On the right are various components.
I’ll say right away: it’s not for the faint of heart to use the built-in shaving unit. She is so lazy and doesn’t do what you expect, which is just awful. Instead, you can use the droiddraw.org website after creating the interface there and clicking on the Generate button can copy the code into the code tab and everything will be ok.
And in other matters, the best way is to create an interface from code, using formulas based on the screen resolution ratios. Without this, a normal interface that looks attractive on all screens is difficult to create.
However, for now let's go the easy way.
There are several types of objects on screen types of layers. However, many of them can contain each other and live together. Consider one of them:
1) LinearLayout - each element below the previous one.
2) RelativeLayout - each element is relative to the previous one (for example, you can set the parameter to the left of the button 1, below the text box, in the indent 40 pixels below the button 2, etc.
The settings of each component in the properties window are pretty familiar, and the properties themselves are similar to the Vinform elements.
Having created a more or less attractive interface, it should be run like that.
For this there is an Activity. By default, we have a file called Activity1, in which the class is derived from the Activity class.
Line above class declaration
[Activity (Label = "AndroidApplication1", MainLauncher = true, Icon = "@ drawable / icon")]
describes the title of the application window, the icon, and learns whether to launch this activity when the application starts.
From the main startup activation you can run any other. After autoloading this activation after starting the application, we load the interface with the line SetContentView (Resource.Layout.Main);
To access any item, we must use the FindViewById <> () function; when assigning an instance of the tag class an element that we need. Specifically, in our example, we see the line
FindViewById (Resource.Id.MyButton);
“MyButton” is the name of the button, you can see it when creating the interface in the code tab.
Through a simple construction Button Button = FindViewById (Resource.Id.MyButton);
we can work with the button and process all actions with it. In this case, the click handler looks like this:
button.Click + = delegate {button.Text = string.Format ("{0} clicks!", count ++); };
Having designed and written the app, we mine compile the apk file by going to the build tab and clicking the Package for android button. 2 files will appear in the project folder, one of which is signed by an automatic signature; we can use it to install the device.
On this, I think this short tutorial can be finished. In the future, I will most likely write a similar tutorial on porting and developing on iOS.
Source: https://habr.com/ru/post/169467/
All Articles