Manage Network Folders with PowerShell
We publish the second part of the translation of the article File Server Management with Windows PowerShell . In the first part, we looked at how to build network folder reports using PowerShell.
This time, our focus is on issues such as creating a network folder, delegating access to it and stopping sharing.
Create new folders
Now let's take a look at how PowerShell can be used to create and manage files and folders. Everything that I will demonstrate, you can use in PS 2.0 and 3.0 (although in PS 3.0 you can simplify the examples I've given). Managing a file server in PowerShell 2.0 requires accessing WMI and writing complex scripts. In PowerShell 3.0, especially if you have Windows Server 2012, this type of management is greatly simplified. That's what I'm going to consider.
Everything we need is already available in the SMBShare module, which is installed by default on my Windows 8 machine. The commands in this module will allow us to manage folders locally and remotely. I'm not going to dwell on each team in detail - they are pretty much the same type; I recommend reading help and examples. We will start by using the New-SMBShare command to create a new folder.
You need to do this in a couple of steps. Since the folder should be on a remote server, I will set up a remote PowerShell session:
$session=New-PSSession -ComputerName SRV2K12RC Of course, I can use the interactive session, but we are faced with the task of automation, so I use the Invoke-Command command . First, I will create a new folder:
invoke-command -ScriptBlock {mkdir c:\shares\companyfiles}-Session $session ')
And now the hard part. I want to set these NTFS permissions so that JDHLAB \ Domain Users have Change permissions (Change). To do this, you need to create a new access rule that changes the list of access rules and reapplies them to the folder. Example 6 shows an example script:
Example 6: Creating, modifying and applying access rules
$sb={ Param($path) $du=new-object System.Security.AccessControl.FileSystem AccessRule "jdhlab\domain users","Modify","allow" $acl = Get-ACL $path $acl.AddAccessRule($du) Set-Acl -Path $path -AclObject $acl } In Example 6, I made it so that the path parameter can be reused.
Invoke-Command -ScriptBlock $sb -Session $session -ArgumentList c:\shares\companyfiles There are ways to simplify this process, but for purposes of clarity, we will keep everything as it is. Now we are ready to create a new folder.
I can use this session, but I want to demonstrate how you can use the New-SmbShare command to remotely connect to a file server:
New-SmbShare -Name Files -Path c:\shares\companyfiles -CimSession SRV2K12RC -FullAccess "jdhlab\domain admins" -ChangeAccess Everyone -Description "Company files" Access to the default folder is Read Only (ReadOnly). I gave domain admins Full Control over the folder, and I gave everyone else the rights to change (Change). This path is relative to the remote computer, which should work under PS 3.0.
Advanced folder settings
You can get information about a folder at any time by using the Get-SMBShare command , as you can see in Figure 9. You can do a couple more things with our folders, for example, to encrypt the SMB connection, which enumeration mode and caching type to use for folders. I'm going to use Set-SMBShare to make a flexible setup for the folder I just created. Let's see it on example 7.
Example 7: Flexible folder configuration
PS C:\> Set-SmbShare -Name Files -EncryptData $True -FolderEnumerationMode AccessBased -CachingMode Documents -CimSession SRV2K12RC Confirm Are you sure you want to perform this action? SRV2K12RC: Performing operation 'Modify' on Target '*,Files'. [Y] Yes [A] Yes to All [N] No [L] No to All [S] Suspend [?] Help (default is "Y"): 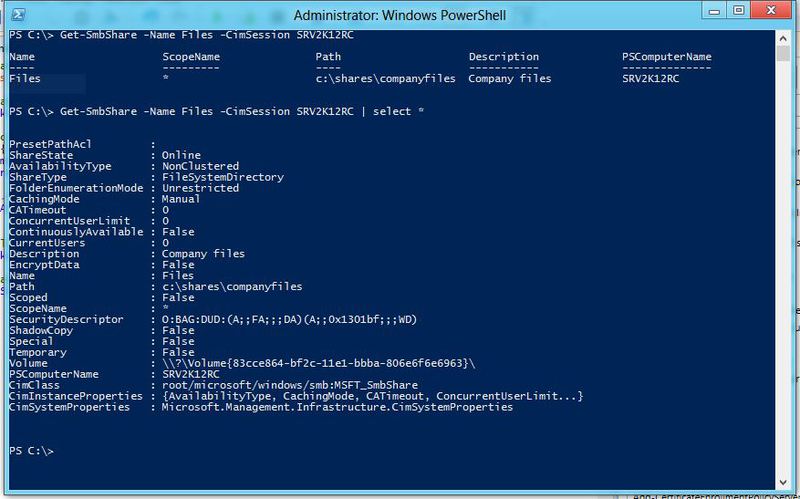
The above applies to a single folder, but you can easily use Get-SMBShare to extract all folders and then transfer them to Set-SMBShare and apply changes to them all:
Get-SMBShare -CimSession SRV2K12RC -Special $False | Set-SmbShare -EncryptData $True -Confirm:$false This command will extract all folders (except administrative folders) on computer SRV2K12RC and set the EncryptData property to True . I don’t want to confirm every action, so the Confirm switch is set to False . Set-SMBshare does not write anything into the pipeline, in the event that you do not use –Passthr u. As you can see, I was able to change everything with the help of a single command.
Deleting network folders
Finally, delete the network folder. The code in Example 8 completely disables sharing of the folder I just created. Is it possible to make it easier? Of course, the folder structure is still on the file server.
Example 8: Delete the network folder
PS C:\> Remove-SmbShare -Name Files -CimSession SRV2K12RC Confirm Are you sure you want to perform this action? SRV2K12RC: Performing operation 'Remove-Share' on Target '*,Files'. [Y] Yes [A] Yes to All [N] No [L] No to All [S] Suspend [?] Help (default is "Y"): Bringing together
And now let's summarize everything in one script. Without going into details of the code, I note that the commands can be run in parallel. For example, after creating a folder, I create a network folder and set NTFS permissions at the same time, see example 9.
Example 9: Create a network folder and set NTFS permissions
Workflow New-FileShare { Param( [string]$Name, [string]$Path, [string]$Principal, [string]$Right="Modify" ) # . Sequence { # Write-Verbose -Message "Creating new folder $path on $pscomputername" $newfolder = New-Item -Path $path -ItemType Directory } # . Sequence { Parallel { # InlineScript { Write-Verbose -Message "Modifying NTFS permissions" Write-Verbose -Message "Creating entry for $using:principal with a right of $using:Right" $entry=New-Object -typename System.Security .AccessControl.FileSystemAccessRule -argumentlist $using:Principal,$using:Right,"allow" # ACL $acl = Get-ACL -path $using:path # $acl.AddAccessRule($entry) Write-Verbose -Message "Applying the new ACL" Set-Acl -Path $using:path -AclObject $acl } #inline # . Write-Verbose -message "Creating the file share $name" $newshare = New-SmbShare -Name $name -Path $path -Description "File share for $principal" -EncryptData $True -FolderEnumerationMode AccessBased -CachingMode Documents -FullAccess "$env:userdomain\domain admins" -ChangeAccess $Principal } #Parallel } #sequence # . Sequence { Parallel { Write-Verbose -Message "Getting the new share" Get-SmbShare -Name $name Write-Verbose -Message "Getting the new share access" Get-SmbShareAccess -Name $name } } This script creates a new network folder, assigns permissions to a user or group. I can run it from under Windows 8 or on a Windows Server 2012 file server using the following command (which should be entered in one line):
New-FileShare -Name adeco -Path c:\shares\adeco -Principal jdhlab\adeco -Right "FullControl" -PSComputerName SRV2K12RC The process will take a couple of seconds. The results in the screenshot below.

There is nothing wrong with using an ordinary GUI for the same. However, if you need specialized reports or you want to automate this process, PowerShell is the best fit.
All examples can be downloaded here . The author also recommends visiting the forums on PowerShell.org for all issues related to PowerShell.
Source: https://habr.com/ru/post/169049/
All Articles