Installing Fusion Drive in iMac 2010
 My two year old iMac began to upset me at the speed of work. After the installation of the “Lion” the braking began, after the “Mountain Lion” the system began to slow down even more.
I was particularly upset by the very slow performance of the hard disk. Since I work at night, it was not very comfortable to listen to the constant noise of the hard drive. Installing 16GB of RAM did not solve the problem. It would not be bad to install an SSD drive. But they are small and expensive. And where to put data from a terabyte disk? It's like moving from a three-room apartment to a one-room apartment.
When Apple announced Fusion Drive, I thought, this is what I need and speed and volume. But to buy for the sake of this new computer, I was not ready. And when I read on Habré that this technology runs easily on old poppies, I realized that the time had come. So - upgrade.
')
There was some thrill. It was fueled by legends and stories about dust falling under the glass of the display. And the fact that Apple devices can be disassembled only in specialized centers and for big money. And most, no. But fearing wolves is not going to the forest.
I already had experience in disassembling and assembling laptops. And I am aware that I will do everything at your own peril and risk, and I warn you about this too. All written concerns aimak of 2010 release with 27 diagonal.
In the head loomed a plan.
- Buy SSD 256G drive.
- Somehow disassemble the iMac.
- Install the drive and edit the Fusion Drive.
I started from the second point.
There are two ways: the first is to install an SSD drive instead of an optical drive. Then it will not be necessary to remove the motherboard, but still it was necessary to remove the glass from the aimag. And if so, then I chose the option a little more difficult. And the DVD will remain. We put the disk second, gracefully gluing it with tape to the inner wall of the computer.
To work, I purchased the SSD installation kit in the US. link. eshop.macsales.com/item/OWC/DIYIM27SSD10

The kit itself cost $ 49, plus international shipping for $ 13. But that's not all.
When I paid for the whole thing, they contacted me and made me stunned; Due to the fact that Russia has very strict customs regulations, I need to pay another $ 42.
My pleas to the conscience that I had already paid for the international shipment according to the tariffs of their website did not lead to anything. I was warmly apologized to me and kindly offered to cancel the order. But I already got involved in this matter and I no longer wanted to retreat. I had to pay extra. As a result, the whole set cost me $ 104. Hmm ... a little expensive.
To be honest, you can save a lot and not buy this kit.
From the whole kit I used:
1. Two suckers that can be bought on aliexpress.com for 12 dollars with free shipping to Russia.
2. Tricky screwdriver chamomile T-10, which can be bought there for a couple of dollars.
3. Normal Phillips screwdriver.
4. SATA cable (you will find one in your cable box)
5. Power splitter for SATA drives.
6. Towel - microfiber. Sold in the household.
7. Six pieces of double-sided stockpile.
Actually, almost the entire set of tools turned out to be superfluous. I think you will meet much less money. Oh yeah, I used tweezers, which I already had. And international delivery for $ 55 you do not need.
The most valuable is the SATA drive power splitter. On aliexpress, it sells for $ 2.2.

Buying a disc.
I have no operating experience of SSD drives. After talking with more experienced comrades, I came to the conclusion that you need to take the drive with any controller except SandForce. The choice fell on a Vertex 4 256GB drive with an IndiLinx controller. Yes, and other drives in my city in stock and was not. And my hands were already itching to look into the aimak's guts, since the day before from America a package arrived with a set for installation.
We start dismantling
The site has a detailed video tutorial on how to disassemble and install SSD in imac 2010.
Everything is clear and without knowledge of the English language. For convenience, I took a tablet with me and launched a video with it on video instructions. It really helped. I scrolled the video several times to not miss anything.
So, plan of action.
1. Turn off the computer. Disconnect all cords.
2. Suction cups glass. (And it turns out it is held by magnets).
3. Disconnect the matrix. 8 tricky bolts. The main matrix not to touch with your fingers, as the Americans say in the video, is “very difficult to clean.”
4. Disconnect the motherboard. 10 tricky bolts.
5. Glue the drive to the tape.
6. We connect cables to disks.
7. We collect.
Americans are planning to spend 60 minutes on everything about everything. I did it at three o'clock with a lunch break.
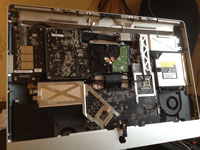
Surprise first. I was very afraid that dust would fall on the inside of the glass. But when I neatly detached the glass from the case, a pinch of dust fell out from under the junction of the glass onto the matrix. Well, everything! Shock! Watch me now on the internet through a dusty window.


Surprise the second. When you unscrew the screws of the matrix, the tweezers must be held very tightly. Since the magnets strive to pull the screws from the tweezers.
Surprise the third. As it turned out inside the poppy there was even more dust that had to be taken in the hands of a brush and a hairdryer. What my spouse really helped me with.

And the dust turned out to be very easily removed from the glass and the matrix, thereby the microfibre towel.
No more surprises. I slightly disturbed the order of the video instruction. There they stick the disk on the tape, and then connect the cable. It is not comfortable. I first connected the cable, and then glued the disc to the case. So comfortable. Very much there inside everything is closely located.

Unfortunately, I do not have a photo of the disk already installed. He was focused and forgot to photograph, but, I repeat, everything is shown in great detail in the video instructions.
Reassembly
When reassembling, be sure to plug into the rear connectors all cables that are. This will allow the motherboard to stand up smoothly, and in the future you will not have distortions in the connectors. And, yes, one detail. Screws that hold the motherboard are screwed back with a noticeable effort, more than when unscrewing. At first it seemed to me that I was breaking the thread, but no, everything turned out to be in order, this is some kind of fixing chip.
Before primagnit glass, I turned on the computer and made sure that all the components work. Indeed, in the process I turned off a bunch of internal connections. Aymak booted and pleased me with the message. “The connected drive cannot be used. Initialize?
It was a good sign. With the monitor turned on, I carefully checked again whether there is dust on the matrix or on the glass. Everything is good. Fears were far-fetched. And I installed the glass, nicely clicking magnets. Bingo!
Part two. Run Fusion Drive.
The whole procedure is well-documented here in this article on Habré. Go to Fusion Drive.
I was guided by this article , as it seemed to me more understandable.
The following procedure.
1. Format SSD using Disk Utility.
2. We make BackUp of the whole system with the help of Time Machine.
3. Using the Apple Recovery HD HD USB utility, we create a bootable USB flash drive.
4. Boot from the flash drive and install our Fusion Disk through the Terminal, as described in the articles.
5. Restart and restore the system from Time Machine.
Everything went smoothly. In the end, I got one big disk 1,25TV.
But the system continued to "grunt" hard drive, which upset me. Where is the promised performance? Is it all for nothing?
It was necessary to conduct testing. Unfortunately, I didn’t measure hard disk speeds before installing Fusion Drive. It was clear one thing, then he braked.
In the AppStore downloaded the free program Blackmagic Disk Speed Test.
Measurement showed me the speed of 130 MB / s reading and the same record. That said little to me. Then, for comparison, I measured the speed on mac mini 2012. On it, the hard disk speed was 70 MB per second. Not a big increase, I thought. Probably you need all the same to enable technology TRIM. By default, it is disabled if the SSD is not installed by Apple.
What is TRIM, read here. Trim activation in OS X Mountain Lion. In short, it increases disk speed by 30%.
I did not play with the terminal and ran the TrimEnabler program, since the program authors assured that all the glitches described in the article were fixed.
I rebooted the computer, and, oh, a miracle, it booted in about 20 seconds. Before that, it took me five minutes to boot. Naturally with the restoration of all running programs.
I was very impressed. Here it is! No wonder tried. Measured speed - 200 mb / s. Already better.
Findings.
I have been working on the system for five days now. The flight is normal. At first, the system "grunt" hard drive, moving files to the SSD. And then came the long-awaited silence.
Aimak breathed and fluttered. Programs open very quickly. They go to the hard disk very rarely when I climb into some old distant folder. Now once again measured the speed of the disk. Already almost 250 mb / s. But as they say, it's not about the speed of the disk, but about the sensations.
I am very satisfied.

In conclusion, I can add that my fears about the upcoming aimag upgrade were in vain. Not gods iPhones collected.
Source: https://habr.com/ru/post/168835/
All Articles