Get network folder reports using PowerShell
 Jeffrey Hicks has published another article on PowerShell, this time dedicated to managing file servers. We decided to break it into two parts: building reports on the file server and directly managing file balls. In the first part, we consider the reports.
The post will address the following questions:
- How to display a list of all network folders on the computer (s)
- Create reports on the size of network folders
- Determine file ownership
- We find the date of creation of files. We reveal “old” files and files created over a certain period of time.
So, under the cut, you will find the translation of the article File Server Management with Windows PowerShell .
Get all network folders
To begin with, we define what is shared. The task is simple: we simply query the Win32_Share class to use Windows Management Instrumentation (WMI). You do not even need to log in to the file server. You can run this command from anywhere.
Get-WmiObject -class -Win32_Share -computername chi-fp01 ')
Instead of chi-fp01, specify the name of the computer that interests us.
By running this command you will receive all network folders, including printers (if any). But since we are talking about file balls, let's limit the query. All Win32_Share instances have a Type property, as shown in Table 1.

Add a filter to the original command:
Get-WmiObject -class -Win32_Share -computername chi-fp01 –filter "Type=0" Thus, we display only the necessary information.

But if you are also looking for hidden folders - those that end with a dollar sign ($) - the filter will have to be slightly rewritten:
Get-WmiObject -Class win32_share -computername chi-fp01 –filter "Type=0 AND name like '%$'" In WMI, a percent sign (%) is used instead of a wildcard. Print all folders except those that are hidden a little more difficult.
Get-WmiObject -Class win32_share -computername chi-fp01–filter "type=0 AND name like '%[^$]'" The command displays all Win32_Share objects whose Type property is 0 and the name does not end with $.
Get the size of the network folder
Quite often, information is needed on how much space the file balls take. Use Get-ChildItem , or its abbreviation dir , and pass the results to Measure-Object :
dir c:\shares\public -recurse | where {-Not $_.PSIsContainer}| Measure-Object -Property length -Sum -Minimum -Maximum As a result, you will receive information on the total number of objects, size in bytes, the smallest and largest file sizes. In the previous command, applied the filter. In PowerShell 3.0, the same thing can be made easier, but the command I used works both v2.0 and 3.0. It is best run locally. The code in Example 1 combines this command with our WMI technique to get a report on the size of the high-level folders.
Example 1: Report on the size of high-level network folders
$share=Get-WmiObject -Class Win32_Share -ComputerName CHI-FP01 -filter "name='Sales'" $sb={ Param ($path) dir $path | where {$_.PSIscontainer} | foreach { $stats=dir $_.Fullname -recurse -errorAction "SilentlyContinue" | where {-NOT $_.PSIscontainer} | Measure-object -Property Length -sum New-Object -TypeName PSObject -Property @{ Computername=$env:Computername Path=$_.Name Fullname=$_.Fullname SizeKB=[math]::Round(($stats.sum/1KB),2) NumberFiles=$stats.count } #property } #foreach } #sb $results=Invoke-Command -ScriptBlock $sb -ComputerName $share.__SERVER -ArgumentList @($share.path) -HideComputerName You can format or process $ results as your heart desires. Need a digestible table? Just use the following command:
$results | Format-Table Computername,Fullname,SizeKB,NumberFiles -autosize 
Thus, it is possible to make a full report on the use of all folders on the file server. Save time, use example 2.
Example 2: Report on the use of file sphere
$sb={ #Get the file shares locally. $shares=Get-WmiObject -Class Win32_Share -filter "type=0" foreach ($share in $shares) { #Suppress any access denied error messages. Write-Host "Measuring $($share.path)" -ForegroundColor Green $stats=dir $share.path -Recurse -ErrorAction SilentlyContinue | Where {-Not $_.PSIscontainer} | Measure-Object -Property Length -Sum $hash=@{ Computername=$env:Computername Path=$share.path Share=$share.Name SizeKB=[math]::Round(($stats.sum/1KB),2) Files=$stats.count } #Write a custom object to the pipeline for each share. New-Object -TypeName PSObject -Property $hash } #foreach $share }#sb $results = Invoke-Command -ScriptBlock $sb -ComputerName CHI-FP01 -HideComputerName And again I will slightly format the table.
$results | sort SizeKB –Descending | Select Computername,Share,SizeKB,Files | ft -auto 
Get files by owner
Moving on - find the owners of the files. If you use quotas, reports are likely to get. Otherwise, all you need to do is extract the ACL of the file that includes the owner and aggregate the results. It is best to add the owner of the file as a custom property.
$data=dir | where {-not $_.PSIsContainer} | select name, @{Name="Owner";Expression={(Get-ACL $_.fullname).Owner}}, length We can group by the property of the new owner and then process the new object.
$data | group owner | Select Name,Count,@{Name="Size";Expression={($_.Group | Measure-Object -Property Length -sum).Sum}} A couple of efforts and you can apply the same approach to the file ball, as indicated in the code of example 3.
Example 3: Group file balls by owner
$sb={ Param($path) $data=dir $path | where {-not $_.PSIsContainer} | select name, @{Name="Owner";Expression= {(Get-ACL $_.fullname).Owner}},length $data | group -property owner | Select @{Name="Computername";Expression={$env:computername}}, @{Name="Path";Expression={$path}},Name,Count,@{Name= "Size";Expression={ ($_.Group | Measure-Object -Property Length -sum).Sum}} } #sb <# Run the command remotely and suppress the RunspaceID since we don't really need it. #> Invoke-Command -ScriptBlock $sb -ComputerName CHI-FP01 -ArgumentList @("c:\shares\public") -HideComputerName | Select * -ExcludeProperty RunspaceID I also have to point out that there may be problems: with files whose name is more than 260 characters or contains unusual characters, especially if you are trying to run Get-ACL. In PowerShell 3.0, this cmdlet has the -LiteralPath parameter, which helps solve the above problems.
Again, we derive a readable table.
$data | Sort Size | ft -auto 
Get files by creation date
The last reporting technique I want to demonstrate is the creation of a report with the most recently created files. In fact, we create a collection of objects that we can use in several ways. You may want to use objects or delete or move files, or you may want to build a report that you can send to management. Always create PowerShell commands so that you can use them later.
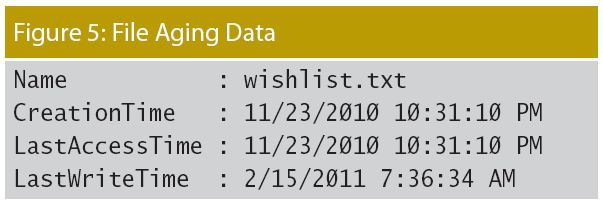
Determining the age of the file is not so easy. In PowerShell, a file object (file type object) has several properties that you may want to use. For example, the command:
get-item c:\work\wishlist.txt | Format-List Name,*time gives the output shown in the screenshot below.
Personally, I think it's better to use LastWriteTime , which means when the file was last accessed. I have encountered situations when LastAccessTime was updated through third-party programs, for example, antivirus, which in itself does not mean the truth. And LastAccessTime has been deactivated since Windows Vista, although you can enable it. You also need to be careful, because these values can vary depending on whether you copy or move files between disks. But you can solve it yourself. Using this file as an example, we can force PowerShell to tell us how old the file is. See example 4.
Example 4. Determining the age of files
PS C:\work> get-item wishlist.txt | format-list name, CreationTime,LastWriteTime, >> @{Name="Age";Expression={(Get-Date)-$_.LastWriteTime}}, >> @{Name="Days";Expression={((Get-Date) -$_.LastWriteTime).TotalDays}} >> Name : wishlist.txt CreationTime : 11/23/2010 10:31:10 PM LastWriteTime : 2/15/2011 7:36:34 AM Age : 511.06:42:17.4251748 Days : 511.279372271039 The Age property is a TimeSpan object, and the Days property is just the TotalDays property of this object. But since we can do this for one file, we can do it for others. Let's take a look at my shared folder and find all the files that have not changed in the last 400 days.
dir c:\shares\public -recurse | Select Fullname,CreationTime,LastWriteTime, @{Name="Age";Expression={(Get-Date)-$_.LastWriteTime}}, @{Name="Days";Expression={[int]((Get-Date) -$_.LastWriteTime).TotalDays}}, @{Name="Owner";Expression={(Get-ACL $_.fullname).Owner}} | Where {$_.Days -ge 400} | Sort Days -Descending I will go further and include the file owner. The screenshot below shows the results from running this code in a remote session on my file server.

I can save these results to a variable and use them at any time. Since I have the full name of the file, transfer to another command, for example, Remove-Item, is not difficult.
One of my favorite techniques is determining how many files were changed in a year.
dir c:\shares\sales -recurse | Select Fullname,LastWriteTime, @{Name="Age";Expression={(Get-Date)-$_.LastWriteTime}}, @{Name="Year";Expression={$_.LastWriteTime.Year}} | Group-Object Year | Sort Name As you can see in the screenshot, everything looks combed. Need details? You can analyze the Group property, which is a collection of files.

It is useful to know how many files did not change in 30, 90 or 180 days. Unfortunately, there is no easy way to use Group-Object for this, so I need to "go some other way"; see example 5.
Example 5: Determine the period of file changes
$path="c:\scripts" #Get some other properties in case we want to further #break down each bucket. $files=dir $path -recurse | Select Fullname,CreationTime,LastWriteTime,Length, @{Name="Age";Expression={(Get-Date)-$_.LastWriteTime}}, @{Name="Days";Expression={[int]((Get-Date) -$_.LastWriteTime).TotalDays}} $hash=@{ Path=$path Over= ($files | Where {$_.Days -gt 365} | Measure-Object).Count '365Days'= ($files | Where {$_.Days -gt 180 -AND $_.Days -le 365} | Measure-Object).Count '180Days'= ($files | Where {$_.Days -gt 90 -AND $_.Days -le 180} | Measure-Object).Count '90Days'= ($files | Where {$_.Days -gt 30 -AND $_.Days -le 90} | Measure-Object).Count '30Days'= ($files | Where {$_.Days -gt 7 -AND $_.Days -le 30} | Measure-Object).Count '7Days'= ($files | Where {$_.Days -gt 0 -AND $_.Days -le 7} | Measure-Object).Count } New-Object -TypeName PSObject -Property $hash | Select Path,Over,365Days,180Days,90Days,30Days,7Days The figure below shows the result when I ran this code for a folder with my scripts, which, as I know, has a dense age distribution (decent age distribution). My code does not include actual files, but it would be too difficult to change my example.

The post is based on the first part of the article File Server Management with Windows PowerShell .
Bonus:
Speaking of how to find files using PowerShell and WMI, Jeffrey Hicks writes on his blog (part 1 and 2 ).
Source: https://habr.com/ru/post/168377/
All Articles