Secrets of fast coding in WebStorm
Today there are some practical tips for working with WebStorm.
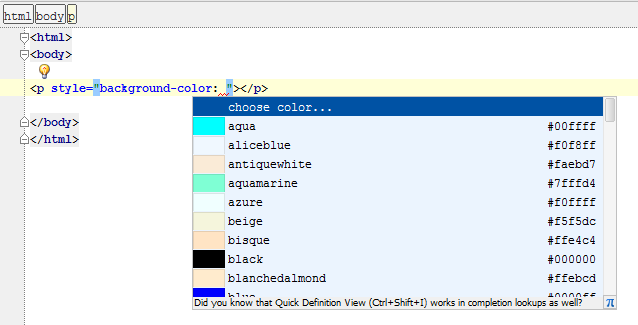
First we write quite simple HTML, after color: press <Ctrl-space> and we get a list of colors.
')
KO prompts: in all IDE from JetBrains <Ctrl-space> - this is a context-sensitive prompt.
As soon as we chose a color, a small square of the same color immediately appears on the vertical bar to the left of the text. Now you can click on it, and the palette will open, from which you can choose any color at all.

And now let's imagine a more complicated project, a small application under node.js.
JetBrains IDEs are said to be good attention to detail and an understanding of the context. Here, it would seem, a trifle: for testing this application I need to make a simple page with a form in HTML. Made, tried, complicated the application, the test also needs to be complicated: I am reworking the form so that it looks convenient for filling in several fields.
I start typing at the end of the line tag

Add a new function to the .js file. I write fun <Ctrl-space>, autocompletion works, I get a function, then I can continue: the name and the function body. WebStorm has two ways to autocomplete:
When you put an opening brace, the closing one is immediately put - and you want, and you will not forget it at the end of the function body. You press Enter - and she kindly drives off not to the next line, but two lines down, opening space for the function body.
It is necessary to multiply the line, say, a form field of the same type? <Ctrl-D> (from the word Duplicate).
It is necessary to proceed to the definition of something (variable, function, class?) <Ctrl-B> (from the word Base). And now it would be necessary back? <Ctrl-Alt-Left Arrow>.
A few more tricks for those who, like me, recently wrote under node.js:
1) If an error occurs in node.js when launching an application from WebStorm
this most likely means that you are trying to start another copy of the node.js server (and only one copy can live on one TCP port). To avoid this, you need to Run | Edit Configurations in the node.js branch for your application (for example, index.js) check the checkbox no other instances are running .
2) If the application has require ('module'), and definitions (for example, functions) from this module are not visible in the IDE, and are not available by Ctrl-B, it looks like you cynically violate the recommendations of the node.js developers: if you use the module in the project, you need to install it locally.
This means ( thanks to Sergey Simonchik for the clarification!) That in the project folder there should be a folder node_modules, and there should be folders of the corresponding modules in it. If there is no folder, and using the npm install command, the module is not created, it must be created manually, and in the root folder of the project on the command line, give the command npm install module .
The npm program is stupid (or too smart): if you don’t have node_modules at the root of the project and there is a node_modules folder above the project root, the module will be installed locally into it.
If the modules are installed correctly, and WebStorm continues to emphasize the functions of the modules with a gray wavy line (“not defined”), then you need to note which node.js libraries you include:


3) On-the-fly code verification in WebStorm can be done in as many as three different ways, all three are quite flexible: JSLint, JSHint and internal code inspector. By default, only the internal inspector is enabled, which can be configured inhumanly flexible in the Settings-> Inspections menu.
If you need to enable JSHint or JSLint, then this is done in the Javascript menu | Code Quality Tools. Both of these tools are external, but they come bundled with WebStorm and are transparently integrated into the IDE.

When you turn on any ways to check the code in the editor window, it immediately highlights what the inspectors think is errors, and on the error indication bar to the right of the text, a lot of red and yellow dashes appear, crying about the need to fix the code manually. Depending on whether you are writing code to run in a browser or on a server, you can enable different settings of the inspectors, as some quite correct code for node.js JSLint by default is strongly criticized.
Not everyone constantly needs spell checking with the built-in code inspector. I do not want to name the variables in my code with the words of the English language, and everyone there qry_1 and qry_2 are underlined by a green wavy line (not to mention the names of the fields in the database, which also come across in the code). You can disable spell checking in Settings | Inspections | Spelling.
Of course, this is not all the secrets of convenient coding in WebStorm, and if the community approves the text, in the next releases we will talk about support for TypeScript, SourceMaps and some useful hot keys.
UPD : Especially for those who silently put a minus: as always, the author will be grateful not only to those who are satisfied, but also to those who will tell what disappointed and what I would like to see. Together we will make the world a better place.
First we write quite simple HTML, after color: press <Ctrl-space> and we get a list of colors.
')
KO prompts: in all IDE from JetBrains <Ctrl-space> - this is a context-sensitive prompt.
As soon as we chose a color, a small square of the same color immediately appears on the vertical bar to the left of the text. Now you can click on it, and the palette will open, from which you can choose any color at all.
And now let's imagine a more complicated project, a small application under node.js.
JetBrains IDEs are said to be good attention to detail and an understanding of the context. Here, it would seem, a trifle: for testing this application I need to make a simple page with a form in HTML. Made, tried, complicated the application, the test also needs to be complicated: I am reworking the form so that it looks convenient for filling in several fields.
I start typing at the end of the line tag
<br> <br> and offers a list of options with the already selected tag that I need. I just press Enter, and - done!Add a new function to the .js file. I write fun <Ctrl-space>, autocompletion works, I get a function, then I can continue: the name and the function body. WebStorm has two ways to autocomplete:
<Ctrl-space>, <Enter>- this is to supplement with the insertion of text, and
<Ctrl-space>, <Tab>- with the replacement of the text to the right of the cursor to the separator (removes incorrectly written keywords and names).
When you put an opening brace, the closing one is immediately put - and you want, and you will not forget it at the end of the function body. You press Enter - and she kindly drives off not to the next line, but two lines down, opening space for the function body.
It is necessary to multiply the line, say, a form field of the same type? <Ctrl-D> (from the word Duplicate).
It is necessary to proceed to the definition of something (variable, function, class?) <Ctrl-B> (from the word Base). And now it would be necessary back? <Ctrl-Alt-Left Arrow>.
Attention! You can plunge!
<Ctrl-Alt> - <left arrow> on some laptops flips the screen 90 o . To cancel this useful function and use this key combination in WebStorm, you need to call the Intel HD-graphics program in the right side of the system panel, and there select the Key combination | Turn off .

A few more tricks for those who, like me, recently wrote under node.js:
1) If an error occurs in node.js when launching an application from WebStorm
throw arguments[1]; // Unhandled 'error' event Error: listen EADDRINUSE this most likely means that you are trying to start another copy of the node.js server (and only one copy can live on one TCP port). To avoid this, you need to Run | Edit Configurations in the node.js branch for your application (for example, index.js) check the checkbox no other instances are running .
2) If the application has require ('module'), and definitions (for example, functions) from this module are not visible in the IDE, and are not available by Ctrl-B, it looks like you cynically violate the recommendations of the node.js developers: if you use the module in the project, you need to install it locally.
This means ( thanks to Sergey Simonchik for the clarification!) That in the project folder there should be a folder node_modules, and there should be folders of the corresponding modules in it. If there is no folder, and using the npm install command, the module is not created, it must be created manually, and in the root folder of the project on the command line, give the command npm install module .
The npm program is stupid (or too smart): if you don’t have node_modules at the root of the project and there is a node_modules folder above the project root, the module will be installed locally into it.
If the modules are installed correctly, and WebStorm continues to emphasize the functions of the modules with a gray wavy line (“not defined”), then you need to note which node.js libraries you include:
3) On-the-fly code verification in WebStorm can be done in as many as three different ways, all three are quite flexible: JSLint, JSHint and internal code inspector. By default, only the internal inspector is enabled, which can be configured inhumanly flexible in the Settings-> Inspections menu.
If you need to enable JSHint or JSLint, then this is done in the Javascript menu | Code Quality Tools. Both of these tools are external, but they come bundled with WebStorm and are transparently integrated into the IDE.
When you turn on any ways to check the code in the editor window, it immediately highlights what the inspectors think is errors, and on the error indication bar to the right of the text, a lot of red and yellow dashes appear, crying about the need to fix the code manually. Depending on whether you are writing code to run in a browser or on a server, you can enable different settings of the inspectors, as some quite correct code for node.js JSLint by default is strongly criticized.
Not everyone constantly needs spell checking with the built-in code inspector. I do not want to name the variables in my code with the words of the English language, and everyone there qry_1 and qry_2 are underlined by a green wavy line (not to mention the names of the fields in the database, which also come across in the code). You can disable spell checking in Settings | Inspections | Spelling.
Of course, this is not all the secrets of convenient coding in WebStorm, and if the community approves the text, in the next releases we will talk about support for TypeScript, SourceMaps and some useful hot keys.
UPD : Especially for those who silently put a minus: as always, the author will be grateful not only to those who are satisfied, but also to those who will tell what disappointed and what I would like to see. Together we will make the world a better place.
Source: https://habr.com/ru/post/168267/
All Articles