Mail server based on ROSA Server Enterpise Linux in a few minutes
Introduction
This article is a continuation of a series of tutorials related to configuring ROSA Server. In the previous article, we described the deployment of a named-server based on the ROSA Enterprise Linux Server (hereinafter referred to as RELS) using the ROSA Directory Server tool.
Today I'll show you how you can quickly and easily deploy your own internal corporate mail server, including with support for several mail domains.
Like last time, we will assume that the OS is already installed. Just in case, I remind you that if you install RELS from scratch, then when selecting packages in the “Servers” section, you must select the “ROSA Directory Server” option.
When deploying a server within your company, you should use the requisites and names that are taken from you.
I intentionally lowered the firewall setting, since there are so many manuals on this topic. I describe exactly what has not yet been published on the Web.
Preparing for launch
')
Before starting the settings, make sure that the hostname -f command gives something like:
If any error occurs during the execution of this command, then open the / etc / hosts file and set the FQDN name manually. On the example of our system, it will look like this:
If you do not do this, during the installation of the necessary components, you may receive an error message due to the fact that the ROSA Directory Server cannot find the FQDN of the server. Because of this, further installation of RDS components will be interrupted.
The first thing we do is run the component deployment and initial setup wizard called ROSA Server Setup. The icon of this application is available directly on the desktop, or in the main menu Options> ROSA Server Setup. You can also configure using the web interface by contacting
Anyway, your browser will be launched, where this window will appear:

You must select the item "Go to ROSA Server Setup". At the next step, a warning will appear about the need to add an exception to the Firefox browser in order to add a self-signed certificate to protect the connection connection to the web console server settings. You must click on the button "Add exceptions". Otherwise, we will not be able to configure the server.
With proper implementation of all necessary actions, the window shown below should appear.

It is used as root. The password is also from the root user. Then we will be in the main menu. To perform our tasks, you need to select a section on the left called "ROSA Directory Server". Then press "Enter".

In this section, we select the modules we need to configure the mail server. The list of the minimum services needed to solve the problem:
Having finished the necessary modules, you should click on the button “Install components”. After that, anyone can drink tea / coffee / juice, while all the necessary components of the future server are installed.
At the very end, the “Continue” button and the “Failed to install” notification will indicate the success of the completed step, as shown below.

After clicking the "Continue" button, we proceed directly to the primary configuration of the mail server and the DNS server. Our eyes should open a form that must be filled with the necessary data.
A bit about server settings:
For greater clarity, add screenshots:


After filling out the form, you must click "Continue", thereby confirming the correctness of the settings. If any data was entered in the process of filling out the form incorrectly, you can click the "Back" button and change the settings.
A big request to pay attention to the messages that appear during the next step of the setup wizard. You should write down or remember the addresses by which you can get into the server administration interface and usernames for login.
You should also read messages related to server settings. For example, notifications about the need for ports in the firewall, as well as some general information about the settings of the mail server. Once again, just in case, let me remind you that the MDS password that you entered in the form above will be required to log into the ROSA Management Console (hereinafter referred to as RMC)

Upon completion of the initial configuration procedure, you must open a browser and enter the address specified in the server setup process: localhost / mmc . In the future, the server settings panel can be accessed from the local network by IP address or by the FQDN of the server.
If everything is correct, then the RMC login page should open. To log in, you must use the root username and password specified in one of the previous steps. Optionally, you can select the RMC interface language.
The next step necessary for setting up the construction of an internal corporate mail server is setting up a name server, without which the mail server simply will not function.
To configure DNS, go to the "Network" section in the main window and select "Add DNS zone". In the section that opens, you must specify the following parameters:
If all settings have been entered correctly, then after pressing the “Create” button, a corresponding confirmation will appear, which at the same time asks us to restart the DNS server daemon. What we will do by going to the section "Managing network services". More details can be obtained by reading the previous article just dedicated to configuring the DNS server.
After creating a DNS zone, you need to add a mail domain. To carry out the procedure, go to the "Mail" section and select the "Add Domain" item.

As already mentioned, the mail domain name can be the same as the FQDN name of the domain we created. In the illustration above, the adjustment is made in this way. After creating the mail domain, be sure to remember to restart the DNS server.
After creating a domain, you must create at least two users in order to verify the correct functioning of the mail system.
If there is such a desire, you can specify the size of the quota for mailboxes of users of the mail domain, by specifying a “tick” next to the corresponding item.
After creation, do not forget to restart the daemon responsible for the work of the DNS.
If you need several domains, it is enough to carry out the same procedure again.
We jump!
It is time to check our server in action. But before we do this, create a couple of test users on the server. So go to the "Users" section and look for the "Add" button there. A user profile form will open with a very large number of fields, of which we only need:
Please note that the address is the future email address in the zone of the domain we created. An example of filling in the fields just in case resulted in the screenshot below.

After filling out the profile scroll to the bottom of the page and pay attention to the item "Access to mail." If not, specify. Otherwise, the user's mailbox will not be created.

If you wish, quotas, aliases, and forwarding can be specified as you wish. Click "Confirm" and go to check the work of the mail.
Let's try to enter the mail through the web interface. Please note that to log in to the mail, you must specify the entire user name, including the part following the @ symbol. By default, the webmail interface is located at hostname / roundcubemail .

If you successfully logged into the webmail interface, everything should function correctly. :) To clear your conscience, you can write a letter to another e-mail address acquired during the process of adding users to the server. You can check the success of mail delivery either by logging in via the web interface, or by setting up an email client. By the way, we are going to set up the last one now.
And fly.
I chose Mozilla Thunderbird as an e-mail client because it is cross-platform and is configured equally well for any OS, be it Linux, MacOS or Windows. However, the use of any other email client is not forbidden. I personally, for example, have checked the work of even such an old email client as Outlook Express 6. No problems have been noticed.

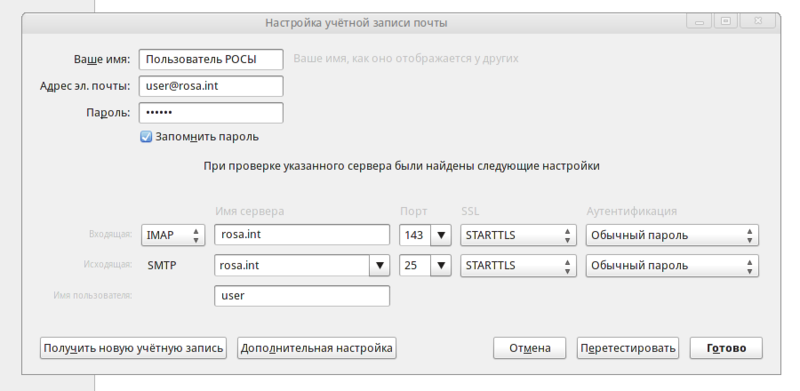
Thunderbird independently and absolutely correctly determined the parameters of the mail server. Unless it was necessary to correct server name removing a point at the beginning. After clicking the “Finish” button, notifications about a self-signed certificate will pop up, the authenticity of which needs to be confirmed. After confirming the authenticity of the certificate, we will get to the main window of the mail client and see the contents of the user's mailbox on the server (if there is one, of course).
Conclusion
As you can see, the process of configuring the mail server running ROSA Server is quite simple and does not cause difficulties. The ROSA Server Setup and ROSA Management Console tools allow you to deploy a server in a matter of minutes, even to a novice system administrator.
Questions and reasonable criticism are welcome. Ficrekvesta too :)
This article is a continuation of a series of tutorials related to configuring ROSA Server. In the previous article, we described the deployment of a named-server based on the ROSA Enterprise Linux Server (hereinafter referred to as RELS) using the ROSA Directory Server tool.
Today I'll show you how you can quickly and easily deploy your own internal corporate mail server, including with support for several mail domains.
Like last time, we will assume that the OS is already installed. Just in case, I remind you that if you install RELS from scratch, then when selecting packages in the “Servers” section, you must select the “ROSA Directory Server” option.
When deploying a server within your company, you should use the requisites and names that are taken from you.
I intentionally lowered the firewall setting, since there are so many manuals on this topic. I describe exactly what has not yet been published on the Web.
Preparing for launch
')
Before starting the settings, make sure that the hostname -f command gives something like:
user @ rels ~ $ hostname -f
rosa
If any error occurs during the execution of this command, then open the / etc / hosts file and set the FQDN name manually. On the example of our system, it will look like this:
192.168.100.1 rosa rosa.intIf you do not do this, during the installation of the necessary components, you may receive an error message due to the fact that the ROSA Directory Server cannot find the FQDN of the server. Because of this, further installation of RDS components will be interrupted.
The first thing we do is run the component deployment and initial setup wizard called ROSA Server Setup. The icon of this application is available directly on the desktop, or in the main menu Options> ROSA Server Setup. You can also configure using the web interface by contacting
hostname:8000/ hostname:8000/ .Anyway, your browser will be launched, where this window will appear:
You must select the item "Go to ROSA Server Setup". At the next step, a warning will appear about the need to add an exception to the Firefox browser in order to add a self-signed certificate to protect the connection connection to the web console server settings. You must click on the button "Add exceptions". Otherwise, we will not be able to configure the server.
With proper implementation of all necessary actions, the window shown below should appear.
It is used as root. The password is also from the root user. Then we will be in the main menu. To perform our tasks, you need to select a section on the left called "ROSA Directory Server". Then press "Enter".
In this section, we select the modules we need to configure the mail server. The list of the minimum services needed to solve the problem:
- Main components of MDS
- Web Mail with MDS Backend
- DNS server with MDS backend
Having finished the necessary modules, you should click on the button “Install components”. After that, anyone can drink tea / coffee / juice, while all the necessary components of the future server are installed.
At the very end, the “Continue” button and the “Failed to install” notification will indicate the success of the completed step, as shown below.
After clicking the "Continue" button, we proceed directly to the primary configuration of the mail server and the DNS server. Our eyes should open a form that must be filled with the necessary data.
A bit about server settings:
- MDS domain name. Domain name. It may be the same as the FQDN of the domain.
- MDS Password - Password for the Directory Server Control Panel.
- Password policy - if it is enabled by default, then all passwords that are created must have sufficient complexity. Otherwise, the password will not be accepted.
- SQL database password. Since we are creating the very first database, you need to specify a new password. The “Current Password” field is left blank.
- In the section "DNS server with MDS backend" in the field "my networks" specify the main subnet from which DNS will accept requests.
- "Mail server with MDS backend" - you need to specify the FQDN name of the mail server. An example is shown in one of the screenshots below. IMAPS and POP3S (secure versions of the IMAP and POP3 protocols) can be specified as supported protocols.
- “My Networks” is responsible for which subnet clients can send mail through this server.
- “Web mail with MDS backend” - sets the password for the administrative record of the mail server database.
For greater clarity, add screenshots:
After filling out the form, you must click "Continue", thereby confirming the correctness of the settings. If any data was entered in the process of filling out the form incorrectly, you can click the "Back" button and change the settings.
A big request to pay attention to the messages that appear during the next step of the setup wizard. You should write down or remember the addresses by which you can get into the server administration interface and usernames for login.
You should also read messages related to server settings. For example, notifications about the need for ports in the firewall, as well as some general information about the settings of the mail server. Once again, just in case, let me remind you that the MDS password that you entered in the form above will be required to log into the ROSA Management Console (hereinafter referred to as RMC)
Upon completion of the initial configuration procedure, you must open a browser and enter the address specified in the server setup process: localhost / mmc . In the future, the server settings panel can be accessed from the local network by IP address or by the FQDN of the server.
If everything is correct, then the RMC login page should open. To log in, you must use the root username and password specified in one of the previous steps. Optionally, you can select the RMC interface language.
The next step necessary for setting up the construction of an internal corporate mail server is setting up a name server, without which the mail server simply will not function.
To configure DNS, go to the "Network" section in the main window and select "Add DNS zone". In the section that opens, you must specify the following parameters:
- FQDN domain name. By this name, your server will be accessed from the network.
- Name server name. You can leave the default.
- IP address of the server. Specify the one that is attached to it in the local network, as well as its external address.
- The range of your network in the fields "Network Address" and "Subnet Mask" are mandatory, otherwise the reverse zone service will not work. These same fields are required if you are going to configure an automatic IP distribution server.
If all settings have been entered correctly, then after pressing the “Create” button, a corresponding confirmation will appear, which at the same time asks us to restart the DNS server daemon. What we will do by going to the section "Managing network services". More details can be obtained by reading the previous article just dedicated to configuring the DNS server.
After creating a DNS zone, you need to add a mail domain. To carry out the procedure, go to the "Mail" section and select the "Add Domain" item.
As already mentioned, the mail domain name can be the same as the FQDN name of the domain we created. In the illustration above, the adjustment is made in this way. After creating the mail domain, be sure to remember to restart the DNS server.
After creating a domain, you must create at least two users in order to verify the correct functioning of the mail system.
If there is such a desire, you can specify the size of the quota for mailboxes of users of the mail domain, by specifying a “tick” next to the corresponding item.
After creation, do not forget to restart the daemon responsible for the work of the DNS.
If you need several domains, it is enough to carry out the same procedure again.
We jump!
It is time to check our server in action. But before we do this, create a couple of test users on the server. So go to the "Users" section and look for the "Add" button there. A user profile form will open with a very large number of fields, of which we only need:
- Login
- Password
- Name
- Surname
- Mailing address
Please note that the address is the future email address in the zone of the domain we created. An example of filling in the fields just in case resulted in the screenshot below.
After filling out the profile scroll to the bottom of the page and pay attention to the item "Access to mail." If not, specify. Otherwise, the user's mailbox will not be created.
If you wish, quotas, aliases, and forwarding can be specified as you wish. Click "Confirm" and go to check the work of the mail.
Let's try to enter the mail through the web interface. Please note that to log in to the mail, you must specify the entire user name, including the part following the @ symbol. By default, the webmail interface is located at hostname / roundcubemail .
If you successfully logged into the webmail interface, everything should function correctly. :) To clear your conscience, you can write a letter to another e-mail address acquired during the process of adding users to the server. You can check the success of mail delivery either by logging in via the web interface, or by setting up an email client. By the way, we are going to set up the last one now.
And fly.
I chose Mozilla Thunderbird as an e-mail client because it is cross-platform and is configured equally well for any OS, be it Linux, MacOS or Windows. However, the use of any other email client is not forbidden. I personally, for example, have checked the work of even such an old email client as Outlook Express 6. No problems have been noticed.
Thunderbird independently and absolutely correctly determined the parameters of the mail server. Unless it was necessary to correct server name removing a point at the beginning. After clicking the “Finish” button, notifications about a self-signed certificate will pop up, the authenticity of which needs to be confirmed. After confirming the authenticity of the certificate, we will get to the main window of the mail client and see the contents of the user's mailbox on the server (if there is one, of course).
Conclusion
As you can see, the process of configuring the mail server running ROSA Server is quite simple and does not cause difficulties. The ROSA Server Setup and ROSA Management Console tools allow you to deploy a server in a matter of minutes, even to a novice system administrator.
Questions and reasonable criticism are welcome. Ficrekvesta too :)
Source: https://habr.com/ru/post/168183/
All Articles