NooLite-2, or smart home for dummies
After successfully testing the system, I swung to replace all the switches in the house with control panels, and build a “smart home”, at least in terms of lighting.
The result was a system that combines the on / off of the light with switches and via the Internet - using the buttons on the web page.
How it happened - read under the cut.
The plan was beautifully rendered, and for several hours my wife and Itook away the mouse from each other, thinking where the switch should stand and what to control. The big plus was the ability to control one lamp from several switches, so it was decided to move away from the standard model “one room - one switch” and place the switches in the places where a person spends most of the time - near the computer, bed and sofa :)

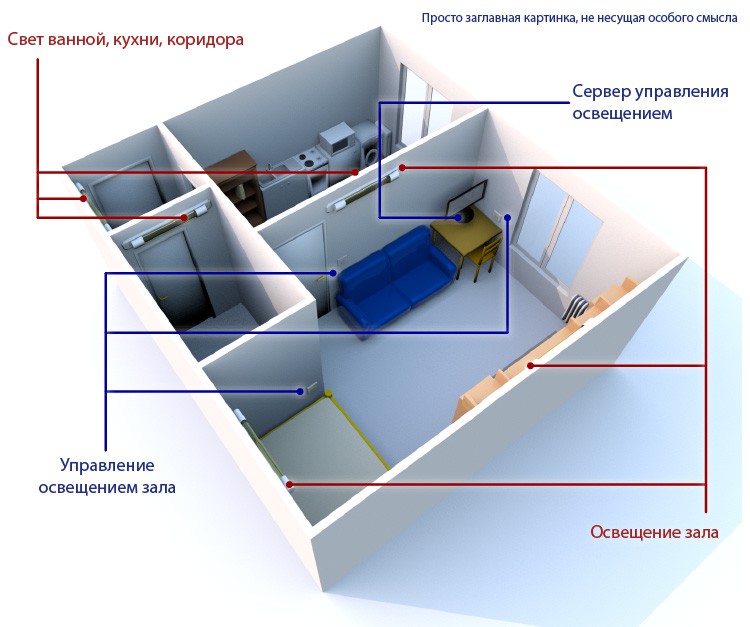
Some explanations for the picture. Lamps and loads are marked with red inscriptions, controls are blue.
The light of the kitchen and the number 1 console are exactly what I described in the previous topic.

Of course, most of the lamps are on the ceiling, but at the same time on the plan they covered the room, and it looked not very clear. Therefore, in the pictures ceiling chandeliers were on the walls.
Under each name is a model of the console or power unit.

The fan, although not lighting, is still marked on the plan - it is controlled by a dimmable unit (at maximum power it is too noisy).
And now we try to fly with all this garbage
To implement this daring plan in life we need ...

Lots and lots of boxes. More precisely, not theirs, but their contents:

I have already analyzed in detail what is in them in the previous article, so I will not repeat.
From the new - adapter for computer control:

Inside - a disk with the program and the transmitter itself.

By itself, it is necessary to disassemble.

Inside - Attiny45 as a USB interface, and PIC12F675:

The adapter is defined as a HID device, therefore it works without drivers (more precisely with system ones). Of course, one cannot do without a program, but for Linux this is definitely a plus, no kldload noolite.so. :)
Another is a pocket transmitter.

With 4 buttons, 1 of which is used for binding-decoupling (D), 2 - on-off and brightness control (A, B), and one more - scenario ( ).
).

By the way, with the remote control it is very convenient to check the work when connecting all this stuff, because the wall switch is not so convenient to carry in your pocket, and the binding button is not so convenient.
Let us examine what it is necessary to unscrew the 3 screws on the back side:

And neatly divide it into two halves:

Here is a fee closer:

The controller is PIC16F630.

Everything else is unchanged, except that a new type of switches was added (on the left) - with three scenario buttons.
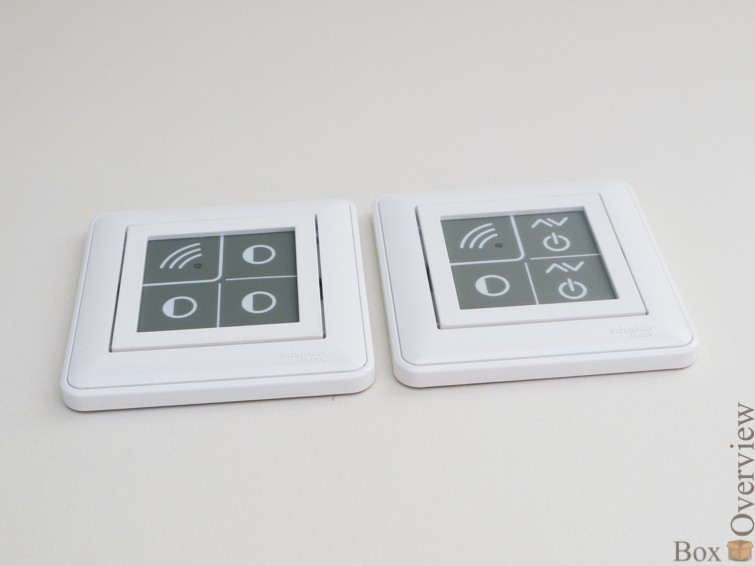
Plus they are that you can attach any number of power blocks to them, and the minus is that if you need to turn the light on and off, you will need to use two buttons from three - one to turn on, the other to turn off. Only one remains, and there is often no place to stick it - if it is hung up to turn on the lamp, then it cannot be turned off from this switch, and vice versa. I would be comfortable with a switch with one on-off button and two scenario buttons , like the PU212 , just the opposite.
And another new power unit - dimmable:


And close the socket:

In terms of wire lighting:

We connect the switches with each other and wall them in the wall - we will not need them anymore.
Block temporarily glue to the ceiling with hot melt.

Do not pay attention to the ceiling - I have a year of sluggish repair, as soon as I finish the bath - there will be a stretch ceiling.
True, the power unit will have to move somewhere, because to configure you need physical access.
Another one - in the chandelier in the hall:

And the block - in the wall lamp, it will be a night light:

After that came the turn of the switches. The one in the kitchen - you have already seen.

In the hall, above the sofa:

Another one is near the computer so as not to get up again:

Near the bed:

And near the bathroom:

The last switch took its place on the front door:

As it turned out, it’s very convenient when leaving the apartment - turn off all the lights so that it doesn’t shine in vain, and when you come back - turn on the kitchen and in the hall from the threshold, so as not to wander in the dark with packages.
The server (half-alive x120e without a keyboard) took its place of honor in the drawer of the drawer (because it makes a lot of noise):

')
Run the program, press the settings button, and bind the channels to the power blocks. In fact, on the contrary - we tie the power blocks to the channels - the unique address of the adapter is written into the memory of the blocks, so that it does not confuse it with the neighbor's adapter.

The procedure is simple - press the button on the power block, press the “Binding” in the program, after the LED on the block starts flashing quickly - confirms the binding by pressing the button of the block again, and exit the binding mode - press the button again. Repeat for all blocks. This must be done once, and when changing the computer, it is not necessary to do - the settings are saved in the power blocks. The maximum number of channels - 8 pieces.

However, such control from a computer is not functional enough, and is suitable, perhaps, only for managing loads - lighting engineering, for example. Well, there, turn on the strobe light, turn off the light head, turn on the searchlight, turn on the stage lights, turn off the light fill, turn on the laser. But not for a smart home - who wants to go to the computer every time, turn on the program and poke the mouse?
For normal use in a smart home, developers offer an open API (for windows, launch the program with the -api parameter, for other operating systems, send packages directly to the HID device).
And as a beautiful control panel, you can use the MajorDoMo project (it was already written about it on the habr , and the developer himself is present on the habre - Jey ).

We assemble the management program:
Taken here .
Manage like this:
Of course, the first couple of times he logs in via ssh to the server in order to turn off the light with the console command is cool , but thewife did not appreciate the soul requires something simple. Let's make a web muzzle. Well, most likely a web muzzle.
Php code that can take three parameters and run the control program:

Now everything is fine, but something is missing. The disadvantage is that with this use, the device that displays the page must be in the home network. And if this is a phone with Wi-Fi turned off?
Unlock, turn on WiFI, wait for power on, go to the page, press a button, turn off WiFI ...
On an external server we perform:
The final touch is to protect against disconnection (on the local server):
Go to beta.appinventor.mit.edu , create a new application. We throw a few buttons into the form to get something like this:

Do not forget to add the Web component. Click the button "Open in block editor". Download the file, run it (need java).
By dragging the blocks around the screen and connecting them, we make sure that pressing each button leads to a request to the appropriate address. Something like this:

Then we copy the program to the phone (Package for phone - download to this computer). We start.

True, for some reason, when you press a button in the application, the light turns on not after a second, as when working with a web page, but after 3-4 seconds. I suspect that the delay will disappear if you write the program normally, but I didn’t have enough of it.

There is a whole class of devices whose purpose is to smoothly raise the brightness of a lamp at a certain time — light alarm clocks. Since the brightness of the lamp rises smoothly, and for a long time (usually from 30 minutes to an hour), the bright light does not hit the eyes, but allows you to wake up quietly. Produces such alarm clocks, for example, Phillips . And we are worse? It is enough just to write a small script.
For example, if we need to wake up at 9 am, then it should be started at 8.30 with the following parameters:

There are dramatic changes in brightness, because the noolite-candle inc 1 10 command was used - i.e. in one step, the brightness increased by 10%. If we take 1% for a step, then the change in brightness is very smooth.
And of course, any number of lamps, or even a chandelier can act as a “night light”, if there are incandescent lamps or dimmable energy-saving lamps in it.
1 Computer Adapter - PC118 - $ 50
5 power units SL-111-200 (for ordinary lamps) - $ 17.5 * 5
1 power unit SN-111-200 (for a night lamp) - $ 17.5
1 power unit ST-111-200 (for the fan) - $ 17.5
3 PU-313-1 control panels - $ 16.1 * 3
3 PU-312-1 control panels - $ 16.1 * 3
1 remote keychain PN313-1
Thus, the costs were: 50 + 17.5 * 7 + 16.1 * 6 = $ 270
Similar to the characteristics of the X10 protocol electronics, judging by the calculations on the site (5 lighting control points, 2 points with brightness changes, control from wall-mounted wireless switches, control from a computer and a phone) will cost 24,140 rubles.
Of course, we must also take into account the cost of the server computer, but I think the possibility of finding an old computer or laptop is not a problem.
As you can see, the decision was pretty budget.
Snap - very simple, a few button presses. Installing and configuring the program - also does not cause problems. Installing and configuring a server for an untrained person can cause difficulties, but it can still be solved.
In addition, no need to think through the plan perfectly in advance - at any time it is easy to add another switch or control unit. Easy to take with you when you move.
I like :)
If you do not have an account on Habrahabr, you can read and comment on our articles on BoxOverview.com
The result was a system that combines the on / off of the light with switches and via the Internet - using the buttons on the web page.
How it happened - read under the cut.
Make a plan
For starters, I, running around with a tape measure and a piece of paper around the house, drew an apartment plan, and then built a 3D apartment model in the SweetHome 3D program. I can't say what worked out perfectly, but it gives an idea about the apartment. Who cares, here is the project file .The plan was beautifully rendered, and for several hours my wife and I
If interested, here's the plan.
And render
In the end, they settled on the fact that the switches in the remaining rooms would remain in place, but two more would be added in the hall, beside the bed and the computer, as I said. I also wanted to add the ability to turn on the light not at full power, but since all the chandeliers contain energy-saving lamps, it was decided to buy a lamp for a halogen lamp for an adjustable night lamp. The result was three pictures showing the relative position of all the lamps and switches in the apartment.Some explanations for the picture. Lamps and loads are marked with red inscriptions, controls are blue.
The light of the kitchen and the number 1 console are exactly what I described in the previous topic.
Of course, most of the lamps are on the ceiling, but at the same time on the plan they covered the room, and it looked not very clear. Therefore, in the pictures ceiling chandeliers were on the walls.
Under each name is a model of the console or power unit.
The fan, although not lighting, is still marked on the plan - it is controlled by a dimmable unit (at maximum power it is too noisy).
To implement this daring plan in life we need ...
Lots and lots of boxes. More precisely, not theirs, but their contents:
I have already analyzed in detail what is in them in the previous article, so I will not repeat.
From the new - adapter for computer control:
Inside - a disk with the program and the transmitter itself.
By itself, it is necessary to disassemble.
Inside - Attiny45 as a USB interface, and PIC12F675:
The adapter is defined as a HID device, therefore it works without drivers (more precisely with system ones). Of course, one cannot do without a program, but for Linux this is definitely a plus, no kldload noolite.so. :)
Another is a pocket transmitter.
With 4 buttons, 1 of which is used for binding-decoupling (D), 2 - on-off and brightness control (A, B), and one more - scenario (
).By the way, with the remote control it is very convenient to check the work when connecting all this stuff, because the wall switch is not so convenient to carry in your pocket, and the binding button is not so convenient.
Let us examine what it is necessary to unscrew the 3 screws on the back side:
And neatly divide it into two halves:
Here is a fee closer:
The controller is PIC16F630.
Everything else is unchanged, except that a new type of switches was added (on the left) - with three scenario buttons.
Plus they are that you can attach any number of power blocks to them, and the minus is that if you need to turn the light on and off, you will need to use two buttons from three - one to turn on, the other to turn off. Only one remains, and there is often no place to stick it - if it is hung up to turn on the lamp, then it cannot be turned off from this switch, and vice versa. I would be comfortable with a switch with one on-off button and two scenario buttons , like the PU212 , just the opposite.
And another new power unit - dimmable:
Install
Instead of a fan dimmer (yes, with my favorite terminals ):And close the socket:
In terms of wire lighting:
We connect the switches with each other and wall them in the wall - we will not need them anymore.
Block temporarily glue to the ceiling with hot melt.
Do not pay attention to the ceiling - I have a year of sluggish repair, as soon as I finish the bath - there will be a stretch ceiling.
True, the power unit will have to move somewhere, because to configure you need physical access.
Another one - in the chandelier in the hall:
And the block - in the wall lamp, it will be a night light:
After that came the turn of the switches. The one in the kitchen - you have already seen.
In the hall, above the sofa:
Another one is near the computer so as not to get up again:
Near the bed:
And near the bathroom:
The last switch took its place on the front door:
As it turned out, it’s very convenient when leaving the apartment - turn off all the lights so that it doesn’t shine in vain, and when you come back - turn on the kitchen and in the hall from the threshold, so as not to wander in the dark with packages.
The server (half-alive x120e without a keyboard) took its place of honor in the drawer of the drawer (because it makes a lot of noise):
')
Managed from a computer
Download and install the program to control the controller. We stick a control adapter into the computer.Run the program, press the settings button, and bind the channels to the power blocks. In fact, on the contrary - we tie the power blocks to the channels - the unique address of the adapter is written into the memory of the blocks, so that it does not confuse it with the neighbor's adapter.
The procedure is simple - press the button on the power block, press the “Binding” in the program, after the LED on the block starts flashing quickly - confirms the binding by pressing the button of the block again, and exit the binding mode - press the button again. Repeat for all blocks. This must be done once, and when changing the computer, it is not necessary to do - the settings are saved in the power blocks. The maximum number of channels - 8 pieces.
However, such control from a computer is not functional enough, and is suitable, perhaps, only for managing loads - lighting engineering, for example. Well, there, turn on the strobe light, turn off the light head, turn on the searchlight, turn on the stage lights, turn off the light fill, turn on the laser. But not for a smart home - who wants to go to the computer every time, turn on the program and poke the mouse?
For normal use in a smart home, developers offer an open API (for windows, launch the program with the -api parameter, for other operating systems, send packages directly to the HID device).
And as a beautiful control panel, you can use the MajorDoMo project (it was already written about it on the habr , and the developer himself is present on the habre - Jey ).
Install MajorDoMo and configure as a control panel for Windows
After launching MajorDoMo (Start-Programs-MajorDoMo or c: / _ majordomo / start.bat, by the way, enter it immediately in autorun - it won’t start itself) in the browser, go to the system page - localhost or by ip address, I have 192.168. 1.104 . In the upper corner, click on the link "Control Panel", go under the standard login admin / admin.
In the control panel, go to the scripts section (on the left, in the "Objects" block), and create a new script (if you have several blocks, you can first create a category for scripts - Categories - Add a category).
We call it, say, hall_light, select a previously created category, and in the code we write the following:
According to the description of the control program commands - the api key indicates that the program starts without a graphical interface, the on_ch5 and off_ch5 keys , respectively, switch on and off the load on channel 5. There is also the sw_ch5 key - it switches the load state, i.e. was turned on - off, and vice versa.

Save the script by clicking the "Add" button under the editor window. Create scripts for all channels that we want to manage.
Go to the item "Management Menu"

Click "add a new section", call it somehow, at the bottom click "add".

The page is overloaded, this menu appears at the bottom of the page. Add a new child item, call it, in the item “Type” select “Switch”, and in the item “Script” - the script that we created in the previous step. We save. We create switches for all scenarios (it is convenient to use the “clone” button for this).
Go to the main interface, go to the created section and see on the side a convenient menu with switches. You can see it if you go to localhost / menu.htmlInstall MajorDoMo and configure as a control panel for Windows
Go to the download page, and download the latest version of the system. Installing (I hope this stage will not cause questions).After launching MajorDoMo (Start-Programs-MajorDoMo or c: / _ majordomo / start.bat, by the way, enter it immediately in autorun - it won’t start itself) in the browser, go to the system page - localhost or by ip address, I have 192.168. 1.104 . In the upper corner, click on the link "Control Panel", go under the standard login admin / admin.
In the control panel, go to the scripts section (on the left, in the "Objects" block), and create a new script (if you have several blocks, you can first create a category for scripts - Categories - Add a category).
We call it, say, hall_light, select a previously created category, and in the code we write the following:
if ($params['VALUE']) { safe_exec('"c:\Program Files\nooLite\noolite.exe" -api -on_ch5'); sleep(1); } else { safe_exec('"c:\Program Files\nooLite\noolite.exe" -api -off_ch5'); sleep(1); } According to the description of the control program commands - the api key indicates that the program starts without a graphical interface, the on_ch5 and off_ch5 keys , respectively, switch on and off the load on channel 5. There is also the sw_ch5 key - it switches the load state, i.e. was turned on - off, and vice versa.
Save the script by clicking the "Add" button under the editor window. Create scripts for all channels that we want to manage.
Go to the item "Management Menu"
Click "add a new section", call it somehow, at the bottom click "add".
The page is overloaded, this menu appears at the bottom of the page. Add a new child item, call it, in the item “Type” select “Switch”, and in the item “Script” - the script that we created in the previous step. We save. We create switches for all scenarios (it is convenient to use the “clone” button for this).
Linux Management
After because of my curved hands, the Windows hung the third time in a day, I spat on it and transferred the server to Linux. I also decided that MajorDoMo is too cool for my purposes - get a control panel with buttons.We assemble the management program:
sudo apt-get install libusb-1.0-0 libusb-1.0-0-dev cd /tmp wget https://raw.github.com/pythonchik/nooLite/master/nooLite.c gcc nooLite.c -o noolite -lusb-1.0 sudo cp /tmp/noolite /usr/local/bin/ sudo chmod +x /usr/local/bin/noolite Taken here .
Manage like this:
sudo noolite -api -on_ch 5 # 5 sudo noolite -api -off_ch 5 # 5 sudo noolite -api -sw_ch 1 # 1 sudo noolite -api -set_ch 2 30 # 30% Of course, the first couple of times he logs in via ssh to the server in order to turn off the light with the console command is cool , but the
Php code that can take three parameters and run the control program:
<? $channel=($_GET['channel']); $command="-".($_GET['command'])."_ch"; $level=($_GET['level']); exec("noolite -api $command $channel $level"); ?> Create a file in the root of the web server, call it index.php, copy the above lines into it, and below - links that will act as buttons. <a href="?channel=5&command=on" > </a> <a href="?channel=5&command=off" > </a> Add CSS to taste. It turns out something like this:Boring code
<!DOCTYPE html PUBLIC "-//W3C//DTD XHTML 1.0 Transitional//EN" "http://www.w3.org/TR/xhtml1/DTD/xhtml1-transitional.dtd"> <html xmlns="http://www.w3.org/1999/xhtml"> <meta http-equiv="Content-Type" content="text/html; charset=UTF-8" /> <title>NooLite control panel</title> <style type="text/css"> .light { -moz-box-shadow:inset 0px 1px 0px 0px #ffffff; -webkit-box-shadow:inset 0px 1px 0px 0px #ffffff; box-shadow:inset 0px 1px 0px 0px #ffffff; background:-webkit-gradient( linear, left top, left bottom, color-stop(0.05, #ededed), color-stop(1, #dfdfdf) ); background:-moz-linear-gradient( center top, #ededed 5%, #dfdfdf 100% ); filter:progid:DXImageTransform.Microsoft.gradient(startColorstr='#ededed', endColorstr='#dfdfdf'); background-color:#ededed; border:2px solid #dcdcdc; display:inline-block; color:#8a8a8a; width:200px min-width: 200px font-family:arial; font-size:14px; font-weight:bold; padding:7px; text-decoration:none; }.light:hover { background:-webkit-gradient( linear, left top, left bottom, color-stop(0.05, #dfdfdf), color-stop(1, #ededed) ); background:-moz-linear-gradient( center top, #dfdfdf 5%, #ededed 100% ); filter:progid:DXImageTransform.Microsoft.gradient(startColorstr='#dfdfdf', endColorstr='#ededed'); background-color:#dfdfdf; }.light:active { position:relative; top:1px; } .dark { -moz-box-shadow:inset 0px 1px 0px 0px #dedede; -webkit-box-shadow:inset 0px 1px 0px 0px #dedede; box-shadow:inset 0px 1px 0px 0px #dedede; background:-webkit-gradient( linear, left top, left bottom, color-stop(0.05, #969496), color-stop(1, #a5a6a3) ); background:-moz-linear-gradient( center top, #969496 5%, #a5a6a3 100% ); filter:progid:DXImageTransform.Microsoft.gradient(startColorstr='#969496', endColorstr='#a5a6a3'); background-color:#969496; border:2px solid #bebfbd; color:#ffffff; width:200px font-family:arial; font-size:14px; font-weight:bold; padding:7px; text-decoration:none; }.dark:hover { background:-webkit-gradient( linear, left top, left bottom, color-stop(0.05, #a5a6a3), color-stop(1, #969496) ); background:-moz-linear-gradient( center top, #a5a6a3 5%, #969496 100% ); filter:progid:DXImageTransform.Microsoft.gradient(startColorstr='#a5a6a3', endColorstr='#969496'); background-color:#a5a6a3; }.dark:active { position:relative; top:1px; } </style> <head> <body> <h1>NooLite control light panel</h1> <div> <p><h3>:</h3></p> <p> <a href="?channel=5&command=on" target="invisible" class="light"> </a> <a href="?channel=5&command=off" target="invisible" class="dark"> </a> </p> <p><h3>:</h3></p> <p> <a href="?channel=3&command=on" target="invisible" class="light"> №1</a> <a href="?channel=3&command=off" target="invisible" class="dark"> №1</a> </p> <p> <a href="?channel=4&command=on" target="invisible" class="light"> №2</a> <a href="?channel=4&command=off" target="invisible" class="dark"> №2</a> </p> <p><h3>:</h3></p> <p> <a href="?channel=2&command=on" target="invisible" class="light"> </a> <a href="?channel=2&command=off" target="invisible" class="dark"> </a> </p> <p> <a href="?channel=1&command=on" target="invisible" class="light"> </a> <a href="?channel=1&command=off" target="invisible" class="dark"> </a> </p> <iframe name="invisible" style="border:0; width: 0; height: 0;"></iframe> </body> </html> <? $channel=($_GET['channel']); $command="-".($_GET['command'])."_ch"; $level=($_GET['level']); exec("noolite -api $command $channel $level"); ?> Now everything is fine, but something is missing. The disadvantage is that with this use, the device that displays the page must be in the home network. And if this is a phone with Wi-Fi turned off?
Unlock, turn on WiFI, wait for power on, go to the page, press a button, turn off WiFI ...
We configure access from the Internet
We modify a little code so that it is impossible to execute an arbitrary code by passing the necessary GET parameter.Cautiously, the most terrible bydlokod. I am writing to PHP for the second time in my life
The rest of the page remains unchanged. For further, we will need any server with a white IP, and the ability to access via SSH. We configure port forwarding .If someone can tell how to check the variable belonging to the list of allowed commands, I will be grateful. I do not want to ask a question about such trifles.
<? if(isset($_GET['channel']) && $_GET['channel'] == '1'){ $channel=($_GET['channel']); } if(isset($_GET['channel']) && $_GET['channel'] == '2'){ $channel=($_GET['channel']); } if(isset($_GET['channel']) && $_GET['channel'] == '3'){ $channel=($_GET['channel']); } if(isset($_GET['channel']) && $_GET['channel'] == '4'){ $channel=($_GET['channel']); } if(isset($_GET['channel']) && $_GET['channel'] == '5'){ $channel=($_GET['channel']); } if(isset($_GET['command']) && $_GET['command'] == 'on'){ $command="-".($_GET['command'])."_ch"; } if(isset($_GET['command']) && $_GET['command'] == 'off'){ $command="-".($_GET['command'])."_ch"; } if(isset($_GET['command']) && $_GET['command'] == 'set'){ $command="-".($_GET['command'])."_ch"; } if(isset($_GET['level']) && $_GET['level'] == '0'){ $level=($_GET['level']); } if(isset($_GET['level']) && $_GET['level'] == '20'){ $level=($_GET['level']); } if(isset($_GET['level']) && $_GET['level'] == '40'){ $level=($_GET['level']); } if(isset($_GET['level']) && $_GET['level'] == '60'){ $level=($_GET['level']); } if(isset($_GET['level']) && $_GET['level'] == '80'){ $level=($_GET['level']); } if(isset($_GET['level']) && $_GET['level'] == '100'){ $level=($_GET['level']); } exec("noolite -api $command $channel $level"); On an external server we perform:
echo "GatewayPorts=yes" >> /etc/ssh/sshd_config On the local server (to which the adapter is connected, and on which the web server listens on port 80) we perform: ssh vvzvlad@servername -R 8080:localhost:80 Now, opening the page http: // servername: 8080 / we will see the same local page accessible from the Internet. The command response time is about a second.The final touch is to protect against disconnection (on the local server):
cd ~/.ssh/ sudo ssh-keygen -t dsa # scp id_dsa servername:~/.ssh/authorized_keys # echo "PubkeyAuthentication yes" >> /etc/ssh/ssh_config ssh servername -t echo "PubkeyAuthentication yes" >> /etc/ssh/ssh_config # And we put in autorun any way you want: autossh vvzvlad@servername -R 8080:localhost:80 In general, there is no need for a computer, any USB router will be enough for “control via the web” (fortunately, they all now work on Linux). Absolutely the same thing is done - a program is assembled, a custom interface is written (even php is not necessary, you can completely do with any language, or even bash, executed via CGI), and port forwarding is configured on a single server (nothing is required from it except to work in quality of the tunnel server and authorize the user - so that they do not turn off the light by mistake by typing the wrong address). The user receives a small device without a fan, which provides control via the web interface in the local network, and when registering on the manufacturer's website - a personal web page with password authorization. Log in - and you get the ability to manage loads from anywhere.Writing an application for Android
Well, we write. Not a line of code was written, not counting the links. If this is interesting to someone, I'd rather write a separate article than I will do here a sheet. I will touch only the main points:Go to beta.appinventor.mit.edu , create a new application. We throw a few buttons into the form to get something like this:
Do not forget to add the Web component. Click the button "Open in block editor". Download the file, run it (need java).
By dragging the blocks around the screen and connecting them, we make sure that pressing each button leads to a request to the appropriate address. Something like this:
Then we copy the program to the phone (Package for phone - download to this computer). We start.
True, for some reason, when you press a button in the application, the light turns on not after a second, as when working with a web page, but after 3-4 seconds. I suspect that the delay will disappear if you write the program normally, but I didn’t have enough of it.
We make a light alarm clock or a controlled night light
There is a whole class of devices whose purpose is to smoothly raise the brightness of a lamp at a certain time — light alarm clocks. Since the brightness of the lamp rises smoothly, and for a long time (usually from 30 minutes to an hour), the bright light does not hit the eyes, but allows you to wake up quietly. Produces such alarm clocks, for example, Phillips . And we are worse? It is enough just to write a small script.
Also not the most optimal code. Watch at your own risk
How to use it is clear from the code, or from the online help, if you run the script with the help parameter. #!/bin/bash channel=8 # s=0 case $1 in "inc") i=0 e=100 [[ $4 == v ]] && echo : $[100/$3], $[$2*100/$3] while [ $i -lt $e ] do noolite -api -set_ch $channel $i i=$[$i+$3] s=$[$s+1] sleep $2 [[ $4 == v ]] && echo $s, : $i done [[ $4 == v ]] && echo . exit 1 ;; "dec") i=100 e=0 [[ $4 == v ]] && echo : $[100/$3], $[$2*100/$3] while [ $i -ge $e ] do noolite -api -set_ch $channel $i i=$[$i-$3] sleep $2 s=$[$s+1] [[ $4 == v ]] && echo $s, : $i done [[ $4 == v ]] && echo . exit 1 ;; "help") echo "noolite-candle [inc,dec] second step v" echo "inc - " echo "dec - " echo "second - " echo "step - (1-100)" echo "v - " echo " noolite-candle inc 2 1 - 0 100 1(1,2,3,4...) 2 . 200(2*100) ." exit 1 ;; *) echo " help " exit 1 ;; esac For example, if we need to wake up at 9 am, then it should be started at 8.30 with the following parameters:
./noolite-candle inc 18 1 Or at 7 am, like this: ./noolite-candle inc 36 1 With this command, the brightness will gradually increase over the course of an hour.There are dramatic changes in brightness, because the noolite-candle inc 1 10 command was used - i.e. in one step, the brightness increased by 10%. If we take 1% for a step, then the change in brightness is very smooth.
And of course, any number of lamps, or even a chandelier can act as a “night light”, if there are incandescent lamps or dimmable energy-saving lamps in it.
pros
- Cost of
1 Computer Adapter - PC118 - $ 50
5 power units SL-111-200 (for ordinary lamps) - $ 17.5 * 5
1 power unit SN-111-200 (for a night lamp) - $ 17.5
1 power unit ST-111-200 (for the fan) - $ 17.5
3 PU-313-1 control panels - $ 16.1 * 3
3 PU-312-1 control panels - $ 16.1 * 3
1 remote keychain PN313-1
Thus, the costs were: 50 + 17.5 * 7 + 16.1 * 6 = $ 270
Similar to the characteristics of the X10 protocol electronics, judging by the calculations on the site (5 lighting control points, 2 points with brightness changes, control from wall-mounted wireless switches, control from a computer and a phone) will cost 24,140 rubles.
Of course, we must also take into account the cost of the server computer, but I think the possibility of finding an old computer or laptop is not a problem.
As you can see, the decision was pretty budget.
- Easy to install and configure
Snap - very simple, a few button presses. Installing and configuring the program - also does not cause problems. Installing and configuring a server for an untrained person can cause difficulties, but it can still be solved.
- Simultaneous operation of two systems
- Ability to install without rework and extensibility
In addition, no need to think through the plan perfectly in advance - at any time it is easy to add another switch or control unit. Easy to take with you when you move.
Minuses
- Touch switches
- Lack of feedback
- Small customization options.
Results
Excellent entry-level solution for building lighting and load management systems. This is quite a "designer for adults." If you want - turn on the lamps via the Internet, if you want - you can do a controlled nightlight, you want - a smart home with voice commands and turning on the lights on a schedule.I like :)
If you do not have an account on Habrahabr, you can read and comment on our articles on BoxOverview.com
Source: https://habr.com/ru/post/168039/
All Articles