Detailed manual "How to create the PA infotype in SAP HR" or "How to tame SAP?" (Part 1)
 SAP is a fairly common system in large enterprises not only in the West, but also in the countries of the former Soviet Union. There are many gossips and discussions, both positive and negative about SAP. And the negative reviews are mainly connected, not so much with the complexity of the system, as with the intuitively incomprehensible interface and the lack of accessible literature (books, instructions) in plain Russian.
In this article, I want to give the beginning of the available instructions on some aspects of SAP, with which often beginners have problems. This article will be devoted to the creation of personnel administration infotypes (PA) for the SAP HR module. If this instruction you like and will be useful, dear reader, then, I hope, it will not be the last.
Soon there will be a year, as I work as an internal SAP consultant for a project to implement the SAP HR module of a very large enterprise in Ukraine. SAP studied from scratch: Google, downloaded courses and advice from external consultants. Therefore, in this article I will try to show step by step and easily how to create PA infotypes for the same newcomers as I was a year ago (although now it’s also far from being a “guru”).
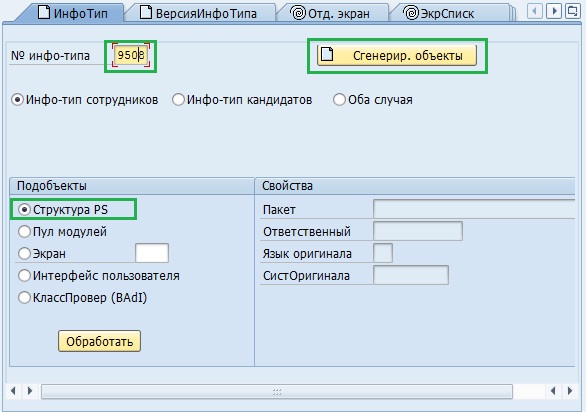
1. First, start the transaction PM01 - create an infotype. Custom infotypes are required to be created on 9-ku (I advise you to check the free number for the infotype beforehand). Also in the "Sub-objects" block , the radio button should be on the "Structure PS" . Next, click the button "Generate objects" .
The system offers us to create a structure for our info-type. We agree.
')

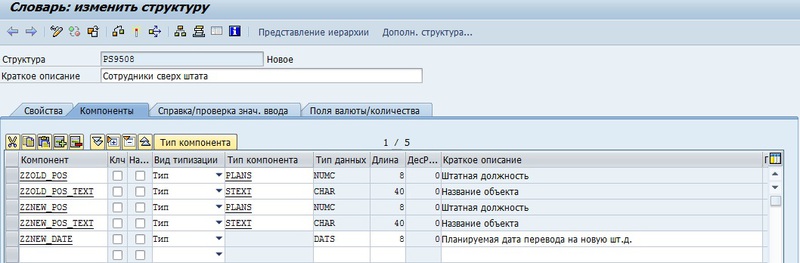
2. Create our structure. You do not need to create standard fields (eg BEGDA, PERNR ), they will automatically be linked to the infotype. According to the SAP recommendation, the fields should be called ZZ *. We also define data types for our fields according to the types of existing fields in the system (for example, PLANS , which automatically sets the NUMC data type and 8 characters in length), or choose the data type (for example, CHAR ) by clicking on the “Component type” button we give it a length and give a brief description of our field.
Another helpful tip. If any field requires a search tool (such as a standard search tool to select a date, when you click on the icon that appears to the right of the field), go to the Help / Validation tab . input " , where we click on the " key " and the button " Finder " . In 90% of cases, the required search tools are in the standard, such as the pc search. positions on org. structure as shown in the screenshot.

We activate our structure. If a window shown below appears, we are not afraid, but click "No".

3. After that, click "Back . " We agree to several messages, after which the system suggests filling out a nameplate (T582A) , where the characteristics of our infotype are stored. We need to create a record for your infotype, for this I advise you to copy an existing one.

We save. If we need to change this data, then go to transaction SM30 , where we call the view direction V_T582A .
4. Our infotype is created. It can already be created for a person in PA30 , and used for its intended purpose, if your infotype is simple, and does not require any “pull-ups” of values, operations after entering data, etc.
This is where all instructions usually end, and it turns out that we have an infotype is not very simple, and what to do next is not clear. So that I will continue to delve into this topic.
In transaction PM01, in the sub-object block there are a few more lines that we will need:
a) Module pool ( MPXXXX0 , where XXXX is our infotype), where include-programs have already been generated:
- * 10 - Global data;
- * 20 - PBO logic;
- * 30 - PAI-logic;
- * 40 - subroutines
where "*" is "MPXXXX" .
We mainly need PBO-logic (Process Before Output) and PAI (Process After Input) . In the PBO, we describe everything that happens from the moment IT starts up to its output to the screen (for example, we pull up the current position of the person by whom we create IT in the zzold_pos field). In PAI, we describe everything that will happen after pressing “Enter” when we have already entered information (for example, if we need to calculate how much time is left before the date zznew_date is current).
b) Screen. We, for our infotype, need a screen 2000 - this is the screen for input and viewing, the one that appears in transaction PA30. 3000 - to display IT records in the list (in PA30, the icon is in the form of “slides with the sun.” 4000 and 5000 - for fast and batch IT input. Here we will only touch the 2000 screen, because for fast and batch input you will need a separate instruction, and probably several times larger than this.
5. To begin, let us enter the 2000 screen, where we select the “Format Editor” radio button. In it, we can "draw" the screen of our IT. We have already created all the fields from the structure we created. We draw, we direct beauty.

When you select a field, another window opens with field parameters. There are a few nuances. First, fill in the attributes. Here you can set whether it is necessary to fill the field, or to note that this field is only for output, or to make the text selected (it draws blue). Secondly, the first field in front of the inscription "Group" must be filled. The value “006” means that this field is always visible. "Googling" you can find what you need to enter values in these 4 fields, for example, to display the field only after pressing Enter. This is a very important point, for the fields already created there will be “006”, but if you create a new field and do not complete the group, you will not see the new field on the screen, and you can suffer for a long time.
The next step is to select the radio button of the “Execution logic” line, where we will write the execution logic for our screen.
In the window that opens, everything is already generated, and we can only prescribe additional logic. There is also Process Before Output and Process After Input. In the PXXXX module, where XXXX is our infotype, we can write everything that allows us to ABAP. Below is a sample of the code in this module, where we, when creating an infotype for a person, pull up his staff, and out of 1000 IT, for a full-time job, pull up a descriptive text.
TABLES: PA0001, HRP1000. DATA: FLAG(1). IF FLAG IS INITIAL. FLAG = '1'. SELECT SINGLE * FROM PA0001 WHERE PERNR eq P9508-PERNR AND BEGDA le P9508-BEGDA AND ENDDA ge P9508-BEGDA. MOVE PA0001-PLANS TO P9508-ZZOLD_POS. SELECT SINGLE * FROM HRP1000 WHERE OBJID eq PA0001-PLANS AND OTYPE eq 'S ' AND BEGDA le P9508-BEGDA AND ENDDA ge P9508-BEGDA. MOVE HRP1000-STEXT TO P9508-ZZOLD_POS_TEXT. ENDIF. In addition, in PAI, you can also create your own module in which you can describe the logic after we have filled in the data and pressed Enter.
IF P9508-ZZOLD_POS NE PA0001-PLANS. SELECT SINGLE * FROM HRP1000 WHERE OBJID EQ P9508-ZZOLD_POS AND OTYPE EQ 'S ' AND BEGDA LE P9508-BEGDA AND ENDDA GE P9508-BEGDA. MOVE HRP1000-STEXT TO P9508-ZZOLD_POS_TEXT. ENDIF. CLEAR HRP1000. SELECT SINGLE * FROM HRP1000 WHERE OBJID EQ P9508-ZZNEW_POS AND OTYPE EQ 'S ' AND BEGDA LE P9508-BEGDA AND ENDDA GE P9508-BEGDA. MOVE HRP1000-STEXT TO P9508-ZZNEW_POS_TEXT. Here we look, whether we have changed a regular position, and we read from 1000 IT the describing text on a new regular position.
Below is a screenshot of what the created infotype looks like.

That's it, the creation of our info-type is over. I tried to explain everything as accessible as possible for beginners. I hope that my article will be useful to you. If you have questions, write, I will always be happy to help.
Source: https://habr.com/ru/post/167935/
All Articles