Initial configuration of Juniper SRX routers
In this article, I will try to speak as lucidly as possible about how to configure the Juniper SRX series out of the box. An article of this kind is already there: habrahabr.ru/post/144218 , but mine is more complete and more detailed.
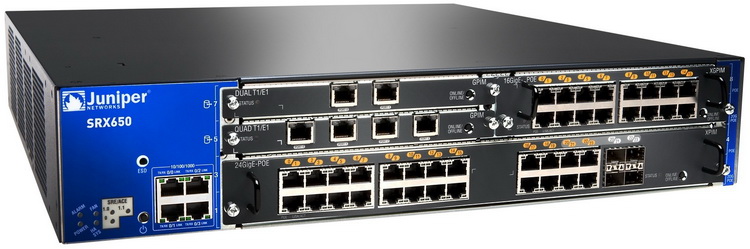
Why Juniper SRX, and not any particular model type SRX100 or SXR240? Yes, simply because the settings will be completely identical, due to the complete uniformity of the platform - Junos OS. This is very convenient when seemingly different in price and performance devices are configured in exactly the same way. This is only one of the advantages of Junos OS.
First we need to get to the Juniper console. There is, of course, a variant of the initial configuration via the web interface, but for some reason it does not always work in the old firmware (version 10). And in general, get used to the fact that there is a web interface, but we want to become real sysadmins? And then imagine the situation, you are driving in a car, standing in a traffic jam, and they call you and ask you to urgently set something up on the gateway. At your fingertips there is only a slow mobile internet. If you take something to configure through the web GUI graphical interface, it will take oh-a lot of time. This is apart from the fact that the web-muzzle outside the network should be closed for security reasons.
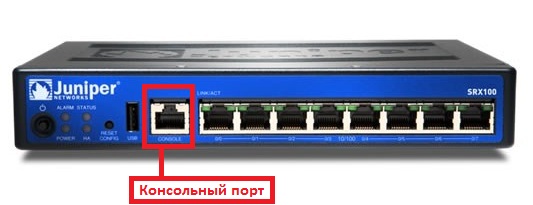
You can join the console through the console port. How it looks is shown in the picture:
')
At first glance, this is the usual RJ-45, but it is not. In fact, this connector has nothing to do with the ethernet port. This connector is for control only and for nothing more. Included with Juniper is always an adapter for connecting the console port to the COM port of the computer. So we need to do.
Next, download the Putty client from the site www.putty.org.ru and launch it. A window appears in which we need to put the Serial and the port. The port number can be viewed in the Windows "Device Manager" after connecting the router to the computer. In our example, this is COM3.

Pressing "Open", we will connect to Juniper. By the way, if we first turn it on, and then (after waiting for the OS to boot), we connect to it via the console port, then we will not see any invitation, but just a black screen. This is normal. You just need to enter your username and password and we will get into the system.
If we first connect to Juniper with wires, and then turn on its power, we will see in the console the boot process for Junos OS. At some point, the system will ask us: “Hit Enter to boot immediately or space bar for command prompt”. If we press the "space" (this is given one second), then we get into the recovery-console. This can be useful if we forget the root password. But it is better not to forget. The password recovery procedure is described here www.juniper.net/techpubs/software/junos-security/junos-security11.1/junos-security-admin-guide/index.html?user-auth-recover-root-pwd-srx.html
When we configure Juniper for the first time, you need to be logged in as root with an empty password. In the future, the system will necessarily require you to specify a root password.
After entering the login-password comes the command line prompt:

There are three modes of operation in Junos OS:
1. Unix go (sh), has the “root @ srx%” prompt. Since Junos OS is based on FreeBSD, the first place we get after logging in is unix based. It is better to do nothing in it on Juniper. Enter cli, press Enter and get into the Junos OS shell itself.
2. Operational mode, has the prompt “root @ srx>”. This is, by and large, debug and monitoring mode. In it, you can view important parameters of the router, also in this mode, for example, software updates and operations such as restart-shutdown occur. If we enter edit or configure, we get into the most important mode of operation.
3. Configuration mode, has the prompt “root @ srx #”. In this mode, the router is configured, i.e. editing and application of the config. This mode is the main mode in which you have to work. Also, from here for convenience, you can run operational mode commands using the run command. For example, you cannot launch ping from configuration mode, but you can use the run:
run ping 1.2.3.4. command run ping 1.2.3.4.Hereinafter I will mention the names of interfaces of the form ge-0/0 / x. These are gigabit interfaces. However, the Juniper SRX100 has 100 Mbps interfaces, they are called fe-0/0 / x. In fact, the config will be exactly the same up to interface names, keep in mind.
We proceed to the initial configuration of Juniper from the command line. Our tasks:
1. Configure root authentication and other important parameters (DNS, DHCP).
2. Configure the switch ports (what is called the LAN ports in SOHO routers) on the interfaces c ge-0/0/1 to ge-0/0/7.
3. Configure the Internet on the interface ge-0/0/0. Two options: either the provider directly gives us the IP address, or we get it via PPPoE (cable Internet or ADSL). Options for getting Internet through VLAN and L2TP will not be considered here.
4. Configure zones and security policies.
5. Configure NAT to distribute the Internet to the local network.
This can be done in two ways: manually or by the initial setup wizard. The wizard can be launched from the shell with the command
root@srx% config-wizard| Enter host name: | Here we enter the name Juniper. It will be displayed at the command prompt. Plays a purely visual role. |
| Please enter root password: Retype root password: | Here we enter the super root user password (required) |
| Would you like to configure a domain name? [yes, no] (no): Enter domain name: | Enter the domain name here (optional) |
| Would you like to configure name server? [yes, no] (no): Enter IP address for the name server: Would you like to configure an alternative name server? [yes, no] (no): Enter IP address for the name server: | Here we enter the address of the primary DNS server (highly desirable) And here is the secondary address (optional) |
| Configure the following network interfaces Identifier ... Interface .... 1 ........ ge-0/0/0 .... 2 ........ ge-0/0/1 .... 3 ........ ge-0/0/2 Please select interface identifiers: IP address for this interface: Subnet mask bit length for this interface [1–32] (32): Enter a security zone name to associate this interface to: | Lists the physical interfaces of the router here. If we want to configure this or that interface, then we need to select its number in the list Here we enter the interface number Here we enter its new IP address Here we specify the subnet mask And here we specify the security zone to which the interface belongs (for example, trust for the internal network, untrust for the Internet) |
| Would you like to configure default gateway? [yes, no] (no): Enter IP address for the default gateway: | Here we enter the address of the main gateway that the provider gave us. |
| Would you like to create a new user account? [yes, no] (no): Enter a new user name: Enter user password Retype the password: | Here you can create a new user other than root (optional). It may be useful if the router will be configured by more than one administrator. |
| Would you like to configure SNMP Network Management? [yes, no] (no): Enter community string [public]: | Here you can assign a community name for monitoring via SNMP (optional) |
After completing the configuration, the system will display the final configuration and ask for permission to apply the settings (commit). After the commit, we will see the command line prompt again and can enter cli.
And now the same, but more deeply and in the form of commands. Various examples of initial setup can be found here: www.juniper.net/us/en/local/pdf/app-notes/3500153-en.pdf
Enter configuration mode:
Enter Juniper's name:root@srx% cliroot@srx> edit
root@srx# set system host-name _root@srx# set system root-authentication plain-text-passwordNext, we need to configure the Internet interface. Here we consider the simplest case when the provider gives us a static white IP address explicitly. Setting up the Internet through PPPoE will be discussed later. Suppose the provider gave us the address 1.2.3.4 with the mask 255.255.255.240 == / 28 (subnet prefix). It should be noted that the juniper does not understand the subnet mask in its classical octet record, but only as a prefix . More information about subnet prefixes can be found here: ru.wikipedia.org/wiki/%D0%91%D0%B5%D1%81%D0%BA%D0%BB%D0%B0%D1%81% D1%81 % BE% D0% B2% D0% B0% D1% 8F_% D0% B0% D0% B4% D1% 80% D0% B5% D1% 81% D0% B0% D1% 86% D0% B8% D1% 8F
root@srx# set interfaces ge-0/0/0 unit 0 family inet address 1.2.3.4/28Now let's configure the Juniper web interface. We need to make it available only from the internal network and unavailable from the Internet:root@srx# set routing-options static route 0/0 next-hop 1.2.3.1
Enable ssh access to the router:root@srx# set system services web-management http interface vlan.0
root@srx# set system services sshA much more convenient option for our task is to make all the remaining ports of Juniper equal in their rights, which will allow connecting network devices to any port, by analogy with the usual unmanaged switches. To do this, you must make all the other ports members of the same VLAN.
This command created interface-range, i.e. a set of interfaces called interfaces-trust and included ports 1 through 7 in this range. This type of interface grouping saves us time, because need to enter fewer commands.root@srx# set interfaces interface-range interfaces-trust member-range ge-0/0/1 to ge-0/0/7
root@srx# set interfaces interface-range interfaces-trust unit 0 family ethernet-switching vlan members vlan-trustHere we create the vlan-trust itself and say that the given vlan is terminated (has an IP address) on the vlan.0 interfaceroot@srx# set vlans vlan-trust vlan-id 3root@srx# set vlans vlan-trust l3-interface vlan.0
root@srx# set interfaces vlan unit 0 family inet address 192.168.1.1/24Next, you need to configure the address of the DNS server (in this example, Google Public DNS):
We configure the DHCP server on the vlan.0 interface (so that client devices receive network settings via DHCP)root@srx# set system name-server 8.8.8.8root@srx# set system name-server 8.8.4.4
We configure security zones. Zone names can be any, you can have a large number of zones and customize transitions between zones in the form of policies. This is a very convenient way to configure security. In this example, we will have two zones: trust (local network) and untrust (Internet).root@srx# set system services dhcp router 192.168.1.1root@srx# set system services dhcp pool 192.168.1.0/24 address-range low 192.168.1.2root@srx# set system services dhcp pool 192.168.1.0/24 address-range high 192.168.1.100root@srx# set system services dhcp propagate-settings vlan.0
Here we create a untrust security zone and attach the interface ge-0/0/0, which we have to the Internet, to this zone. The host-inbound-traffic zone parameter denotes which services and protocols, depending on, can access Juniper itself . For example, in this example we allowed to ping our Juniper from the outside, as well as connect to it via ssh. If we want to get an Internet address via DHCP, then we need to enable the dhcp service. If we want to use IPsec tunnels between Junipers, then we need to enable the IKE service, and so on. The same applies to routing protocols. For example, to allow OSPF route exchanges, you need to enter the host-inboubd-traffic protocols ospf option.root@srx# set security zones security-zone untrust interfaces ge-0/0/0.0 host-inbound-traffic system-services pingroot@srx# set security zones security-zone untrust interfaces ge-0/0/0.0 host-inbound-traffic system-services ssh
Configure the trust zone:
To the trust zone, we have a virtual interface vlan.0, whose members now, you guessed it, are physical interfaces from ge-0/0/1 to ge-0/0/7 . For the trust zone, we have allowed any services and protocols, for example HTTP, that is, Juniper’s web interface. You cannot get to its web interface from the Internet, as specified in the untrust zone settings.root@srx# set security zones security-zone trust host-inbound-traffic system-services allroot@srx# set security zones security-zone trust host-inbound-traffic protocols allroot@srx# set security zones security-zone trust interfaces vlan.0
Carefully read the last two paragraphs and try to understand well the purpose of the host-inbound-traffic command, since It directly affects the security of our network. If we do not want our network users to access the Juniper web interface, we can leave it as it is, but deny it in policies. In more detail about politicians I will write separate article, since This is a very broad topic of discussion.
Configuring zones displays their interfaces and allows traffic addressed to the router itself. Transit traffic policies (passing through Juniper) are described elsewhere as transitions between zones.
It describes the traffic policy when moving from the trust zone to the untrust zone. In this example, all requests are allowed from the local network to the Internet. If we want to somehow restrict the users of our network to use the Internet (for example, to prohibit communication via ICQ or IRC), then here you can create appropriate prohibiting rules.root@srx# set security policies from-zone trust to-zone untrust policy trust-to-untrust match source-address anyroot@srx# set security policies from-zone trust to-zone untrust policy trust-to-untrust match destination-address anyroot@srx# set security policies from-zone trust to-zone untrust policy trust-to-untrust match application anyroot@srx# set security policies from-zone trust to-zone untrust policy trust-to-untrust then permit
root@srx# set security policies from-zone trust to-zone trust policy trust-to-trust match source-address anyroot@srx# set security policies from-zone trust to-zone trust policy trust-to-trust match destination-address anyroot@srx# set security policies from-zone trust to-zone trust policy trust-to-trust match application anyroot@srx# set security policies from-zone trust to-zone trust policy trust-to-trust then permit
This describes the policy from the trust zone to the trust zone. Again, all transitions are allowed.
We will not describe the policy from the untrust zone (Internet) to the trust zone (local network) here. Why? Because the default policy is deny-all, i.e. all that is clearly not allowed is forbidden, and hosts from the global network should not have access to the hosts protected by Juniper, shouldn’t they? In general, if we have not created a policy, this does not mean that it does not exist at all. It is, only it is empty, and therefore it responds to all transitions with a ban.
The last number in our program today will be setting up NAT to distribute the Internet to users on the local network.
By this we set up Source NAT between the local network and the Internet. Now LAN users can safely use the services of the global network.root@srx# set security nat source rule-set trust-to-untrust from zone trustroot@srx# set security nat source rule-set trust-to-untrust to zone untrustroot@srx# set security nat source rule-set trust-to-untrust rule source-nat-rule match source-address 0.0.0.0/0root@srx# set security nat source rule-set trust-to-untrust rule source-nat-rule then source-nat interface
Also, it is desirable to include an intrusion prevention system (IDP, intrusion detection prevention). Its basic settings are shown here:
You can read more about the great features of Junos IDP in the Junos Security book. You can download it for example here: www.bookarchive.ru/computer/network/kompjuternaja_bezopasnost/101776-junos-security.htmlroot@srx# set security zones security-zone untrust screen untrust-screenroot@srx# set security screen ids-option untrust-screen icmp ping-deathroot@srx# set security screen ids-option untrust-screen ip source-route-optiontroot@srx# set security screen ids-option untrust-screen ip tear-droproot@srx# set security screen ids-option untrust-screen tcp syn-flood alarm-threshold 1024root@srx# set security screen ids-option untrust-screen tcp syn-flood attack-threshold 200root@srx# set security screen ids-option untrust-screen tcp syn-flood source-threshold 1024root@srx# set security screen ids-option untrust-screen tcp syn-flood destination-threshold 2048root@srx# set security screen ids-option untrust-screen tcp syn-flood timeout 20root@srx# set security screen ids-option untrust-screen tcp land
After entering all the commands, you need to check them for syntax and logic with the command:
root@srx# commit checkroot@srx# commitroot@srx# rollback 0root@srx# set system max-configuration-rollbacks 49root@srx# rollback ?If we perform remote configuration of Juniper and are afraid that applying a new policy or setting up an interface may lead to loss of communication with the device, then you can use the commit as follows:
root@srx# commit confirmed _The final config is given under the spoiler
Final config
 ## Last changed: 2013-01-24 12:09:10 UTC
 version 12.1R4.7;
 system {
     host name JuniperSRX;
     root-authentication {
         encrypted-password "$ 1 $ 2bWkMZhh $ mdsdcqRN71Pa7Wmb9VGSn /";  ## SECRET-DATA
     }
     name-server {
         8.8.8.8;
         8.8.4.4;
     }
     services {
         ssh;
         web-management {
             http {
                 interface vlan.0;
             }
         dhcp {
             router {
                 192.168.1.1;
             }
             pool 192.168.1.0/24 {
                 address-range low 192.168.1.2 high 192.168.1.100;
             }
             propagate-settings vlan.0;
         }
     }
     syslog {
         archive size 100k files 3;
         user * {
             any emergency;
         }
         file messages {
             any critical;
             authorization info;
         }
         file interactive-commands {
             interactive-commands error;
         }
     }
     max-configurations-on-flash 5;
     max-configuration-rollbacks 49;
     license {
         autoupdate {
             url https://ae1.juniper.net/junos/key_retrieval;
         }
     }
 }
 interfaces {
     interface-range interfaces-trust {
     member-range ge-0/0/1 to ge-0/0/7;
     unit 0 {
         family ethernet-switching {
             vlan {
                 members vlan-trust;
             }
         }
     }
 }
 ge-0/0/0 {
     unit 0 {
         family inet {
             address 1.2.3.4/28;
         }
     }
 }
 ge-0/0/1 {
     unit 0 {
         family ethernet-switching {
             vlan {
                 members vlan-trust;
             }
         }
     }
 }
 ge-0/0/2 {
     unit 0 {
         family ethernet-switching {
             vlan {
                 members vlan-trust;
             }
         }
     }
 }
 ge-0/0/3 {
     unit 0 {
         family ethernet-switching {
             vlan {
                 members vlan-trust;
             }
         }
     }
 }
 ge-0/0/4 {
     unit 0 {
         family ethernet-switching {
             vlan {
                 members vlan-trust;
             }
         }
     }
 }
 ge-0/0/5 {
     unit 0 {
         family ethernet-switching {
             vlan {
                 members vlan-trust;
             }
         }
     }
 }
 ge-0/0/6 {
     unit 0 {
         family ethernet-switching {
             vlan {
                 members vlan-trust;
             }
         }
     }
 }
 ge-0/0/7 {
     unit 0 {
         family ethernet-switching {
             vlan {
                 members vlan-trust;
             }
         }
     }
 }
 vlan {
     unit 0 {
         family inet {
             address 192.168.1.1/24;
         }
     }
 }
 routing-options {
     static {
         route 0.0.0.0/0 next-hop 1.2.3.1;
     }
 security {
      screen {
         ids-option untrust-screen {
             icmp {
                 ping-death;
             }
             ip {
                 source-route-option;
                 tear-drop;
             }
             tcp {
                 syn-flood {
                     alarm-threshold 1024;
                     attack-threshold 200;
                     source-threshold 1024;
                     destination-threshold 2048;
                     timeout 20;
                 }
                 land;
             }
         }
     }
     nat {
         source {
             rule-set trust-to-untrust {
                 from zone trust;
                 to zone untrust;
                 rule source-nat-rule {
                     match {
                         source-address 0.0.0.0/0;
                     }
                     then {
                         source-nat {
                             interface;
                         }
                     }
                 }
             }
         }
     policies {
         from-zone trust to-zone untrust {
             policy trust-to-untrust {
                 match {
                     source-address any;
                     destination-address any;
                     application any;
                 }
                 then {
                     permit;
                 }
             }
         }
         from-zone trust to-zone trust {
             policy trust-to-trust {
                 match {
                     source-address any;
                     destination-address any;
                     application any;
                 }
                 then {
                     permit;
                 }
             }
         }
     }
     zones {
         security-zone trust {
             host-inbound-traffic {
                 system-services {
                     all;
                 }
                 protocols {
                     all;
                 }
             }
             interfaces {
                 vlan.0;
             }
         }
         security-zone untrust {
             screen untrust-screen;
             interfaces {
                 ge-0/0 / 0.0 {
                     host-inbound-traffic {
                         system-services {
                             ssh;
                             ping;
                         }
                     }
                 }
             }
         }
     }
 }
 vlans {
     vlan-trust {
         vlan-id 3;
         l3-interface vlan.0;
     }
 }
This concludes the article on the initial setup of Juniper SRX. I would be very happy questions and comments! Further articles are planned on Junos CLI, PPPoE, Policies, IPsec, and Routing Basics on Junos OS.
Source: https://habr.com/ru/post/166897/
All Articles