As I digitalized the film, and not only
A little preface
At first, even the thought was not to write an article, everything seemed mundane and of little interest. But to my surprise, being engaged in arranging photo albums on New Year's holidays, I noticed with interest that it was not only I who decided to dedicate this useful time to festive time. The relevant article on the topic “Experience in creating a catalog and indexing a family photo archive. Indexing and digitization of photographic films ” was also on habr. A little later, another article “Metadata for organizing the storage of a photo archive” appeared . Therefore, I decided to share some kind of experience, maybe that will help anyone bit by bit.
')
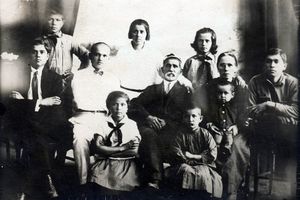
In general, the idea of scanning and organizing old photos was, of course, long nurtured, it’s not easy to decide on such a volume of work on scanning old films (more than a hundred) and photos (thousands). In general, since my childhood I wanted to have digitized old photos of great-great-great-great-grandparents, and finally, 20 years later, I decided to move on to this matter.
Scanner
The first thing was the question - of course the scanner. At one time, about 7 years ago, he tried to digitize negatives and decided to stock a film scanner. There wasn’t much money, I chose something cheaper, it turned out to be Miktotek Filmscan 35 .

Compared with the monsters scan, it cost a penny, but the result was awesome. I used Silverfast to it as the most advanced software at the time (maybe even now). I don’t know why, but sometimes at different aisles this miracle gave me a blue or green photo, everything hung, it was unpredictable and very sad, I had to spend 10-15 minutes on each frame, correcting the histograms and doing other dances with tambourine. In general, this process has discouraged me from scanning films for several years, the scanner is somewhere lying around.
Now, having considered all the pros and cons, it was decided the following.
There were several points to consider:
- scan for the most part will not I, but parents, good they have time now
- it is necessary to scan not only films, but also photos
- need to scan a lot
- no fabulous budget
In addition to all of the above, I understood that now the film is no longer the actual carrier, and therefore most likely it will be necessary to scan only once, though it may take a lot of time.
So, film scanners have disappeared for two reasons:
Firstly, previous experience has shown that a cheap normal unit cannot be bought, but the fact that it’s cheap, oh, I can’t bear such a hell the second time.
Secondly, buying a scanner for photos separately and separately for a film is also somehow expensive and impractical.
Moreover, I said to myself, if something good happens, I’ll take it to a professional laboratory, and you can even go broke for a dozen people.
Looking at what is on sale from what can scan except paper and also film, it turned out that the choice is small: either again transcendental prices, or just a couple of options. Break all the stores working immediately after the holiday, it turned out that there are the following acceptable options:
- Epson Perfection V330 Photo (A4, 4800 x 9600 dpi, USB 2.0, CCD, Film Adapter)
- Epson Perfection V370, Photo (A4, 4800x9600 d / d, CCD, USB 2.0)
- Canon CanoScan LiDE 700F (A4 9600x9600dpi 48bit CIS Slide Adapter USB2.0)
- Canon CanoScan 5600F (A4 4800x9600dpi 48bit Slide Adapter USB2.0)
The rest was either too expensive, from 10,000, or, conversely, nothing skillfully. Unfortunately, the CanoScan 5600F was dropped due to the lack of sales at the moment, although the description is very good. The rest, according to reviews, were about the same, but the decisive role was played by the fact that for Epson there were drivers for Linux, and since I would like to work not only under Windows, I finally won Epson Perfection V330 Photo. Nowhere could I find out how the 330 model differs from the 370, but since the Linux drivers were mentioned only for the 330, I settled on it, so to speak, “to avoid”.

Drivers take on the site AVASYS .
Unfortunately, I didn’t have time to try it under Linux yet, but in the Windows software I liked the function of removing defects - it works on black and white old photos with a bang. But you also need to be careful with it - sometimes it can be considered something worthwhile for a defect.
In the comments about the scanner, the problem with the appearance of stripes when scanning films is mentioned in some places - but I haven’t seen it yet. Nevertheless, in my opinion, here is something useful about this found in one of the reviews on the Yandex market: “After two years I can report on the outcome of the investigation: there is a calibration window in the scanner frame where the white balance is set. If there are dust particles, “broken pixels” are obtained, which, when runted through the carriage, give stripes. This is most likely a constructive defect in the new LED backlight (but who confesses to this ...). So gentlemen, if you have such a scanner,
remove dust. ”
With what permission to scan - this question was not the last. The scanner produces a maximum of 4800x9600, but when I tried to set this up when scanning a photo of 9x13cm, the system began to curse the scale, had to be reduced.
The criterion for choosing the resolution is simple: if you assume that you can print with a standard resolution of 300dpi, then to get the same image, you must have at least 300dpi. Taking into account that the photos are old, there is no sense in overstating this figure - all the same, the physical resolution will not allow getting quality from nothing. Again, it is unlikely that someone will ever want to print a poster with a picture of a great-grandfather on A1 or even A4. If anyone writes a book - it is unlikely that there will be a picture more than on a sheet. In general, I decided that for very old ones two-fold excess will come down, for better ones and later ones - three-fold, i.e. 600dpi and 900dpi respectively. Then I chose the one that was closest to the one that issued the software that came with the scanner.
For negatives, I decided to use the maximum - it was not for nothing that I bought with such a resolution ... Most likely this is a bust of 48004800dpi, but you can always cut back, but the main thing is that then you will not have to rescan with other parameters and you can sleep well.
Scans are saved, of course, in no case in jpeg, in order to avoid loss of compression. Everything is just tiff. It seems, of course, that the place eats more, but then scan once - and then not to know the problems: what I want, I do. I also didn’t come to this right away, but practice shows that if you save now, then I will regret and return to this issue, but if everything is at its maximum, then later there’s nothing to regret.
Cataloging
Naturally, after digitizing, the whole thing must be raked. The main task was to sign great-great-relatives, for I wanted to preserve the family history for the future, and without competent comments there no one would ever figure it out.
The option to immediately process the pictures and upload to the site did not work for two reasons: firstly, it is necessary to process everything at once, and this time, and the parents do not understand anything about it; secondly, technologies are changing, and who would know how a site will look like in a couple of decades, if at all, it will somehow exist.
Using a smart cataloging software did not work for the same significant reason - there is no guarantee that in several decades this software will be alive and, accordingly, no one will understand what, where and how is stored in its smart unique format.
It came to mind the decision to store the description in a plain text file with the same name as the photo - the text it and the text in Africa, surely anyone will be able to read after ten decades, even if they come up with some kind of super-unicode, yet it is much more reliable than special software. But as a programmer, I looked with horror at this option - well, ugly and that's it. Yes, and uncomfortable in the process.
The parents said that they generally wanted to be in a Word - this is a photo, this is a signature - and everything is clear. From such a proposal, the hair stood on end, for again - today there is a Word - tomorrow it is not.
Another option is to store the signature in the EXIF. It was embarrassing that when processing images, many EXIF softphones are simply ignored, as a result, losing precious signatures may be irreplaceable.
In general, after analyzing the whole situation, I made a decision: we skip the photo, sign it as EXIF and then read all these pictures with captions so that there is no temptation to change anything, and thus guarantee the safety of the information. I want to change - make a copy - and go. Well, of course backups. And in general, in the end, we are programmers in order to jot down a small script so that the whole EXIF can be just in case exported to a text file, “to avoid” :)
There are a lot of command line tools for working with EXIF in Linux, but this is unacceptable for convenient work with a large number of images. However, this is what it is:
exif , exiftool , exiv2 , googling, you can find more detailed information. Next, I used exiftool for batch processing, but more on that later.We look that is from GUI. After learning what the OpenSource community offers us, I’ve once stopped at DigiKam - “digiKam is an advanced digital photo management application for Linux, Windows, and Mac-OSX”, as it is written on their website.
I decided to edit in the GIMP , the GNU Image Manipulation Program, an analogue of Photoshop, but opensource. Therefore, the ability to edit photos for cataloging software was not separately required, but several things were bribed in the cataloging itself.

First, DigiKam edits EXIF, which is what I need.
Secondly, all the photos on the screen at once, we sign in the window next to it and immediately proceed to the next one - quickly, simply and conveniently.
Thirdly, it was noticed that in EXIF itself there are several similar tags for commenting: Comment , UserComment , ImageComment , and so, DigiKam writes at once to everything, so the probability that the other software will read this information is quite large.
In addition, reading the reviews, I was pleased with the idea that in addition to just EXIF, the softphone is able to maintain a directory without copying anything, unlike many others, but simply processing everything in place. It was a huge plus - I was not looking for this opportunity initially, but it turned out to be impossible by the way. And what I liked was - apart from entering information into EXIF, she writes it to her database and then it is convenient to sort and search for photos by tags, tags, descriptions, etc. And even if at some point the software disappears and the base too - then a copy of the data will remain in EXIF, which, in fact, I need.
Some interesting thoughts on cataloging are described in the article “The Experience of Creating a Catalog and Indexing a Family Photo Archive.” Indexing and digitization of films . So, all or almost all of this data can also be kept in EXIF and, if necessary, exported to any format, as it will be convenient for us.
An additional advantage of DigiKam is that you can choose any photo as an album cover, but I liked the idea of having a photo of the paper album as the cover, thanks to the author.
Another non-obvious point that I encountered when working with DigiKam: if there are no rights to write to the photo file, then the software silently writes only to its database, without giving any indication that there are problems. For a long time I tried to figure out why there is a signature in the program, but not in the file, especially since the option “save to file” is set in the settings. So, keep this in mind - check the access rights, otherwise you can swear for a long time.
We post on the site
So, solved the main tasks - scanning and cataloging. Now it's time to boast in front of relatives, show friends a photo. Naturally by posting photos on the site. Not so long ago, I already did a softphone for this business: I folded the necessary photos in
catalog, launched - and ready, the album became. I wrote about this on a Habré last time, "Simple automation: photo album . " Now, using DigiKam, I decided that right in EXIF-tags you can mark a photo, you need to put it in a photo album or not, because when scanning there were all sorts of pictures that you should not upload to the site. And comments can now be taken from EXIF.
It seems to be all right, but not very.
Everything on the site is processed in PHP, and there, as it seemed to me, there is a great function for working with EXIF,
read_exif_data() , but as practice has shown, this underfunction shows only part of the data, completely silent about the rest. I rummaged through everything I could - and the dream of an easy life had sunk into oblivion, I had to pull out EXIF from files at the stage of album generation, since the command line tools are taking place.As a result, I rewrote the script, remembering the caustic comment on his previous article “Perl php-file generator ... Monsieur knows a lot about it ...”, he laughed to himself that he was still right that he did not fully rely on PHP - so she would have substituted me Now the leg, and so a couple of minutes - and the problem is solved.
So, when processing photos in DigiKam, we mark the photo with a flag (it is called PickLabel there). The checkbox is written to the file in EXIF. When we process all the files from the directory, we pull out the checkbox using exiftool:
$flagPickLabel = `exiftool -b -PickLabel '$fname_in'`; Well, then, depending on the flag - if it is, then we process it, if not, we skip it. Everything is set in the command line so that it is convenient. In fact, here you can process a lot of things, it already tastes and colors who needs what.

Link to the source, if suddenly someone needs to carefully look or even apply: photo_album-r143.tar.gz . How to use - mentioned in the previous article, I will not repeat.
Thank you for your attention on this, and if someone came in handy, then he is immensely pleased.
Criticism is welcome.
UPD : I accidentally found it at habr about scanning negatives - I wonder how I didn’t notice before. Let it be here to heap.
Source: https://habr.com/ru/post/166649/
All Articles