It is so easy to take and hide information
Each of the readers must have seen films many times where a superhero / supervillain passed on encrypted information. We are accustomed to the word "cipher", "encryption" and any secret transfer of information is now associated with these words. Although in reality, this is far from the case. Secure transmission of information is far from being limited to cryptography (encryption), but there are still many methods and means for this.

In particular, the author of this material would like to touch on steganography. Steganography is the concealment of the fact of information transfer.
How is this fundamentally different from cryptography?
In the case of cryptographic transformations, the fact of hiding information is obvious. That is, when A transmits information to B, then C knows that the information is secret, but does not have (at best) algorithms for its decryption if it falls into his hands.
Steganographic transformations of the message allow you to hide the fact of the transfer of secret information from the attacker. That is, C may also notice the exchange of information between A and B, but will not see anything of value in it.
')
The steganographic method better cryptographic.
Hiding the fact of information transfer reduces the risk that secret or confidential information will get to the attacker, and even if it does, he may not see anything valuable in it (why - we will explain below).
This is only in the films the secret information of the hero is provided with an impenetrable cipher. In real life, the attacker will send two hefty G. and D. to the hero, who after another broken joint will still know the key for decryption.
In the case of a stego message, the attacker will not even be motivated for such actions, because the stego message does not attract attention.
So how does it work?
The main principle of steganography is to hide confidential information inside the open, usually all-accessible information. That is, one type of information (text, images, audio, etc.) is placed inside other information (text, images, audio, etc.). Thus, a container (information that carries a stego message) looks more than harmless.
The most common of the methods that the reader can find on the Internet is hiding text in an image.
Right in this material we will write a program that will hide a small message in the image. We will write in PHP, so we will have a web program.
To get started, let's write an html page without too much design (this is not a web design lesson yet). Hence the index.php file:
I think there is no need to specifically explain that the “Address” field will contain the image address, and in the “Code” field - some hidden information. The purpose of the buttons is also obvious. The img_new block will contain the initial information, including the finished container with a stego message in it.
When developing we will use the Ajax framework, or rather exactly one of its functions. Therefore, let's connect this framework and one of our js files to index.php.
The algorithms will occur in the files stego.php and destego.php. We link them to our index using two functions of our java script: stego (), de_stego ().
So, stego.js:
Each of these functions first clears the img_new block, then sends the corresponding data from the fields that the user enters to the server, where they are further processed by our program. Finally, the data returned is output to the img_new block.
Change the buttons so that when you click the corresponding functions are called:
We now turn to the most interesting, to the transformations. First consider the file stego.php.
Before we add the verification of the image address
And image type checking. We assume that the user will use only the most common formats: jpg, gif, png. Otherwise, the program will also try to load the image, but success depends on the corresponding PHP build.
It should be noted here that hosters often do not include the GD graphic library in PHP. If the program will not work for you - contact your hosting provider with this question.
Let's continue ...
We display the image of the user on the screen in png format. Why this particular format? Because we will also display another image in png. So it will be better to compare the images between them.
Next, we determine the size of the image, set the initial x, y coordinates, find out the length of the message, and put the messages in the $ code working variable.
Next comes the fun part. Namely, the cycle in which our message gets into the image. First we give the code, and then we will analyze:
The cycle will be repeated until we reach the end of the message. In addition, we will start with the last character. First, we recognize the color of the pixel by the x, y coordinates ($ color_pixel = imagecolorat ($ img1, $ x, $ y);), put in the $ color_pixel_RGB array the ratio of the red, green and blue colors in pixels.
Please pay attention to the line: $ color_pixel_RGB [blue] = ord ($ code [$ length]) - This is where the blue color level is replaced with the character number of the message in the ASCII table. This is convenient because they should not exaggerate the number 255 as well as the value of the variable, respectively, RGB. The author randomly chose blue. You can try with any other (green or red), which in this program remain intact, except in one case, which will be next.
Later in the cycle, the pixel is applied to the new image and the coordinates are increased. If they exceed the width of the image, then the value of the coordinate along the height (y) increases, and x equals zero.
This is not a tricky way, we have hidden our message in the image.
But how does the program find out when the stego message is deleted that the message has ended? To do this, in the last pixel message, change the red level to 1.
And display a new image on the screen:
Thus, the stego.php file is ready and looks like this:
Now let's move on to the second function, since what's the point in hiding information, if we cannot then pull it out ourselves?
And so the file destego.php.
Half the code is the same as the code stego.php:
Here we already know the checks for entering information, loading an image and displaying it on the screen.
Next is the cycle that pulls our information from the image:
The cycle will continue until it finds the end of the message indicated by us.
One by one, the pixel will be checked along the same route as when the message was inserted and extract character by character.
Display a message.
$ Text [0] = "" is necessary because the first character remains empty and can be filled with any "garbage".
And so, destego.php looks like this:
So, our program is on the Internet . So it looks like:

Enter the address of the image .
Enter the message of the author of the material: Sergey Osadchy
Click "Hide" and get the original image:
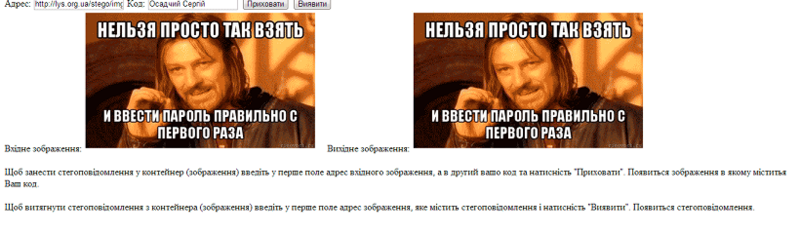
As you can see, the image is identical.
We copy the address of the original image, paste it into the address of the image and click "Withdraw". We get:
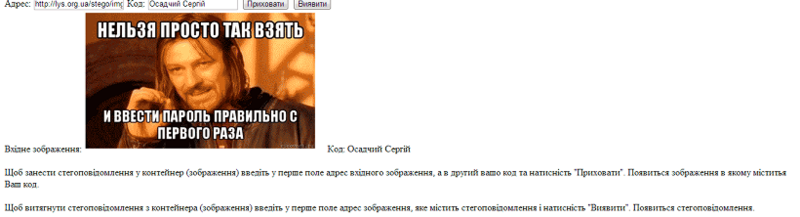
You can make sure yourself.
So, our web program works. But it only has an educational function for those who are not familiar or have little knowledge of steganography. Steganographic method carries a lot of opportunities for the hidden transfer of confidential information. Algorithms can be complicated and combined with other methods (add keys, cryptography and organizational issues), thus increasing the container's stegacity.
In the following articles, the author will tell more about steganography and other methods of protecting information, both during its storage and transmission.
PS Do not be too hard on the author. This is my first article on Habré. Thank!
In particular, the author of this material would like to touch on steganography. Steganography is the concealment of the fact of information transfer.
How is this fundamentally different from cryptography?
In the case of cryptographic transformations, the fact of hiding information is obvious. That is, when A transmits information to B, then C knows that the information is secret, but does not have (at best) algorithms for its decryption if it falls into his hands.
Steganographic transformations of the message allow you to hide the fact of the transfer of secret information from the attacker. That is, C may also notice the exchange of information between A and B, but will not see anything of value in it.
')
The steganographic method better cryptographic.
Hiding the fact of information transfer reduces the risk that secret or confidential information will get to the attacker, and even if it does, he may not see anything valuable in it (why - we will explain below).
This is only in the films the secret information of the hero is provided with an impenetrable cipher. In real life, the attacker will send two hefty G. and D. to the hero, who after another broken joint will still know the key for decryption.
In the case of a stego message, the attacker will not even be motivated for such actions, because the stego message does not attract attention.
So how does it work?
The main principle of steganography is to hide confidential information inside the open, usually all-accessible information. That is, one type of information (text, images, audio, etc.) is placed inside other information (text, images, audio, etc.). Thus, a container (information that carries a stego message) looks more than harmless.
The most common of the methods that the reader can find on the Internet is hiding text in an image.
Right in this material we will write a program that will hide a small message in the image. We will write in PHP, so we will have a web program.
To get started, let's write an html page without too much design (this is not a web design lesson yet). Hence the index.php file:
: <input type="url" name="url" id="url" value=""> : <input type="text" name="code" id="code" value=""> <input type="button" value="" > <input type="button" value="" ><br> <div id="img_new"></div> I think there is no need to specifically explain that the “Address” field will contain the image address, and in the “Code” field - some hidden information. The purpose of the buttons is also obvious. The img_new block will contain the initial information, including the finished container with a stego message in it.
When developing we will use the Ajax framework, or rather exactly one of its functions. Therefore, let's connect this framework and one of our js files to index.php.
<script src="ajax.js"></script> <script src="stego.js"></script> The algorithms will occur in the files stego.php and destego.php. We link them to our index using two functions of our java script: stego (), de_stego ().
So, stego.js:
stego.js
function stego (url, code) { $("#img_new").html(""); $.ajax({ type: "POST", url: "stego.php", data: 'url_img='+url+'&stego_code='+code+'', cache: false, success: function(html){ $("#img_new").html(html); } }); } function de_stego (url) { $("#img_new").html(""); $.ajax({ type: "POST", url: "destego.php", data: 'url_img='+url+'&stego_code='+code+'', cache: false, success: function(html){ $("#img_new").html(html); } }); } Each of these functions first clears the img_new block, then sends the corresponding data from the fields that the user enters to the server, where they are further processed by our program. Finally, the data returned is output to the img_new block.
Change the buttons so that when you click the corresponding functions are called:
<input type="button" value="" onclick="stego(document.getElementById('url').value,document.getElementById('code').value)"> <input type="button" value="" onclick="de_stego(document.getElementById('url').value)"><br> We now turn to the most interesting, to the transformations. First consider the file stego.php.
Before we add the verification of the image address
if (!$_POST[url_img]) { echo " "; exit(); } And image type checking. We assume that the user will use only the most common formats: jpg, gif, png. Otherwise, the program will also try to load the image, but success depends on the corresponding PHP build.
$type_img = explode (".", $_POST[url_img]); switch(strtolower($type_img[count($type_img)-1])) { case "png": $img1 = imagecreatefrompng($_POST[url_img]); break; case "jpg": $img1 = imagecreatefromjpeg($_POST[url_img]); break; case "jpeg": $img1 = imagecreatefromjpeg($_POST[url_img]); break; case "gif": $img1 = imagecreatefromgif($_POST[url_img]); break; default: $img1 = imagecreatefromgd ($_POST[url_img]); break; } It should be noted here that hosters often do not include the GD graphic library in PHP. If the program will not work for you - contact your hosting provider with this question.
Let's continue ...
We display the image of the user on the screen in png format. Why this particular format? Because we will also display another image in png. So it will be better to compare the images between them.
imagepng ($img1, "img/img_code1".date(si).".png"); echo " : <img src='img/img_code1".date(si).".png' width='400px'>"; Next, we determine the size of the image, set the initial x, y coordinates, find out the length of the message, and put the messages in the $ code working variable.
$size = getimagesize($_POST[url_img]); $w = $size[0]; $h = $size[1]; $x = $y = 0; $length = strlen($_POST[stego_code]); $code = $_POST[stego_code]; Next comes the fun part. Namely, the cycle in which our message gets into the image. First we give the code, and then we will analyze:
while ($length--) { $color_pixel = imagecolorat ($img1, $x, $y); $color_pixel_RGB = imagecolorsforindex ($img1, $color_pixel); $color_pixel_RGB[blue] = ord ($code[$length]); $color_new_pixel = imagecolorclosest ($img1, $color_pixel_RGB[red], $color_pixel_RGB[green], $color_pixel_RGB[blue]); imagesetpixel ($img1, $x, $y, $color_new_pixel); $x+=50; if ($x>$w) {$x=0; $y++;} } The cycle will be repeated until we reach the end of the message. In addition, we will start with the last character. First, we recognize the color of the pixel by the x, y coordinates ($ color_pixel = imagecolorat ($ img1, $ x, $ y);), put in the $ color_pixel_RGB array the ratio of the red, green and blue colors in pixels.
Please pay attention to the line: $ color_pixel_RGB [blue] = ord ($ code [$ length]) - This is where the blue color level is replaced with the character number of the message in the ASCII table. This is convenient because they should not exaggerate the number 255 as well as the value of the variable, respectively, RGB. The author randomly chose blue. You can try with any other (green or red), which in this program remain intact, except in one case, which will be next.
Later in the cycle, the pixel is applied to the new image and the coordinates are increased. If they exceed the width of the image, then the value of the coordinate along the height (y) increases, and x equals zero.
This is not a tricky way, we have hidden our message in the image.
But how does the program find out when the stego message is deleted that the message has ended? To do this, in the last pixel message, change the red level to 1.
$color_new_pixel = imagecolorclosest ($img1, 1, $color_pixel_RGB[green], $color_pixel_RGB[blue]); imagesetpixel ($img1, $x, $y, $color_new_pixel); And display a new image on the screen:
imagepng ($img1, "img/img_code2".date(si).".png"); echo " : <img src='img/img_code2".date(si).".png' width='400px'>"; Thus, the stego.php file is ready and looks like this:
stego.php
<?php if (!$_POST[url_img]) { echo "і і і"; exit(); } $type_img = explode (".", $_POST[url_img]); switch(strtolower($type_img[count($type_img)-1])) { case "png": $img1 = imagecreatefrompng($_POST[url_img]); break; case "jpg": $img1 = imagecreatefromjpeg($_POST[url_img]); break; case "jpeg": $img1 = imagecreatefromjpeg($_POST[url_img]); break; case "gif": $img1 = imagecreatefromgif($_POST[url_img]); break; default: $img1 = imagecreatefromgd ($_POST[url_img]); break; } imagepng ($img1, "img/img_code1".date(si).".png"); echo " : <img src='img/img_code1".date(si).".png' width='400px'>"; $size = getimagesize($_POST[url_img]); $w = $size[0]; $h = $size[1]; $x = $y = 0; $length = strlen($_POST[stego_code]); $code = $_POST[stego_code]; while ($length--) { $color_pixel = imagecolorat ($img1, $x, $y); $color_pixel_RGB = imagecolorsforindex ($img1, $color_pixel); $color_pixel_RGB[blue] = ord ($code[$length]); $color_new_pixel = imagecolorclosest ($img1, $color_pixel_RGB[red],$color_pixel_RGB[green], $color_pixel_RGB[blue]); imagesetpixel ($img1, $x, $y, $color_new_pixel); $x+=50; if ($x>$w) {$x=0; $y++;} } $color_new_pixel = imagecolorclosest ($img1, 1, $color_pixel_RGB[green], $color_pixel_RGB[blue]); imagesetpixel ($img1, $x, $y, $color_new_pixel); imagepng ($img1, "img/img_code2".date(si).".png"); echo " : <img src='img/img_code2".date(si).".png' width='400px'>"; ?> Now let's move on to the second function, since what's the point in hiding information, if we cannot then pull it out ourselves?
And so the file destego.php.
Half the code is the same as the code stego.php:
destego half
if (!$_POST[url_img]) { echo " "; exit(); } $type_img = explode (".", $_POST[url_img]); switch(strtolower($type_img[count($type_img)-1])) { case "png": $img1 = imagecreatefrompng($_POST[url_img]); break; case "jpg": $img1 = imagecreatefromjpeg($_POST[url_img]); break; case "jpeg": $img1 = imagecreatefromjpeg($_POST[url_img]); break; case "gif": $img1 = imagecreatefromgif($_POST[url_img]); break; default: $img1 = imagecreatefromgd ($_POST[url_img]); break; } echo " : <img src='".$_POST[url_img]."' width='400px'> "; echo ": "; $size = getimagesize($_POST[url_img]); $w = $size[0]; $h = $size[1]; $x = $y = 0; Here we already know the checks for entering information, loading an image and displaying it on the screen.
Next is the cycle that pulls our information from the image:
while ($color_pixel_RGB[red]!=1) { $color_pixel = imagecolorat ($img1, $x, $y); $color_pixel_RGB = imagecolorsforindex ($img1, $color_pixel); $text = chr($color_pixel_RGB[blue]).$text; $x+=50; if ($x>$w) {$x=0; $y++;} } ; The cycle will continue until it finds the end of the message indicated by us.
One by one, the pixel will be checked along the same route as when the message was inserted and extract character by character.
Display a message.
$text[0] = ""; echo $text; $ Text [0] = "" is necessary because the first character remains empty and can be filled with any "garbage".
And so, destego.php looks like this:
destego.php
<?php if (!$_POST[url_img]) { echo " "; exit(); } $type_img = explode (".", $_POST[url_img]); switch(strtolower($type_img[count($type_img)-1])) { case "png": $img1 = imagecreatefrompng($_POST[url_img]); break; case "jpg": $img1 = imagecreatefromjpeg($_POST[url_img]); break; case "jpeg": $img1 = imagecreatefromjpeg($_POST[url_img]); break; case "gif": $img1 = imagecreatefromgif($_POST[url_img]); break; default: $img1 = imagecreatefromgd ($_POST[url_img]); break; } echo " : <img src='".$_POST[url_img]."' width='400px'> "; echo ": "; $size = getimagesize($_POST[url_img]); $w = $size[0]; $h = $size[1]; $x = $y = 0; while ($color_pixel_RGB[red]!=1) { $color_pixel = imagecolorat ($img1, $x, $y); $color_pixel_RGB = imagecolorsforindex ($img1, $color_pixel); $text = chr($color_pixel_RGB[blue]).$text; $x+=50; if ($x>$w) {$x=0; $y++;} } ; $text[0] = ""; echo $text; ?> So, our program is on the Internet . So it looks like:
Enter the address of the image .
Enter the message of the author of the material: Sergey Osadchy
Click "Hide" and get the original image:
Input Image:
Original Image:
As you can see, the image is identical.
We copy the address of the original image, paste it into the address of the image and click "Withdraw". We get:
You can make sure yourself.
So, our web program works. But it only has an educational function for those who are not familiar or have little knowledge of steganography. Steganographic method carries a lot of opportunities for the hidden transfer of confidential information. Algorithms can be complicated and combined with other methods (add keys, cryptography and organizational issues), thus increasing the container's stegacity.
In the following articles, the author will tell more about steganography and other methods of protecting information, both during its storage and transmission.
PS Do not be too hard on the author. This is my first article on Habré. Thank!
Source: https://habr.com/ru/post/166583/
All Articles